


28
Operating Gate for the First time
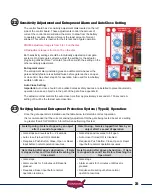
Identify your installation below and verify the correct SW1
and SW2 dipswitch settings.
Verify linear actuator type HD or PRO80 and set SW2
switch 4 to the correct position.
HD - SW2 switch 4 OFF - press down on left side
PRO80 - SW2 switch 4 ON - press down on the right
hand side
NOTE: This check must be performed before operating the gate.
Failure to do so may damage the gate operator.
Before operating the gate lets make sure the control board dipswitches are set
correctly for your installation. Locate the SW1 and SW2 dipswitches on the control board.
Factory SW1 default dipswitch settings are 3 and 4 ON.
Factory SW2 default dipswitch settings are 3 ON.
SW1 switch settings
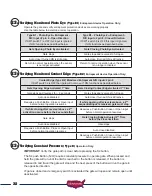
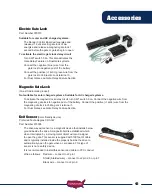
Photo Eye
Close
Direction
Photo Eye
Open
Direction
Contact
Edge
Single
(PULL TO OPEN)
SW1 switch 3, 4 should
be in the ON position
SW1 switch
8 and 10
ON
SW1 switch
7 and 10
ON
SW1 switch
2 ON
Single
(PUSH TO OPEN)
SW1 switch 3,4 and 9
should be in the ON
position
SW1 switch
8 and 10
ON
SW1 switch
7 and 10
ON
SW1 switch
2 ON
Dual
(PULL TO OPEN)
SW1 switch 3, 4 should
be in the ON position
SW1 switch
8 and 10
ON
SW1 switch
7 and 10
ON
SW1 switch
2 ON
Dual
(PUSH TO OPEN)
SW1 switch 3, 4, 9 should
be in the ON position
SW1 switch
8 and 10
ON
SW1 switch
7 and 10
ON
SW1 switch
2 ON
1.
Locate the Open / Close command button on the control board. This button will start the gate when
pressed once; pressing it again will stop the gate.
2.
Press and release the Open / Close button. The linear actuator should begin to extend. Allow the
gate to travel to the factory adjusted extend position. The gate should typically stop short of the
desired extended position.
3.
Press and release the Open / Close button twice. The linear actuator should begin to retract. Allow
the gate to travel to the factory adjusted retract position. The gate should typically be very close to
the desired retracted position. If minor adjustment is required remove release pin and rotate the
threaded end rod to the desired open position.
OFF
ON
OFF
ON
19
ON - Down on right
OFF - Down on left


