36
25. Move the motion system to the P
1
position by pressing the P
1
key and turn the laser on and
off with the test key, leaving it on long enough to mark the brown tape. If no mark is
produced find the beam with a piece of thermal paper and center it on the tape with the
knobs on the back of mirror #2.
26. Move the motion system to the P
2
position by pressing the P
2
key and again make a mark
on the tape with the TEST key.
27. Compare the two marks. If the marks are centered and on top of one another proceed to
step 28. If not, make the following adjustments while continuously comparing marks at
positions P
1
and P
2
(if tape becomes to cluttered replace it with a new piece):
a.
If marks are spread side to side, adjust the upper knob on mirror #2 until the marks
are aligned in the side to side direction.
b.
If marks are spread up and down, adjust the lower knob on mirror #2 until they are
aligned in the up and down direction.
Once the marks are aligned in both directions so that they lie on top of each other:
c.
To center the marks horizontally, move the block on which mirror #2 is mounted to
one side or the other side (usually a very small amount of movement is needed) while
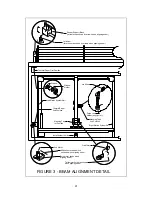
keeping it square against the rail (reference Figure 3).
d.
To center the marks vertically, adjust shutter block in which mirror #1 is mounted.
28. Reinstall mirror #3 (see Optics Cleaning Section 4.3 for details on installation of mirror).
29. Place a piece of brown masking tape over the beam entrance hole for the mirror #4
(reference Figure 3) mount and again indent the tape to make the inner circle visible in the
tape.
30. Make a mark in the tape at both positions P
1
and P
2
using the TEST button.
31. Compare the two marks. If the marks are centered and on top of one another proceed to
step 32. If not make the following adjustments while continuously comparing marks at
positions P
1
and P
2
(if tape becomes to cluttered replace it with a new piece):
a.
If mark at P
1
is centered and mark at P
2
is high or low, rotate mirror #3 in its mount
until marks at P
1
and P
2
line up in that direction (reference Figure 3).
b.
If mark at P
1
is not centered in the up or down direction, adjust the lower knob on the
back of mirror #2 until mark at P
1
is centered in that direction.


