28
k.
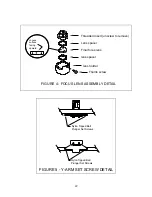
Replace spacer in lens housing and gently insert lens into lens holder ensuring convex
side of lens is up away from spacer.
l.
Place remaining spacer on top of lens and screw threaded insert snugly into place.
CAUTIO:
Over-tightening the threaded insert can cause the optical element to break.
m.
Carefully slide the lens holder assembly back onto the optics carriage on the rail.
n.
Replace the 4-40 thumb screw and tighten gently, just snug.
4.3.2 FOURTH MIRROR CLEAIG
a.
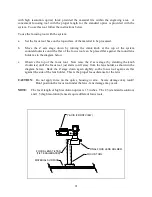
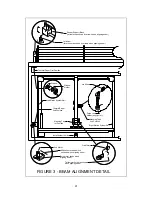
The fourth mirror is located just above the final focus lens and is held in place by a
single 2-56 socket head cap screw (reference Figure 3).
b.
While holding on to mirror bracket, remove the 2-56 screw and lift mirror and holder
straight off optics holder.
c.
Thoroughly dust off the mirror using the oil free compressed air or Freon duster as
described previously. If mirror is extremely dirty use a stream of lens cleaning
solution #1 from the small plastic wash bottle to flush the surface instead.
d.
Apply lens cleaning solution #1 to the mirror. Let sit for one minute.
e.
Using a cotton swab, gently roll across mirror once.
f.
Use new swabs and repeat rolling across mirror once with each new swab until the
mirror is clean and dry. Never use a swab twice as dust build-up on the swab may
scratch mirror's surface.
g.
Inspect mirror and repeat procedure if necessary until mirror is clean.
h.
Replace mirror on optics assembly by setting mirror and bracket straight down on to
optics holder and replacing 2-56 screw.
OTE:
Sliding mirror on optics holder will cause scratching of mirror.
4.3.3 THIRD MIRROR CLEAIG
a.
The third mirror is at the front of the movable arm in a mirror holder (reference
Figure 3). The top cover must be removed to access this mirror.

