background image

VIDEO EDITOR: CHAPTER THREE

179

Notes:

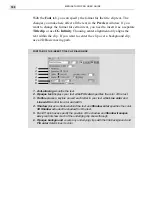
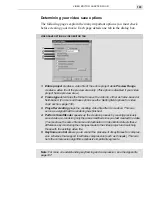
The Motion Control window allows you to determine the path of a clip by
adjusting various control points. When you first open a Moving Path dialog box, the
Start control point (S) is active and appears at the center of a sample of the clip. By
dragging the start control point, you can reposition the clip. To reposition the End
control point (E), click it to make it active and then drag it to a new location. If you
use the Keyframe Controller, you can add additional control points (+) which give
you more options for controlling the direction of the path. Beneath the sample clip
is a fixed frame which represents the frame size of the video project. If your moving
path does not appear within this frame, then it will not be seen in the resulting
video sequence.

The Reference box allows you to change the position of the control point within the
sample clip, thereby controlling which part of the clip moves first, as well as the
axis of any rotations (except for Sphere and Cylinder) – by default this is set to the
center. For example, clicking the top left corner changes the focus of the active
keyframe on the sample clip in the Motion Control window to the top left corner of
the clip. This is particularly useful when you need to reposition a clip but are
restricted by the size of the Motion Control window, such as for long title credits.
By switching the reference of the clip to the top, you can then drag the sample clip
outside of the frame box and beyond the area of the window.

The Zoom button opens the Zoom window which displays the Motion Control
window in greater magnification. A green frame also appears in the Motion Control
window indicating the current area displayed in the Zoom window. (By moving this
frame, you change the area being examined.) You can increase the zoom level (up
to 4x) by clicking the Zoom window (to zoom out right-click). With the Zoom
window open, you can still work on your moving path by dragging the control points
in the Motion Control window. Double-click the title bar to close the Zoom window.

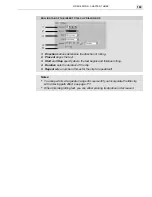
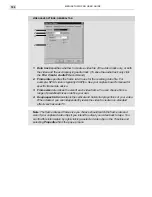
In Video Editor, you can choose from five distinct moving paths: 2D Basic,

2D Advanced, 3D, Cylinder, and Sphere (you can also customize your own
paths in the custom folder). They all use the same dialog box to control their
movements, differing only in areas specific to their effect. The Moving Path

dialog box diagrams on the previous page use the 2D Basic dialog box as the
example.

One common use for the 2D Basic Moving Path does not actually move at
all. During the nightly news, a common technique is to put a small clip or

story title to the upper right of the screen above the anchor's shoulder. This
effect can be done easily in Video Editor. You can think of it as a still moving
path.

Содержание MEDIASTUDIO PRO 6.0

Страница 1: ...User Guide MediaStudio Pro Ulead Systems Inc January 2000 VERSION 6 0...

Страница 2: ...trademarks mentioned in this manual are used for identification purposes only and remain the exclusive property of their respective owners Sample files Files provided as samples on the program CD can...

Страница 3: ...19 Source window 19 Track control 19 Preview window 19 Full Digital Video DV support 20 Advanced MPEG capture edit and create 20 More new tools 20 Internal changes 21 Tutorials Tutorial 1 Video Captu...

Страница 4: ...9 Applying a video filter 49 Cloning an image 50 Creating a video matte 51 Performing advanced techniques 52 Performing an erase effect 52 Performing an advanced power duplication 53 Creating backgrou...

Страница 5: ...pture 83 The chapter in review 84 Video Capture Chapter 2 Capturing video 85 Tips for capturing good video and audio 86 Getting the right hardware 86 Using compression 87 Techniques for improving your...

Страница 6: ...y 110 Storyboarding your clips before Timeline insertion 111 Working with folders 111 Drag and drop 111 Viewing Production Library thumbnails 112 Adding effects to the Production Library 112 Working w...

Страница 7: ...Setting field options for video clips 138 Working with cues 140 Placing project cues 140 Placing clip cues 141 Locating clips 142 Locating an empty time slot 143 Trimming clips 143 Using the Trim win...

Страница 8: ...ating a moving path 177 Creating 3D moving paths 181 Managing keyframes on a moving path 182 Applying audio filters 183 Changing the amplification of an audio clip 184 Adding a soundtrack 184 Creating...

Страница 9: ...itting an image in the edit window 227 Working with frames in a project 227 Inserting frames 228 Duplicating frames 229 Deleting frames 229 Replacing frames 229 Customizing Video Paint 231 The chapter...

Страница 10: ...your work 264 Performing a flick preview 264 Performing a preview 265 The chapter in review 266 CG Infinity CG Infinity Chapter 1 Getting started 269 Understanding the basics 270 Understanding object...

Страница 11: ...Using the Envelope tool 293 Adjusting shapes 294 Creating a moving path 296 Changing the shape of a moving path 297 Changing the size and style of an object over time 298 Changing the speed of an obj...

Страница 12: ...rces 327 Mixing tracks 327 Removing a mixed track 328 Applying special effects 329 Performing a fade 329 Changing speed 330 Performing a stereo pan 331 Reversing a file 331 Performing an echo 332 Perf...

Страница 13: ...anyone wanting to work with and control digital video This soft ware package is ideal for graphic designers multimedia producers Internet developers home video directors and independent filmmak ers W...

Страница 14: ...y We strongly recommend working through the Tutorials section of this manual and checking out the sample projects found in the Samples folder of MediaStudio Pro before really digging into the advanced...

Страница 15: ...More info Once you ve played with the program a little and can already edit clips apply transitions and add a title or two you might want to return to the manual for tips tricks and ideas The compani...

Страница 16: ...er entitles you to product updates and upgrade information as well as technical support You can also instantly register online electronically after installing the program 2 Insert the MediaStudio Pro...

Страница 17: ...ck on the appropriate command in the Start Programs Ulead MediaStudio Pro 6 0 submenu This submenu may differ depending on the choices you made during installation If you are already working in any of...

Страница 18: ...creating a faster more efficient and more stable editing platform For those of you who are veteran MediaStudio Pro users here s a brief look at some of the more significant changes The traditional Wi...

Страница 19: ...Apply button Track control Small changes here and there have led to polished track controls that are easy to use You can lock tracks to protect them from changes temporarily hide mute tracks to make y...

Страница 20: ...or CD R allows anyone to create their own Video CD VCD MediaStudio Pro lets you create WhiteBook standard MPEG 1 movies that are ready to be written to a VCD See page 207 MediaStudio Pro 6 0 also allo...

Страница 21: ...rt New technologies are constantly emerging but you can be assured that MediaStudio Pro is up to date with full support for DV and new MPEG 1 and MPEG 2 editing Open architecture means that MediaStudi...

Страница 22: ...MEDIASTUDIO PRO USER GUIDE 22...

Страница 23: ...Tutorials Tutorials...

Страница 24: ......

Страница 25: ...Video Capture Video Capture is where you ll begin Hook up your camcorder and you re ready to import video files to your computer for professional editing MediaStudio Pro introduces a number of amazin...

Страница 26: ...r camcorder s manual for specific instructions 2 Run Video Capture 3 From the View menu select Preview You should be able to see the output from your camcorder in the Video Capture Preview window 4 Us...

Страница 27: ...n page 96 To capture DV by batch 1 Turn on your camcorder and set it to Play mode or VTR mode See your camcorder s manual for specific instructions 2 Run Video Capture 3 From the View menu select Prev...

Страница 28: ...the device and set it to Play mode or VTR mode See your device s manual for specific instructions 3 Run Video Capture 4 From the Setup menu select Switch Capture Plug in 5 Select Ulead MPEG VFW Captur...

Страница 29: ...ograms to create a final video production Here you can insert your files and then arrange them into their playing sequence adding impressive transition effects overlays and moving paths as you go Tuto...

Страница 30: ...ct 1 Run Video Editor Click File New 2 In the New dialog box select an Existing project template You can also open this dialog box at any time by clicking the New button 3 Click OK When you save your...

Страница 31: ...wse for a video file clip There are a number of sample files on the MediaStudio Pro CD or use a file you have previously captured 3 Click Open 4 Move your cursor to the beginning of the Va track and c...

Страница 32: ...ber of tech niques you can use the following is one of the easiest To trim a video clip 1 Select a video clip on the Timeline by clicking on it 2 Move the cursor to the very right edge of the clip The...

Страница 33: ...1 Insert one clip into Va and another into Vb Make sure the clip in Vb overlaps the one in Va by about a second 2 Go to the Transition Effect folder in the Production Library Click Window Production...

Страница 34: ...ure those are set up correctly Previewing takes place in the Preview window You can use the controls there to play rewind fast forward or step through your movie It is often the case that you will onl...

Страница 35: ...speed of a filter as it moves from the first frame to the last To apply a video filter 1 Select the Video Filter 2D Mapping gallery from the Production Library and drag and drop the Ripple filter onto...

Страница 36: ...e overlay tracks V1 V99 2 From the Production Library select the Moving Path 2D Basic gallery 3 Drag and drop the 2D Basic thumbnail onto a clip in a video overlay track of the Timeline The 2D Basic M...

Страница 37: ...option to enable the Rolling tab and then select the following options in the Font tab if not already selected Note If you align text in the center it works only on the text within the clip To align t...

Страница 38: ...ion 3 Drag the control point upward to increase amplification downward to decrease it Place additional control points to determine where to start and end your changes To remove a control point drag it...

Страница 39: ...such as wipe peel or split screen Below is an example of how to create a split screen To create a split screen effect 1 Insert a clip into Va and another into Vb 2 From the Transition Effect gallery c...

Страница 40: ...Library drag and drop the 2D Basic Moving Path thumbnail onto the clip in the overlay track The 2D Basic Moving Path dialog box opens 3 Click the Keep aspect ratio option and enter a new width value...

Страница 41: ...istance 1 Create a suitable Rolling title sequence in the V1 track See page 37 2 From the Production Library drag and drop the 2D Advanced Moving Path onto the title clip This opens a dialog box 3 Adj...

Страница 42: ...Double click on the audio clip to open it in the Source window Play back the clip and when you hear the sound you wish to synchronize the video clip to press F5 This places a cue on the cue bar above...

Страница 43: ...ing to individual frames of a video project With it you can create such effects as laser blasts background mattes and cloned actors and props Tutorial 3 In this tutorial you will learn about Getting t...

Страница 44: ...time saver and allows you to perform edits quickly without draining system resources To open a video file for editing 1 Click the Open Video File button on the Standard toolbar to open the Open Video...

Страница 45: ...t As you drag a selection marquee appears outlining the area included in the selection When finished move the selection to a new location on the image This selection is now referred to as a floating s...

Страница 46: ...hen adjust either the vertical or horizontal slider tabs until the Height and Width spin boxes read 7 Once completed set the Brush Angle to 0 and the Soft Edge to 34 3 In the Options tab set the Appli...

Страница 47: ...ndow 2 Click Edit Power Duplicate to open the Power Duplicate dialog box 3 Select the Paint Layer option in the Source group box and the Apply after current frame option in the Apply group box In the...

Страница 48: ...macro You can also give it a name and description 4 Click OK The macro is saved to the proper location and the edits are removed from the edit window Note To have the macro play back automatically se...

Страница 49: ...to If you want to apply the filter to the entire clip make no selection 2 Select the Video Filter Camera Lens gallery from the Production Library and drag and drop the Kaleidoscope filter onto the edi...

Страница 50: ...the Brush panel click the Absolute button if it is not already selected 2 Move to the image you want to clone and holding down the Shift key click over the object or feature you want to clone A crossh...

Страница 51: ...k OK The dialog box closes and a new project is created Use the default settings if you do not yet have a Video Editor project to work with 3 Click the Lasso tool on the Tool panel and then click the...

Страница 52: ...to open the Fill dialog box 2 Select the color you want to use as the fill from the Color group box and enter 15 in the Transparency spin box 3 Click OK to close the dialog box and apply the fill Onc...

Страница 53: ...ains the edits you want to duplicate and then click Edit Power Duplicate to open the Power Duplicate dialog box 2 Select the Paint Layer option in the Source group box 3 Select the After current frame...

Страница 54: ...ct The Animation Texture dialog box opens displaying various options for controlling the display and movement of a texture 3 Select thumbnail 11 from the Pattern group box and then click on the End ke...

Страница 55: ...g then deselects these areas Keep doing this until all areas of the sea are no longer part of the selection If you need to add areas of the fish to the selection area hold down the A key When finished...

Страница 56: ...rush from the Attribute toolbar 3 In the Shape tab of the Brush panel specify a small brush size with no soft edge and in the Options tab set the blur value to one 4 Zoom in on the edit window contain...

Страница 57: ...l click the Straight Line button Set the laser s color in the Color tab and the brush s height and width in the Shape tab 3 Click the Recording button and then click OK The edit window is centered in...

Страница 58: ...original background in a second edit window background win dow 3 Click the Clone tool on the Tool panel In the Options tab of the Brush Panel click the Frame button and with the SHIFT key click anywhe...

Страница 59: ...G Infinity s tools you can send text and objects flying into the third dimension This tutorial is de signed to give you everything you need to get started at creating your own CG sequences Tutorial 4...

Страница 60: ...olbar Rectangle select Draw From Center deselect Equal Sides deselect 2 In Preview mode draw a rectangular path within the frame of the edit window and in the Object Style Panel set the fill color to...

Страница 61: ...ext alignment font or any other characteristics select the text and then choose the appropriate options from the Attribute toolbar 3 Switch to the Envelope tool A red border appears around the text as...

Страница 62: ...of the Object Style panel 2 Click the Gradient square to open the Magic Gradient dialog box 3 Click the Edit button in the Palette ramp group box to open the Palette Ramp Editor dialog box and select...

Страница 63: ...nd node to change the object s perspective 4 Duplicate the object and then click the Resize button on the Attribute toolbar and drag the left side of the object to the right flipping it To make sure i...

Страница 64: ...ape 4 Click Edit Duplicate to make a copy of the current object giving it a yellow fill color with no line color Then switch to the Object tool and drag the left side over to the right flipping the ob...

Страница 65: ...End control point follows the path of your mouse Releasing your mouse then creates the moving path 3 Click the Play button on the Time Control panel to see how your animation looks If you want to cha...

Страница 66: ...om the background Gradient mattes require a little more work To create a gradient matte 1 Select the tool you wish to create the path with and draw the shape of the matte in the edit window 2 Select t...

Страница 67: ...two nodes to the left and right of the top node on the larger circle Click the Adjust Path button on the Attribute toolbar and drag the center node upward 4 Click the Cusp node button on the Attribute...

Страница 68: ...g Delete Remove the darker ones first and then drag the remaining nodes so that the darker colors appear to the left of the circle and the lighter ones to the right When finished click OK and then sel...

Страница 69: ...indow 7 Move the slider to the 1 second mark and add a keyframe This is the time you want the object to commence its movement Place your pointer on the object in the edit window and drag it back so th...

Страница 70: ...nter 68 in the Width spin box Click the Keep Aspect Ratio button to ensure the height changes proportionally After resizing position the object in the center of the edit window frame 6 Click on the le...

Страница 71: ...Video Capture Video Capture...

Страница 72: ......

Страница 73: ...nt sources such as VCRs TVs laserdiscs or camcorders Once captured you can then play back those files or take them into Video Editor to start constructing your own video project Chapter 1 In this chap...

Страница 74: ...a VCR camcorder or laserdisc and your computer If you do not have a video capture board you can still use Video Capture to play back existing video files Once you have your video source connected and...

Страница 75: ...Capture a frame to a file Capture a video color palette Rewind through a video Go forward through a video Go to the previous frame Play a video repeatedly Go to the last frame Go to the first frame Go...

Страница 76: ...nect to a video channel and specify the type of video source you have as well as the television standard it operates on these options may differ depending on your video capture board In general you sh...

Страница 77: ...ened by clicking the Video Format button on the Standard toolbar or Setup Video Format The settings in this dialog box may differ for some video capture boards You should adjust these settings accordi...

Страница 78: ...captured depends on a combination of factors namely the video source the video capture board and the sound card installed in your computer In general the video capture board handles the capturing of...

Страница 79: ...olors do not appear as vibrant or are darker than you expected Such examples indicate that your video capture board and the video source are not properly adjusted or calibrated By having a well calibr...

Страница 80: ...eo source s color signal broken down into its component parts Composite Chroma Luma and Parade Composite displays all the component parts combined Chroma shown in green the color values and Luma shown...

Страница 81: ...on dialog box redraws itself regularly To do this set the Get video frame for every option in the Color Calibration dialog box to 1 second This ensures that at every second the preview test pattern re...

Страница 82: ...eform monitor the typical settings are about White Yellow Cyan Green Magenta Red Blue Black 100 65 50 50 30 20 20 0 Note White and black should always be 100 and 0 respectively though the other colors...

Страница 83: ...e once the clip finishes playing When clear the video stops on the last frame after playing 3 Display frame numbers when playing shows each frame number in the Status bar as it is being displayed When...

Страница 84: ...mode before capturing to get an idea of the resulting quality p 76 When viewing in Preview mode set the frame size and frame rate of the video in the Preview Options dialog box p 77 Calibrate Video Ca...

Страница 85: ...rce material This can be several minutes of video or simply individual frames that you want to incorporate into other projects you are working on Chapter 2 In this chapter you will learn about Tips fo...

Страница 86: ...is the faster video can be digitized and then used by your computer While the video capture board handles video input it is the CPU which handles the delivery The faster the CPU is the more video as...

Страница 87: ...match the com pression ratios of hardware based compression it is device independent and therefore can be played back on a variety of machines This makes software based compression the ideal choice f...

Страница 88: ...t this level is not necessary You may find a mono 11 kHz 8 bit file more practical Also if you are capturing background music then it may not be necessary to capture it at the same time you are captur...

Страница 89: ...Capture begins captur ing immediately using your current settings Capture Video dialog box 3 Specify the desired frame rate in the Frame rate spin box If captur ing full motion video from a drop fram...

Страница 90: ...continues capturing until you press the ESC key If you want to perform single frame captures then select the Manual option If you have a controllable device select the Device control option For more o...

Страница 91: ...to Video Editor and drag and drop the file into a video project This is also useful for batch captures as the library creates an icon for each captured file which you can then use to storyboard and a...

Страница 92: ...ideo file after capturing plays back each file after capturing Leave this clear if you want to continue viewing your video source after capturing 3 Synchronize video with audio ensures that during cap...

Страница 93: ...supporting a specified frame rate a message box may appear after capturing detailing how many frames were captured and of those how many were dropped frames This message box is controlled in the Adva...

Страница 94: ...is is suitable for videos featuring a variety of colors such as outdoor shots To retain some color while at the same time saving disk space choose the 8 bit data type which depending on your video cap...

Страница 95: ...n Next to capture one frame Cancel to end the capturing When the capturing process is completed a palette is generated from the optimum combination of colors based on the captured frames Once defined...

Страница 96: ...ile while All frames saves all the frames in the file 5 Specify the desired video attributes in the General Advanced and Compression tabs For more on these options see Determining your video save opti...

Страница 97: ...ype of controllable device you have in the Current device combo box Click Options if you need to define more parameters for the selected device control driver Visit Ulead s web side to know more about...

Страница 98: ...ensure you have the correct sequences of video You can also load an existing batch file or even a Video Editor DVP file from which to capture Using batch lists in this way allows you to capture exact...

Страница 99: ...ture them To do this click the Record button on the Control bar or Control Record F5 In the Capture Video dialog box that opens select the Device control option in the Method group box and click OK Vi...

Страница 100: ...if you get dropped frames p 93 Preallocate a capture file before capturing p 93 For Indexed Color video capture a color palette p 94 Mark video sequences before capturing them p 97 Use the Capture Ba...

Страница 101: ...Video Editor Video Editor...

Страница 102: ......

Страница 103: ...ed any effects and transitions you are ready to create a video production which can be saved as a file placed on the Internet distributed on a CD or sent back out to video tape Chapter 1 In this chapt...

Страница 104: ...acks These tracks hold the many different events that occur over time In Video Editor these events are referred to as clips and they combine together to make up a video project The other windows in th...

Страница 105: ...p in a project Redo an undone action Undo a previous action Create a video file Show and edit Project Settings Open or close the Preview window Open or close the Source window Context Sensitive Online...

Страница 106: ...ps that you place into the Timeline but also defines the properties for the resulting video such as the television standard and the size of the frames used Any clips that you place into the project su...

Страница 107: ...late Options dialog box opens up 2 Select and set the attributes for your new template Note For a more detailed explanation of setting up a template see page 108 or refer to Video Editor Help Also it...

Страница 108: ...e frame rate and the frame size You can also control the number of overlay tracks displayed and view the files currently used by the project see page 117 Notes The number of tabs which appear in the P...

Страница 109: ...and its source files to another PC use the same directory structure as the original to ensure the clips are correctly linked Smart Relink Since a DVP file contains links to potentially hundreds of fi...

Страница 110: ...il pictures While this is certainly not the most glamourous part of the movie making process spending a short period of time at the beginning of your project setting up and populating the Production L...

Страница 111: ...ly selected gallery appear on the right side of the Production Library window To the left are folders which organize the various thumbnails of the particular gallery You can manage these folders by ri...

Страница 112: ...ow each of the thumbnails If you want to maximize the space available for displaying thumbnails click the Preferences command and in the dialog box that opens clear the Show border option The Search c...

Страница 113: ...inal video production Clips that have been inserted directly onto the Timeline will also automatically be added to the Production Library s Project gallery Inserting video audio and image clips The ea...

Страница 114: ...licking Insert Project File This places the entire contents of the video project into the Timeline and is particularly helpful if you have broken up larger projects into more manage able portions and...

Страница 115: ...tion see page 186 Silence and color clips can be used as placeholder clips which can stand in for other clips you want to insert later For example you may want to start working on a video project but...

Страница 116: ...and select Color Clip from the pop up menu 2 In the Insert Color Clip dialog box specify the duration of the clip in the Duration spin box 3 Choose the color of the clip by clicking the color square o...

Страница 117: ...udio tracks when scrolling click the Scroll Lock button at the top of the vertical scroll bar or the View Scroll Lock command The next time you scroll both tracks move in unison Also to control the nu...

Страница 118: ...n modified To help improve performance but still retain some visual cues as to the contents of a clip select the Thumbnail mode video only This shows the first and last frames of a video clip separate...

Страница 119: ...TSC standard and at 1 minute each division represents 1 800 frames and so on To change the unit of measurement you have two options Click the Ruler Unit button to open the pop up menu and choose the p...

Страница 120: ...fy the number of commands to appear in custom and cache areas The custom area displays commands you specifically insert into the panel while the cache area automatically tracks the last commands you h...

Страница 121: ...of type list It is always best to insert the actual project files for any projects you have created in one of these other programs as they have not been rendered or compressed in any way and thus mai...

Страница 122: ...the above procedure but is specifi cally designed to bring video files in line with a project s settings Since your project s settings determine the final movie s format any clips you have inserted th...

Страница 123: ...have in Preferences to customize Video Editor 1 Enable undo specifies the maximum levels of undo redo allowed by Video Editor up to 99 As Video Editor allocates more memory for each level of undo red...

Страница 124: ...attributes of the current Project If you often create video projects using the same attributes then leave this option clear 8 Automatically save every automatically saves the video project at the time...

Страница 125: ...more on the frame type see page 139 Select Frame based if your video capture board does not support field based capture or your video files are not field based If you insert a non field based video w...

Страница 126: ...program 2 Associated program indicates the program to open whenever the Edit Open in Associated Program command is selected 3 Include trim information allows a video clip opened in the associated pro...

Страница 127: ...ch free space you have left on your hard drive 3 Limit hard disk usage to specifies how much memory you want to allocate just for Video Editor s purposes If you are only using Video Editor and want to...

Страница 128: ...meline p 111 Edit a thumbnail in the Production Library p 112 Insert video audio and image clips into the Timeline p 113 Insert color title and silence clips into the Timeline p 115 Control the displa...

Страница 129: ...nd this chapter is the most important section in this book Chapter 2 In this chapter you will learn Making selections in the Timeline p 130 Working with clips p 133 Working with cues p 140 Locating cl...

Страница 130: ...d a clip you can move it or drag on its borders to trim the clip To select all the clips in a particular track click the Track button on the left side of the track If you want to select all the clips...

Страница 131: ...n group them together so that they remain as a unit see page 133 Using the Time Selection tool The Time Selection tool allows you to select a period of time including any clips or portions of clips th...

Страница 132: ...ction tool 1 Click the Track Selection tool on the Timeline toolbar 2 Click on a clip The clip along with the rest of the track to the right of the clip is selected Therefore if you click on the first...

Страница 133: ...our project and manipulating them is the most important skill you can master The next few pages cover the basics cutting copying pasting and trim ming To cut or copy a selected clip to the Clipboard C...

Страница 134: ...p to another This is a very powerful technique that allows you to maintain perfect consistency between clips To paste the attributes of a clip only 1 Select the clip 2 Right click the clip or use the...

Страница 135: ...clips transitions and even project cues for more on cues see page 140 Splitting the audio from video clips Video clips commonly also have audio On the Timeline the accompanying audio clip is placed i...

Страница 136: ...rect folder or folders MediaStudio Pro includes a feature that works completely transparent meaning that you won t even notice it called Smart Relink If you have moved your files to another drive or f...

Страница 137: ...ile at the time of capture otherwise this command has no benefit Note For more on color calibration see the Video Capture section Calibrating your display page 79 Freezing a frame A common technique i...

Страница 138: ...frame 5 was frozen Frame 5 is then repeated frozen until frame 6 is reached Normal playback resumes Freeze after frame was also selected with the value of 11 and the frame is repeated frozen until the...

Страница 139: ...eo capture board used to digitize the original video For more information see the documentation accompanying your video capture board If you cannot determine the correct order switch between the two a...

Страница 140: ...e location on the Timeline A triangular blue cue marker appears on the cue bar Setting cues Working with cues Cues are simply bookmarks for your video project As your projects get larger and more comp...

Страница 141: ...edges of the Timeline Click View Cue Manager to delete cues rename them or jump to a specific cue Placing clip cues You can also place cues on individual clips In this case the cues are black and appe...

Страница 142: ...p select it under Start Time in the list box 3 Click OK To go to another clip from the same source file click the Find Next button on the Standard toolbar or click Search Find Next F2 Note You can als...

Страница 143: ...g movies There are a number of convenient methods for doing this in Video Editor Each of these offers different advantages depending on the type of clip and the opera tions you wish to perform To trim...

Страница 144: ...tion selected see below only the previous frame is displayed whenever you use the Trim window Using the Scissors tool to trim clips To cut a clip 1 Click the Scissors tool or hold down the S key on yo...

Страница 145: ...the clip back it will reveal the underlying portion of the other clip which is then untrimmed This is useful if you want to merge two clips together and need to see the frames of each clip in the Trim...

Страница 146: ...k Ripple editing will move everything including empty space out of the way to make room for the inserted clip but only on the target track Multi Track Ripple editing will move everything including emp...

Страница 147: ...mple green avi is again inserted between the red and yellow clips This time Single Track Ripple is selected RippleEditingexamples The following illustrations will help you understand the sometimes com...

Страница 148: ...rtion point To insert a clip into another 1 Select Edit Ripple Editing Single or Multi Track 2 Click the Insert Video File button 3 In the Insert Video dialog box select the clip you want to insert As...

Страница 149: ...rations and place clip specific cues Clips can be dragged to and from the Source window and into the Timeline or Production Library A quick double click will immediately open up a clip in the Source w...

Страница 150: ...ded into the Source window 6 Navigation bar See details on the next page 7 Current position displays and allows you to edit the time of the current position of the Jog bar 8 Trim area displays and all...

Страница 151: ...he active clip continuously 9 Mark In and Mark Out position the Trim Handles at the current location of the Jog bar and adjust the Trim Area Trimming clips in the Source window The Source window allow...

Страница 152: ...ay boxes can be manually edited Just click on the box and key in the new numbers to automatically readjust the Jog bar and or Trim bar To trim an audio clip 1 Place the red vertical line where you wan...

Страница 153: ...iew the output there The Preview window itself is very similar to the Source window see page 149 Where the Source window is used to view trim and add cues to individual clips the Preview window is use...

Страница 154: ...ne the preview range This is also represented as a blue line both in the Preview window and on the Preview bar above the Timeline Click Edit Preview Range and enter specific timecode values to define...

Страница 155: ...et from File Preferences on the Preview tab Preview files can take up a huge amount of disk space so it is impor tant to set these folders up properly Some times MediaStudio Pro will generate a Not en...

Страница 156: ...ir final positions p 133 Copy and paste an entire clip or its attributes only p 133 Select the Edit Snap command to snap clips to cues or to the edges of other clips p 135 Use cues in the Timeline as...

Страница 157: ...un wild as you learn about the most fun and exciting features of Video Editor Chapter 3 In this chapter you will learn about Performing transition effects p 158 Using keyframe controls p 164 Performin...

Страница 158: ...the effect To apply a transition effect 1 Place a clip in the Va track and another in the Vb track making sure the clips overlap a little 2 Open the Production Library and select the Transition Effect...

Страница 159: ...lied to the clip 9 Speed control selects the preview play speed 10 Actual image button displays actual video in the sample window 11 Preview button plays the effect with its current settings 12 Transi...

Страница 160: ...at the same time Note Double click a previously inserted transition to open the Transition Options dialog box It is automatically opened when you insert a new transition only when the Display Options...

Страница 161: ...dozens and dozens of different transition effects to choose from the jump cut with no transition and the crossfade are probably the only two that are commonly used in Hollywood movies Another popular...

Страница 162: ...et carried away and use them between every clip A fancy transition is not always the best artistic choice however and can at times be distracting Simple jump cuts or fades are often your best choices...

Страница 163: ...When you click the second clip the audio levels are automatically faded in and out on both clips You can also use this technique in a more general way across all of the overlapping clips in your proj...

Страница 164: ...oce dure below uses the Circle Wipe transition effect dialog box to create a customized transition animated with keyframes To use keyframes to animate a transition effect 1 Place a clip in the Va trac...

Страница 165: ...button To move a keyframe To move any keyframe just drag it to a new location Since keyframes are chronological in nature it is impossible to drag a keyframe beyond a neigh boring keyframe on either...

Страница 166: ...folder drag the PAINT AVI clip onto the V1 track and line it up underneath the clip in the Va track 3 Click the Overlay Options button on the Timeline toolbar or click Clip Overlay Options This comma...

Страница 167: ...the source for the overlay 7 Color RGB selects the color to be transparent 8 Advanced control window displays a representation of the threshold cutoff max value min value and gamma value parameters Cl...

Страница 168: ...re are two main types you can choose from color based and mixed based Color based types such as Color Luma Chroma Gray Key and Blue Screen all work by making a specified key color transparent These ty...

Страница 169: ...nt overlays involves using Alpha Channels This technical term simply means an area or areas of an image that have been selected to be transparent in an image or video In many ways an Alpha Channel is...

Страница 170: ...ontribute to the levels of highlight and shading that appear in an image The Gamma graph is a visual guide which allows you to change these values and thus affect changes in the highlights and shadows...

Страница 171: ...aying To create an image matte 1 Run your favorite image editing software such as PhotoImpact Video Paint or CG Infinity can also be used and create a rectangle the same size as the frames in your vid...

Страница 172: ...olid colors that make it easier to identify which areas to show and which to hide For greater control you can use a Grayscale matte which works by using a gradient transparency as a matte where the le...

Страница 173: ...right click and select Video Filters from the pop up menu 3 Select the filter you want to apply from the Available filters list box and click Add The filter is moved to the Applied filters list box 4...

Страница 174: ...ich shows the result after application of the filter 3 Change the various filter attributes until you get the result you want Remember to adjust both the start and end attributes by clicking on the ke...

Страница 175: ...e to a video filter When you apply a video filter it affects the entire frame of a video clip There may be times however when you would prefer it to only affect a certain portion of the clip such as a...

Страница 176: ...affected by selecting the Invert option 5 Click OK to return to the Video Filters dialog box 1 Mask window shows a frame from the mask 2 Preview window shows a frame from the selected clip and the par...

Страница 177: ...ated with CG Infinity To create a 2D basic moving path 1 Open the Production Library and select the 2D Basic Moving Path folder from the Moving Path gallery 2 Drag the 2D Basic thumbnail onto a clip i...

Страница 178: ...hat any changes to a clip s dimensions are reflected equally in the Width and Height boxes 8 Preview allows you to display the moving path before actually applying it 9 Show Background displays the ba...

Страница 179: ...clip but are restricted by the size of the Motion Control window such as for long title credits By switching the reference of the clip to the top you can then drag the sample clip outside of the fram...

Страница 180: ...control point and repeat steps 5 and 6 entering exactly the same values 8 Click OK and preview the effect The 2D Advanced Moving Path dialog box is similar to the 2D Basic Moving Path except that you...

Страница 181: ...es have options for controlling the behavior of the path and the clip itself For example if you select the Clip Angle in the Adjust combo box you can adjust the rotation of the clip on the surface of...

Страница 182: ...of the of the fixed project frame 3 Drag the Preview slider in the Keyframe Controller halfway between the start and end keyframes 4 Click Add Keyframe and drag the red square the new control point t...

Страница 183: ...To apply an audio filter 1 Select the audio clip you want to apply the filter to 2 Click the Audio Filters button or Clip Audio Filters or right click the clip and select Audio Filters from the pop up...

Страница 184: ...he SHIFT key before adjusting the control points you will see values in dB and for the exact amplification Adding a soundtrack Putting background music into your movie is simple but you must carefully...

Страница 185: ...end of the fade in at the beginning of the fade out and at the end of the fade out 4 Drag the two middle control points lower to set the volume Note For greater accuracy in editing zoom in on the clip...

Страница 186: ...Insert Title Clip to open the Insert Title Clip dialog box 3 Type the text that you want in your title in the Title text box 4 Click OK and place the clip into an overlay track V1 on the Timeline It...

Страница 187: ...al monitor outputs the results to an external monitor if your hardware supports it 8 Background video displays the background video behind the preview Notes When Enable rolling is selected the Shadow...

Страница 188: ...and Shadow transpar ency controls how much of the underlying clip shows through 6 Opaque background covers any underlying clips with the title background and Fill color determines its color With the F...

Страница 189: ...olling text you can either prolong its duration or decrease it 1 Direction buttons determine the direction of rolling 2 Place at aligns the text 3 Start and Stop specify where the text begins and fini...

Страница 190: ...nce of effects at different stages p 164 Choose a key type and specify how you want an overlay clip to blend onto the background video p 168 Use mattes to show or hide specific areas in a video p 171...

Страница 191: ...puter or record the movie back to your camcorder Chapter 4 In this chapter you will learn about Creating a movie p 192 Analyzing a video file s data rate p 199 Creating an audio file p 201 Creating an...

Страница 192: ...plicated operation See the next section on Determining your video save options to learn more about these options 5 Click OK to accept the current video attributes The Video Save Options dialog box clo...

Страница 193: ...field based For more on these options see the Setting field options for video clips section page 138 3 Play after creating plays the resulting video file after its creation This can serve as a signal...

Страница 194: ...ack only or both the video and the accompanying audio track To save the audio track only click the File Create Audio File command 2 Frame rate specifies the frame rate to use for the resulting video f...

Страница 195: ...ases you should leave this option cleared 4 Interleave audio and video evenly distributes video and audio data within the video file Standard AVI files are interleaved at 1 1 which means that each vid...

Страница 196: ...ssion scheme to the keyframes specified here 4 Data type determines the number of colors to save the video with In general the lower the number of bits used the smaller the resulting file size 8 bit d...

Страница 197: ...a useful method for controlling the frame size of a video without having to resize the actual frames This is important as resizing frames resamples the original video resulting in distortion and loss...

Страница 198: ...Once selected click OK The standard Create Video File or Create Audio File dialog box opens 3 In the Create Video File dialog box enter a Name and set up any other Options Click Save when finished The...

Страница 199: ...to open the Data Rate Analysis dialog box 2 Browse for and select the video file that you want to analyze and then click Analysis The Data Rate Analysis window details the various attributes of the f...

Страница 200: ...n a clip to its original settings click Restore Note Removing a keyframe doesn t remove the frame itself it only removes the reference to that frame as a keyframe 3 Click Save As to save the new keyfr...

Страница 201: ...m the Save as type list 3 Enter a File name 4 Click the Options button to view or edit the specific details of the file in the Audio Options dialog box The Compression tab contains the options you nee...

Страница 202: ...quence 1 Click File Create Video File 2 Select Ulead Image Sequence Files UIS and the drive and folder where you want to save the frames of the video 3 Enter a File name 4 Click the Options button to...

Страница 203: ...particularly because not all post production companies support the wide array of effects available in Video Editor Note You must post the timecode see the next page onto each of your clips in a video...

Страница 204: ...ately post timecode you need to have recorded the timecode at the time of capture using a controllable device To post timecode 1 Click Clip Post Timecode to open the Post Timecode dialog box Post Time...

Страница 205: ...op up menu to see this information If you have already created an avi file with your project it is easy to print the finished movie to tape Note To output a video to tape you need a video capture boar...

Страница 206: ...lick File Print To Tape Timeline to open the Select Timeline dialog box 2 Choose whether to output the Entire project or just a selected Preview range 3 Select Options to open the Print To Tape Option...

Страница 207: ...iaStudio Pro s Timeline sequentially You can then use Timeline playback to play the files back seamlessly to tape Creating a VCD A VCD is simply a special version of a CD ROM The exciting thing about...

Страница 208: ...iles can only be played back on your PC and only with the proper software player In the future it may be possible to create DVDs at home using this format but that is not currently feasible Secondly b...

Страница 209: ...d even the very first DV products on the market this latest version now offers comprehensive support for DV in all of its manifestations This includes but is not limited to Type 1 Type 2 PAL NTSC and...

Страница 210: ...and remove noise from the edges p 197 Use the File Create Multiple Files command to create video files from a number of different projects p 198 Use the File Data Rate Analysis command to analyze a vi...

Страница 211: ...Video Paint Video Paint...

Страница 212: ......

Страница 213: ...such as lightning bolts lasers beams virtual sets and mattes You can also use the wide range of natural and particle based painting tools to work on single images for use in other projects such as web...

Страница 214: ...f the frames appears as a clip in the Filmstrip panel You can scroll through this panel to view the clip or select a specific frame to work on When you select a frame it opens automatically as an imag...

Страница 215: ...aste an image View in Composite mode View in Paint Layer mode Redo an undone action Undo a previous action View in Normal mode View in Onionskin mode View in Ruby Mask mode View in No Source Video mod...

Страница 216: ...e top marker indicates the frame s position timecode in the current view while the bottom marker indicates the frame s position relative to the entire clip Markers indicating the position of the curre...

Страница 217: ...o Paint file UVP UVP files do not save the source video file just the clip information which contains a pointer to the original video file as well as a list of all the edits performed on each frame in...

Страница 218: ...s that make up a video sequence The maximum duration for any file you open is 30 seconds Note Video Paint automatically converts any file you open into its workspace to True Color If you want to const...

Страница 219: ...select the frames you are interested in Video Paint saves the project if changes have been made and then reloads it so only the selected frames appear To edit frames outside of the current project us...

Страница 220: ...video or image file which merges your edits with the original source file To create a video file click File Create Video File This opens the standard Create Video File dialog box which has the same op...

Страница 221: ...an image either from Video Paint or any other image editor you can paste it into an edit window To do this click the Paste button on the Standard toolbar or Edit Paste CTRL V Images are pasted at the...

Страница 222: ...Duplicate Last Floating Selection CTRL K or Duplicate Last Paint Layer CTRL L Duplicate Last Floating Selection places a copy of the last active floating selection while Duplicate Last Paint Layer cop...

Страница 223: ...earing before or after the active frame In the Duration spin box indicate how many frames to duplicate over 5 Set the Start and End frame transparency in the Start and End tabs Default is 0 or no tran...

Страница 224: ...ltiple frame actions option or decrease the number of frames to duplicate over Creating a matte frame 2 and then power duplicating it across the others Placing cues In Video Paint you can place cues a...

Страница 225: ...ox Viewing edit windows Whenever you open a file the first frame of the sequence appears in an edit window at its original size 1x Video Paint allows you to control the size of this edit window as wel...

Страница 226: ...so press the and keys to zoom in and out on images regardless of the current tool selected Pressing the Z key while using another tool automatically switches that tool to the Zoom tool Releasing the Z...

Страница 227: ...By submenu The maximum zoom level available is deter mined by the size of the image and your current display mode An alternative to the Fit in Window By command is the Fit in Window button on the Att...

Страница 228: ...Select the frame in the Filmstrip panel where you want to begin inserting the additional frames 2 Click Frame Insert to open the Insert Frame dialog box Insert Frame dialog box 3 Specify the number of...

Страница 229: ...ames The Frame Delete command removes a frame or frames from your project shortening the duration accordingly This does not remove them from the actual source file When you click this command the Dele...

Страница 230: ...x and then specify what to replace the frames with in the Link with group box The Empty frame option replaces the frames with the current film color while the Source video option uses frames from the...

Страница 231: ...this option clear 2 Levels of undo redo specifies the maximum levels of undo redo allowed by Video Paint up to 99 As Video Paint allocates more memory for each level of undo redo you may find that to...

Страница 232: ...equence to the first frame after it has been played like a CD player When clear the sequence stops on the last frame after playing like coming to the end of a tape in the VCR 7 Play macro after record...

Страница 233: ...uch total disk space is allocated for virtual memory as well as how much space is allocated in RAM for use by all MediaStudio Pro programs 1 Define additional folders for virtual memory allows you to...

Страница 234: ...y adapters or the environment in which you work as lighting and temperature can also affect a monitor s performance 1 Hi Color dithering allows you to improve the display of True Color images when you...

Страница 235: ...itor both of these squares should look approximately the same 2 Examine the two color squares and if the two squares look different adjust the Monitor gamma spin box until the bottom square looks simi...

Страница 236: ...appearing as an image in an edit window p 214 Control the size of frames in the Filmstrip panel by using the right mouse pop up menu p 216 Open only a few seconds of a video file for speedier editing...

Страница 237: ...ch and Clone tools to the more common Paintbrush and Transform tools Chapter 2 In this chapter you will learn about Working in different display modes p 238 Making selections p 242 Working with color...

Страница 238: ...rious painting and retouching tasks Ruby Mask mode The Ruby Mask mode is useful when you want to create a video or image matte that protects certain areas of an underlying video from any edits you may...

Страница 239: ...e tab of the Brush Panel Now when you paint the ruby mask is applied 5 Select the next frame and click Edit Duplicate Last Paint Layer The paint layer from the previous frame is copied to the current...

Страница 240: ...page 252 3 Click the Onionskin mode button on the Standard toolbar or View Display Mode Onionskin 4 Click View Onionskin Options to open the Onionskin Options dialog box Onionskin Options dialog box...

Страница 241: ...s have a transparency applied If left clear the transpar ency is applied to the source video plus the paint layer Depending on the type of video this may produce no noticeable effect 9 Click OK The di...

Страница 242: ...selection a dotted line appears around the edges of the selected area This dotted line is called the selection marquee The marquee can either be floating containing image data or non floating selectin...

Страница 243: ...area the edges blend in slightly with the surrounding background An added feature of selecting in the paint layer is the Shrink button on the Attribute toolbar When you select this button any selecti...

Страница 244: ...ur mouse allows you to draw precise curved segments clicking your mouse allows you to define straight line segments By combining both drawing techniques you can quickly outline selection areas that co...

Страница 245: ...ctive way to select large solid colored portions of an image such as a blue screen or patches of skin and clothing When you use the Magic Wand tool it operates in one of two modes Line or Area In Line...

Страница 246: ...s thereby selecting the entire image A value of 50 selects neighboring pixels that have values that differ from the pixel you click on by 50 For example if you click on a pixel with values R25 G60 B19...

Страница 247: ...on pixel by pixel To move a selection marquee to another frame first copy it and then click Edit Paste As Mask see page 221 Working with color Before you start painting on images you need to select th...

Страница 248: ...or then replaces the current foreground color If you already know the RGB values of the color you want you can enter them directly in the appropriate RGB spin boxes Note When you run Video Paint for t...

Страница 249: ...amount of brightness from left to right When you move your mouse over any colors their respective RGB color values are displayed at the bottom of the dialog box and the color itself appears in the lef...

Страница 250: ...foreground and background squares on the Attribute toolbar The next time you select a color the active color square changes Attribute toolbar of the Eyedropper tool Loading and saving color tables The...

Страница 251: ...veral frames To view the painting tools click the Paint tool button on the Tool panel The Brush panel opens and all the various brushes are displayed along the Attribute toolbar To apply a paint tool...

Страница 252: ...you are using BRUSH PANEL SHAPE TAB 1 Height specifies the height of a brush You can also drag the vertical slider to the right of the preview To keep aspect ratio click the Lock button 2 Width speci...

Страница 253: ...termines how paint is applied to an image Depending on the tool you can choose one of the following Always replaces the original colors with the painted color Hue and Saturation applies only the hue a...

Страница 254: ...he resulting color For example if the resulting color is black the inverse will be white Pigment applies the color which is produced from blending the painted color with the original colors much in th...

Страница 255: ...lled these options are disabled 2 Spacing determines how close each drop of color is applied as a percentage to the current brush size The higher the value the farther away drops are applied Likewise...

Страница 256: ...mode This removes the white from the paint layer revealing the underlying image This is a good technique for creat ing quick video mattes Transforming selections After you ve made a selection area yo...

Страница 257: ...s you can use to paint with and the Brush panel changes to show the available attributes for the selected tool 2 Hold down the SHIFT key and click your mouse over the area you wish to clone This area...

Страница 258: ...osshair appears in the top left corner of the image and as you clone the crosshair moves to the exact same location to ensure you are cloning accurately between both the active and target frames Cloni...

Страница 259: ...y controls for refining the degree of retouching To learn about cloning over several frames see the Duplicating changes over frames section page 222 Notes Confine the area to retouch by first creating...

Страница 260: ...moves intensity from colors making them lighter Warping distorts an image as you drag your mouse Transparency determines the transparency of the paint as it is applied Wet adds water to the paint maki...

Страница 261: ...tions which are ignored when you play the macro back 3 When finished click the Macro button again to end the recording The Add To Library dialog box opens 4 Select the folder in the Macro gallery wher...

Страница 262: ...method group box Select Entire image if you want the macro to appear the same on each frame To have the macro animate sequentially over each frame click either the Progressive or Regressive options P...

Страница 263: ...find that they take longer to apply depending on your system resources or the type of filter To apply a video filter 1 Drag over the Preview bar in the Filmstrip panel to select the frames you want t...

Страница 264: ...vigator or View Flick SHIFT F The preview is then performed on the image in the edit window Before you perform the preview however you need to set your flick options to determine which area of the ima...

Страница 265: ...a preview file To do this first define your preview options by clicking the Preview Options button on the Standard toolbar or View Preview Options Once the Preview options have been defined drag over...

Страница 266: ...mations p 240 In Composite mode you select areas of an image in Paint Layer mode you select areas of your edits p 243 Use the Eyedropper tool to select colors from an image in an edit window p 250 Sav...

Страница 267: ...CG Infinity CG Infinity...

Страница 268: ......

Страница 269: ...ts or as standalone video and image files With CG Infinity you can easily produce television and film quality opening and ending credits as well as an extensive range of both regular and freehand grap...

Страница 270: ...ed to create a new edit window At the center of the edit window is a frame indicating the size of the video frames for your CG project Everything outside the frame is part of the pasteboard area which...

Страница 271: ...e Redo an undone action Undo a previous action Bring an object to the front Bring an object forward Send an object backward Send an object to the back Show the Time Control Panel Show the Object Style...

Страница 272: ...ect Once created you can begin adding text and objects and then manipulate them with various drawing tools When you are finished you can create a video file of your work or insert the CG Infinity proj...

Страница 273: ...ource group box You can select a general background color by right clicking on the color square and selecting a color from the pop up menu that appears You can also enter the RGB values for a color di...

Страница 274: ...all the toolbars and panels present click View Remove Menu Bar This re moves the title and menu bars of the CG Infinity screen only leaving all other screen elements present You can still use the men...

Страница 275: ...ve finished working on a CG Infinity project you can create a new video or image file that combines the project s objects with the current background To create a video file click File Create Video Fil...

Страница 276: ...This places the object in the center of the current view To paste only certain attributes such as the fill color or shadow click Edit Paste Object Style This opens the Paste Object Style dialog box w...

Страница 277: ...the base reference point X 0 Y 0 at the top left corner of the frame in the edit window You can reset this reference point by dragging the intersecting ruler lines from the Base Point button at the co...

Страница 278: ...ertical spacing between each point in the grid If you want your objects to snap to grid points or guides select the Snap to distance option and specify the range within which a snap should occur For e...

Страница 279: ...n CG Infinity based on the NTSC or PAL color models Select the appropriate option if you plan on having your video played back on an NTSC or PAL device such as a television If you are designing for mo...

Страница 280: ...marquee of a new selection and Touch selects objects that are touched by the marquee of a selection area In most cases use Touch as it allows you to quickly select objects without having to draw a sel...

Страница 281: ...eate these objects by tracing over existing images drawing your own shapes or using the Text tool to create impressive titles and text effects Chapter 2 In this chapter you will learn about Defining a...

Страница 282: ...articularly useful for text objects Leave this clear if you want a sharp edge such as with square or rectangular objects 3 Transparency controls how transparent an object appears The first option Norm...

Страница 283: ...same way as explained in Video Paint see page 248 The third option Gradient fills an object with a special gradient pattern To choose the gradient click the color square to open the Magic Gradient dia...

Страница 284: ...ECT STYLE PANEL SHADOW TAB 1 Shadow options determine the type of shadow to apply to an object The first option None does not apply any shadow while the second option Drop applies a drop shadow You ca...

Страница 285: ...reflect the new style You can also change the default style by dragging and dropping a style directly from the Style gallery in the Production Library to the graphic on the Tool panel If you wish to...

Страница 286: ...Select the font you want to use as well as any other font characteris tics such as size bold and italics You can also specify the alignment of the text as well as the kerning and leading Note Kerning...

Страница 287: ...t corner down as you draw The second option Equal Sides ensures that the sides of the shape are all of equal length If not selected you can draw a shape with variable width and height The final option...

Страница 288: ...y of shapes with the Shape tool Using the Freehand tool The Freehand tool allows you to create any kind of shape you want by allowing you to draw it with your mouse This is particularly useful for tra...

Страница 289: ...se the value in the Accuracy spin box on the Attribute toolbar 4 When you are satisfied with the accuracy of your path switch to the Object tool or click outside the area to place the shape as an obje...

Страница 290: ...Open Path button on the Attribute toolbar This fills the line of the shape only leaving the contents clear To view an open path you need to specify a line width in the Object Style Options panel Selec...

Страница 291: ...l copies Grouping objects is especially useful at the end of a project when you have layered them in their final positions To group objects select them and then click Edit Group To ungroup them select...

Страница 292: ...unding box of a selected object Depending on the type of transform you are perform ing these handles appear either on the sides and corners of the bounding box or just the corners To manipulate the ac...

Страница 293: ...ir form from a particular font By changing the envelope of the text you have much greater flexibility over how the text is warped and distorted For example you could make the text appear as a wave or...

Страница 294: ...Adjust tool The Adjust tool is particularly useful if you have traced an object or created your own freehand drawing and need to modify it so that it better takes the shape you want To adjust a path 1...

Страница 295: ...active only if the Curved Node option is selected This option is best for performing general changes to a path s curvature Smooth Node changes the curvature of the path between the preced ing followin...

Страница 296: ...tool and then click Edit Delete DEL If there is no moving path the object is deleted To create a moving path 1 Position the object where you want it to start its movement and then select the Moving Pa...

Страница 297: ...ame options as the Adjust tool see page 294 To create greater movement you can add nodes anywhere along the path and edit them as you would with the Adjust tool To assign the path of an object as a mo...

Страница 298: ...Time Control Panel A keyframe is added to the Keyframe slider Keyframes are explained in detail in the Using keyframe controls section page 164 4 Change the style and size of the object using the Obj...

Страница 299: ...ate a fast motion effect as the object has to cover more ground within the same time period Like wise by moving the object back you create a slow motion effect as the object has less distance to trave...

Страница 300: ...g File Properties To change the start time of a moving object 1 Select the object you want to change with the Moving Path tool The moving path of the object appears 2 Move the Preview slider in the Ti...

Страница 301: ...end 4 Move the Preview slider to the start or click on the Start Keyframe to return the object back to its beginning position 5 Click the Play button to see the motion of the object Performing minor...

Страница 302: ...the background p 288 Make general path adjustments using the Symmetric node specific adjustments using the Cusp node p 295 Position your objects at their starting point before making a moving path p 2...

Страница 303: ...Audio Editor Audio Editor...

Страница 304: ......

Страница 305: ...over your soundtrack With it you can play record and edit the audio components of your video project with drag and drop ease and a click of the mouse Chapter 1 In this chapter you will learn about Un...

Страница 306: ...window as a wave form This waveform represents the various positive and negative peaks that a natural sound wave makes If it is a mono file single channel only one waveform is present while stereo fil...

Страница 307: ...Run a mixer program Fit a selection in the window Mark the start and end of a selection Go to next cue Add a cue Go to previous cue Drag and drop file to another program Alternate between the last tw...

Страница 308: ...the start of a file click Control Go To Start CTRL HOME To move it to the end click Control Go To End CTRL END If you have created a selection area you can play the contents of the selection by click...

Страница 309: ...e twice the size of an 8 bit file Saving files Once you have recorded or made changes to a waveform you need to save it To do this click File Save or Save As CTRL S For previously saved files clicking...

Страница 310: ...r needs For more on these see the section on Creating a new edit window page 308 Once you click OK the dialog box closes and the waveform is changed accordingly Viewing waveforms When you edit a wavef...

Страница 311: ...ew Note If you have created a selection area you can fit the selection to the edit window by clicking on the Fit Selection In Window button on the Toolbar Controlling the display and time unit of wave...

Страница 312: ...ce Saving then updates the file accordingly Recording sound In Audio Editor you can record sound to any open edit window this can be an existing file or a new empty edit window Depending on your syste...

Страница 313: ...ltimedia Volume Control 3 Make active the edit window you want to record the sound into and click the Record button on the Toolbar or click Control Record CTRL R A message box appears displaying the c...

Страница 314: ...speakers directly from your hard disk then you would want more than just telephone quality The chart below offers you some ideas of the different types of audio quality possible and how they affect f...

Страница 315: ...s the detail with which Audio Editor draws waveforms Selecting the Precise scan option produces a very detailed waveform but may take more time to redraw because of the extra information The Quick sca...

Страница 316: ...eakers it will be played back on p 308 Use the Edit Convert To command to change a waveform s properties p 310 Use the Global View panel in the Overview strip to zoom in on a waveform as well as repos...

Страница 317: ...ificantly easier With a number of advanced audio effects and enhancements Audio Editor will soon have you creating audio files that add impact to your work and multimedia presentations Chapter 2 In th...

Страница 318: ...ike to select This method is very useful for creating selections as your ear can hear the sound more clearly than your eye can see it Drag on the waveform in the Overview strip This can only be done i...

Страница 319: ...icate the starting and ending positions for the area your cursor currently spans which depending on your zoom level may be the same or different The bottom box for stereo files there will be two one f...

Страница 320: ...l Add Cue Placing cues on a waveform Managing cues You can manage cues in waveforms in several ways such as changing their position and description removing them from the edit window and switching bet...

Страница 321: ...or can be viewed in Audio Editor for WAV files only This makes it much easier when editing video as you can identify key areas in an audio track with which to match the appropriate action in the video...

Страница 322: ...he duration of the audio file by the duration of the pasted segment Replace overwrites the waveform at the cursor position replacing it with the audio data from the clipboard If the clipboard data is...

Страница 323: ...number of studio quality filters that correct and enhance or sweeten the sound in your audio files Note If you only want to sweeten a certain portion of an audio file you must select it first otherwi...

Страница 324: ...n some cases you may not see much change to the waveform after normalizing depending on the existing amplification levels Waveform before changing amplification Waveform after changing amplification b...

Страница 325: ...amplitude point 0 in a waveform the baseline Silence is useful in audio editing particularly for what it isn t rather than what it does For example silence is responsible for adding and removing time...

Страница 326: ...Effect Remove Noise Any sound which occurs within this level is then removed from the waveform As background noise is usually of a low amplitude selecting a 2 5 threshold is often adequate Setting th...

Страница 327: ...In the DC Offset dialog box you can drag the Offset slider to move the waveform above or below the baseline Moving to the right shifts the baseline up while moving to the left pulls it down This does...

Страница 328: ...files together you may want to remove one of the files from the mixture For example you may be preparing an audio project for a client and after having created a master file they decide they want to r...

Страница 329: ...of special affects that you can use to add impact to your audio files and provide enhancements which are difficult to replicate when recording from the original source These can be anything from perfo...

Страница 330: ...de starts quickly and fades more slowly For best results it is a good idea to first experiment with a variety of different settings Waveform before applying a fade effect Waveform after applying a Fad...

Страница 331: ...and end level of 0 results in complete silence while 100 leaves the output unchanged As with the Fade command you can choose between Linear Exponential and Logarithmic changes to help smooth the effec...

Страница 332: ...f time that passes before you hear an echo while Decay ac counts for the loss of sound in each repetition Bound determines the next round of repetition and is repeated until the echo fades away entire...

Страница 333: ...h list box and then enter a value in the Cross duration spin box in M S ms to determine how much of the two files overlap If you do not specify a duration the second file is added to the end of the ac...

Страница 334: ...r creating precise selections p 319 Use cues to mark events in a waveform p 319 Click the Edit Mute command to remove areas without affecting the duration of a waveform p 321 Normalize a waveform befo...

Страница 335: ...Appendix Appendix...

Страница 336: ......

Страница 337: ...hind digital video editing and video in general This means an appreciation of both the analog and digital video worlds and how the sound and moving pictures that make up video move between those world...

Страница 338: ...hy you cannot view video recorded in England on a television set in the United States and vice versa without special equip ment Inside the video signal The standard video signal defines color by two f...

Страница 339: ...ouble scanning so many lines for each field To compensate for this it was decided to interlace the display scan alternate lines rather than every line For example the first scan would pass over every...

Страница 340: ...ideo on CD ROM or over the Internet then your decision on the type of video you will use is determined by the type of machine or medium it will be played back from This is because different machines a...

Страница 341: ...ates require more memory as a greater number of images must be stored and shown each second So if you are producing fast motion video such as recording a sporting event you probably need to retain as...

Страница 342: ...nternet Understanding video compression While frame rate frame size and data type all contribute to controlling the transfer rate the real savings come from effective use of compression In general the...

Страница 343: ...re sophisticated interframe techniques to save only the differences between keyframes called I frames Currently there are two standards MPEG I and MPEG II MPEG I is designed to produce screen 352x240...

Страница 344: ...ge of Cinepak is that it is software based therefore requiring no special hardware so any machine can play it back PC or Mac and screen 320x240 24 bit 15 frames per second video can play back well ove...

Страница 345: ...Index Index...

Страница 346: ...MEDIASTUDIO PRO USER GUIDE 346...

Страница 347: ...ming AE 310 Audio fading VE 185 Audio filters VE 183 Auto capturing VC 90 Autosnap VP 244 Symbols 3D Moving Paths VE 181 A Adding shadows to an objectCG 284 Adjust tool CG 294 Adjusting an object s pa...

Страница 348: ...video VC 85 auto VC 90 hardware concerns VC 86 manual VC 90 single frames VC 93 tips VC 86 CG Infinity program CG 269 adjust tool CG 294 basics CG 270 bring to front CG 291 color tab CG 283 customizin...

Страница 349: ...E 136 clearing VE 135 Clip Selection Tool VE 143 color VE 115 VE 116 cues VE 140 VE 141 cutting copying VE 133 deleting VE 135 display mode VE 118 displaying VE 118 editing VE 129 jumping to VE 142 lo...

Страница 350: ...275 selections VP 221 D Data Rate analysisVE 199 VE 200 Data transfer rate VC 86 VE 195 Data type VC 77 VE 196 Decay AE 332 Delay AE 332 Deleting frames VP 229 Deleting clips VE 135 Digital Video DV V...

Страница 351: ...ng TUT4 62 Grayscale mattes VE 172 Grid CG 277 customizing CG 278 Grouping objects CG 291 Grouping clips VE 133 Guides CG 277 customizing CG 278 H Hardware concerns for capturingVC 86 I Insert Title C...

Страница 352: ...changing across time CG 298 default styles CG 285 defining attributes CG 282 defining style CG 282 dimensions CG 282 freehand CG 288 manipulating TUT4 63 moving CG 292 moving paths CG 296 resizing TU...

Страница 353: ...rag and drop VE 111 placing clips VE 110 thumbnails VE 112 Projects CG 272 cues VE 140 customizing VE 107 layout VE 109 saving VE 109 new VE 106 VP 219 output VE 191 packaging VE 109 VP 217 rendering...

Страница 354: ...325 Silence clips VE 115 Smart Check Convert VE 122 Smart Trim VE 145 Snap to VE 135 Sound amplification AE 323 calibration AE 327 inserting AE 322 mixing AE 322 AE 327 muting AE 321 normalizing AE 32...

Страница 355: ...ty TUT4 60 Video Capture TUT1 28 Video Paint TUT3 49 creating a corporate logo TUT4 64 TUT4 67 creating a new project TUT2 30 creating a picture in pictureTUT2 40 creating a split screen TUT2 39 creat...

Страница 356: ...95 customizing VC 83 VC 92 data transfer rate VC 86 data type VC 77 VC 94 displaying video VC 76 improving the signal VC 79 options VC 77 overlay mode VC 76 preview mode VC 76 dropped frames VC 93 fo...

Страница 357: ...ion VE 170 grouping clips VE 133 insertingVE 113 VE 114 VE 116 jumping to clips VE 142 key frame controls VE 164 layout saving VE 109 locating clips VE 142 locating empty time slotsVE 143 mattes VE 17...

Страница 358: ...nto the Timeline TUT2 31 previewing your workTUT2 34 rolling credits TUT2 37 scrolling titles into the distance TUT2 41 synchronizing audio videoTUT2 42 transition effects TUT2 33 trimming clips TUT2...

Страница 359: ...dvanced macro techniquesTUT3 57 advanced power duplicationTUT3 53 advanced techniquesTUT3 52 applying video filters TUT3 49 cloning TUT3 50 common techniquesTUT3 49 creating a project TUT3 44 creating...

Страница 360: ...O PRO USER GUIDE 360 W Waveform display AE 311 Waveform monitor VC 82 Windows color picker VP 250 Working with CG Infinity objectsCG 281 Working with color VP 247 Z Zoom tool VP 226 Zooming VE 119 VP...

Отзывы: