10
Chapter 2: Installation
airFiber AF-11FX User Guide
Ubiquiti Networks, Inc.
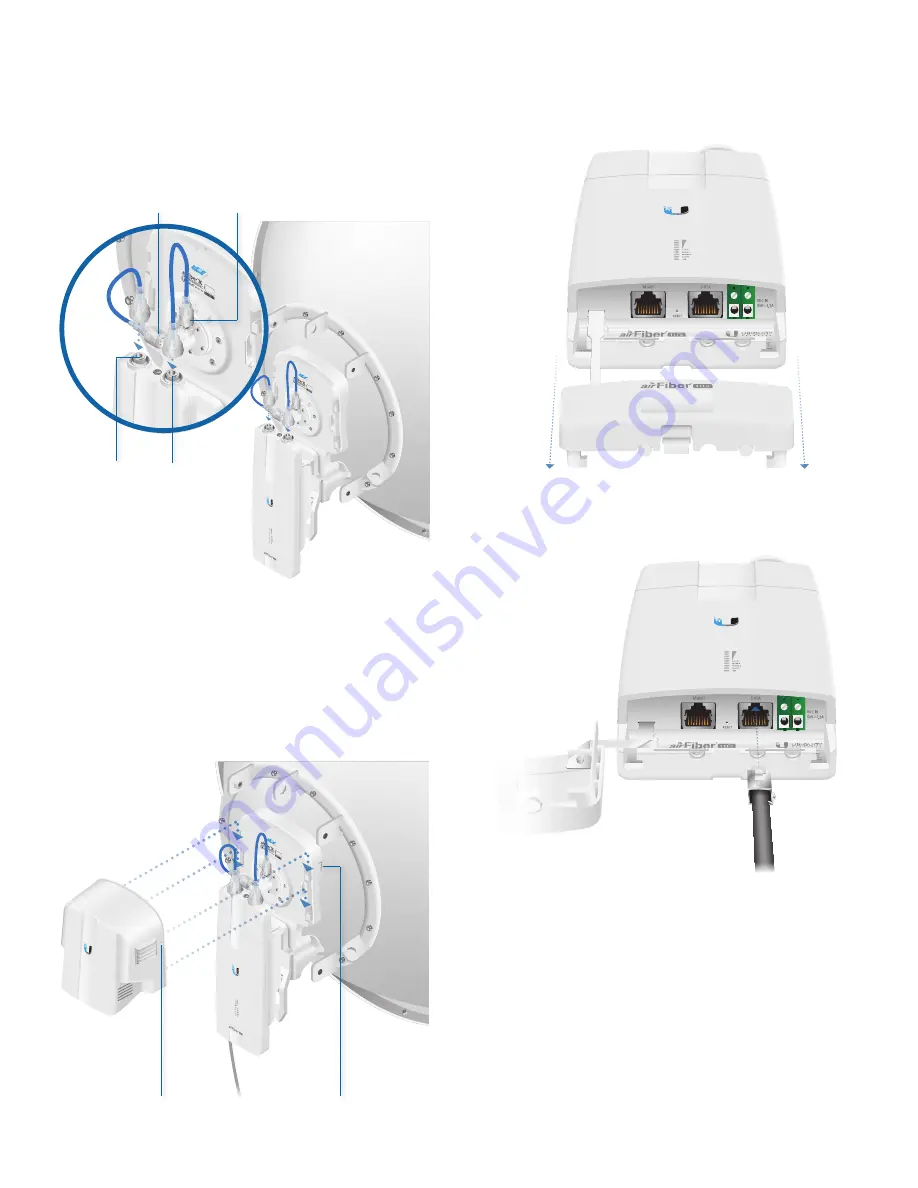
3. Connect the RF Cable(s) (one in SISO mode, two in
MIMO mode) to the radio as follows:
•
Attach the RF Cable from the H Connector
to the
radio’s Chain 0 connector.
•
Attach the RF Cable from the V Connector
to the
radio’s Chain 1 connector.
V Connector
H Connector
Chain 1
Chain 0
4. Attach the protective shroud.
a. Align the dot on the top of the shroud with the
arrow on the dish antenna.
b. Guide the shroud’s tabs into the slots on the
antenna.
c. Push the shroud in and then pull it down until it
locks into place.
Dot
Arrow
Connecting Data
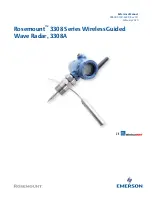
1. Lift the release latch on the bottom of the AF‑11FX and
slide the Port Cover off.
2. Connect an outdoor, shielded Ethernet cable to the
DATA port.
3. If you are using DC power, connect the other end of the
Ethernet cable to your LAN.
Содержание airFiber AF-11FX
Страница 1: ...11 GHz FDD Licensed Backhaul Radio Model AF 11FX...
Страница 2: ......
Страница 6: ...iv Table of Contents airFiber AF 11FX User Guide Ubiquiti Networks Inc...
Страница 10: ...4 Chapter 1 Overview airFiber AF 11FX User Guide Ubiquiti Networks Inc...
Страница 20: ...14 Chapter 2 Installation airFiber AF 11FX User Guide Ubiquiti Networks Inc...
Страница 26: ...20 airFiber AF 11FX User Guide Ubiquiti Networks Inc...
Страница 30: ...24 airFiber AF 11FX User Guide Ubiquiti Networks Inc...
Страница 34: ...28 Chapter 6 Network Tab Ubiquiti Networks Inc...
Страница 38: ...32 Chapter 7 Services Tab airFiber AF 11FX User Guide Ubiquiti Networks Inc...
Страница 42: ...36 Chapter 8 System Tab airFiber AF 11FX User Guide Ubiquiti Networks Inc...
Страница 48: ...42 Appendix K Safety Notices airFiber AF 11FX User Guide Ubiquiti Networks Inc...
Страница 54: ...48 Appendix N Declaration of Conformity airFiber AF 11FX User Guide Ubiquiti Networks Inc...


