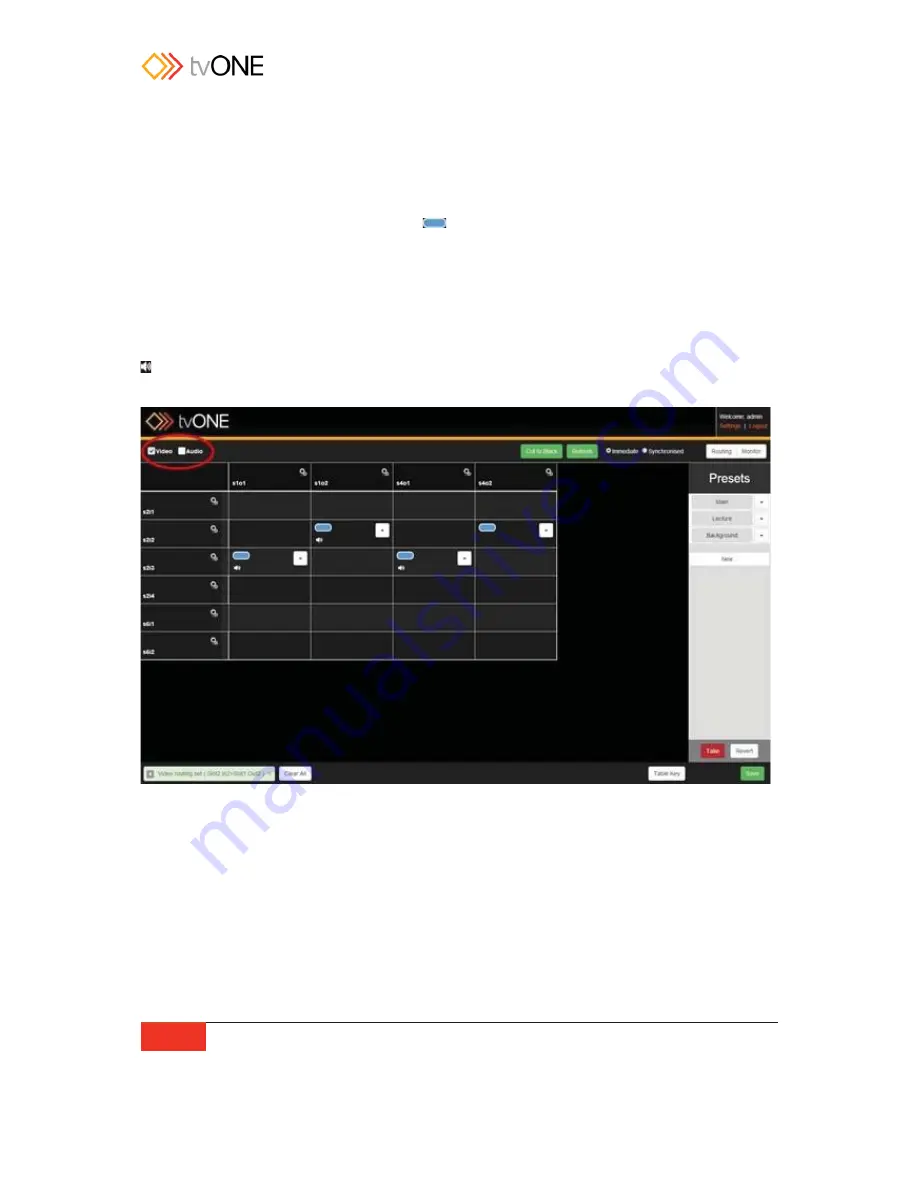
Tvone C3-440 Скачать руководство пользователя страница 110


102


Routing 


Routing Video 

If the system detects that the input for the row you are selecting and the output for the 
column you are selecting are both appropriate, video-enabled slots, when you click on the 
cell intersecting the two, a blue 

lozenge will appear, indicating that the video 

feed for that input is now routed to that output. 
You can confirm this by checking the Notification window - if successful, the notification will 
say something like "Video routing set (Slot2.In2>Slot1.Out2)". 
 
If you would like to simplify the routing table to look specifically at the video routing, uncheck 
the Audio box in the top left corner. The table will decrease to show only cards with video 
options, and selecting a cell will configure only the video portion of the routing. (An audio 

icon   appears in a cell if audio is configured for that routing, but in this view it doesn't 
specify what the audio routing is.) 


Содержание C3-440

Страница 1: ...tvONE CORIOmatrix MX C3 440 CORIOmatrix C3 340 CORIOmatrix mini C3 310 Manual Version 1 1 4 29th of March 2016...

Страница 2: ...eval system or transmitted in any form or any means electronic or mechanical including photocopying and recording for any purpose other than the purchaser s personal use without the written permission...

Страница 3: ......

Страница 4: ...tiges Eigentum 10 INSTRUCCIONES IMPORTANTES DE SEGURIDAD 12 Propiedad intelectual 12 BELANGRIJKE VEILIGHEIDSINSTRUCTIE 13 Intellectueel eigendom 13 VIKTIGA S KERHETSANVISNINGAR 14 Intellektuell egendo...

Страница 5: ...nput Settings 56 Configuring Input Alias 58 Configuring Input AspectRatio 60 Configuring Input Brightness 62 Configuring Input Color Space 64 Configuring Input Contrast 66 Configuring Input Type 68 Co...

Страница 6: ...Routing Audio with Input AFV 103 Configuring AFV from the Input 103 Configuring AFV from the Routing Table Cell 105 Routing Audio with Output BreakAway 107 Presets 110 About Presets 110 What is a Pre...

Страница 7: ...olution Editor 157 Editing Horizontal Sync Pulse Property from CORIOdiscover Resolution Editor 159 Editing Horizontal Back Porch Property from CORIOdiscover Resolution Editor 161 Editing HorizontalSyn...

Страница 8: ...from Command Line 199 Command Line Resolution Options 200 List Usable Resolutions by Name 200 List Resolutions by Index 201 Read Output Resolution 202 Specific Resolutions by Index 203 Set Output Reso...

Страница 9: ...but not limited to any implied warranties of merchantability or fitness for a particular purpose In no event shall the supplier or manufacturer of this product be liable for errors found within or be...

Страница 10: ...ignal ports EN 55103 1 2009 Environment E4 Radiated disturbance 1000 to 4000 MHz FCC CFR 47 Part 15 2009 Canadian Standard ICES 003 Issue 4 Immunity Electrostatic discharge Radiated RF disturbance Mag...

Страница 11: ...n of this equipment in a residential area is likely to cause harmful interference in which case the user will be required to correct the interference at his own expense Caution This equipment is inten...

Страница 12: ...oduce all copyright and other proprietary notices that are on the original copies 2 License Limitations The license s granted in Section 1 are conditioned upon your compliance with the following limit...

Страница 13: ...DING ANY IMPLIED WARRANTIES DUTIES OR CONDITIONS OF MERCHANTABILITY OR FITNESS FOR A PARTICULAR PURPOSE ALSO THERE IS NO WARRANTY OR CONDITION OF TITLE QUIET ENJOYMENT QUIET POSSESSION CORRESPONDENCE...

Страница 14: ...neral The section titles in this Agreement are used solely for the parties convenience and have no legal or contractual significance Any list of examples following including or e g is illustrative and...

Страница 15: ...tvOne End User License Agreement 7 tech usa tvone com or tech europe tvone com or refer to http www tvone com contactus 2...

Страница 16: ...here they exit from the apparatus x This unit must be connected to a mains socket outlet with a protective earth connection x The AC wall outlet should be installed near to the unit and be easily acce...

Страница 17: ...l e pr s de l unit et ais ment accessible x Utilisez uniquement les fixations et accessoires sp cifi s par le fabricant x D branchez cet appareil durant les orages lectriques ou pendant les p riodes p...

Страница 18: ...kabel aus dem Ger t gef hrt wird nicht eingeklemmt werden kann x Verwenden Sie nur Zusatzger te Zubeh r die das der Hersteller angibt x Ziehen Sie den Netzstecker dieses Ger ts bei Gewittern und auch...

Страница 19: ...tvOne Safety Instructions 11...

Страница 20: ...s en el aparato x Use s lo accesorios elementos especificados por el fabricante x Desenchufe el aparato durante las tormentas el ctricas o si no va a usarlo durante un largo per odo de tiempo x Consul...

Страница 21: ...en aanbevolen x Haal de stekker van dit apparaat bij onweer uit het stopcontact Doe dit ook wanneer het apparaat lange tijd niet wordt gebruikt x Laat alle onderhoud over aan gekwalificeerd personeel...

Страница 22: ...enuttag och d r den kommer ut fr n enheten x Anv nd bara anslutningar och tillbeh r som specificeras av tillverkaren x Dra ur n tsladden f re skv der eller n r enheten inte ska anv ndas en l ngre tid...

Страница 23: ...en kommer ut av apparatet x Ikke bruk andre typer tilbeh r enn det som er angitt av produsenten x Koble apparatet fra str mforsyningen i tordenv r eller n r det ikke skal brukes over en lengre periode...

Страница 24: ...a kohdista x K yt vain valmistajan m ritt mi lis laitteita lis varusteita x Kytke laite irti verkkovirrasta ukkosmyrskyn aikana tai silloin kun sit ei k ytet pitk n aikaan x J t kaikki huoltotoimenpit...

Страница 25: ...ation and request the proper cable Installation should be made such that the system fans are not blocked by other pieces of equipment and such that they may not be accidentally touched by users Connec...

Страница 26: ...18 Introduction Configure Connection via Serial on page 29...

Страница 27: ...RIOmatrix web UI that is provided with the firmware Although the unit can be controlled using an RS 232 serial connection and Crestron or AMX controllers their use is not outlined here to use those pr...

Страница 28: ...ft to right top to bottom direction while putting the first output card in slot 16 and working backwards OUTPUT cards are painted white with black writing Output cards are placed after input cards slo...

Страница 29: ...tvOne Introduction 21...

Страница 30: ...ition to the video cards a monitor card is available from tvONE which enables you to see all attached inputs and outputs on a separate display See About Monitoring on page 117 for more information 1 D...

Страница 31: ...slots 18 19 and 20 only work with data not video signals On a CORIOmatrix mini slots are also numbered left to right but there are a total of six slots slot six is already filled with DVI I or DVI U c...

Страница 32: ...two connectors would be slot14 out1 and slot14 out2 labeled from left to right These names may also be abbreviated to the first initial so in the examples above the inputs could also be s1i1 s1i2 s1i...

Страница 33: ...rowser it may not perform as expected Symptoms range from inability to access the UI past the login page to graphical anomalies or functional loss of features The browsers which are supported for use...

Страница 34: ...make sure your computer and the CORIOmatrix are on the same Ethernet network If you do not want the CORIOmatrix on your network yet you can connect the computer directly to the CORIOmatrix via Ethern...

Страница 35: ...o con firm the network settings on the unit While the unit is restarting it appears as Offline in the device Once the reboot is completed you can select the appropriate line 6 Select the unit in CORIO...

Страница 36: ...28 Introduction...

Страница 37: ...n Logged In 4 There are two potential IP address settings the static IP settings and the DHCP settings If you want to configure a static IP you need to disable DHCP as those settings will over ride st...

Страница 38: ...ading the software automatically retrieves information on the cards that are installed in your unit Inputs appear vertically down the left side of the page outputs appear horizontally across the top o...

Страница 39: ...tvOne Getting Started 31...

Страница 40: ...thernet on page 26 1 Select the unit in CORIOdiscover and click the Open button to open the device in your default web browser Alternatively in the web browser of your choice type the IP address of th...

Страница 41: ...hed configuring or using the CORIOmatrix tvONE recommends that you log out of your session and close the browser window for security reasons To log out of the CORIOmatrix web interface click the Logou...

Страница 42: ...cover software tool You can find instructions to install CORIOdiscover here Once you have CORIOdiscover installed Open the application and you should be presented with the following window 1 Select yo...

Страница 43: ...ceed with the update then check the tick box when updating This way you have x Your earlier backup in your copy location and x The recent backup on your SD card after the update Also your system will...

Страница 44: ...using the WebUI of the CORIOmatrix MX it is recommended to completely clear the cache of your browser to prevent it from showing old cached pages If you d like to restore a backup or if you have selec...

Страница 45: ...ator and click the Settings button in the top right corner of the Routing Page From the Settings area you can access information about your CORIOmatrix change passwords configure networking review or...

Страница 46: ...in the top right corner 2 Choose the System option in the left sidebar In the right hand pane you see various information including the device name model number serial number firmware version and the...

Страница 47: ...on the device and is not displayed during transmission over the API Only the administrator can reset another user s password To change passwords follow these steps 1 While connected to a CORIOmatrix a...

Страница 48: ...t match 3 Check the notifications in the bottom left corner of the screen to make sure the password change was successful If it was unsuccessful the notification box will change from green to red 4 If...

Страница 49: ...m the drop down whether you will be using a Static IP address or if the address will be configured by DHCP If you choose DHCP neither IP Address nor Subnet Mask will be configurable 4 If you chose Sta...

Страница 50: ...42 Settings For assistance with configuring network settings on first boot see Configure Connection via Ethernet on page 26 and...

Страница 51: ...tvOne Settings 43 Configure Connection via Serial on page 29...

Страница 52: ...ed to save changes once you finish making modifications 1 While connected to a CORIOmatrix as the administrator click the Settings button in the top right corner 2 Choose the Slots Status option in th...

Страница 53: ...or outputs you can specify the way to handle source switching Choices are Fade through Black or Freeze and Cut For both inputs and outputs you can assign them to a 4K Bundle Group in case you are usin...

Страница 54: ...copy the backup to your PC before taking further steps If you wish to do a backup 1 While connected to a CORIOmatrix as the administrator click the Settings button in the top right corner 2 At the bot...

Страница 55: ...tvOne Settings 47 4 When the backup is finished the progress bar disappears and the notification area informs you that the backup was successful...

Страница 56: ...ios x You have previously chosen to make a backup via Backup to SD x You have previously update the firmware and you selected Save Device Settings or x You have copied a backup to your SD card from an...

Страница 57: ...he second progress bar indicates that the CORIOmatrix is restarting with the restored settings Please make use of the Reboot Device button if you are uncertain whether the machine has rebooted 5 When...

Страница 58: ...50 Settings If you have any issues following these steps while using Chrome Firefox or Safari please see Troubleshooting Doesn t Reconnect After Restore on page 211...

Страница 59: ...on the left and outputs listed horizontally across the top To configure routing find the cell that is the intersection of the desired input and the desired output and select that cell More details ar...

Страница 60: ...you are logged in as a user The rest of this document will generally assume that you are logged in as the administrator if you are logged in as a user and do not see a feature described in this docume...

Страница 61: ...m to be connected to the web interface but no commands are reaching the unit If the unit is no longer connected an error message is returned within 60 seconds of the unsuccessful command being sent Th...

Страница 62: ...contextual pane If nothing else has been selected it shows the Presets You can add edit or delete presets from this pane See About Presets on page 110 for more information If you select an input or ou...

Страница 63: ...Configure The top option Remove can be used if you want to delete the configurations that have been made in that cell AFV or Audio Follow Video indicates that the audio routing is defined at the input...

Страница 64: ...out that input including the full name the alias and the status of the slot From this pane you can change the alias if you wish to rename the slot to something more memorable such as BluRay The alias...

Страница 65: ...e blank fields for inapplicable options such as EDID filename HDMI and HDCP In addition you can configure the AFV Audio Follow Video in this section From here you can define the AFV settings for this...

Страница 66: ...information about that input including the full name the alias and the status of the slot If you only wish to change the alias of the input you can type it into the text field here the name must begi...

Страница 67: ...s is in the left column at the top You can type into this text field to set an alias just as above 5 When you have finished configuring the input to your requirements click the Save changes button and...

Страница 68: ...CORIOmatrix can be in a variety of possible aspect ratios You can configure the desired aspect ratio in the input settings To configure the aspect ratio of the input 1 Click on the gear icon next to...

Страница 69: ...wn Click on the drop down menu to choose the aspect ratio you prefer from such options as 4 3 5 3 5 4 16 9 16 10 1 1 and 16 6 5 When you have finished configuring the input to your requirements click...

Страница 70: ...levels This is however a disabled setting when in Extended mode see Video Range To configure the brightness of the input 1 Click on the gear icon next to the input you wish to configure 2 The right h...

Страница 71: ...lumn towards the bottom Click into the text box and type an integer between 30 and 30 The default value is 0 5 When you have finished configuring the input to your requirements click the Save changes...

Страница 72: ...onfigure in addition to the default information To configure the color space of the input 1 Click on the gear icon next to the input you wish to configure 2 The right hand pane shows some information...

Страница 73: ...inputs YUV defaults to 709 for 720p 1080i 1080p resolutions defaults to 601 for all other resolutions YUV_601 and YUV_709 both specific options within the YUV color space 5 When you have finished conf...

Страница 74: ...useful when you are switching between and matching sources of varying brightness and contrast levels This is however a disabled setting when in Extended mode see Video Range To configure the contrast...

Страница 75: ...the bottom Click into the text field and select a value as a percentage between 30 and 130 The default value is 100 5 When you have finished configuring the input to your requirements click the Save c...

Страница 76: ...U inputs are capable of receiving a number of different signals and you can configure the input to the expected signal type To configure the input type of the input 1 Click on the gear icon next to th...

Страница 77: ...his for HDMI input RGBHV analog RGB with HV separate horizontal and vertical sync RGsB Analog RGB with sync on Green YUV YPbPr YUV with sync on Y use this also for YPbPr component analog CV Composite...

Страница 78: ...feed will switch to a blank screen You can configure the color you would like the screen to show in the event that there is no video feed coming in To configure the source loss color 1 Click on the g...

Страница 79: ...you prefer to display if there is no input signal Choices include black red green yellow blue magenta cyan and white If you do not configure this setting the default color is blue 5 When you have fin...

Страница 80: ...e default information Some information is not configurable but you can check what the settings are in the Input Settings window 1 Click on the gear icon next to the input you wish to configure 2 The r...

Страница 81: ...ed options are Found or Not_Found whether HDCP is enabled the measured resolution of the input signal the location of the EDID file for this input and whether input audio is detected The options avail...

Страница 82: ...plications were some sources will often have an extended colour space Configuring Input 4K Bundle Input ID CORIOmatrix MX only It is possible to bundle 4 input signals to be part of a single 4K stream...

Страница 83: ...letters numbers and underscores no spaces You can also adjust the resolution of the output from the drop down list of selections If this is all you wish to modify press the Done button and return to t...

Страница 84: ...Color space turn Monitor Audio Bars on or off and select various Audio options for the slot ONLY available on CORIOmatrix MX Video Range and 4K Bundle Output ID allow for more options to refine how th...

Страница 85: ...ormation about that output including the full name the alias the status of the slot and the resolution If you only wish to change the alias of the output you can type it into the text field here the n...

Страница 86: ...in the left column at the top You can type into this text field to set an alias just as above 5 When you have finished configuring the output to your requirements click the Save changes button and th...

Страница 87: ...matrix can be in a variety of possible aspect ratios You can configure the desired aspect ratio in the output settings To configure the aspect ratio of the output 1 Click on the gear icon next to the...

Страница 88: ...Click on the drop down menu to choose the aspect ratio you prefer from such options as 4 3 5 3 5 4 16 9 16 10 1 1 and 16 6 5 When you have finished configuring the output to your requirements click th...

Страница 89: ...page 107 and can be configured directly from the cell in the routing table but you can also configure an output s audio from the settings for that particular output To configure the audio of the outp...

Страница 90: ...T define which input the audio is coming from it simply sets a preferred default state for this output 5 When you have finished configuring the output to your requirements click the Save changes butto...

Страница 91: ...utputs are capable of sending a number of different signals and you can configure the output to the expected signal type To configure the color scale of the output 1 Click on the gear icon next to the...

Страница 92: ...n the drop down menu to choose the color scale you prefer Options may vary but may include Auto Black RGB YUV YUV_601 and YUV_709 5 When you have finished configuring the output to your requirements c...

Страница 93: ...re in addition to the default information To configure the display type of the output 1 Click on the gear icon next to the output you wish to configure 2 The right hand pane shows some information abo...

Страница 94: ...ick on the drop down menu to choose the display type you prefer from such choices as Monitor Projector Repeater and Unknown 5 When you have finished configuring the output to your requirements click t...

Страница 95: ...If they do not match exactly despite having selected a source the Output setting Genlock enable will show Off to indicate that genlock was not achieved If this is the case check available resolutions...

Страница 96: ...ft column halfway down Click on the drop down menu to choose the source you would like to genlock to 5 When you have finished configuring the output to your requirements click the Save changes button...

Страница 97: ...is HDCP compliant The Keep Off option disables HDCP on the Output meaning that only non HDCP sources will work on the Output The Follow Sources option turns the HDCP on the output on or off depending...

Страница 98: ...at the bottom Click on the drop down menu to choose the HDCP settings you prefer HoldOn KeepOff or FollowSources 5 When you have finished configuring the output to your requirements click the Save cha...

Страница 99: ...lution of the output 1 Click on the gear icon next to the output you wish to configure 2 The right hand pane shows some information about that output including the full name the alias the status of th...

Страница 100: ...st the resolution click the Configure button in the bottom right hand corner of the settings pane A new window pops up 4 From this window Resolution is in the left column near the top Click on the dro...

Страница 101: ...seconds all outputs will go blank for a moment due to an attempt to renegotiate Framelock Note If you wish to create and use Custom Resolutions beyond the built in resolutions available on your unit...

Страница 102: ...lt fades a source out to black and fades the incoming source from black giving a smooth transmission Freeze and Cut freezes the first source and cuts the incoming source in from the frozen image To co...

Страница 103: ...y down Click on the drop down menu to choose the source switching transition you prefer Fade through Black or Freeze and Cut 5 When you have finished configuring the output to your requirements click...

Страница 104: ...uts are capable of sending a number of different signals and you can configure the output to the expected signal type To configure the type of the output 1 Click on the gear icon next to the output yo...

Страница 105: ...n the drop down menu to choose the output type you prefer Choices may vary but include RGBHV analog and digital RGBS RGsB YUV and CV YC 5 When you have finished configuring the output to your requirem...

Страница 106: ...purpose of this feature is to provide support for medical applications were some sources will often have an extended colour space Configuring Output 4k Bundle Output ID CORIOmatrix MX only It is possi...

Страница 107: ...ond time Video and audio outputs are set back to their previous configuration The notification area says Set all outputs to auto and the Cut to Black button returns to its original color Command Line...

Страница 108: ...efresh disconnect or otherwise abandon your changes If you are in Synchronized mode any queued but not yet committed changes are indicated by a blue cell In the screenshot above s2i1 slot 2 input 1 ha...

Страница 109: ...rmation when the routing page is loaded and it subsequently sends commands to the CORIOmatrix but it does not regularly refresh the web UI with the current state of the CORIOmatrix If you are working...

Страница 110: ...irm this by checking the Notification window if successful the notification will say something like Video routing set Slot2 In2 Slot1 Out2 If you would like to simplify the routing table to look speci...

Страница 111: ...op down menu BreakAway indicates that the audio routing is defined at the output By default breakaway audio uses the same source for video and audio input but it can mean that anytime that output is s...

Страница 112: ...any time you select that input for an output the table will show a yellow lozenge or multiple yellow lozenges if audio is split between multiple inputs in the appropriate cell intersecting that outpu...

Страница 113: ...ternatively AFV routing can be configured the same way BreakAway routing is configured 1 In the cell that shows the intersection between the desired input and desired output click on the drop down arr...

Страница 114: ...hannels are shown as ChannelA ChannelB ChannelC and ChannelD To the right of each of these you can choose an audio source from any of your audio input options Simply select the appropriate slot and in...

Страница 115: ...hannels are configured in the Input Settings BreakAway indicates that the audio routing is defined at the output By default breakaway audio uses the same source for video and audio input but it can me...

Страница 116: ...en configured with AFV settings the default shows the AFV settings that were defined in the input settings These defaults can be overridden from this page The four potential BreakAway audio channels a...

Страница 117: ...r channels even if the video card only supports two channels such as an HD SDI input module In this case the selections for ChannelC and ChannelD will be ignored If you are unsure how many channels ar...

Страница 118: ...useful if for example you want to do a presentation and swap between several pre configured routing arrangements of your inputs and outputs In this example your first preset may be a single camera in...

Страница 119: ...ure the routing settings are applied 2 In the routing wall s right hand Preset pane click the New button below any existing presets 3 A new preset will appear at the bottom of the list of presets name...

Страница 120: ...are in Synchronized mode click the Take button to make sure the routing settings are applied 2 In the routing wall s right hand Preset pane click the drop down icon to the right of the appropriate pre...

Страница 121: ...reset follow these steps 1 In the routing wall s right hand Preset pane click the drop down icon to the right of the appropriate preset 2 In the drop down menu choose Rename from the list 3 A window p...

Страница 122: ...114 Presets 4 Click the Save button The window closes and the newly renamed preset appears in the list in the Preset pane...

Страница 123: ...ropriate preset 2 In the drop down menu choose Delete from the list 3 The selected preset disappears from the list of available presets in the Preset pane Caution If you delete a preset it cannot be r...

Страница 124: ...rdless of whether you are in Immediate or Synchronized mode If you want to swap to a different preset simply press the appropriate button for that preset Swap between presets as many times as you need...

Страница 125: ...t or output and small green lines in the bottom left corner show audio channel activity Each input is shown in the top section in order with slot 1 input 1 at the top left continuing across and then d...

Страница 126: ...eb control software the only configuration available was the automatic configuration of monitor settings Beginning with version 2 0 0 there are various ways you can configure monitoring by changing Au...

Страница 127: ...immediately displays a grid with all detected inputs and outputs shown sequentially This view is useful if you want quick and instant feedback showing all inputs and outputs without wanting to finess...

Страница 128: ...the two output connectors on the monitor card By default the second output display duplicates the first If you wish to use both output displays with unique content uncheck the box and configure the s...

Страница 129: ...r 8x8 2x2 and 4x4 views only take up a quarter of your overall output you can add other views to different quadrants and drag and drop to rearrange them as you wish The maximum number of a given view...

Страница 130: ...wish If you change your mind you can drag the item backwards and forwards between grid spaces The Inputs and Outputs at the top show each item by card and slot number When the input or output is bein...

Страница 131: ...m that grid and makes it black available from the Inputs or Outputs list at the top of the window The corresponding space in the grid goes blank meaning that an input or output can now be assigned to...

Страница 132: ...initiate a Take You can queue up a number of changes and commit them all at once by making multiple changes before pressing the Take button In this mode be sure to click the Take button before you re...

Страница 133: ...left corner as a live audio meter indicating number of channels and level of each channel If audio is going through that input or output the green lines increase and decrease vertically as each chann...

Страница 134: ...version 2 0 0 the CORIOdiscover application includes a Resolution Editor 1 Start the CORIOdiscover application 2 Select the target device the one you want to have the Custom Resolution and press the R...

Страница 135: ...successfully logged in you see the Resolution Editor main window 5 By default the Resolution Editor shows all resolutions both built in and custom Scroll to the bottom of the list or select the Custo...

Страница 136: ...Editor Guide Note that built in resolutions only have a Copy option while Custom Resolutions have Copy Edit and Reset buttons For more details see Listing Resolutionsfrom CORIOdiscover Resolution Edit...

Страница 137: ...olutions both broadcast and computing as well as certain non standard resolutions These include the more commonly used resolutions from the following standards x CEA 861 D x VESA CVT x VESA DMT In add...

Страница 138: ...support x borders any required border values must be included in the front and back porches x the pixel clock is limited to the following range o 13 5MHz to 162MHz x The value for the Active Video mu...

Страница 139: ...lutions both built in and custom Scroll to the bottom of the list or select the Custom Only radio button to see the Custom Resolutions For each resolution you can see the resolution number Name Width...

Страница 140: ...132 Resolution Editor Guide resolution the Scan Type Pixel Clock and both Horizontal and Vertical values for Total pixels Active pixels Front and Back Porch Sync Pulse Polarity and Frequency...

Страница 141: ...atches your desired resolution and press the Copy button 2 In the resulting Edit Resolution window enter a meaningful name for your Custom Resolution and change the other fields as required If you are...

Страница 142: ...134 Resolution Editor Guide 3 When you have finished configuring the fields click the Update button and the new Custom Resolution will be placed in the next available empty Custom Resolution...

Страница 143: ...Resolution based on a video standard such as CVT follow these steps 1 Select an empty Custom Resolution and click the Edit button 2 In the resulting Edit Resolution window choose the appropriate Stand...

Страница 144: ...ith CORIOgrapher be sure to read the notes regarding naming at Editing Name Propertyfrom CORIOdiscover Resolution Editor on page 145 For more information on the individual fields see elsewhere in this...

Страница 145: ...ck the Edit button 2 In the resulting Edit Resolution window be sure that Manually create a custom resolution is selected from the Standard drop down list 3 Enter a meaningful name for your Custom Res...

Страница 146: ...sewhere in this manual Note that some fields must be updated to appropriate values before you can save the resolution 4 When you have finished configuring the fields click the Update button and the Cu...

Страница 147: ...equired If you are going to use your Custom Resolution with CORIOgrapher be sure to read the notes regarding naming at Editing Name Propertyfrom CORIOdiscover Resolution Editor on page 145 For more in...

Страница 148: ...after you press the Update button with the exception of the Name If you change the Name attribute of a Custom Resolution that you have already set to an output the output will revert to the default b...

Страница 149: ...ved details Reset the Custom Resolution to default settings This is equivalent to deleting but the slot is still available for future use To clear a Custom Resolution 1 Select the Custom Resolution an...

Страница 150: ...esolution Editor that Custom Resolution now appears empty with values reset to default Note If you clear a Custom Resolution that you have already set to an output the output will revert to the defaul...

Страница 151: ...ndow This pane displays information about the highlighted resolution Built in resolution details are read only custom resolution details can be edited In this pane you can view information including t...

Страница 152: ...e Editing Resolution Properties from CORIOdiscover Resolution Editor Various details specific to a resolution are saved on a per resolution basis You can edit settings for Custom Resolutions Each prop...

Страница 153: ...ame as something meaningful for you within the limitations of the permissible characters See Note below Instructions 1 From the Resolution Editor window scroll to the Custom Resolutions section and pr...

Страница 154: ...t The default Name is the string EmptyNNNN where NNNN is the number of the Custom Resolution Note that Resolution1000 is Empty1000 Resolution1001 is Empty1001 Resolution1009 is Empty1009 and so forth...

Страница 155: ...red to an output This is intentional If you wish to use a Custom Resolution with CORIOgrapher the Name must conform to the following format width x height scantype rate optional where width width in p...

Страница 156: ...used on the CORIOmatrix and CORIOmatrix mini to assist in signal conversion when an input and output have different aspect ratio Description Lists the Aspect ratio for this Custom Resolution in the f...

Страница 157: ...When you have modified the Aspect as desired click the Update button at the bottom of the window to commit changes and return to the Resolution Editor Default 4 3 Notes Valid available Aspect ratios...

Страница 158: ...s are dependent on the following p h v f where p Pixels per second h Horizontal total pixels v Vertical total pixels f Frame rate in frames per second For example for 1920x1080p60 h 2200 v 1125 and f...

Страница 159: ...ious properties of the Custom Resolution In the upper right section you can type a number into the Pixel Clock option 3 When you have modified the Aspect as desired click the Update button at the bott...

Страница 160: ...Pixel Clock at 640x480p60 is 800 525 59 94 25 175MHz Note that p60 is nomenclature the rate is actually 59 94MHz The maximum Pixel Clock at 1600x1200p60 is 2160 1250 60 162MHz To calculate the Vertica...

Страница 161: ...ption The Scan type state of this Custom Resolution has two options p Progressive scan mode i Interlaced scan mode Instructions 1 From the Resolution Editor window scroll to the Custom Resolutions sec...

Страница 162: ...en you have modified the Scan type as desired click the Update button at the bottom of the window to commit changes and return to the Resolution Editor Default Progressive p Notes Only Progressive p o...

Страница 163: ...dth of the displayed image in pixels For example for a Custom Resolution of 1024x768 this value would be 1024 Instructions 1 From the Resolution Editor window scroll to the Custom Resolutions section...

Страница 164: ...efault 0 Notes The valid range of values is 64 to 1920 For a valid Custom Resolution you must configure this property to a value within the valid range In the CORIOdiscover Resolution Editor the Pixel...

Страница 165: ...e gap between the end of the Active Video and the start of the Horizontal Sync Pulse in pixels Instructions 1 From the Resolution Editor window scroll to the Custom Resolutions section and press the E...

Страница 166: ...Default 0 Notes The valid range of values is 1 to 2000 For a valid Custom Resolution you must configure this property to a value within the valid range In the CORIOdiscover Resolution Editor the Pixel...

Страница 167: ...lse identifies the start of each row of pixels line of video in the Custom Resolution Instructions 1 From the Resolution Editor window scroll to the Custom Resolutions section and press the Edit butto...

Страница 168: ...Default 0 Notes The valid range of values is 8 to 500 For a valid Custom Resolution you must configure this property to a value within the valid range In the CORIOdiscover Resolution Editor the Pixel...

Страница 169: ...orch is the gap between the end of the Horizontal Sync Pulse and the beginning of the Active Video in pixels Instructions 1 From the Resolution Editor window scroll to the Custom Resolutions section a...

Страница 170: ...Default 0 Notes The valid range of values is 1 to 2000 For a valid Custom Resolution you must configure this property to a value within the valid range In the CORIOdiscover Resolution Editor the Pixe...

Страница 171: ...of each row of pixels line of video in the Custom Resolution It can be either Positive or Negative This value is the Horizontal Sync Polarity Instructions 1 From the Resolution Editor window scroll to...

Страница 172: ...ttom of the window to commit changes and return to the Resolution Editor Default N Notes In the CORIOdiscover Resolution Editor the Pixel Clock is not affected by any changes to the Horizontal Sync Po...

Страница 173: ...ht of the displayed image in pixels For example for a Custom Resolution of 1024x768 this value would be 768 Instructions 1 From the Resolution Editor window scroll to the Custom Resolutions section an...

Страница 174: ...ution Editor Default 0 Notes The valid range of values is 64 to 1200 For a valid Custom Resolution you must configure this property to a value within the valid range In the CORIOdiscover Resolution Ed...

Страница 175: ...gap between the end of the Active Video and the start of the Vertical Sync Pulse in pixels Instructions 1 From the Resolution Editor window scroll to the Custom Resolutions section and press the Edit...

Страница 176: ...ync Pulse and Vertical Back Porch for an interlaced resolution double the value of the even field Interlacing standards are designed this way in order to present the values in a similar format to Prog...

Страница 177: ...in the Custom Resolution Note that for Interlaced Custom Resolutions both odd and even frames will have a Vertical Sync Pulse Instructions 1 From the Resolution Editor window scroll to the Custom Res...

Страница 178: ...Sync Pulse and Vertical Back Porch for an interlaced resolution double the value of the even field Interlacing standards are designed this way in order to present the values in a similar format to Pr...

Страница 179: ...ch is the gap between the end of the Vertical Sync Pulse and the beginning of the Active Video in pixels Instructions 1 From the Resolution Editor window scroll to the Custom Resolutions section and p...

Страница 180: ...ync Pulse and Vertical Back Porch for an interlaced resolution double the value of the even field Interlacing standards are designed this way in order to present the values in a similar format to Prog...

Страница 181: ...elds in the Custom Resolution It can be either Positive or Negative This value is the Vertical Sync Polarity Instructions 1 From the Resolution Editor window scroll to the Custom Resolutions section a...

Страница 182: ...ton at the bottom of the window to commit changes and return to the Resolution Editor Default N Notes In the CORIOdiscover Resolution Editor the Pixel Clock is not affected by any changes to the Verti...

Страница 183: ...lution Editor in CORIOdiscover Description This attribute is to be used only when creating a Custom Resolution as defined in CEA 861 D Instructions 1 From the Resolution Editor window scroll to the Cu...

Страница 184: ...d in CEA 861 D The CEA identifier information option does not affect the Custom Resolution It is there strictly for providing attached equipment with information on the resolution When defining a Cust...

Страница 185: ...lution1 CanFramelock No Resources Resolutions Resolution1 PixelClock 25175000 Resources Resolutions Resolution1 ScanType p Resources Resolutions Resolution1 HActive 640 Resources Resolutions Resolutio...

Страница 186: ...HSyncPolarity N Resources Resolutions Resolution1000 VSyncPolarity P Resources Resolutions Resolution1000 CEAID 0 Resources Resolutions Resolution1000 Origin Example Done Resources Resolutions Resolut...

Страница 187: ...de 179 Once you have configured a Custom Resolution use System SaveAllSettings to ensure that your changes are persistent and not lost after powering off Caution It is possible to apply an invalid Cus...

Страница 188: ...itor Guide Editing Resolution Properties from Command Line Various details specific to a resolution are saved on a per resolution basis You can edit settings for Custom Resolutions Each property is co...

Страница 189: ...hat Resolution1000 is Empty1000 Resolution1001 is Empty1001 Resolution1009 is Empty1009 and so forth Resources Resolutions Resolution1000 Name Resources Resolutions Resolution1000 Name Empty1000 Done...

Страница 190: ...pixels num x the letter x x scantype either ifor interlaced or pfor progressive i or p rate the frame rate this must be at least one character num and may contain a period if relevant optional any op...

Страница 191: ...00 Aspect Description Lists the Aspect ratio for this Custom Resolution in the form width height in units of equal size Example Resources Resolutions Resolution1000 Aspect 16 6 Resources Resolutions R...

Страница 192: ...the Framelock mechanism Yes The Custom Resolution is compatible with the Framelock mechanism and may be used as either an Input or Output to Framelock No The Custom Resolution is not compatible with t...

Страница 193: ...example for 1920x1080p60 h 2200 v 1125 and f 60 This gives p 2200 1125 60 148 5MHz Example Resources Resolutions Resolution1000 PixelClock 148500000 Resources Resolutions Resolution1000 PixelClock 148...

Страница 194: ...interlaced resolution double the value of the even field Interlacing standards are designed this way in order to present the values in a similar format to Progressive values In the CORIOdiscover Resol...

Страница 195: ...ources Resolutions Resolution1000 ScanType Description The Scan Type state of this Custom Resolution has two options p Progressive scan mode i Interlaced scan mode Example Resources Resolutions Resolu...

Страница 196: ...alue would be 1024 Example Resources Resolutions Resolution1000 HActive 1024 Resources Resolutions Resolution1000 HActive 1024 Done Resources Resolutions Resolution1000 HActive 1024 Default 0 Notes Th...

Страница 197: ...in pixels Example Resources Resolutions Resolution1000 HFrontPorch 96 Resources Resolutions Resolution1000 HFrontPorch 96 Done Resources Resolutions Resolution1000 HFrontPorch 96 Default 0 Notes The...

Страница 198: ...n Example Resources Resolutions Resolution1000 HSyncPulse 8 Resources Resolutions Resolution1000 HSyncPulse 8 Done Resources Resolutions Resolution1000 HSyncPulse 8 Default 0 Notes The valid range of...

Страница 199: ...ctive Video in pixels Example Resources Resolutions Resolution1000 HBackPorch 288 Resources Resolutions Resolution1000 HBackPorch 288 Done Resources Resolutions Resolution1000 HBackPorch 288 Default 0...

Страница 200: ...n be either Positive or Negative This value is the Horizontal Sync Polarity Example Resources Resolutions Resolution1000 HSyncPolarity N Resources Resolutions Resolution1000 HSyncPolarity N Done Resou...

Страница 201: ...of 1024x768 this value would be 768 Example Resources Resolutions Resolution1000 VActive 768 Resources Resolutions Resolution1000 VActive 768 Done Resources Resolutions Resolution1000 VActive 768 Def...

Страница 202: ...nge of values is 1 to 100 For a valid Custom Resolution you must configure this property to a value within the valid range To calculate the Vertical Front Porch Vertical Sync Pulse and Vertical Back P...

Страница 203: ...ncPulse 2 Default 0 Notes The valid range of values is 1 to 100 For a valid Custom Resolution you must configure this property to a value within the valid range To calculate the Vertical Front Porch V...

Страница 204: ...he valid range of values is 1 to 100 For a valid Custom Resolution you must configure this property to a value within the valid range To calculate the Vertical Front Porch Vertical Sync Pulse and Vert...

Страница 205: ...itive or Negative This value is the Vertical Sync Polarity Example Resources Resolutions Resolution1000 VSyncPolarity N Resources Resolutions Resolution1000 VSyncPolarity N Done Resources Resolutions...

Страница 206: ...Resolution1000 CEAID 0 Done Resources Resolutions Resolution1000 CEAID 0 Default 0 Notes This field value must be 0 or a value specified in the CEA Standard Profile as defined in CEA 861 D The CEA ide...

Страница 207: ...VT in this field for a CEA Standard Profile it may be useful to have CEA Example Resources Resolutions Resolution1000 Origin Example Resources Resolutions Resolution1000 Origin Example Done Resources...

Страница 208: ...is used as an example any valid slot number can be used in that context Description List all the usable resolutions Example Slots Slot16 Module_Resolutions 640x480p60 4 3 640x480p72 4 3 1920x1200p50c...

Страница 209: ...Description List all the resolutions Example Slots Slot16 Resolutions Slots Slot16 Resolutions Resolution1 Slots Slot16 Resolutions Resolution2 Slots Slot16 Resolutions Resolution71 Slots Slot16 Reso...

Страница 210: ...stomResolution Done Slots Slot16 out1 Resolution Default 1280x720p60 Notes If the properties of the Custom Resolution are changed then the resolution will be reapplied on the output and the connection...

Страница 211: ...Example For a built in resolution Slots Slot16 Resolutions Resolution1 Slots Slot16 Resolutions Resolution1 Name 640x480p60 Slots Slot16 Resolutions Resolution1 Aspect 4 3 Slots Slot16 Resolutions Re...

Страница 212: ...esolution Empty1 Done Slots Slot16 out1 Resolution Empty1 Default 1280x720p60 Notes If the properties of the Custom Resolution are changed then the resolution will be reapplied on the output and the c...

Страница 213: ...Slot1 In1 Set_Resolution NewCustomResolution Done Slots Slot1 In1 Set_Resolution or Slots Slot1 In1 Measured_Resolution Slots Slot1 In1 Measured_Resolution NewCustomResolution Done Slots Slot1 In1 Mea...

Страница 214: ...However it is only possible to set a Resolution on an output Input Resolutions are read only the values are set by the incoming video signal Note that when detecting input resolutions if both a Custo...

Страница 215: ...a Custom Resolution on an output are 1 Set up a Custom Resolution with appropriate details for the output you wish to use 2 Connect a display that supports the signal as described in your Custom Reso...

Страница 216: ...ution on an input are Set up a Custom Resolution with appropriate details for the source you wish to use Connect the source that has the matching signal as described in your Custom Resolution Check th...

Страница 217: ...ing to connect to is running the latest firmware If the unit is running older firmware it will not be compatible with the CORIOdiscover application Install the most recent available firmware on the CO...

Страница 218: ...ting 4 If you are connecting directly to the CORIOmatrix with just an Ethernet cable make sure your computer s Ethernet port is autosensing has Auto MDI X capability and does not require an Ethernet c...

Страница 219: ...instead the browser tells you it cannot access that IP address If this happens the process goes as expected up to the point that the unit restarts After sitting at this progress bar for a while your b...

Страница 220: ...as to be the same as another slot for example rename s1i2 to be s1i1 after saving the name the original slot with that name will now have a blank name field In the aforementioned example the original...

Страница 221: ...e some may show the routing page but other elements of the interface may not perform correctly 2 If you are using a supported browser but the Routing page still does not display correctly reload the p...

Страница 222: ...a Windows Security alert pops up you may have the incorrect password stored in your web browser If you experience this issue log in with the correct username and password and if you are allowing the b...

Страница 223: ...After Changing Resolution If you are changing the resolution of an output you may find that approximately three seconds after committing the new resolution all outputs go black for a short time This...

Страница 224: ...l is going out 3 If the display is a known good display and has power the monitor card is a known good card and is recognized by the system you may need to change the output settings to something that...

Страница 225: ...rds Info User admin Logged In type the command to change resolution for the appropriate output slot In the example below the monitor card is in slot 6 and we are using output 1 changing the resolution...

Отзывы: