background image

TruSteel AutoVap30 User Manual |  | v. 1.9

11 / 39

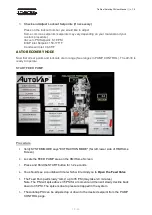
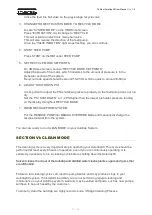
2. POWER ON HMI (Human Machine Interface/Touch Screen)

Pull out RED EMERGENCY button

In about 15 seconds, the 

“HOME SCREEN” will appear and will begin to monitor pump control,

temperature, and alarm settings.

VERIFY PARAMETERS

On the HMI Home Screen, first verify the VACUUM level has "dropped" to within your working
parameter (1.2-2.0 PSIA)

Содержание AutoVap30

Страница 1: ...Copyright 2020 by TruSteel LLC All Rights Reserved TruSteel AutoVap30 User Manual Version 1 9 ...

Страница 2: ... DISTILLED WATER CLEANING CYCLE 23 STAGE 3 SOLVENT CLEANING CYCLE 2 24 STAGE 4 COMPLETING CLEAN MODE 24 SECTION VII SHUT DOWN 24 SECTION VIII OPERATION AND SAFETY INFORMATION 25 HMI OPERATION 26 PUMP CONTROL 26 SYSTEM MODES 26 PUMP STATUS 27 MANUAL OVERRIDE 28 FEED PUMP LOCKOUTS 28 FEED PUMP AUTO SP 28 TEMPERATURE 28 ALARMS 29 ALARM RESET 31 MAINTENANCE 31 ETHYL ALCOHOL SAFETY INFORAMTION MSDS 32 ...

Страница 3: ...TruSteel AutoVap30 User Manual v 1 9 3 39 STEP 8 SHUT DOWN 39 ...

Страница 4: ... and vacuum pump The on board control panel is required to properly operate the system Any changes in equipment specifications or placement of equipment out of the scope of TruSteelʼs Pre Installation Manual may causes losses in efficiency of recovery Upon installation of the AutoVap30 TruSteel will train the staff who will be operating the system This operating manual can also be used as a guide ...

Страница 5: ...TruSteel AutoVap30 User Manual v 1 9 5 39 ...

Страница 6: ...TruSteel AutoVap30 User Manual v 1 9 6 39 ...

Страница 7: ...TruSteel AutoVap30 User Manual v 1 9 7 39 ...

Страница 8: ...xt steps of operation CHILLER STARTUP Please refer to the user manual of your chiller system for guidance of operation The suggested operating temperature of your chiller system is 41 44 F 5 7 C WATER HEATER STARTUP Please refer to the user manual of your water heater system for guidance of operation Note Most AutoVap30 water heater systems have a manifold with a recirculating water pump Powering ...

Страница 9: ... Flow Rate in gallons minute The Flow Rate is very important You must have a flow rate above 10 gallons minute If the flow rate is below that the AutoVap may not operate efficiently The flow rate should be between 10 18 GPM for optimal operation If the flow rate is below 10 gallon per minute you must refill the heater with water Do this when the before the heater is turned on You must refill the h...

Страница 10: ...TruSteel AutoVap30 User Manual v 1 9 10 39 Pull the Red EMERGENCY button OUT Turn all H O A switches to AUTO ...

Страница 11: ...ch Screen Pull out RED EMERGENCY button In about 15 seconds the HOME SCREEN will appear and will begin to monitor pump control temperature and alarm settings VERIFY PARAMETERS On the HMI Home Screen first verify the VACUUM level has dropped to within your working parameter 1 2 2 0 PSIA ...

Страница 12: ...on Note It may take 5 10 minutes for all temperatures to reach maximum range after powering on ancillary equipment Verify the PRE HEATER OUTLET EVAP INLET EVAP OUTLET are all registering hot temperatures Verify the COND INLET COND OUTLET are registering cold temperatures ...

Страница 13: ...gin to feed tincture into the system before running Auto Mode Note This step is only necessary if there is no liquid in the sight glass just below the preheater Procedures 1 Return to the HOME SCREEN button in top left corner of HMI 2 Open Vacuum Ball Valve Open the Blue Ball Valve located on the vacuum line This will introduce vacuum into the AutoVap system as long as the Vacuum pump is on ...

Страница 14: ...By turning the needle valve counterclockwise you will be releasing vacuum on the system 4 Verify Vacuum Pressure 1 2 2 0 PSIA Locate Vacuum Pressure on the HMI Home Screen and verify the VACUUM is in range 1 2 2 0 PSIA 5 Open Feed Line Ball Valve Locate your feed line ball valve and open it The vacuum pressure will draw material from the feed line through the pump priming it and into the system On...

Страница 15: ...r your lockouts If the system is running within range of your parameters then it will continue to run until you manually stop the system If a parameter goes out of the setpoint range the feed pump will automatically stop Procedures 1 Open the PUMP CONTROL Screen Locate PUMP CONTROL on the HMI Home Screen and press on the button to open the PUMP CONTROL Screen ...

Страница 16: ...TruSteel AutoVap30 User Manual v 1 9 16 39 2 Understanding the Pump Control Screen LOCKOUTS are located in the FEED PUMP section to the left ...

Страница 17: ...TruSteel AutoVap30 User Manual v 1 9 17 39 All LOCKOUT lights must be GREEN to start to the AutoVap Each LOCKOUT corresponds to a specific piece of ancillary equipment ...

Страница 18: ... F 79 C the system will stop lockout This most likely means there is an issue with the water heater and it needs to be addressed COND INLET Chiller If the condenser column senses the temperature above 55 F 12 C the system will stop lockout This most likely means there is an issue with the chiller and it needs to be addressed If one of these Lockouts are red please verify whether the corresponding ...

Страница 19: ...V 30 is ready to operate START FEED PUMP Procedure 1 Verify SYSTEM MODE says EXTRACTION MODE far left lower side of HMI Home Screen 2 Locate the FEED PUMP area on the HMI Home Screen 3 Press and Hold the START button for 1 2 seconds 4 You should see a countdown timer which will remind you to Open the Feed Valve 5 The Feed Pump will slowly ramp up to 35 PSI may take 3 4 minutes Note The PSI will sp...

Страница 20: ...e preheater This procedure is typically performed before and after CLEAN MODE Recycle Mode Explained Recycle Mode is necessary in order to completely discharge the AutoVap30 of tincture feed material that is still trapped in the system Specifically tincture gets trapped in the Preheater after Auto Recovery has stopped Recycle Mode works by switching the direction of the Recycle Valve and the direc...

Страница 21: ...to 1 2 PSI higher than the lowest preheater pressure reading on the display throughout RECYCLE MODE 7 DRAIN RESIDUE FROM SYSTEM Put the RESIDUE PUMP into MANUAL OVERRIDE Mode and manually discharge the residue material from the system You are now ready to run CLEAN MODE on your AutoVap System SECTION VI CLEAN MODE The cleaning cycle is a very important step in operating your AutoVap30 This cycle s...

Страница 22: ...OVAP FOR CLEANING CYCLE 1 Attach Place feed line into the clean solvent or distilled water 2 Close the BLUE feed line ball valve 3 Locate the area on the HMI Home Screen where it says system mode The current system mode should say Extraction If not press on the Recycle button and the system will switch back to Extraction mode 4 Locate the area on the HMI Home Screen where it says Clean Mode 5 Pres...

Страница 23: ...ht to go out 4 Start Feed Pump Locate the Feed Pump status on the HMI Home Screen and Press Start Now the feed pump will spin in reverse draining and processing what is left in the preheater This may take a 3 6 minutes depending how how fast you run the feed pump 5 Adjust the speed of the pump as necessary Try to maintain a pump speed of 15 25 Hz which equals around 30 60 psi 6 Now manually discha...

Страница 24: ...logs in the system and could cause pump failure when restarting the AutoVap system Failure to run CLEAN MODE could void warranty on the system SHUTTING DOWN AUTOVAP SYSTEM Procedures 1 TURN OFF HMI Locate the red button on the HMI and push it IN to turn off the HMI 2 CLOSE FEED LINE Locate the ball valve on the feed line and close it 3 TURN OFF WATER HEATER RECIRCULATING PUMP Locate the power swit...

Страница 25: ...ituation which if not avoided can result in serious injury or death The CAUTION notice indicates a potentially hazardous situation which if not avoided may result in minor or moderate injury and or damage to the equipment Do not proceed beyond a CAUTION notice until indicated conditions are rectified It is the operatorʼs sole responsibility to use the equipment in a safe manner Operators assume al...

Страница 26: ...ill levels prior to operation CAUTION All system containers must be checked for accidental pressurization Depressurize prior to opening CAUTION DO NOT allow children or non trained operators to tamper with or play near the equipment HMI OPERATION Four Sections of AV30 Control Panel Operation 1 Pump Control Feed Residue and Ethanol Pump Auto Manual Control and Setpoints 2 Temperature Thermocouple t...

Страница 27: ...rol Screen PUMP STATUS Residue Pump Ethanol Solvent Recovery Pump Auto will allow pump control through the programmed interface Not Auto No automatic control only control available will be located on the front panel in Hand Operation The Speed of Hand can be controlled on the front side of the VFD as Variable knob Ready is ready to call and there are no faults present Called Pump has been called b...

Страница 28: ... operator set point value during ramp up and during normal operation When locked out the pump may start up again if the alarm is reset If the condition still exists the system will lockout again Feed Overspeed Lockout There is no set point for this lockout After being called if system pressure is significantly less than the desired PSI Set Point and its commanded speed is too high When locked out ...

Страница 29: ...on will clear itself Evap Outlet Temperature If Enabled an Alarm Indication will be initiated for this if the temperature drops below the alarm setpoint for the preset amount of time If the condition clears before the Alarm can be reset than the Alarm indication will clear itself Condenser Inlet Temperature If Enabled an Alarm Indication will be initiated for this if the temperature rises above th...

Страница 30: ... fails to provide running feedback in the preset amount of time after being called by the PLC If the condition clears before the Alarm can be reset than the Alarm indication will clear itself Feed Pump Fail to Run If Enabled an Alarm Indication will be initiated for this if the pump fails to provide running feedback in the preset amount of time after being called by the PLC If the condition clears...

Страница 31: ...Pump is controlled by their corresponding Level Switches Note Residue Switches are Ultrasonic Level Switches different from Ethanol Switches which are Float Style switches Automatic operation of all three pumps can be stopped by switching H O A to the Off Position When transitioning to Recycle Mode upon changing mode the system will lockout for 20 sec to give the valve enough time to actuate and c...

Страница 32: ...rt damage Target Organs Kidneys heart central nervous system liver eyes optic nerve Potential Health Effects Eye Causes severe eye irritation May cause painful sensitization to light May cause chemical conjunctivitis and corneal damage Inhalation ingestion or skin absorption of alcohol can cause significant disturbances in vision including blindness Skin Causes moderate skin irritation May cause c...

Страница 33: ... cool Containers may explode in the heat of a fire Extinguishing Media For small fires use dry chemical carbon dioxide water spray or alcohol resistant foam For large fires use water spray fog or alcohol resistant foam Use water spray to cool fire exposed containers Water may be ineffective Do NOT use straight streams of water Auto ignition Temperature 362 8 deg C alcohol Flash Point 13 9 deg C 57...

Страница 34: ...a Sierra for diagnosis Ensure that the system is properly primed See PRIME FEED PUMP section Ensure the system vacuum is no lower than 2 psia Any lower than 2 psia will cause the discharge pumps to fight against vacuum and can cause them to be compromised Lost Prime Run the system to fill the evaporator and condenser sight glass to the center line and turn the feed off Close the vacuum valve V3 an...

Страница 35: ...at your gauge reading difference is for you elevation Pressure Gauges are set for sea level The basic formula is Current Atmospheric Pressure x Max Rated Level of a Vacuum Pump 29 92 Hg absolute vacuum Refer to the following table to correct for vacuum pump performance at various altitudes AV30 FLOW DIAGRAM CLICK HERE FOR PULL PDF FLOW DIAGRAM ...

Страница 36: ...TruSteel AutoVap30 User Manual v 1 9 36 39 AV30 FLOW IMAGE CUTAWAY CLICK HERE FOR LARGER VIEW ...

Страница 37: ...TruSteel AutoVap30 User Manual v 1 9 37 39 ...

Страница 38: ...uum Ball Valve 2 Adjust vacuum pressure to 1 2 2 0 PSIA use black needle adjustment 3 Open Feed Line Ball Valve 4 Monitor the sight glass under the Pre heater STEP 4 EXTRACTION MODE 1 Verify all pumps are in Auto Mode 2 Set PSI Setpoint it should be set already Normal operating PSI is between 30 60 PSI 3 Start FEED PUMP STEP 5 DISCHARGE FIRST CRUDE In this step you are going to recycle the first l...

Страница 39: ...EANING CYCLE 1 Press Enable on Clean Mode 2 Set Vacuum close to atmospheric PSIA may vary on your altitude 3 CLEAN SOLVENT Run clean solvent until the solvent looks clear in the residue sightglass Collect tainted solvent Run Recycle Mode manually discharge 4 DISTILLED WATER VERY IMPORTANT STEP Run distilled water through system and then discharge Run Recycle Mode manually discharge 5 Run more clea...

Отзывы: