background image

Trust SpaceC@m 300

25


NL 

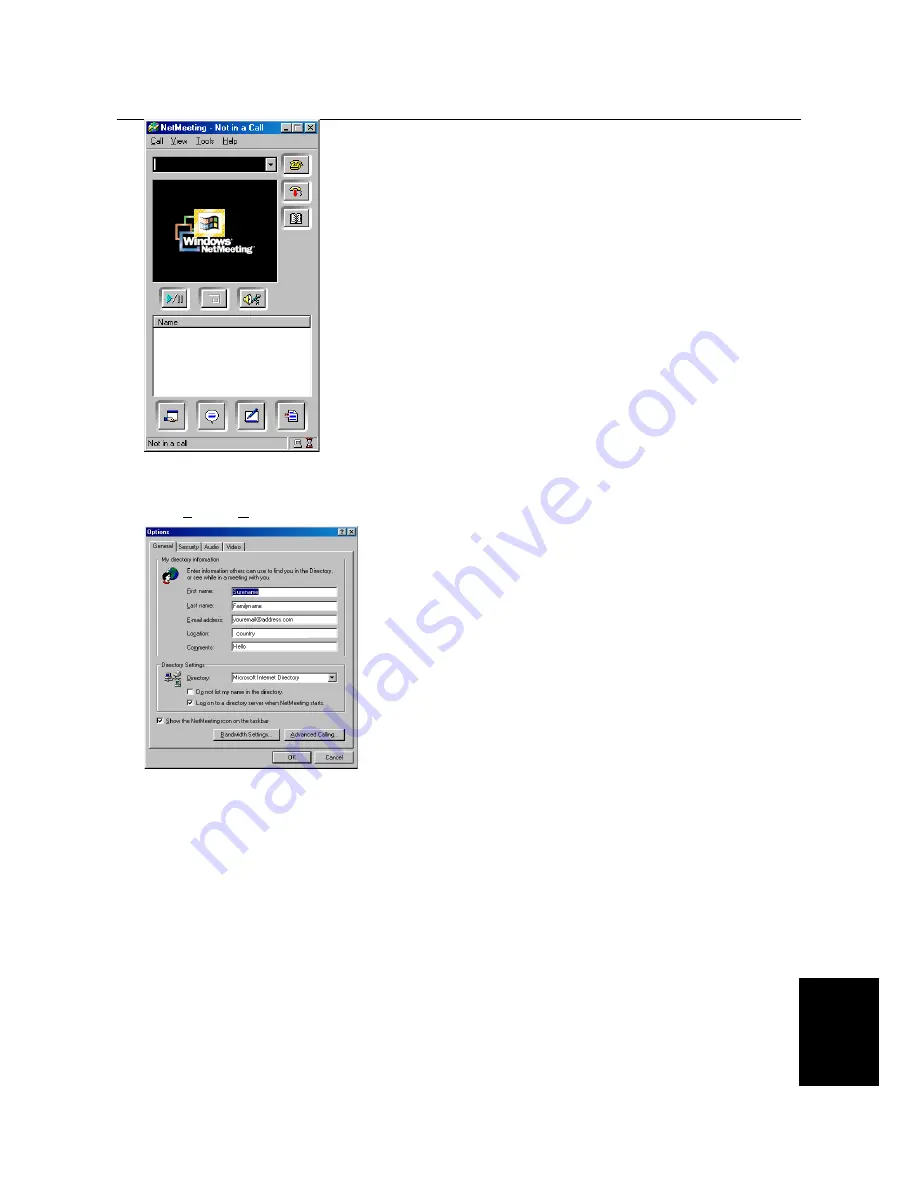
Figure 43: Using Microsoft ® NetMeeting

6.  Now you have to make the unique settings for NetMeeting.

Go to Tools -> Options…. Figuur 44 verschijnt.

Figure 44: Unique settings Microsoft ® NetMeeting

7.  Click ‘Video’. Figure 45 appears

Содержание SpaceC@m 300

Страница 1: ...Trust SpaceC m 300 NL TRUST SPACEC M 300 Instruction Manual Version 3 0 ...

Страница 2: ...rieval systems for any purpose other than the purchaser s own personal use without prior written permission from the manufacturer Disclaimer statement The manufacturer specifically disclaims all warranties either express or implied including but not limited to implied warranties for the marketability and suitability for a particular purpose with respect to the software the accompanying product man...

Страница 3: ...ress 3 0 SE 5 4 3 Installing Acer EasyXpress VideoMail 2 2 9 4 4 Installation Microsoft NetMeeting Windows 98 Me 2000 12 5 Using the camera and the applications 16 5 1 Trust SpaceC m 300 Software 16 5 1 1 Description of the functions 16 5 1 2 Advanced image settings 17 5 1 3 Taking a snapshot 18 5 1 4 Zoom in zoom out 19 5 2 Using Ulead PhotoExpress 3 0 SE 19 5 3 Using Acer EasyXpress VideoMail 2 ...

Страница 4: ...the associated figure Additional information will be shown as follows Note If you connect the Trust Spacec m 300 to a USB HUB then the USB HUB should have its own power supply The examples assume that the letter D has been assigned to your CD ROM drive If your system uses a different drive letter for your CD ROM drive for example E you should replace D by E 1 2 Contents of the package Please check...

Страница 5: ...ged or worn b Liquid has entered the device c The device has fallen and or the casing has been damaged 4 Position the device so that the cables cannot be damaged 3 Functions of the Trust SpaceC m 300 Figure 1 Functions of the Trust SpaceC m 300 A Snapshot button Takes a picture when this button is pressed B Lens turn the lens to make the image sharp C LED goes on when the camera is in use D USB co...

Страница 6: ...drive and the program will start automatically Should this not happen start up Setup exe in the CD Figure 2 will appear Figure 2 Installating the driver 2 Click on TRUST SPACEC M 300 to install the driver Figure 3 will appear Figure 3 Installation of driver 3 Click on Next to start the installation Figure 4 will appear ...

Страница 7: ...he headphones with the microphone to the sound card For this see the symbol on both plugs You have now completed the installation of the driver program Continue to chapter 4 2 for the installation of Ulead Photo Express 3 0 SE 4 2 Installing Ulead Photo Express 3 0 SE Ulead Photo Express 3 0 SE is an image editor which you can use to load and edit the images on your computer that you have taken us...

Страница 8: ...Click on Install Figure 7 will appear Figure 7 Installing Ulead Photo Express 3 0 SE 3 Click on Next Figure 8 will appear Figure 8 Installing Ulead Photo Express 3 0 SE 4 Click on Yes to accept the license agreement and continue with the installation Figure 9 will appear ...

Страница 9: ...Trust SpaceC m 300 7 NL Figure 9 Installing Ulead Photo Express 3 0 SE 5 Click on Next A screen similar to figure 10 will appear Figure 10 Installing Ulead Photo Express 3 0 SE ...

Страница 10: ...ll appear Figure 11 Installing Ulead Photo Express 3 0 SE 7 Click on Next Figure 12 will appear Figure 12 Installing Ulead Photo Express 3 0 SE 8 Click on Next Ulead Photo Express 3 0 SE will now be installed Figure 13 will appear after the installation ...

Страница 11: ...3 0 SE See chapter 4 3 for the installation of Acer EasyXpress VideoMail 2 2 4 3 Installing Acer EasyXpress VideoMail 2 2 You can use Acer EasyXpress VideoMail 2 2 to send video and audio multimedia e mails To use this program you need to have a modem or ISDN connection a sound card with speakers and a microphone and an Internet account Follow the instructions below to install EasyXpress VideoMail...

Страница 12: ...for the installation of Acer EasyXpress VideoMail 2 2 and click on OK Figure 16 will appear Figure 16 Installing Acer EasyXpress VideoMail 2 2 3 Click on Next Figure 17 will appear Figure 17 Installing Acer EasyXpress VideoMail 2 2 4 Fill in your details and click on Next Figure 18 will appear ...

Страница 13: ...Xpress VideoMail 2 2 5 Click on Next Figure 19 will appear Figure 19 Installing Acer EasyXpress VideoMail 2 2 6 Click on Next Figure 20 will appear Figure 20 Installing Acer EasyXpress VideoMail 2 2 7 Click on Next EasyXpress VideoMail will now be installed ...

Страница 14: ...oft NetMeeting Windows 98 Me 2000 NetMeeting is a program which is included in Windows 98 Me 2000 The program makes it possible to use your Trust SpaceC M as webcam To install NetMeeting you have to follow the next steps Figure A Installation Microsoft NetMeeting 1 Click the Start button left below of your desktop Go to NetMeeting Programs Accessories Internet Tools NetMeeting See Figure A 2 Click...

Страница 15: ...ail address place or country and a greeting text Then click op Next Figure D appears Figure D Installation Microsoft NetMeeting 5 If you do not want to list your name in the directory list select Do not list my name in the directory Click Next to continue Figure E appears Figure E Installation Microsoft NetMeeting 6 Select the connection you use and click Next to continue Figure F appears ...

Страница 16: ...Put a shortcut to NetMeeting on my desktop if you like to have a shortcut of NetMeeting on your desktop of Windows Select Put a shortcut to NetMeeting on My Quick Launch bar if you like to have a shortcut of NetMeeting in your Windows taskbar 9 Click Next to continue Figure H appears Figure H Installation Microsoft NetMeeting 10 Click Next to configure and test the audio settings of NetMeeting Fig...

Страница 17: ...ar sound click the Stop button followed by Next Figure J appears Figure J Installation Microsoft NetMeeting Note Be sure your microphone is connected to your soundcard 13 Speak through the microphone to test The indicator will beat out Use the Record Volume slide switch to set the sensitivity of the volume in the green zone If the volume is in the red or yellow zone the volume is too high Click Ne...

Страница 18: ...this screen See chapter 4 1 2 to adjust the image B Snapshot button Takes a snapshot of the image A The snapshot taken is shown in screen G and added to the Thumbnails H You can also take a snapshot using the button on the camera C Transfer button Opens the snapshot that is shown in the screen G in the image editing program that you have selected F See chapter 4 2 for the use of this program D For...

Страница 19: ...ctions of the driver program 5 1 2 Advanced image settings Follow the instructions below to adjust the camera image Note Only change the settings if it is necessary Incorrect settings can cause problems for other programs e g NetMeeting 1 Go to the Menubar and click on Options 2 Select Capture Filter Figure 23 will appear See the table below for the description of the program s diverse functions F...

Страница 20: ...our depth Function Description T Selects the desired image size U Selects the desired colour depth You can choose between 24 bit RGB and I420 Table 4 Settings 5 1 3 Taking a snapshot Follow the directions below to take and edit a snapshot 1 Click on the Snapshot button B Figure 22 or on the camera button to capture an image The image is shown in the screen G and also as a small image with the Thum...

Страница 21: ... 1 4 Zoom in zoom out The SpaceC m 300 provides the possibility to zoom in or zoom out Use function R in Figure 23 to zoom in and zoom out 5 2 Using Ulead PhotoExpress 3 0 SE A short description for the use of the camera in Ulead Photo Express 3 0 SE is given below For more information about Photo Express 3 0 SE please read this program s manual on the CD ROM 1 Start Photo Express 3 0 SE Figure 25...

Страница 22: ...ot is opened in the Edit screen in Photo Express You can edit and save the snapshot in this screen See figure 28 Note The snapshot button on the camera does not work with this program J Exit button Closes the Video Capture screen figure 27 K Help button Calls up the help function for this screen L Video Format button Adjusts the image size of the screen H A screen similar to figure 24 will appear ...

Страница 23: ...of this program Note You must have a working e mail account installed on your system before you start EasyXpress VideoMail Ask your Internet Service Provider if you have any questions about your e mail account 1 Start EasyXpress VideoMail 2 2 2 A screen similar to figure 29 will appear See the table below for this screen s diverse functions Figure 29 Using Acer EasyXpress Function Description A Th...

Страница 24: ...essage J Open button Opens a saved video mail message K Save button Saves the video mail message Table 7 acer EasyXpress functions 3 Click on VideoMail Wizard F Figure 30 will appear Click on Next Figure 30 Making a video mail message 4 Click on Next Figure 31 will appear Figure 31 Making a video mail message 5 Select whether you wish to record both images and sound only images or only sound Click...

Страница 25: ...le size Click on Next Figure 34 will appear Click on Record to start recording Click on Stop when recording has finished Figure 34 Making a video mail message 8 Click on Record to start recording Click on Stop when recording has finished Figure 35 will appear Figure 40 Making a video mail message 9 Choose the following in this screen Play to play the recording Save to save the recording Mail to se...

Страница 26: ...ams Accessories Internet Tools NetMeeting See Figure 41 3 Two windows will be opened now NetMeeting and your Dial up Connection See Figure 42 Figure 42 Using Microsoft NetMeeting 4 Fill out your username and password and click Connect to make an internet connection 5 When the connection with internet is correct only the NetMeeting window will be shown on your screen See Figure 43 ...

Страница 27: ...25 NL Figure 43 Using Microsoft NetMeeting 6 Now you have to make the unique settings for NetMeeting Go to Tools Options Figuur 44 verschijnt Figure 44 Unique settings Microsoft NetMeeting 7 Click Video Figure 45 appears ...

Страница 28: ... 43 and select option My Video New Window An extra window My Video will be opened now See Figure 46 Figure 46 Using Microsoft NetMeeting 10 Click the play button to see the image of your own camera This image alse will be seen by the other party with you will have a connection later 11 Now you are ready to make a NetMeeting connection Click the phonebook icon in figure 43 Figure 47 appears Figure ...

Страница 29: ...be made now Sometimes it can happen the selected person refuse the connection because he or she already has a connection with somebody else Then select another person in the list Other ils server addresses can be found on internet In case of trouble or if you want to have more information please click the Help function in Figure 43 ...

Страница 30: ...e Close the other program before you start the test program A black image and a red indicator are shown in the SpaceC m 300 test program The snapshot button on the camera does not work The camera is not correctly connected to the USB port Connect the camera correctly to the USB port SpaceC m 300 does not operate in combination with TV capture card Conflict between the camera and TV card Proceed as...

Страница 31: ... 24 bits Distance 5 cm to endless Exposure 1 60 1 25 000 sec Minimum lighting 50 Lux 30 fps for an image size of 160 x 120 20 fps for an image size of 320 x 240 Image speed 15 fps for an image size of 640 x 480 TWAIN interface Yes Connection USB 1 0 Power Via USB port Dimensions HxBxD 105 x 58 x 45 mm Camera weight 100 gram Table 9 Specifications ...

Страница 32: ...0 1 48630261 Kontaktadresse für Einwohner Deutschlands Erreichbar 9 00 17 00 Deutsche Geschäftsstelle Telefon 0800 00TRUST 0800 0087878 Fax 44 0 2821 58873 Los habitantes de España pueden ponerse en contacto con De las 9 00 a las 17 00 horas Oficina española Teléfono 34 0 902 160937 Fax 31 0 78 6543299 Inwoners van Nederland kunnen contact opnemen met Van 9 00 17 00 uur Kantoor Nederland Telefoon ...

Отзывы: