Trinnov Audio Altitude 32 Скачать руководство пользователя страница 107

107 


9


SPECIFY AN ARRAY OF SPEAKERS 


With the release of new 3D audio formats, the number of possible speaker’s positions increases 

considerably. Nevertheless, your video library is surely full of “surround” content (5.1 or 7.1). 

Furthermore, 3D formats do not all have the same limitation in terms of simultaneous active 

speakers. 

So it seems to be essential to be able to create an array of speakers: use several speakers to play the 

same channel. It is also possible to adjust the gain of each speaker of the array to perfectly match 

the needs of the Home-Theater; Thereby, the immersion effect is much more impressive!  

Similar configurations has been used in commercial cinemas for years. 


9.1


SETTING UP AN ARRAY OF SPEAKERS 

Once your speaker’s layout has been declared, configured and fully tested, you can now set up your arrays of speakers. 
The Altitude

32

 is able to duplicate the incoming channel from the decoders on several speakers.  

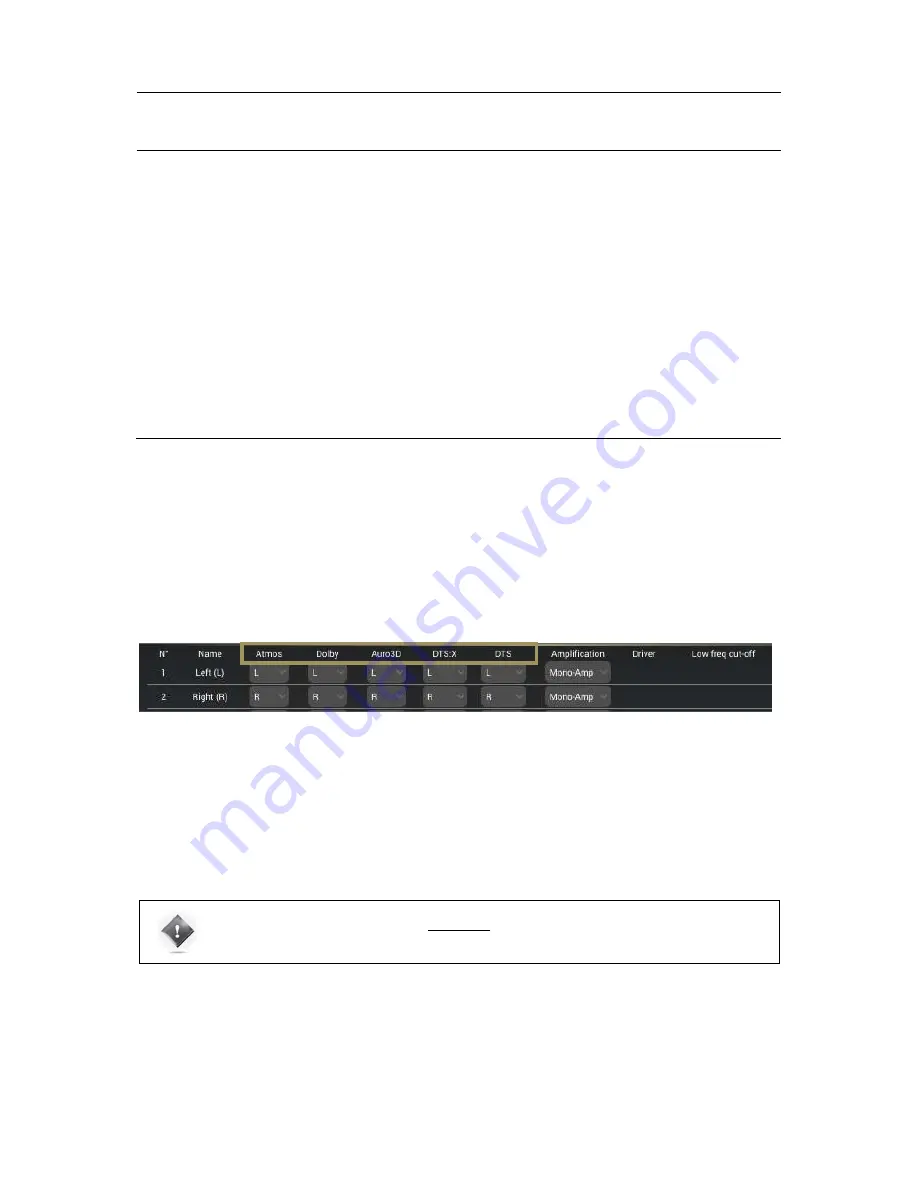
The setup of an array has to be done within the Speaker/Room setup tool, using the mapping column of each decoders. 
As explained in the previous chapter Specify a speaker layoutMapping the channels of different formats section, each 
format has its own speaker’s assignation, you can easily control the number of speakers used by each decoder. Each 
column define the channel used by the associated speaker. In this way, you are able to declare the same channel on 
several speakers.  


In the Speaker/Room setup tool, you can observe 5 columns giving the details of each decoder’s layout: 


Atmos: Layout used for native Dolby Atmos content and Dolby Surround Upmixer; 


Dolby: Layout used for Legacy Dolby content; 


Auro 3D: Layout used for Native Auro 3D content and Auro 3D Upmixer; 


DTS:X: Layout used for native DTS:X content and Neural:X Upmixer; 


DTS: Layout used for Legacy DTS content.  

To specify a speaker layout, please select, in the drop down menu of each speaker, the desired channel that it has to play 
for each decoder.  


IMPORTANT NOTE: DTS:X is limited to 11 different channels. Nevertheless, you can use the arrays to 
duplicate these 11 channels and use more that 11 speakers. 

Содержание Altitude 32

Страница 1: ...1...

Страница 2: ...2...

Страница 3: ...3 ALTITUDE32 USER GUIDE Software version v4 1 Last update February 1 2017...

Страница 4: ...4...

Страница 5: ...ta stored on the device you must have saved them prior to returning your device to the services responsible hereunder The transport cost to Trinnov is to be met by the customer including any return in...

Страница 6: ...tware that it contains or which accompanies it concerning the quality functioning accuracy reliability suitability for a particular purpose or otherwise If this exclusion is not or only partially perm...

Страница 7: ...ured under license from DTS Licensing Limited DTS the Symbol DTS in combination with the Symbol DTS X and the DTS X logo are registered trademarks or trademarks of DTS Inc in the United States and or...

Страница 8: ...tlet consult an electrician for replacement of the obsolete outlet Before connecting the equipment check that the main power supply voltage rating corresponds with the local main power supply The rati...

Страница 9: ...to rain or moisture does not operate normally or has been dropped Do not expose this apparatus to dripping or splashing and ensure that no objects filled with liquids such as vases are placed on the...

Страница 10: ...CONNECTING TO THE ALTITUDE32 34 Overview of the network connection procedure 34 Step 1 download and install a VNC client on your device 35 Step 2 put the Altitude32 and your device on the same network...

Страница 11: ...TION OPTIONS 69 5 5 REMAPPING OPTIONS 70 5 6 NAMING SAVING AND LOADING PRESETS 70 5 7 DEFAULT PRESET 72 5 8 SET A MAXIMUM VOLUME 72 5 9 SET THE DIM LEVEL 73 5 10 BACKUP RESTORE OF PRESETS 73 6 OVERVIE...

Страница 12: ...tion 115 10 5 DECODERS SETTINGS 116 General Settings 116 Dolby decoder settings 117 DTS decoder Settings 118 Auro 3D decoder settings 119 11 GETTING READY FOR CALIBRATION 120 11 1 VERY IMPORTANT TIPS...

Страница 13: ...MAPPING 152 17 3 TARGET CURVE 152 17 4 LIMITER CURVE 152 17 5 ADVANCED OPTIMIZATION SETTINGS 153 Display 153 Front Surround Speaker settings 153 Acoustics Correction 154 Calibration settings 154 Optim...

Страница 14: ...14...

Страница 15: ...le 3D AV Preamplifier ever manufactured Thanks to a unique hardware platform Trinnov Audio offers the first implementations of the latest home theatre audio technologies The Altitude32 has established...

Страница 16: ...the Speaker Layout How to provide the Altitude32 with all the information about your set of speakers This information is required for the automatic calibration of the speakers in the room Specify an...

Страница 17: ...f speaker placement to help you understand the new approach of 3D Sound in the best possible and least confusing way In addition important information will be indicated with the following symbols NOTE...

Страница 18: ...3D Dolby Atmos and DTS X including their respectives upmixers HD Audio Codecs Dolby TrueHD DTS HD Master Audio HDMI 1 4b compliant digital audio with 4K and 3D video pass through HDCP 2 2 HDMI input...

Страница 19: ...features the Optimizer is either a straightforward and easy to use automatic compensation system or an incredibly flexible and powerful tool including numerous advanced filter parameters target curves...

Страница 20: ...20 1 5 UNPACKING THE ALTITUDE32 You will find in the Altitude32 packaging...

Страница 21: ...lect Button Source Item Selection Knob Volume Knob Mute Button Power Switch Back Button Menu Button Optimizer Status Output Meters Audio Sync Status Output Level Current Source Audio Format Direct Sou...

Страница 22: ...one Input on 5 pin XLR 2x Stereo Inputs on XLR 1x 7 1 Input on RCA 3x Stereo Inputs on RCA 8 DIGITAL OUTPUTS 1x AES3 8 or 16 channels on DB25 1x Stereo AES EBU on XLR 1x Stereo S PDIF on RCA 1x Stereo...

Страница 23: ...mode selection OPTIMIZER PRESETS Preset selection MENU BACK ARROWS Navigation in the front panel menu LIGHT Switch off the backlight on the front panel VOL Volume control 1dB step DIM Decreases the v...

Страница 24: ...cess the full user interface in order to operate and or setup the Altitude32 Remotely with an internet browser with a limited access to the user interface allowing to operate the Altitude32 but withou...

Страница 25: ...work Ethernet menu by connecting a monitor and a mouse to the back panel Go to the Network page of the graphical user interface If you are already connected to the Altitude32 with a VNC Client you can...

Страница 26: ...mization Settings Opens the lateral Play menu used for daily operation level adjustment source selection and general information See the chapter Daily Operations Opens the Speakers Room setup tool use...

Страница 27: ...s the Sources panel 3 Perform a daily operation such as selecting a different source A detailed description of this interface is provided in the following pages THE LATERAL MENU BAR You can access the...

Страница 28: ...el by 1dB steps Mute cuts all outputs Dim attenuates the output level by default 20dB Displays which audio source is currently selected as you move the cursor over the icon Source Information Displays...

Страница 29: ...he current audio source FMT the audio format UPMIX the upmix format OUT channels OUTPUT the current HDMI output RES the current video resolution COLOR Color settings used on the HDMI video output OPT...

Страница 30: ...ers room setup tool is a highly practical tool used to setup your system It is explained in the Specify the Speaker Configuration chapter THE FINE TUNING PANEL The Fine Tuning panel gives access to th...

Страница 31: ...tings PRODUCT INFORMATION Product Information can be displayed on the Graphical User Interface default startup page and or on the front panel menu of the Altitude32 Version software version currently...

Страница 32: ...rranty registration form with your email address and your Altitude32 serial number Software updates and support can be performed remotely by Trinnov provided that the Processor is connected to the int...

Страница 33: ...if needed change the network configuration to meet the requirements for integrating the Altitude32 into your overall home theater system For the final installation of the system we suggest to leave y...

Страница 34: ...options A Your device joins the Altitude32 s Wi Fi network disconnect your device from your usual Wi Fi network and connect it to the Altitude32 s own Wi Fi network Access Point B The Altitude32 joins...

Страница 35: ...re 2 2 2 2 USING A MAC OS X COMPUTER If you are connecting from a Mac OS X computer running OS X version 10 5 or higher you can choose to use Apple s Screen Sharing VNC client integrated into the OS X...

Страница 36: ...works choose the network named Altitude XX where XX is the number of your Altitude32 Enter the following password calibration Use the Altitude32 s front panel to check its network status go to the Set...

Страница 37: ...Settings page Go to Settings and click on the Wi Fi menu item located in the top left side of the page In the Chose a network list click on the network Altitude XX where XX is the number of your Altit...

Страница 38: ...Altitude32 to an existing Wi Fi network you need to use the front panel menus to change the Wi Fi settings Click on the menu button on the front panel Select the Setup Network Wi Fi page Turn the Sou...

Страница 39: ...Use the Altitude32 s front panel to check that it now has an IP address go to the Setup Network menu to see the network configuration Once the Altitude32 is connected to your local network you can mo...

Страница 40: ...itude XX where XX is the number of your Altitude32 The field VNC server address now shows the name VNC Server on Altitude XX where XX is the number of your Altitude32 Go to the field VNC password and...

Страница 41: ...number of your Altitude32 This will display the following window Click on the Share Screen button This will display the Screen Sharing login panel Enter the password which is the six digit serial numb...

Страница 42: ...Host s IP address is automatically filled You only need to enter the password which is the six digit serial number of your Altitude32 o the password is 00000X if the number of your Altitude32 s VNC Se...

Страница 43: ...tc WRITE DOWN THE IP ADDRESS OF THE ALTITUDE32 If your VNC client is not zeroconf enabled it cannot find the Altitude32 s VNC Server automatically This is the case of the Tight VNC client for Windows...

Страница 44: ...the Setup Network Wi Fi page Turn the Source Item selection knob to scroll through the settings GETTING THE IP ADDRESS FROM THE ETHERNET SETTINGS To get the IP address from the Ethernet settings via...

Страница 45: ...above 3 Click on the Connect button This will open the VNC Authentication window 4 In the VNC Authentication window enter the password which is the six digit serial number of your Altitude32 printed...

Страница 46: ...TINGS THROUGH THE FRONT PANEL CHECKING THE WI FI SETTINGS To check the Wi Fi settings via the front panel Click on the menu button Go to the Setup Network Wifi page Turn the Source Item selection knob...

Страница 47: ...t settings via the front panel Click on the menu button Select the Setup Network Ethernet page Turn the Source Item selection knob to scroll through the settings CONNECTING THE ALTITUDE32 TO A WI FI N...

Страница 48: ...ltitude32 as Wi Fi Access Point AP password indicates the password to be used when attempting to join the Altitude32 s Wi Fi Access Point AP netmask indicates the netmask of the Altitude32 s Wi Fi Acc...

Страница 49: ...page In the Wi Fi section click on the Setup button This opens the Wi Fi Status Modes page Click on the Connect button in the bottom left corner of the page This will display the available Wi Fi netw...

Страница 50: ...in an existing network wirelessly To change the Wi Fi settings of your Altitude32 via the graphical user interface 1 Open the Advanced Settings interface 2 Go to the Setup Network page 3 Press the Set...

Страница 51: ...erface of the Altitude32 required to remotely switch the Altitude32 on with a Wake on Lan command IP address indicates the IP address of the Ethernet interface of the Altitude32 Netmask indicates the...

Страница 52: ...DHCP server This is the case in most domestic environments To configure the Ethernet connection manually select the Manually specify Network parameters option and hit the Apply button The IP address N...

Страница 53: ...ing ABOUT ZERO CONFIGURATION NETWORKING Zero configuration networking zeroconf is a networking technology that makes it easy to set up and use devices and services on a network Because zeroconf enable...

Страница 54: ...ontrol them Provided that the server supports these formats the Altitude32 can decode and play high resolution 24 bits 192 kHz WAV AIFF FLAC and 16 bits 192 kHz OGG music files 3 2 UPNP NETWORK ARCHIT...

Страница 55: ...s why we have established a shortlist of UPnP third part software optimized for audio JRiver MediaCenter PS Audio eLyric Music Manager These software has been selected tested and qualified based on th...

Страница 56: ...hfortheAltitude JRiver Media Center is a commercial software available for PC and Mac DOWNLOAD www jriver com download html PS Audio eLyric Music Manager www psaudio com eLyric Music Manager is a free...

Страница 57: ...tablet or your computer connected to the same network as the Altitude32 o with a VNC Client connected to the Altitude32 s VNC Server o with a web browser accessing the Altitude32 s web based interfac...

Страница 58: ...itude32 NOTE The system doesn t start instantly and takes about 60 seconds to complete start up While the system starts the front panel screen displays the following image To shut the Altitude32 down...

Страница 59: ...ces and push the select button Use one of the direct selection buttons also available from the remote control NOTE with factory settings the last used source is recalled at start up PRESET SELECTION I...

Страница 60: ...l display of the Altitude32 below the Optimizer status The Sampling Rate of the audio being played is indicated on the left side of the front panel display of the Altitude32 The current upmixer used i...

Страница 61: ...l as 2 buttons to browse through the sources LISTENING FORMAT SELECTION These allows you to switch between the different listening format and so between the different Upmixers This can be done on the...

Страница 62: ...he Back button LIGH BUTTON The Light button allows to turn off the backlight of the front panel screen Pressing on another button will temporary turn on the backlight to let you know the settings you...

Страница 63: ...hical user interface A Mute button also allows you to mute the audio outputs of the Altitude32 A Dim button also allows you to decrease the volume by 20dB NOTE By default the last used volume is recal...

Страница 64: ...a Preset to recall it PRESET SELECTION Presets can be selected through the graphical user interface CHECKING THE FORMAT OF INCOMING AUDIO The format of incoming audio is displayed in the lateral menu...

Страница 65: ...ific output and processing parameters Therefore it can be used to switch between outputs or between different processing settings For example it is possible to configure two Source Configurations set...

Страница 66: ...ed to a specific configuration requirement for your system Source configurations can be used for different purposes to switch between your different sources For example one Blu ray player one Network...

Страница 67: ...multaneously o AES 1 16 AES outputs 1 16 are active analog outputs are disabled o AML Audio Multi Link is active o HDMI HDMI outputs 1 2 are active simultaneously o AES OLD 1 16 old routing used in th...

Страница 68: ...t or to select one of the EQ created and saved in the Processor Output page during the fine tuning FIR EQ Select a FIR EQ that has been saved in the Processor Output page User EQ Select a FIR EQ that...

Страница 69: ...Optimizer is off only the manual settings related to the audio processor are applied o Routing as defined in Speaker Configuration Table in the 3D View page of the Main interface o The Active Xovers f...

Страница 70: ...ing including the horizontal plane and elevation NOTE the 2D remapping consider every speakers on the same elevation plan This may result in strange remapping behavior with speakers in elevation NOTE...

Страница 71: ...t is empty highlighted in blue when the preset is selected A Clear button to clear the memory slot This function irreversibly deletes the preset s parameters A Save button to save current parameters a...

Страница 72: ...the product information menu 5 8 SET A MAXIMUM VOLUME By default the maximum volume possible with the Altitude32 is 20dB The maximum volume can be changed change in the Info menu of the main page Set...

Страница 73: ...plying a 20dB on the master volume The value can be change in the Info menu of the main page Setup tab Here the parameter Dim level dB will define the amount of Dim to apply on the master volume when...

Страница 74: ...Save a Bug report to the USB Key when an expected error occurred the system is halted to prevent damage to your system and a bug report is generated After the restart of the Altitude32 you can save t...

Страница 75: ...rect 2 Optional if one or more speakers require multi amplification configure calibrate and verify the Altitude32 s intelligent active crossovers 3 Optimize the speaker system in the room a Calibrate...

Страница 76: ...ected In this situation the system is not able to produce sound like pink noise or sine If this happens to you please set the clock to Master more or simply switch to an analog input AUDIO CLOCK STATU...

Страница 77: ...lock page of the Setup tab includes all the clock settings The Setup Clock page includes Status Information the same information provided in the Clock page of the main user interface Clock Mode slave...

Страница 78: ...ed through the Processor Meters page Both the peak levels and the RMS levels are displayed You can visualize the peak level of each channel The highest level registered on each channel can be displaye...

Страница 79: ...nk noise from the Speakers Room setup tool click on the Pink Noise button of the corresponding output channel The Processor Inputs tab provides a complete set of processing options for each input chan...

Страница 80: ...ce verification by a consultant or voluntary small change of the tonal balance 7 4 SOLO MUTE AN INPUT OR AN OUTPUT The Inputs page and the Outputs page include Mute and Solo buttons that allow you to...

Страница 81: ...mizer Settings Runtime page allow the user to selectively enable disable the different corrections applied by the Optimizer These options are also available in the Main user interface in the Optimizer...

Страница 82: ...re and after the Trinnov optimization as well as the correction filters The acoustical graphs are available in the Optimizer Graphs page of the Advanced user interface It is possible to display the ac...

Страница 83: ...tions These graphs only take into account the automatic filters computed according to the Optimizer Settings page not the manual adjustments made in the Processor page The display settings will be sav...

Страница 84: ...you want to visualize on each tab and subtab For each level you have the possibility to order the data through various criteria The speaker L R C Sub The point of measurement in the case of a multipo...

Страница 85: ...85...

Страница 86: ...peaker the channel mapping to Dolby DTS Dolby Atmos DTS X and Auro 3D formats and the output routing Verify the routing of the speakers by playing pink noise on each speaker If necessary set some Para...

Страница 87: ...highlighted below The Controls box located in the top right corner of the window allows you to navigate through the 3D view You can rotate the view zoom in and zoom out The Dimensions tab allows you...

Страница 88: ...lable in DVD Blu ray and file based media Below is an example of a specific speaker layout designed to support multiple formats This configuration of 16 speakers includes 7 1 initial layout 7 full ran...

Страница 89: ...akers to support multiple surround and 3D formats such as Dolby Atmos DTS X and Auro 3D Note that this layout can be modified to support the largest Dolby Atmos configuration The 16 speakers layout Tr...

Страница 90: ...ct a bigger system and remove the extra ones IMPORTANT NOTE it is critical to distinguish speakers from channels because one speaker may be used to reproduce multiple channels depending on the audio f...

Страница 91: ...VIEW Click on the Add Speaker button in the From Layout drop down list select the speaker template from which you want to add one or more speakers all the speakers available in the selected speaker la...

Страница 92: ...ight Surround up firing Dolby Enabled speaker Lrse Left Rear Surround up firing Dolby Enabled speaker Rrse Right Rear Surround up firing Dolby Enabled speaker To add a Dolby enable speaker from the dr...

Страница 93: ...configure the settings of each speaker The speaker configuration table located in the lower part of the Speaker Room setup tool allows you to Manually map the channels of the Dolby Dolby Atmos DTS DTS...

Страница 94: ...d in yellow color in the 3D view The available settings for each speaker are the following Dolby Dolby Atmos Auro3D DTS and DTS X channel mapping see below Amplification see below Output Channel speci...

Страница 95: ...up ActiveXovers page of the Advanced Settings user interface Further information about the active crossovers can be found in the Calibrate the Active Crossovers chapter 8 10 MAPPING THE CHANNELS OF DI...

Страница 96: ...nel initially specified as an Atmos speaker to play the Height Left HL channel of Auro3D content NOTE The channel labels and speaker positions of each format are available in the appendix of this docu...

Страница 97: ...s correct from the source to the Altitude32 To verify the routing of each speaker Select the speaker by clicking in the 3D view or by selecting the corresponding line in the speaker table Click on the...

Страница 98: ...rs cut or boost all frequencies equally above a desired cutoff point The shelving low 1st or 2nd order Shelving low filters cut or boost all frequencies equally below a desired cutoff point Each param...

Страница 99: ...is available for each driver of the speaker To open the PEQ editor click on the PEQ icon of the speaker or driver you want to edit The PEQ editor will be displayed as a pop up which overlay the 3D vie...

Страница 100: ...wing parameters Filter Type o The peak notch Parametric equalizers are multi band variable equalizers which allow users to control the three primary parameters amplitude center frequency and bandwidth...

Страница 101: ...applied it is possible to save a PEQ group to have the possibility to load on another channel Once the PEQ has been fully edited to save it as a new PEQ Group click on the Save as button A virtual key...

Страница 102: ...next chapter Load a PEQ Group LOAD A PEQ GROUP Once an EQ group has been saved it is possible to load it on another channel Here is the procedure Open the PEQ editor of the interested channel The sav...

Страница 103: ...if needed Close the PEQ editor by clicking on the Ok button DELETE A PEQ GROUP If an EQ group is not valuable anymore it is possible to delete it to keep a clean and effective list of EQ group To do s...

Страница 104: ...ike to delete in the drop down list Once the desired EQ group is selected please click on the Delete button The EQ group is now deleted Repeat the procedure on other EQ Group if needed Close the PEQ e...

Страница 105: ...ons are fine you can now overwrite this group of EQ on an existing one The saved EQ group are available in the drop down menu of the top left corner called Select an EQ Group Use the drop down menu to...

Страница 106: ...ess to the pink generator Click on the speaker button to generate pink noise on the selected speaker Please note that in case of multiway speaker the pink noise will be generated on the whole speaker...

Страница 107: ...array has to be done within the Speaker Room setup tool using the mapping column of each decoders As explained in the previous chapter Specify a speaker layout Mapping the channels of different format...

Страница 108: ...ntent Left and Right Wide speakers will play Lss and Rss channel simultaneously with Left and Right surround speakers For DTS Legacy content they will play Lss and Rss channel simultaneously with Left...

Страница 109: ...of speakers won t be lost The Selected speakers can all be modified simultaneously using the control panel in the top left corner You can add or decrease gain using 1dB or 1dB buttons or by using the...

Страница 110: ...f the Altitude32 DTS decoders available as a standard feature of the Altitude32 3D decoders ONLY available with the 3D option for the Altitude32 Dolby Digital Dolby Digital Plus Dolby TrueHD DTS Digit...

Страница 111: ...coming content won t be modified and will be played as it is Upmix on Native The incoming content will played using the corresponding upmixer but with the Legacy speaker layout Dolby or DTS column Leg...

Страница 112: ...X Neural X Upmixer Layout Used DTS X Auro 3D Auro 3D Upmixer 1 Layout Used Auro 3D Auro 3D Upmixer Layout Used Auro 3D Native Dolby Atmos Layout Used Atmos Auro 3D Upmixer Layout Used Auro 3D Native...

Страница 113: ...M default layout selected in the Decoders General Settings If this happen selecting Auro 3D listening format will play Native Auro 3D content CPU LOAD do not forget that upmixers require a lot of CPU...

Страница 114: ...istening format still using the Select knob and validate using the Enter button The current listening format is underlined DECODERS CONFIGURATION To configure the Decoders from the front panel press t...

Страница 115: ...e 2 Select a Listening Format in the drop down list available DECODERS CONFIGURATION To configure the decoder parameters for the Dolby DTS and Auro 3D decoders 1 Click on the IN sources menu item of t...

Страница 116: ...activated the Altitude32 will automatically switch to the input format of the decoder Combined with the 3D remapping the Altitude32 virtually replaces the speakers at their ideal position recommended...

Страница 117: ...t use the loudness management information provided in the incoming signal s metadata o DRC Settings Auto Automatic DRC low level boost and high level cut Enabled Enable the Dynamic Range Control manag...

Страница 118: ...ereo Audio description switch on the visual description track intended for the blind and visually impaired Channel remapping this setting is only applicable for surround formats o None No channel rema...

Страница 119: ...aker layout so heights speakers are disabled Incoming stereo content is upmixed to a surround format and incoming Auro 3D content is downmixed to a surround format o Stereo enforce playback in stereo...

Страница 120: ...eakers before calibration to avoid dangerous level jumps 11 2 CHECKLIST BEFORE YOU START Please go through the following checklist to make sure you are ready to start the calibration process You ve re...

Страница 121: ...nd multi point calibrations In both scenarios a reference measurement position should be chosen carefully since it will be used by the Optimizer for Cross over drivers alignment Loudspeaker 3D localis...

Страница 122: ...122 Point the front red LED to the center of the speakers set...

Страница 123: ...TUP PROCEDURE The overall setup and calibration process of the Altitude32 s active crossovers performed through 2 different tools Use the Speaker Room Setup Tool to Configure the number of ways and th...

Страница 124: ...e number of loudspeakers displayed depends on the number of loudspeakers specified in the Speaker Room Setup tool The following settings are available for each loudspeaker The type of high pass or and...

Страница 125: ...Cancel Changes button to cancel your modifications If change is accepted press the Save button of the preset of your choice in the Presets page to save the changes Otherwise changes will be lost The t...

Страница 126: ...before pressing on the Calibrate button to avoid any feedback loop 3 Take off the cover and switch on the microphone 4 Press the Calibrate button in the Setup ActiveXovers page of the Advanced Settin...

Страница 127: ...he level delay and polarity of each driver Before calibration please note The calibration procedure has to be done individually for each speaker An MLS signal is sent to each driver of the selected sp...

Страница 128: ...n in the Setup ActiveXovers page of the Advanced Settings interface Follow the on screen instructions regarding the microphone 12 5 VERIFY THE SOUND OF THE CALIBRATED CROSSOVERS Once the calibration o...

Страница 129: ...uring the calibration In other words adjusting these parameters before launching the calibration will have no effect on the result Under some circumstances the automatic crossover algorithm may sugges...

Страница 130: ...listen carefully to each speaker connected to the crossover You can play pink noise from the Altitude32 and or play your favorite music cinema samples 12 6 SAVE THE PRESET Last but not least don t for...

Страница 131: ...ings user interface Go to the Optimizer Settings Calibration page The Optimizer requires a minimum Sound Pressure Level for proper calibration Until that minimum SPL is reached the test signal will ke...

Страница 132: ...tructions see previous chapter Make sure the measurement environment is silent Press the Mute button to cut the outputs this step must ALWAYS be performed before pressing the Calibrate button Press th...

Страница 133: ...s the battery level The microphone or cables could also be damaged Unstable position for speaker Someone may have moved during the calibration Too many strong reflections around the microphone environ...

Страница 134: ...ove Elevation view The speakers are seen from the listening point Relative degrees of elevation and azimuth are displayed Details view A table listing the measured distance elevation azimuth level del...

Страница 135: ...ound stage This view also provides the RT60 on the top left corner of the page Overlay both representations with the Scale and Ref Radius options to verify the compliance with the recommended placemen...

Страница 136: ...ker cannot be located during calibration it will be displayed in the center of the circle A non located speaker cannot be used for loudspeaker remapping The Summary page provides additional measuremen...

Страница 137: ...tion is the delay that is added to every speaker to time align the system BM Delay may be added to the subwoofer to improve the crossover with the satellites More rarely if the subwoofer is in advance...

Страница 138: ...y Computation time varies depending on the number of speakers in the system and on the Optimizer parameters IMPORTANT NOTE Once the speaker system has been calibrated every change can be applied throu...

Страница 139: ...Management results do not impact the Optimizer graphs 14 1 OVERVIEW OF THE BASS MANAGEMENT SETUP PROCEDURE The recommended bass management setup procedure is as follows Analyze the acoustical graphs...

Страница 140: ...hannel will be reproduced by one or more subwoofers For each speaker you can Specify High Pass and Low Pass filters for respectively the speaker and the bass managed signal redirected to the subwoffer...

Страница 141: ...t On Standard bass management mode On LFE to LR Distributes the LFE signal to the Left and Right speakers Can be used when there is no subwoofer in the system Note that in this mode if a subwoofer is...

Страница 142: ...are detailed in the sub chapters below The configuration steps are the followings Enter the desired settings in the 1 Set filters table Select the speakers on which you want to applied thoses settings...

Страница 143: ...y to the signal redirected to the subwoofer s High Pass Satellites This section will delemit the low end cutoff frequency of the signal send to the satellites You can here select the type of filter Li...

Страница 144: ...h the signal from the channel will be redirected and played by the subwoffer s You can here select the type of filter Linkwitz Riley Bessel or Butterworth the cutoff frequency and the slope use by thi...

Страница 145: ...FE channel A subwoofer assigned to the LFE will play the 1 of the content To assign the LFE channel to a subwoofer please tick the box of the desired subwoofer The LFE signal can be filtered A Low Pas...

Страница 146: ...ultiple subwoofers configurations two typical cases are handled by the Altitude32 If subwoofers are considered as decorrelated away from each other their power add up If subwoofers are considered as c...

Страница 147: ...or each group of speakers Press the Apply Change button 15 2 SETTING UP ONE OR MORE TARGET CURVES To edit the target curve for one or more speakers go to the Optimizer Settings Target Curve page in th...

Страница 148: ...148 NOTE By default the Optimizer will use both IIR and FIR filters to achieve the target curve In addition to target curves several other parameters define the behavior of the automatic equalization...

Страница 149: ...LIZE THE ACOUSTICAL GRAPHS FOR ALL SPEAKERS Go to the Optimizer Graphs page and visualize the acoustical graphs of one or more speakers Depending on your observations you may decide to change the targ...

Страница 150: ...s or outputs Switching optimization on off Viewing the acoustical graphs For a detailed explanation of all those tools please refer to the Essential Tools and Settings chapter 17 1 MAIN OPTIMIZATION S...

Страница 151: ...pproach See also the Limiter Curve functionality described below Acoustic parameters Quantity of Early Reflections and Resolution of Energy Response The Altitude32 uses two different approaches for th...

Страница 152: ...imiter curve go to Optimizer Settings Settings Limiter Curve Use the Add point mode and your mouse to create editing points around the required frequency range Use the Move point mode and your mouse t...

Страница 153: ...T SURROUND SPEAKER SETTINGS The following features can be separately enabled disabled for the front speakers and for the surround speakers Early reflections correction Energy response correction Delay...

Страница 154: ...mized at all Align L R on target default is On If this setting is on the Optimizer applies filters on the Left Right speakers using their average response as target If this setting is off only the cen...

Страница 155: ...owing options Cutoff frequency default is disabled defines the cutoff frequency for the low pass filter that can be applied to the subwoofer Filter type default is Butterworth defines the type of filt...

Страница 156: ...i point Algorithm is able to take every single measurement point into account The purpose of multi point measurement is not only to optimize a wider listening area but also to get more information fro...

Страница 157: ...fixed rules about choosing multi point measurement positions However making measurement outside of the area covered by the speakers can be considered as irrelevant As an example multi point measureme...

Страница 158: ...ailed the calibration but you don t want to perform a calibration again The weight can be adjusted after a calibration you don t have to run a complete calibration to take weight changes into account...

Страница 159: ...uts Make sure that the routing is correct It s up to you to choose the best way to feed you Hi Fi external DAC 19 2 REMOTE START AND STOP The Altitude32 can be remotely switched on via a Wake on LAN n...

Страница 160: ...d Inputs outputs routing Physical inputs outputs Manual input output EQs SETUP PROCESS AND FILTERS CALCULATION Active Crossovers are set up first following a semi automatic calibration procedure The O...

Страница 161: ...om Dolby http www dolby com us en technologies dolby atmos dolby atmos home theater installation guidelines pdf NOTE As of January 2016 the DTS X Home Theatre Installation Guidelines are not yet avail...

Страница 162: ...uld check which pinout your equipment is using before connecting it to the Altitude32 Unbalanced connections must connect signal to SubD Hot and shield to SubD Cold 19 8 3D MEASUREMENT MICROPHONE The...

Страница 163: ...capsules and electronic Camera Microphone thread POWER SUPPLY The power supply located in the base of the microphone uses a standard 9V PP3 LR61 battery Le red led indicates the battery Level Replaci...

Страница 164: ...e the Configure button of the required Measurement to select the correct compensation file For future measurements use the Default Microphone button to make the required compensation file automaticall...

Страница 165: ...165 CONNECTION ORDER...

Страница 166: ...166...

Страница 167: ...167...

Отзывы: