background image

MR5-WR542G

54Mbps Wireless Router User Guide


29


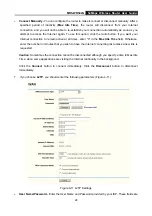
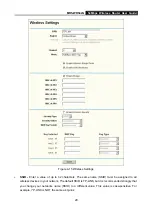
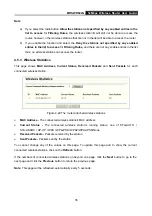
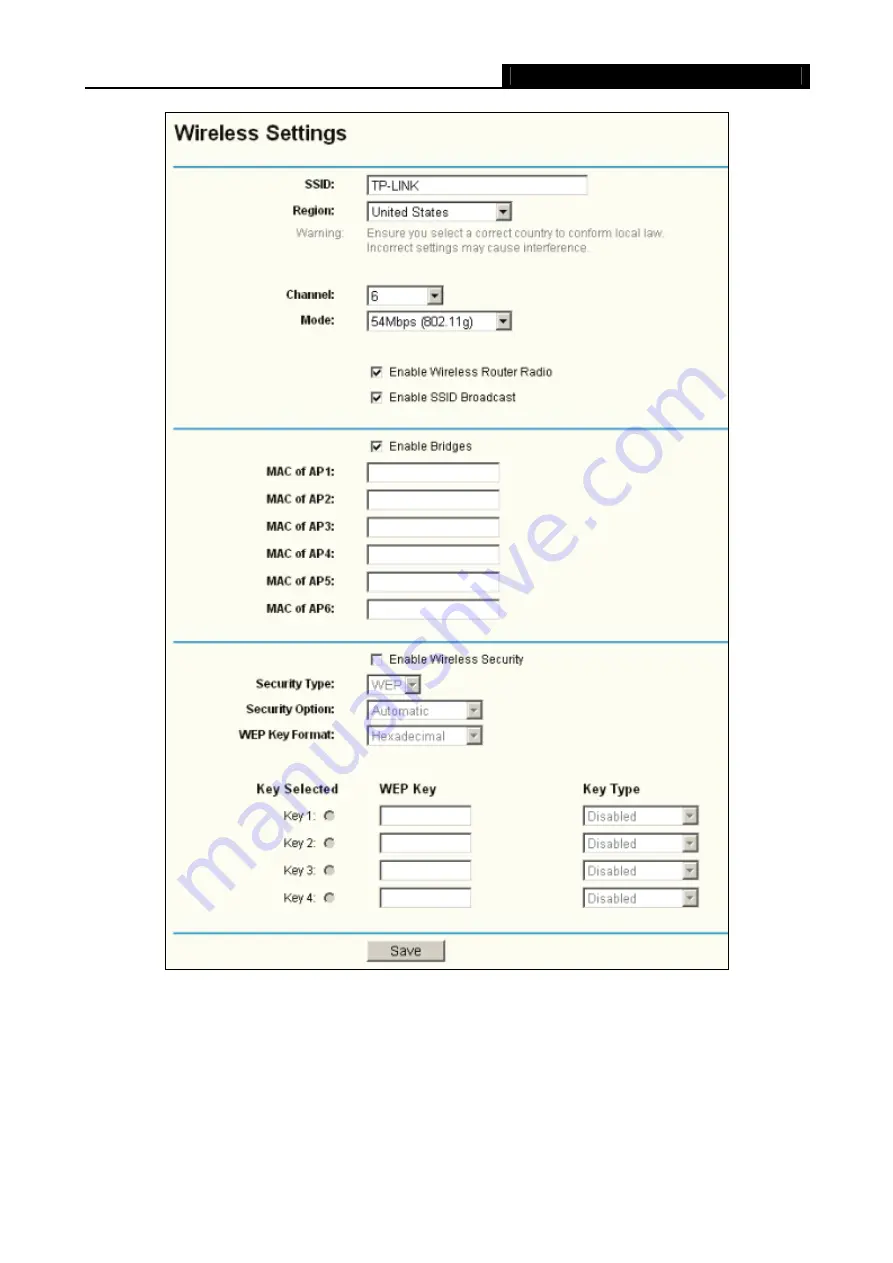
Figure 4-15 Wireless Settings 

¾


SSID - 

Enter a value of up to 32 characters. The same name (SSID) must be assigned to all 

wireless devices in your network. The default SSID is TP-LINK, but it is recommended strongly that 

you change your networks name (SSID) to a different value. This value is case-sensitive. For 

example, 

TP-LINK

 is NOT the same as 

tp-link

Содержание MR5-WR542G

Страница 1: ...MR5 WR542G 54M Wireless Router Rev 1 0 0 2x to 3x eXtended Range 2 4GHz y 802 11g b...

Страница 2: ...e with the instructions may cause harmful interference to radio communications However there is no guarantee that interference will not occur in a particular installation If this equipment does cause...

Страница 3: ...ironment this product may cause radio interference in which case the user may be required to take adequate measures National Restrictions 2400 0 2483 5 MHz Country Restriction Reason remark Bulgaria G...

Страница 4: ...onnecting the Router 6 Chapter 3 Quick Installation Guide 8 3 1 TCP IP configuration 8 3 2 Quick Installation Guide 10 Chapter 4 Configuring the Router 13 4 1 Login 13 4 2 Status 14 4 3 Quick Setup 16...

Страница 5: ...g 53 4 9 1 Binding Setting 53 4 9 2 ARP List 55 4 10 Static Routing 56 4 11 DDNS 57 4 11 1 Dyndns org DDNS 57 4 11 2 Oray net DDNS 58 4 11 3 Comexe cn DDNS 59 4 12 System Tools 60 4 12 1 Time 61 4 12...

Страница 6: ...ne detachable antenna One AC power Adapter for MR5 WR542G 54Mbps Wireless Router Quick Installation Guide One Resource CD for MR5 WR542G 54Mbps Wireless Router including This Guide Other Helpful Infor...

Страница 7: ...MR5 WR542G 54Mbps Wireless Router complies with the IEEE 802 11g and IEEE 802 11b standards so that the data transmission rate is up to 54Mbps It adopts 2x to 3x eXtended Range WLAN transmission techn...

Страница 8: ...pporting static IP address distributing Built in firewall supporting IP address filtering Domain Name filtering and MAC address filtering Supports connecting disconnecting from the Internet on a speci...

Страница 9: ...linked to the corresponding port On There is a device linked to the corresponding port but no activity WAN LAN 1 4 Flashing There is an active device linked to the corresponding port Table 1 1 The LED...

Страница 10: ...ory Defaults function on System Tools Factory Defaults page in the router s Web based Utility 2 Use the Factory Default Reset button First turn off the router s power Second press and hold the default...

Страница 11: ...ll the router you should connect your PC to the Internet through your broadband service successfully If there is any problem please contact your ISP After that please install the router according to t...

Страница 12: ...MR5 WR542G 54Mbps Wireless Router User Guide 7 Figure 2 1 Hardware Installation of the MR5 WR542G 54Mbps Wireless Router...

Страница 13: ...manually 1 Set up the TCP IP Protocol for your PC If you need instructions as to how to do this please refer to Appendix B Configuring the PC 2 Configure the network parameters The IP address is 192 1...

Страница 14: ...Ping command Please check the connection following these steps 1 Is the connection between your PC and the router correct Note The 1 2 3 4 LEDs of LAN port which you link to on the router and LEDs on...

Страница 15: ...gin window will appear similar to that shown in Figure 3 4 Enter admin for the User Name and Password both in lower case letters Then click the OK button or press the Enter key Figure 3 4 Login Window...

Страница 16: ...the necessary network parameters If you choose PPPoE you will see this page shown in Figure 3 7 Figure 3 7 Quick Setup PPPoE User Name and Password Enter the User Name and Password provided by your IS...

Страница 17: ...nter it into this field After you complete the above click Next the Wireless settings page will appear shown in Figure 3 9 Figure 3 9 Quick Setup Wireless settings In this page you can configure the f...

Страница 18: ...how to do this please refer to Section 5 11 5 Rebooting the Router Click the Next button You will then see the Finish page Figure 3 10 Quick Setup Finish After finishing all configurations of basic ne...

Страница 19: ...ss and IP address 3 WAN These parameters apply to the WAN port of the router including MAC address IP address Subnet Mask Default Gateway DNS server and WAN connection type If PPPoE is chosen as the W...

Страница 20: ...MR5 WR542G 54Mbps Wireless Router User Guide 15 Figure 4 1 Router Status...

Страница 21: ...3 LAN MAC Address The physical address of the router as seen from the LAN The value can t be changed IP Address Enter the IP address of your router in dotted decimal notation factory default 192 168...

Страница 22: ...nd L2TP PPTP If you are not sure which connection type you use currently please contact your ISP to obtain the correct information 1 If you choose Dynamic IP the router will automatically get IP param...

Страница 23: ...ill appear shown in Figure 4 5 Figure 4 5 WAN Static IP You should type the following parameters into the spaces provided IP Address Enter the IP address in dotted decimal notation provided by your IS...

Страница 24: ...u want to have elapsed before your Internet connection terminates Caution Sometimes the connection cannot be disconnected although you specify a time to Max Idle Time since some applications is visiti...

Страница 25: ...vanced Settings button to set up the advanced option the page shown in Figure 4 7 will then appear Figure 4 7 PPPoE Advanced Settings Packet MTU The default MTU size is 1480 bytes which value is usual...

Страница 26: ...Click the Save button to save your settings 4 If you choose 802 1X Dynamic IP you should enter the follow parameters Figure 4 8 Figure 4 8 802 1X Dynamic IP Settings User Name Enter the user name for...

Страница 27: ...ick Login to start 802 1X authentication Click Logout to end 802 1X authentication IP Address Enter the IP address in dotted decimal notation provided by your ISP Subnet Mask Enter the subnet Mask in...

Страница 28: ...Internet connection has been terminated due to inactivity Connect on Demand enables the router to automatically re establish your connection as soon as you attempt to access the Internet again If you...

Страница 29: ...main active at all times enter 0 in the Max Idle Time field Otherwise enter the number in minutes that you wish to have the Internet connecting last unless a new link is requested Caution Sometimes th...

Страница 30: ...connected although you specify a time to Max Idle Time since some applications is visiting the Internet continually in the background Connect Automatically Connect automatically after the router is di...

Страница 31: ...And click the Save button Click the Connect button to connect immediately Click the Disconnect button to disconnect immediately Connect on Demand You can configure the router to disconnect from your I...

Страница 32: ...r in minutes that you wish to have the Internet connecting last unless a new link is requested Caution Sometimes the connection cannot be disconnected although you specify a time to Max Idle Time sinc...

Страница 33: ...to reboot 4 5 Wireless Figure 4 14 Wireless menu There are three submenus under the Wireless menu shown in Figure 4 14 Wireless Settings MAC Filtering and Wireless Statistics Click any of them and yo...

Страница 34: ...of up to 32 characters The same name SSID must be assigned to all wireless devices in your network The default SSID is TP LINK but it is recommended strongly that you change your networks name SSID t...

Страница 35: ...The default is 54Mbps 802 11g which allows both 802 11g and 802 11b wireless stations to connect to the router Enable Wireless Router Radio The wireless radio of this Router can be enabled or disable...

Страница 36: ...t stands for any combination of keyboard characters in the specified length Hexadecimal format stands for any combination of hexadecimal digits 0 9 a f A F in the specified length WEP Key settings Sel...

Страница 37: ...WPA2 Radius Server IP Enter the IP address of the Radius Server Radius Port Enter the port number that the radius service used Radius Password Enter the password for the Radius Server Be sure to click...

Страница 38: ...stations not specified by any enabled entries in the list to access To Add a Wireless MAC Address filtering entry click the Add New button The Add or Modify Wireless MAC Address Filtering entry page w...

Страница 39: ...eless MAC Address Filtering list by following these steps 1 Click the Enable button to enable this function 2 Select the radio button Deny the stations not specified by any enabled entries in the list...

Страница 40: ...page shows MAC Address Current Status Received Packets and Sent Packets for each connected wireless station Figure 4 20 The router attached wireless stations MAC Address The connected wireless station...

Страница 41: ...configured on the page shown in Figure 4 22 Figure 4 22 DHCP Settings DHCP Server Enable or Disable the DHCP server If you disable the Server you must have another DHCP server within your network or...

Страница 42: ...C Address Assigned IP and Lease Time for each DHCP Client attached to the router Figure 4 23 Figure 4 23 DHCP Clients List Index The index of the DHCP Client Client Name The name of the DHCP client MA...

Страница 43: ...and IP address in dotted decimal notation of the computer you wish to add 3 Click the Save button when finished Figure 4 25 Add or Modify an Address Reservation Entry To modify or delete an existing e...

Страница 44: ...to the computer specified by the server IP Any PC that was used for a virtual server must have a static or reserved IP Address because its IP Address may change when using the DHCP function You can se...

Страница 45: ...ting entry 1 Click the Modify in the entry you want to modify If you want to delete the entry click the Delete 2 Modify the information 3 Click the Save button Click the Enable All button to make all...

Страница 46: ...supported by the router Incoming Ports Range The port or port range used by the remote system when it responds to the outgoing request A response using one of these ports will be forwarded to the PC...

Страница 47: ...n 3 Click the Save button Click the Enable All button to make all entries enabled Click the Disabled All button to make all entries disabled Click the Delete All button to delete all entries Note 1 Wh...

Страница 48: ...ources or devices as needed UPnP devices can be automatically discovered by the UPnP service application on the LAN You can configure UPnP on this page that shown in Figure 4 32 Figure 4 32 UPnP Setti...

Страница 49: ...IP Address Filtering Domain Filtering MAC Filtering Remote Management and Advanced Security Click any of them and you will be able to configure the corresponding function The detailed explanations for...

Страница 50: ...ny passing through the router Enable Domain Filtering set Domain Filtering is enabled or disabled Enable MAC Filtering set MAC Address Filtering is enabled or disabled You can select the default filte...

Страница 51: ...or modify an IP Address Filtering entry please follow these instructions 1 Effective Time Enter a range of time in HHMM format which point to the range time for the entry to take effect For example 08...

Страница 52: ...the Delete 2 Modify the information 3 Click the Save button Click the Enable All button to make all entries enabled Click the Disabled All button to make all entries disabled Click the Delete All but...

Страница 53: ...er a range of time in HHMM format specifying the time for the entry to take effect For example if you enter 0803 1705 than the entry will take effect from 08 03 to 17 05 2 Domain Name Type the domain...

Страница 54: ...limit for other websites you should specify the following Domain filtering list 4 8 4 MAC Filtering Like the IP Address Filtering page the MAC Address Filtering page shown in Figure 4 39 allows you t...

Страница 55: ...ering page To modify or delete an existing entry 1 Click the Modify in the entry you want to modify If you want to delete the entry click the Delete 2 Modify the information 3 Click the Save button Cl...

Страница 56: ...will use when accessing your router from the Internet The default IP Address is 0 0 0 0 It means this function is disabled To enable this function change the default IP Address to another IP Address a...

Страница 57: ...lue between 5 3600 packets When the current ICMP FLOOD Packets number sis beyond the set value the router will start up the blocking function immediately Enable UDP FLOOD Filtering Enable or Disable t...

Страница 58: ...Address The IP address that blocked by DoS are displayed here Host MAC Address The MAC address that blocked by DoS are displayed here To update this page and to show the current blocked host click on...

Страница 59: ...MAC Binding entry you can click the Add New button or Modify button and then you will go to the next page This page is used for adding or modifying an IP MAC Binding entry shown in Figure 4 46 Figure...

Страница 60: ...e computer you could observe the computers in the LAN by checking the relationship of MAC address and IP address on the ARP list and you could configure the items on the ARP list also This page displa...

Страница 61: ...information must travel to reach a specific host or network To add or delete a route work in the area under the Static Routing page shown in Figure 4 49 Figure 4 49 Static Routing To add static routi...

Страница 62: ...all entries 4 11 DDNS The router offers a Dynamic Domain Name System DDNS feature DDNS lets you assign a fixed host and domain name to a dynamic Internet IP Address It is useful when you are hosting y...

Страница 63: ...ve 2 Type the User Name for your DDNS account 3 Type the Password for your DDNS account 4 Click the Login button to login to the DDNS service Connection Status The status of the DDNS service connectio...

Страница 64: ...e Password for your DDNS account 3 Click the Login button to login the DDNS service Connection Status The status of the DDNS service connection is displayed here Domain Name The domain names are displ...

Страница 65: ...pe the User Name for your DDNS account 3 Type the Password for your DDNS account 4 Click the Login button to login to the DDNS service Connection Status The status of the DDNS service connection is di...

Страница 66: ...ettings Time Zone Select your local time zone from this pull down list Date Enter your local date in MM DD YY into the right blanks Time Enter your local time in HH MM SS into the right blanks Time se...

Страница 67: ...ncing difficulties there is no need to upgrade firmware unless the new firmware supports a new feature you need Note When you upgrade the router s firmware you will lose current configuration settings...

Страница 68: ...ackup and Restore This page shown in Figure 4 58 allows you to save current configuration of router as backup or restore the configuration file you saved before Figure 4 58 Backup and Restore Configur...

Страница 69: ...Static address assignment of DHCP server Web Service Port of the router Upgrade the firmware of the router system will reboot automatically Restore the router s settings to factory default system wil...

Страница 70: ...Log This page shown in Figure 4 61 allows you to query the logs of the router Figure 4 61 System Log The router can keep logs of all traffic You can query the logs to find what happened to the router...

Страница 71: ...mitted by the router Total Bytes The total amount of bytes received and transmitted by the router Packets The total amount of packets received and transmitted in the last Packets Statistic interval se...

Страница 72: ...and password in the Password field finish by clicking Connect Figure A 1 PPPoE Connection Type 4 If your ADSL lease is in pay according time mode select Connect on Demand or Connect Manually for Inter...

Страница 73: ...n the WAN MAC Address field Or else type the MAC Address into the WAN MAC Address field The format for the MAC Address is XX XX XX XX XX XX Then click the Save button It will take effect after rebooti...

Страница 74: ...d using 192 168 1 169 as an example remember to click the Save button Figure A 6 DMZ 4 I want to build a WEB Server on the LAN what should I do 1 Because the WEB Server port 80 will interfere with the...

Страница 75: ...dify a Virtual Server page enter 80 into the blank behind the Service Port and your IP address behind the IP Address assuming 192 168 1 188 for an example remember to Enable and Save Figure A 8 Virtua...

Страница 76: ...dapter s manual if needed 1 Install TCP IP component 1 On the Windows taskbar click the Start button point to Settings and then click Control Panel 2 Click the Network and Internet Connections icon an...

Страница 77: ...ties window will display and the IP Address tab is open on this window by default Now you have two ways to configure the TCP IP protocol below Setting IP address automatically Select Obtain an IP addr...

Страница 78: ...er s LAN IP address is 192 168 1 1 type IP address is 192 168 1 x x is from 2 to 254 and Subnet mask is 255 255 255 0 3 Type the router s LAN IP address the default IP is 192 168 1 1 into the Default...

Страница 79: ...MR5 WR542G 54Mbps Wireless Router User Guide 74 Figure 4...

Страница 80: ...MR5 WR542G 54Mbps Wireless Router User Guide 75 Appendix C Specifications...

Страница 81: ...networking at 54 Mbps using direct sequence spread spectrum DSSS technology using OFDM modulation and operating in the unlicensed radio spectrum at 2 4GHz and backward compatibility with IEEE 802 11b...

Страница 82: ...devices must be configured with the same SSID This is typically the configuration parameter for a wireless PC card It corresponds to the ESSID in the wireless Access Point and to the wireless network...

Отзывы: