background image

Program Mode 

(To preset up to two on and off periods per 
day)

The program mode has two settings for 
weekdays and two for weekends. The hand 
held remote comes with the following pre 
programmed settings:

Weekday Program 

(Monday through Friday) 

Program one (P1) turns ON at 7:00am and 
turns OFF at 8:00am
Program two (P2) turns ON at 5:00pm and 
turns OFF at 7:00pm

Weekend Program 

(Saturday and Sunday)

Program one (P1) turns ON at 9:00am and 
turns OFF at 10:00am
Program two (P2) turns ON at 6:00pm and 
turns OFF at 9:00pm

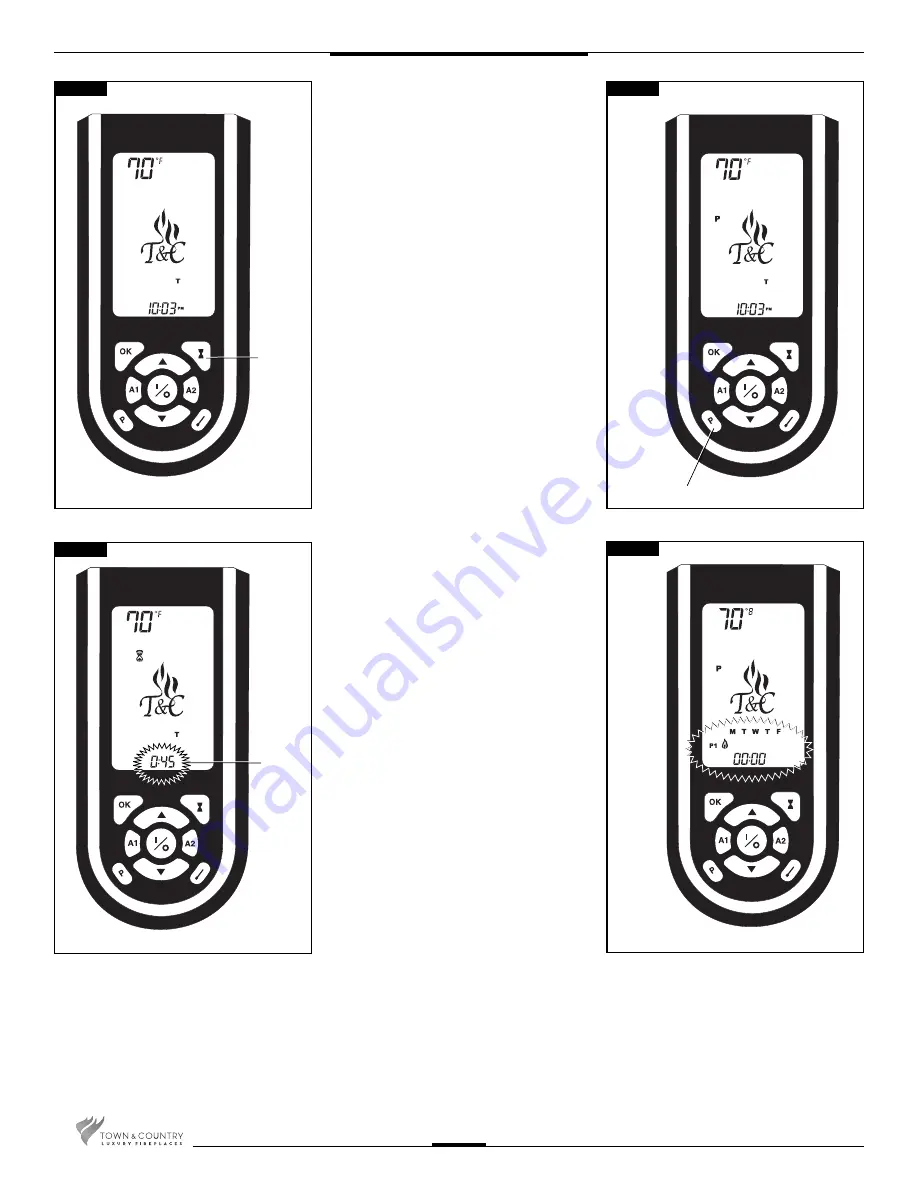
Activate the programs by pressing the program 
button on the lower left hand side of the remote 
hand set. (Fig. #113)
To customize these settings:

1.  

Hold the program button down until the 
display fl ashes. (P1, weekday ON time - 
[Fig. #114])

2.  

Use the up and down buttons to change 
the time to the desired ON time.

3.  

By pressing the OK button, the P1 weekday 
OFF time will fl ash. (Fig. #114)

4.  

Use the up and down buttons to set the 
desired OFF time.

5.  

Press the OK button and the P2 weekday 
ON time will fl ash.

6.  

Repeat the process to set the P2 weekday, 
P1 weekend and P2 weekend programs.

7.  

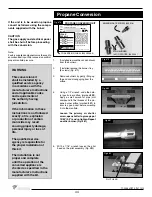
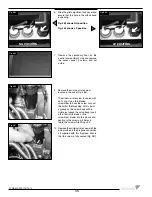
When the P2 OFF time is set and the OK 
button is pressed the display will stop 
fl ashing and the remote will be in program 
mode.

The program settings are now stored in the remote handset and will not change unless the 
above process is repeated or the batteries are removed from the handset.

To switch out of program mode, simply press one of the manual, timer or thermostat mode 
buttons. Please note that if the manual button is pressed it will turn the fi replace off.

Fig. #111

TIMER

Fig. #112

TIMER

RUN

DISPLAY

PROGRAM

Fig. #114

Fig. #113

58

TCWS.54CSTE 110712-72

Содержание TCWS54ST SERIES D

Страница 1: ... fire department Donotstoreorusegasolineorotherflammable vapours and liquids in the vicinity of this or any other appliance Thisappliancemaybeinstalledin anaftermarket permanently located manufactured home USA only or mobile home where not prohibited by local codes Thisapplianceisonlyforusewiththetypeofgas indicated on the rating plate This appliance is not convertible for use with other gases unl...

Страница 2: ...ing 19 Venting Components 19 TCVT PVOFM Power Vent Installation 20 Contents of Power Vent Kit 20 Venting Configurations 20 Minimum Vent Length Chart 21 Vent Terminal Minimum Clearances 21 Horizontal Side Wall Venting 22 Fan Wiring 24 Terminal Dimensions 25 Wiring Diagram 26 TCVT PVOFM3 Power Vent Installation 27 Contents of Power Vent Kit 27 Venting Configurations 27 Terminal Dimensions 28 Horizon...

Страница 3: ...nal Tranquility Burner 38 Propane Conversion 44 Optional Black Diamond Burner 47 Gas Pressure Check 51 Burner Flame Adjustment 52 Firebox Panels Installation 53 Finishing Touch Trim Kit Instructions 54 Lighting Instructions 55 First Fire 55 Maestro Control System 56 Remote Control Initial Setup 56 Maestro Control System Operation 57 Maintenance 60 Replacement Parts TCWS 54CSTE 61 Replacement Parts...

Страница 4: ... located out of traffic and away from furniture and draperies Children and adults should be alerted to the hazards of high surface temperatures and should stay away to avoid burns or clothing ignition Young children should be carefully supervised when they are in the same room as the appliance Clothing or other flammable material should not be placed on or near the appliance Any grill panel or doo...

Страница 5: ...e with the exhaust vent terminal for the horizontally vented gas fuelled heating appliance or equipment The sign shall read in print size no less than one half 1 2 inch in size GAS VENT DIRECTLY BELOW KEEP CLEAR OF ALL OBSTRUCTIONS 4 INSPECTION The state or local gas inspector of the side wall horizontally vented gas fuelled equipment shall not approve the installation unless upon inspection the i...

Страница 6: ... in 0 mm Adjacent side wall 4 in 102 mm Ceiling to appliance 24 in 610 mm Mantel to appliance See Figure 2 Maximum Mantel extension See Figure 2 Mantel support 4 in 102 mm Vent pipe 1 3 4 in 45 mm Fig 1 Fig 2 MAY USE COMBUSTIBLE FACING MATERIAL IN THIS AREA NON COMBUSTIBLE FINISH MATERIAL SEE FIG 8 9 NON COMBUSTIBLE ZONE DO NOT INSTALL ANY COMBUSTIBLE MATE RIAL ELECTRICAL WIRING OR GAS PLUMBING IN...

Страница 7: ...im Kit if required TIP To ensure glass is properly latched grasp the top left and right sides of the glass frame under moderate pressure it should pull forward and return to original position evenly on both sides Fig 5a TheTown CountryFireplaceinstallationandventingmustconformtothelocalcodes or in the absence of local codes current CSA B149 1 installation code in Canada or the current National Fue...

Страница 8: ...ous types of installations are possible such as a peninsula wall an island and between two interior walls Fig 7 Due to high temperatures do not locate this fireplace in areas of high traffic or near furniture or draperies The minimum clearances from the fireplace to combustible surfaces must be adhered to and are shown in Fig 2 and Fig 3 EXAMPLES OF COMMON LOCATIONS SEE FIG 11 FOR DIMENSIONS HANDL...

Страница 9: ... sides and top of the fireplace can be framed in up to the steel studs using conventional lumber Consult local building codes for specific requirements Due to high temperatures non combustible backer board such as cement board or its equivalent must be used to sheet in the front of the fireplace Fig 9 Standard sheetrock dry wall may be used beyond this If the backer board is not to be finished wit...

Страница 10: ...ERIALS NOTE CALCIUM SILICATE IS 1 2 THICK CAUTION CALCIUM SILICATE BOARD CAN BE DAMAGED IF DROPPED OR STRUCK HANDLE WITH CARE INSPECT BOARD PRIOR TO INSTALLATION AND DO NOT USE IF CRACKED NOTE IT IS RECOMMENDEDTO PRE DRILL MOUNTING HOLES IN THE BOARD PRIOR TO SECURINGTOTHE FRAMING THISWILL PREVENT THE BOARD FROM CRACKING Fig 9 Fig 10 Fig 11 NON COMBUSTIBLE MATERIAL MUST EXTEND TO THE TOP EDGE AND ...

Страница 11: ...2 8493 4 STUD SIDES 54 L 2 3 8493 2 STUD OUTER SIDES 54 L 2 4 8493 STUD UPPER LOWER 38 1 16 L 4 5 8493 6 INNER CROSS BRACE 56 7 8 L 1 6 8493 8 STUD CENTER 24 L 3 7 8293 9 LOWER CROSS BRACE 56 7 8 L 1 8 5049 993 SCREW DRYWALL 1 1 4 Pkg 30 TCWS 54STFRKIT 11 TCWS 54CSTE 110712 72 Steel Stud Framing Kit ...

Страница 12: ... 2 Attach 7 to 2 using 1 screw through the top and 1 screw through the side at each end Attach 3 1 on each side with bend out tabs to the front Place 2 remaining pieces of 4 together at the bottom of the framing kit in the same manner as the top screw them together and attach to the inner steel studs Turn the framing kit over and secure all studs from the back 2 2 3 3 4 4 4 4 5 6 6 6 7 FRONT VIEW ...

Страница 13: ...IAL NON COMBUSTIBLE BOARD 2 Attach the Assembled Frame to the Unit Align the assembled frame to the unit framing brackets Fig 13 Attach at the fastening points through the access holes in the outer side studs 3 3 Secure to Existing Framing Bend out the tabs 90 degrees before inserting the unit into its framed housing Fig 14 Secure the frame assembly to the wood frame through the tabs 4 Install Non...

Страница 14: ...ace then align and re engage on the lintel support brackets 5 Removethefrontbottomlintelscrewlocated on the bottom outside corners of the lintel assembly and move it to the hole on the other side of the center bottom lintel screw Fig 19 NOTE The lintel assembly has a maximum range of adjustability of 5 8 to accommo date varying facing material thicknesses The maximum depth of facing material is 6 ...

Страница 15: ...nside the control box Fig 17 5 Connect a 110 V AC switched electrical supply to the electrical blocks installed inside the control box for the lighting Block A is for the upper lights installed in all units Block B is for the lighting in the secondary floor that comes with the optional black diamond burner kit Fig 18 6 Connect the gas supply to the valve Fig 19 7 Plug the A C adaptor into the outl...

Страница 16: ... from the gas control Fig 23 Release the button check manifold pressure and ensure that it s correct Refer to Burner installation manual 18 Pressthecenterbuttonofthewallcontrol The fireplace will shut off 19 Installtheremainingscrewsintheaccess panel and tighten 20 Remove the pressure gauge and the extension test fitting and thread the pressure test port plug into the pressure test port Thread sea...

Страница 17: ...ll be disabled and the LED will not flash to indicate low battery The battery backup must be removed when using a power vent The Standing Pilot feature will be de activated feature not available when Power Vent Pre Purge Mode is active Upon receiving any ON command the powerventoutputwillcloseimmediately buttheignitioncyclewillNOTbeginfor10 seconds pre purge This means that themoduleWILLNOTemitasp...

Страница 18: ... 61 000 BTU HR on both Natural Gas and Propane A drip leg must be installed in the gas supply line going to the gas control valve to minimize the possibility of any loose scale or dirt within the gas supply line from entering the control valve It is essential that a union or flanged connection be installed just upstream of the valve and inside the control compartment to allow for repair or replace...

Страница 19: ... 48 Pipe Length SV5LA 6 Pipe Adjustable SV5LA12 12 Pipe Adjustable SV5LA24 24 Pipe Adjustable SV5E45 Swivel 45 Elbow SV5E90 Swivel 90 Elbow SV5CSB Adjustable decorative sq cathedral support SV5AC Collar for decorative sq cathedral support SV5SU Universal support SV5SD Floor support SV5BM Wall band SV5RSA Attic radiation shield SV5RSM Wall radiation shield SV5BF Firestop SELKIRK DIRECT TEMP Number ...

Страница 20: ... 75 in 38mm Horizontal vent pipe 1 75 in 38mm All other clearances are as per the fireplace installation instructions VENTING CONFIGURATIONS Maximum total vent length is 110ft plus six 90 degree elbows or combination of other elbows equaling 90 degrees with a maximum 66 foot vertical rise Minimum total vent length is one 90 degree elbow plus one foot horizontal The vent can be installed with any c...

Страница 21: ...ne of the regula tor I clearance to service regulator vent outlet 6 feet 1 8 m minimum J clearance to nonmechanical air supply inlet to building or the combustion air inlet to any other appliance 12 inches 30 cm minimum K clearance to a mechanical air supply inlet 6 feet 1 8 m minimum L clearance above paved side walk or a paved driveway located on public property 7 feet 2 1 m minimum M clearance ...

Страница 22: ...y securing the outer flanges on the perimeter of the terminal to the outside wall ensure that the terminal is the right way up exhaust at the bottom Once secured to the building the outer flanges may be covered with siding stucco etc up to the level of the perimeter edge As per local building codes See Fig 30 4 For wall thicknesses 7 1 2 or less install the inner wall plate supplied over the termi...

Страница 23: ...tach pipe to the fireplace Fig 35 Connect the vent pipe to the vent terminal and then secure the inner wall plate and wall pipe cover to the framing This ensures that any insulation is retained in the wall and that the correct clearances are maintained NOTE The vent terminal comes pre painted but can be painted to match your wall finish colour using high temperature paint that can withstand temper...

Страница 24: ...r grill to the assembly and remove grill Fig 38 3 Run the power supply wire from the fireplace to the connector block inside the power vent assembly Fig 39 40 Connect wires as shown Connect ground to ground screw and tighten strain relief 4 Reposition blower grill and secure in place with previously removed screws Place the end cover back onto the upper tabs and secure in place with 2 screws on to...

Страница 25: ...d to match your wall finish color using high temperature paint that can withstand temperatures of at least 250 degrees fahrenheit or 120 degrees Celcius Ensure the your paint is compatible with Thurmalox 230 Series paint Terminal Dimensions 16 5 16 16 1 2 9 6 3 8 1 1 2 7 1 2 13 1 4 25 TCWS 54CSTE 110712 72 ...

Страница 26: ...or 1 4 Female Connector 1 4 Female Connector 1 4 Female Connector 1 4 Female Connector Wiring the Power Vent Kit provided by Town Country Communication wires Main Pilot Low pressure side Orange Orange Pressure switch wire Supplied Power Vent switch wire Supplied Black Black STANDARD AWG 14 2 WIRE OR EQUIVALENT NOT SUPPLIED All electrical installations should be performed by a qualifi ed electricia...

Страница 27: ...e 1 4 8029 Wall Pipe Cover 1 VENTING CONFIGURATIONS Maximum total horizontal vent length is 6ft Minimum total vent length is one 90 degree elbow plus one foot horizontal Ensure vent pipe is properly supported For every 90 degree elbow after the first transition subtract 2 from maximum horizontal run Minimum total vent length is one 90 degree elbow plus one foot horizontal 66 MAX VERTICAL Min 1 3 4...

Страница 28: ...ocation diagram Fig 28 2 Cut and frame a 14 1 2 wide by 14 3 4 high opening For standard up and out installations the opening should be 3 4 lower than the minimum specified in Fig 27 Height of the opening will vary with each installation See Fig 29 3 Attach the power vent terminal by securing the outer flanges on the perimeter of the terminal to the outside wall ensure that the terminal is the rig...

Страница 29: ...ttach pipe to the fireplace Fig 45 Connect the vent pipe to the vent terminal and then secure the inner wall plate and wall pipe cover to the framing This ensures that any insulation is retained in the wall and that the correct clearances are maintained NOTE The vent terminal comes pre painted but can be painted to match your wall finish colour using high temperature paint that can withstand tempe...

Страница 30: ...er grill to the assembly and remove grill Fig 48 3 Run the power supply wire from the fireplace to the connector block inside the power vent assembly Fig 49 50 Connect wires as shown Connect ground to ground screw and tighten strain relief 4 Reposition blower grill and secure in place with previously removed screws Place the end cover back onto the upper tabs and secure in place with 2 screws on t...

Страница 31: ...or 1 4 Female Connector 1 4 Female Connector 1 4 Female Connector 1 4 Female Connector Wiring the Power Vent Kit provided by Town Country Communication wires Main Pilot Low pressure side Orange Orange Pressure switch wire Supplied Power Vent switch wire Supplied Black Black STANDARD AWG 14 2 WIRE OR EQUIVALENT NOT SUPPLIED All electrical installations should be performed by a qualifi ed electricia...

Страница 32: ...AGE SUPPLY TO THIS UNIT ITEM PART No DESCRIPTION QTY 1 TCVT 502462 Power Vent Terminal 1 VENTING CONFIGURATIONS Maximum vent length is 110 ft plus six 90 degree elbows or combination of other elbows equaling 90 degrees with a maximum 66 foot vertical rise Minimum total vent length is one 90 degree elbow plus one foot horizontal The vent can be installed with any combination of rise and run between...

Страница 33: ...restops Horizontal Side Wall Venting Exhaust Outlet Finished Wall Power Vent Terminal Fig 52 Fig 2 A clearances above grade veranda porch deck or balcony 12 inches 30 cm minimum B clearance to window or door that may be opened 12 inches 30 cm minimum C clearance to permanently closed window minimum 12 inches 30 cm recommended to prevent condensation on window D vertical clearance to ventilated sof...

Страница 34: ...ower vent terminal sufficient to pass through the chase NOTE DO NOT CONNECT AN ADJUSTABLE LENGTH VENT PIPE TO THE TERMINAL 6 Seal the connection of the first length of pipe at the terminal and any other pipe to pipe joint by both screwing and taping the outside joint using high temperature foil tape 7 Remove the junction box cover Part D 8 Remove and discard the exhaust shield Part E 9 Apply a bea...

Страница 35: ...T PVOB2 Part F Vertical Rain Cap TCVT 8074 Part C Drip Shield Part B Vertical Standoff Part A Flashing Site Fabricated Chase MUST ALIGN 8 x 1 2 S S 16 Required 8 x 1 1 2 S S 8 REQUIRED NOTE Holes to secure rain cap are not predrilled SILICONE ALL CONNECTING FACES 14 2 Wire w Ground Final Installation Height 21 35 TCWS 54CSTE 110712 72 ...

Страница 36: ...k 120 Volt Common wire White 1 4 Male Connector 1 4 Male Connector 1 4 Male Connector 1 4 Male Connector 1 4 Female Connector 1 4 Female Connector 1 4 Female Connector 1 4 Female Connector Wiring the Power Vent Kit provided by Town Country Communication wires Main Pilot Low pressure side Orange Orange Pressure switch wire Supplied Power Vent switch wire Supplied Black Black STANDARD AWG 14 2 WIRE ...

Страница 37: ... High Temperature self adhesive aluminium tape provided Wrap the tape completely around the joint and press firmly in place Inner pipe does not need to be sealed APPROVED HIGH TEMP SELF ADHESIVE TAPE SUPPLIED VENT PIPE Fig 54 37 TCWS 54CSTE 110712 72 Vent Pipe Sealant ...

Страница 38: ...3 4 LBS SAND 1 HARDWARE PACK 1 PILOT ROCK 2 BURNER ASSEMBLIES 1 BURNER TRAY ASSEMBLY 5 PEBBLE SETS 2 SECONDARY FLOOR HALVES WITHOUT LIGHTS 3 TRAY LEGS A B C D E F B C A D E F D G G G H H Contents of Package 38 TCWS 54CSTE 110712 72 ...

Страница 39: ...leg in place Fig 55 Fig 56 2 Attach tray legs as shown in Fig 56 The center tray leg and the right side of the secondary floor are attached with the same screws to the center floor leg 3 Attach pilot to center tray leg Fig 57 Fig 56 Fig 55 Fig 57 ATTACH HERE AND ON OPPOSITE SIDE ATTACH CENTER TRAY LEG AND SECONDARY FLOOR TOGETHER ROUTE PILOT UP THROUGH HERE ROUTE PILOT UP THROUGH HERE Installation...

Страница 40: ...leg TIP A light will aid aligning the holes in the tray with the leg CAUTION The burners should be tightly butted up against each other at the center to ensure correct operation 5 Remove the panel retainer clips from inside the firebox and install the side panels Replace the panel retainer clips Fig 59 60 NOTE PROCEED TO AND FOLLOW IN STRUCTIONS IN GAS PRESSURE CHECK SECTION ON PAGE 51 BEFORE INST...

Страница 41: ...ing 8 screws Secure tray around pilot first then the other 6 screws 7 Place sand into the burner tray and brush smooth Use caution not to get sand near the burner ports Fig 62 Fig 62 Fig 61 SECURE PILOT HERE FIRST 41 TCWS 54CSTE 110712 72 ...

Страница 42: ...ide of the burner and ensure that the arrow on each rock points towards the same side of the fireplace Fig 64 to 72 8 Each rock has a slot in it s base and is marked with a letter and an arrow Fig 63 Fig 69 Fig 70 Fig 63 Fig 64 Fig 66 Fig 68 Fig 67 Fig 65 42 TCWS 54CSTE 110712 72 ...

Страница 43: ...77 11 Place the fifth set of rocks randomly aroundtheburnersinthesandasdesired 12 Place the pilot rock over the pilot with the opening facing the center of the burner 10 Repeat the sequence of placing the rocks three more times until the burner is covered Fig 76 PORCELAIN STRIPS Fig 77 Fig 71 Fig 72 Fig 75 Fig 73 Fig 74 A B C D E F G H J 43 TCWS 54CSTE 110712 72 ...

Страница 44: ...p the end and disengaging from the orifice 4 Using a 1 2 wrench undo the natu ral gas burner orifice marked 32 Apply a small amount of pipe joint compound to the threads of the pro pane burner orifice marked 51 to ensure a good seal before screwing it into the manifold Loosen the primary air shutter screw open shutter to give a gap of 13 64 0 2 and re tighten Repeat on other burner Fig 81 5 With a...

Страница 45: ...an O ring Use a thin bladed screwdriver to back the screw out past the limit of the threading At this point a groove on the screw body will be visible just above the valve body Insert a thin tool knife blade or fine screwdriver blade into the groove and gently pry the screw up It helps to rotate the screw while lifting on it 10 Replacetheminimumratescrewwiththe one provided in the propane conversi...

Страница 46: ...tach the access panel to the floor of the firebox with the screws previously removed then replace the secondary floor and install or reinstall the burners burner tray and media Date ______________________ By Par ___________________ LP GAS DU GAZ LP 12 5 in wc 12 5 po c e 3 11 kPa 13 9 in wc 13 9 po c e 3 45 kPa 11 0 in wc 11 0 po c e 2 74 kPa 51 Max 61 000Btu 17 8kw Min 39 000Btu 11 5kw 120412 6 W...

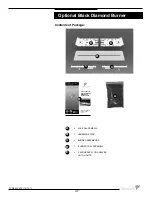
Страница 47: ...ART TCWS 54NG03C2 For Model TCWS54 Series C2 These instructions are supplementary to the Installation and Operating Instructions supplied with the fireplace and should be kept together Refer to the Installation and Operating Instructions for proper gas supply safety requirements and operating instructions IMPORTANT THESE INSTRUCTIONS ARE TO REMAIN WITH THE HOMEOWNER Optional Black Diamond Burner C...

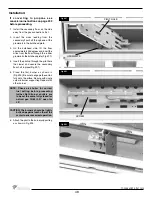
Страница 48: ... the pilot hole then lower and secure the secondary floor half in place Fig 91 5 Place the first burner as shown in Fig 92 Be sure to engage the venturi fully onto the orifice Secure with single screw in burner support leg Repeat with other burner NOTE Check air shutter for correct fuel setting before proceeding further Both burner shutters are to be set the same fully closed for natural gas 13 64...

Страница 49: ...TION ON PAGE 51 BEFORE INSTALLING BURNER TRAY AND MEDIA 9 Place mesh burner tray on top of burners and secure the tray ends to the panels first Two screws per side Fig 96 10 Secure the mesh to the burners with screws provided by screwing through meshtoeachsmallflangeontheburners 8 per burner Fig 96 PANEL RETAINER CLIP SCREWS SCREWS Fig 96 Fig 94 Fig 95 49 TCWS 54CSTE 110712 72 ...

Страница 50: ...the panel set into the fireplace as shown in Fig 97 with the narrow edge facing the center of the fireplace 12 Spread the glass media evenly over the entire mesh tray leaving the small protrusion above the pilot clear of glass Fig 98 PORCELAIN STRIPS Fig 97 50 TCWS 54CSTE 110712 72 ...

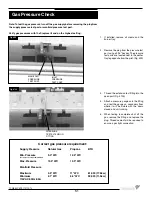
Страница 51: ...he plug Thread sealant will be required to ensure a gas tight connection Note To test the gas pressure turn off the gas supply before removing the plug from the supply pressure test port or manifold pressure test port Verify gas pressures with the fireplace lit and on the highest setting Correct gas pressure requirement Supply Pressure Natural Gas Propane BTU Min Pressure 5 0 WC 12 5 WC For purpos...

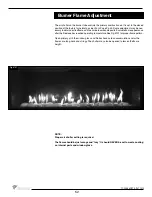
Страница 52: ...r the fireplace has reached operating temperature See Fig 101 for proper flame pattern Open primary air if the window glass and firebox have carbon accumulation and or the flames are long dark and stringy The shutter may also be opened to lessen the flame height NOTE Proper air shutter setting is required The flame should be just orange and lazy It should NEVER be set to create sooting on internal...

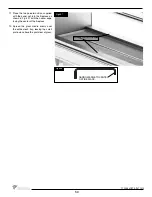
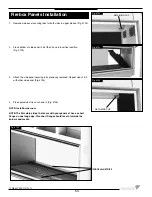
Страница 53: ...oved Repeat steps 2 3 with other side panel Fig 104 4 Place porcelain strips as shown in Fig 105 NOTE Install burner now NOTE The Porcelain strips that came with your panel set have a short flange on one long edge This short flange should face in towards the burners and media Fig 102 Fig 103 Fig 105 Fig 104 RETAINING CLIP RETAINING CLIP PORCELAIN STRIPS 53 TCWS 54CSTE 110712 72 Firebox Panels Inst...

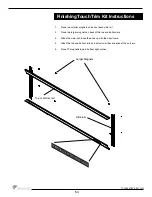
Страница 54: ...ottom rails 3 Attach the side rails Even the ends up with the door frame 4 Attach the top and bottom rails and adjust so mitres are even at the corners 5 Place TC magnetic logo in bottom right corner Larger Magnets Top or bottom rail Side rails 54 TCWS 54CSTE 110712 72 Finishing Touch Trim Kit Instructions ...

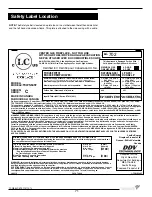
Страница 55: ...ir may result in a fire or explosion D Do not use this appliance if any part has been under water Immediately call a qualified service technician to inspect the appliance to replace any part of the control system any gas control which has been under water 180612 5051 175 5 TCWS54ST Hot while in operation Do not touch Severe burns may result Keep children clothing furniture gasoline and other liqui...

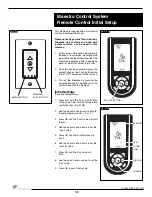
Страница 56: ... The handset is now synchronized with the fireplace Initial Settings Time and temperature 1 Press and hold the A1 and A2 buttons at the same time until the temperature symbol flashes Fig 108 2 Use the up and down arrows to set pre ferred temperature units F or C 3 Press OK and the hour value will start to flash 4 Use the up and down arrows to set the hour value 5 Press OK and the minute value will...

Страница 57: ... button on the remote control can be used to turn the fireplace ON and OFF With the fireplace off press the center button to turn it on The MAN and flame icons will be displayed on the screen A second push will turn it off The MAN and flame icons will disappear from the screen When the fireplace is on the up and down buttons located above and below the center but ton are used to modulate the flame...

Страница 58: ...day ON time Fig 114 2 Use the up and down buttons to change the time to the desired ON time 3 BypressingtheOKbutton theP1weekday OFF time will flash Fig 114 4 Use the up and down buttons to set the desired OFF time 5 Press the OK button and the P2 weekday ON time will flash 6 Repeat the process to set the P2 weekday P1 weekend and P2 weekend programs 7 When the P2 OFF time is set and the OK button...

Страница 59: ...d the thermostat button on the lower right hand side of the hand held remote for 5 seconds Fig 117 The temperature icon on the display will flash Fig 118 3 While the temperature icon is flashing use the up and down arrows to set the temperature to the desired setting 4 Once the desired setting is reached press the OK button If the OK button is not pressed the icon will continue to flash for 5 seco...

Страница 60: ...e Re install glass retaining clips Annual Inspection a Remove glass panel and pebble assemblies if applicable Inspect pebble and burner assemblies for soot buildup If excessive buildup of soot is present have a qualified ser vice person inspect and adjust unit for proper combustion Clean burners with a brush or vacuum cleaner paying close attention to burner ports b Check the pilot system for prop...

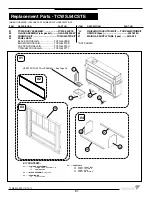
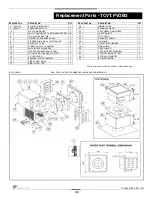
Страница 61: ...N TCPN 54STTI ITEM DESCRIPTION PART NO 5 FINISHING TOUCH TRIM KIT TCRP 54WSTRIMKIT 6 ORIFICE 2pcs 5021 332A 7 MAIN GAS SUPPLY TUBE 1pcs 5019 223 NOT SHOWN KIT CONTENTS 1 TCWS BODY ASSEMBLY 1a SPRING LATCH ASSEMBLY 2 1b CONTROL BOX 2 GLASS ASSEMBLY c w gasket 3 FRAMING KIT 3a STEEL STUDS 4 PANEL SETS 4a PANEL FRONT BASE 4b PANEL LEFT SIDE 4c PANEL REAR 4d PANEL RIGHT SIDE 1 2 3 4 MAESTRO CONTROL AS...

Страница 62: ...IT TCWS 54NGST04C 2 PEBBLE ASSEMBLY 5 boxes 5096 921 3 SAND Two Bags TC42 SAND34 4 PILOT ROCK BLACK 8421 A PILOT ROCK GREY 8422 A WHEN ORDERING INCLUDE PART NUMBER WITH DESCRIPTION 1 2 KIT CONTENTS Replacement Parts Tranquility Burner 62 TCWS 54CSTE 110712 72 ...

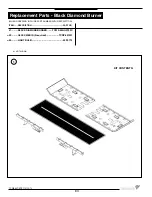
Страница 63: ...T NO 1 BLACK DIAMOND BURNER TCWS 54NGST03C 2 GLASS MEDIA 3 required TCRP 501201 3 LIGHT BULB 5033 713 WHEN ORDERING INCLUDE PART NUMBER WITH DESCRIPTION Replacement Parts Black Diamond Burner 1 KIT CONTENTS 63 TCWS 54CSTE 110712 72 ...

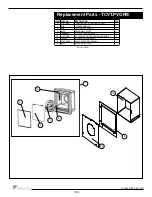
Страница 64: ...DECORATIVE COVER 1 5 8020 INNER WALL PLATE 1 9 5068 8065 1 4 LDF PAPER GASKET 1 10 TCVT 8016 TCVT FMPV OUTER CASING ASSEMBLY 1 11 5024 62 BLOWER POWERVENT 1 12 TCVT 8028 WALL SLEEVE ASSEMBLY 1 13 8029 WALL PIPE COVER 1 NOT SHOWN 1 13 5 12 10 9 11 2 4 Replacement Parts TCVT PVOFM 64 TCWS 54CSTE 110712 72 ...

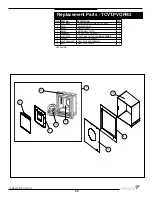
Страница 65: ...RILL COVER 1 5 8020 5 INNER WALL PLATE 1 9 5068 8065 1 4 LDF PAPER GASKET 1 10 TCVT 8035 TCVT FMPV OUTER CASING ASSEMBLY 1 11 5024 63 BLOWER POWERVENT 1 12 TCVT 80285WLD WALL SLEEVE ASSEMBLY 1 13 8029 WALL PIPE COVER 1 NOT SHOWN 1 13 5 12 10 9 11 2 4 Replacement Parts TCVT PVOFM3 65 TCWS 54CSTE 110712 72 ...

Страница 66: ...SHING SHORTY B625 500 2 18 SIDE COVER RIGHT 1 19 SIDE COVER LEFT 1 ITEM PART No DESCRIPTION QTY 20 INSIDE COVER 1 21 EXHAUST SHIELD 1 22 SECONDARY RAIN SHIELD 2 23 JUNCTION BOX 1 24 TOP COVER 1 25 EXHAUST SCREEN 1 26 FLASHING 1 27 OUTLET AIR CHANNEL 1 28 DRIP SHIELD 1 30 VENT COLLAR 1 31 VENT EXHAUST ASSEMBLY 1 32 VERTICAL RAIN CAP TCVT 1 33 VERTICAL STANDOFF 1 34 BLOWER WIRING 1 ITEM 35 AND 36 AR...

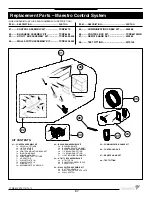
Страница 67: ...1 4 FLEX TUBE 1c 1 2 FLEX TUBE 1d CONTROL MOUNTING BRACKET 1e IGNITION MODULE 1f WIRING HARNESS 1h PRESSURE TEST FITTINGS 1i AC ADAPTOR 1j WS54ST PLATE A 1k WS54ST PLATE B 1l WING NUT 1 1m MINIMUM RATE SCREW NG 2 BULKHEAD ASSEMBLY KIT 2a BULKHEAD PLATE 2b BULKHEAD PLATE GASKET 2c ELEC BULKHEAD ASSEMBLY 2d 1 2 BULKHEAD FITTING 2e 1 4 BULKHEAD FITTING 2f LIGHTING WIRE GROMMETS 3 UTILITY BOX ASSEMBLY...

Страница 68: ... Black 120 V olt Common wire White 1 4 Male Connector 1 4 Male Connector 1 4 Male Connector 1 4 Male Connector 1 4 Female Connector 1 4 Female Connector 1 4 Female Connector 1 4 Female Connector Wiring the Power V ent Kit provided by T own Country Communication wires Main Pilot Low pressure side egnarO egnarO Pressure switch wire Supplied Power V ent switch wire Supplied kcalB kcalB ST ANDARD A WG...

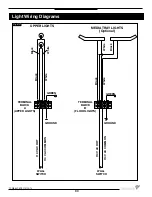
Страница 69: ...ite White 110 V AC HOT 110 V AC HOT 110 V AC COMMON 110 V AC COMMON GROUND GROUND GREEN GREEN WALL SWITCH WALL SWITCH TERMINAL BLOCK A UPPER LIGHTS TERMINAL BLOCK B FLOOR LIGHTS White White Black Black Fig 121 Light Wiring Diagrams 69 TCWS 54CSTE 110712 72 ...

Страница 70: ...70 TCWS 54CSTE 110712 72 ...

Страница 71: ...nd Side Standoffs Sommet Arrière et Côté Butée 0 in 0 po 0 mm Sidewall to Appliance Du mur latéral a l appareil 4 in 4 po 102 mm Mantel to Appliance Du manteau al appareil 9 in 9 po 229 mm Maximum Mantel Extension Allongement maximum du manteau 12 in 12 po 305 mm See Installation Manual for more detail Voyez des Directive de l Installation pour plus détaux Mantel Supports Supports du manteau 2 in ...

Страница 72: ...Technical support 1 250 748 1184 Web site www townandcountryfireplaces net 2975 Allenby Rd Duncan BC V9L 6V8 Printed in Canada ...

Отзывы: