background image

User’s Manual

4-43

Operating Basics

Wireless LAN

The Wireless LAN is compatible with other LAN systems based on Direct 

Sequence Spread Spectrum/Orthogonal Frequency Division Multiplexing 

radio technology that complies with the IEEE802.11 Wireless LAN 

standard.

Frequency Channel Selection of 5GHz for IEEE 802.11a or n draft 2.0

Frequency Channel Selection of 2.4GHz for 802.11b/g or n draft 2.0

Roaming over multiple channels

Card power management

Wired Equivalent Privacy (WEP) data encryption based on an 128-bit 

encryption algorithm

Wi-Fi Protected Access™ (WPA™) support

Advanced Encryption Standard (AES) data encryption

Settings

1. Please make sure that the 

Wireless Communication Switch

 is turned 

on.

2. Click 

Start

 and then click 

Connect To 

to display 

Connect to a network 

window.

3. Click 

Set up a connection or network

.

4. Follow the wizard. You will need the name of the wireless network 

together with security settings. Consult the documentation 

accompanied with your router or ask your wireless network 

administrator for the settings.

Security

TOSHIBA strongly recommend that you enable encryption functionality, 

otherwise your computer will be open to illegal access by an outsider 

using a wireless connection. If this occurs, the outsider may illegally 

access your system, eavesdrop, or cause the loss or destruction of 

stored data.

TOSHIBA is not liable for the loss of data due to eavesdropping or 

illegal access through the wireless LAN and the damage thereof.

The transmission speed over the wireless LAN, and the distance over 

which the wireless LAN can reach, may vary depending on surrounding 

electromagnetic environment, obstacles, access point design and 

configuration, client design and software/hardware configurations. The 

transmission rate described is the theoretical maximum speed as 

specified under the appropriate standard - the actual transmission speed 

will be lower than the theoretical maximum speed.

Содержание PQX31U-00U00C

Страница 1: ...computers toshiba europe com User s Manual Qosmio X300 ...

Страница 2: ...right laws if you use the screen mode switching functions e g Wide mode Wide Zoom mode etc of this product to display enlarged images video at coffee shops or hotels for the purposes of profits or providing these to the public Disclaimer This manual has been validated and reviewed for accuracy The instructions and descriptions it contains are accurate for the TOSHIBA Qosmio X300 Portable Personal ...

Страница 3: ...d other restricted use applications unless Macrovision Corporation expressly authorizes otherwise All forms of reverse engineering or decompiling are forbidden EU Declaration of Conformity CE compliance This product is labelled with the CE Mark in accordance with Radio Equipment and Telecommunications Terminal Equipment Directive 1999 5 EC which includes the compliance to the Electromagnetic Compa...

Страница 4: ...re is not official supported by the operator of the related medical facility Vehicle Environments Please read the operator s manual of the vehicle manufacturer for further restrictions of use Aircraft Environments Please follow the advices of the flight personnel regarding restrictions of use Any consequences resulting from the use of this product in working environments that are not approved or t...

Страница 5: ...en tested to and found to conform with the additional requirements conditional in EG 201 121 Specific switch settings or software setup is required for each network please refer to the relevant sections of the user guide for more details The hookflash timed break register recall function is subject to separate national type approvals It has not been tested for conformity to national type regulatio...

Страница 6: ... Hg and or cadmium Cd will appear below the crossed out wheeled dust bin symbol By participating in separate collection of batteries you will help to assure the proper disposal of products and batteries and thus help to prevent potential negative consequences for the environment and human health For more detailed information about the collection and recycling programmes available in your country p...

Страница 7: ...enter the low power Sleep mode which shuts down the system and display within 15 minutes of inactivity in AC power mode TOSHIBA recommends that you leave this and other energy saving features active so that your computer will operate at its maximum energy efficiency You can wake the computer from Sleep mode by pressing the power button Products that earn the ENERGY STAR prevent greenhouse gas emis...

Страница 8: ...t an authorized service location Use of controls adjustments or the performance of procedures other than those specified may result in hazardous radiation exposure To prevent direct exposure to the laser beam do not try to open the enclosure Location of the required label COMPLIES WITH FDA RADIATION PERFORMANCE STANDARDS 21 CFR SUBCHAPTER J CLASS 1 LASER PRODUCT LASER KLASSE 1 Panasonic Communicat...

Страница 9: ...ntenance contact an authorized service location Use of controls adjustments or the performance of procedures other than those specified may result in hazardous radiation exposure To prevent direct exposure to the laser beam do not try to open the enclosure Location of the required label COMPLIES WITH FDA RADIATION PERFORMANCE STANDARDS 21 CFR SUBCHAPTER J CLASS 1 LASER PRODUCT LASER KLASSE 1 PIONE...

Страница 10: ...ance contact an authorized service location Use of controls adjustments or the performance of procedures other than those specified may result in hazardous radiation exposure To prevent direct exposure to the laser beam do not try to open the enclosure Location of the required label COMPLIES WITH FDA RADIATION PERFORMANCE STANDARDS 21 CFR SUBCHAPTER J CLASS 1 LASER PRODUCT LASER KLASSE 1 Hitachi L...

Страница 11: ... manual carefully and keep this manual for your future reference In case of any trouble with this model please contact your nearest AUTHORIZED service station To prevent direct exposure to the laser beam do not try to open the enclosure CAUTION USE OF CONTROLS OR ADJUSTMENTS OR PERFORMANCE OF PROCEDURES OTHER THAN THOSE SPECIFIED IN THE OWNER S MANUAL MAY RESULT IN HAZARDOUS RADIATION EXPOSURE ...

Страница 12: ...rside 2 7 Front with the display open 2 8 System indicators 2 11 Optical disc drives 2 13 AC adaptor 2 15 Chapter 3 Getting Started Connecting the AC adaptor 3 2 Opening the display 3 3 Turning on the power 3 5 Starting up for the first time 3 5 Turning off the power 3 6 Restarting the computer 3 9 System Recovery Options and Restoring the pre installed Software 3 10 Chapter 4 Operating Basics Usi...

Страница 13: ... 5 2 Windows special keys 5 4 Desktop style Keyboard 5 5 Generating ASCII characters 5 5 Chapter 6 Power Power conditions 6 1 Power indicators 6 2 Battery types 6 3 Care and use of the battery pack 6 5 Replacing the battery pack 6 9 TOSHIBA Password Utility 6 11 Power up modes 6 13 Panel power on off 6 14 System automatic Sleep Hibernation 6 14 Chapter 7 HW Setup Accessing HW Setup 7 1 HW Setup Wi...

Страница 14: ...ction 9 10 4 LCD Brightness and Eye Stain 11 10 4 USB Sleep and Charge 13 10 4 Appendix A Specifications Physical Dimensions A 1 Appendix B Display Controller and Video modes Display controller B 1 Video modes B 1 Appendix C Wireless LAN Card Specifications C 1 Radio Characteristics C 1 Supported Frequency Sub bands C 2 Appendix D Bluetooth wireless technology Interoperability Bluetooth wireless t...

Страница 15: ...puter If you are an experienced computer user please continue reading the preface to learn how this manual is organized then become acquainted with this manual by browsing through its pages Be sure to read the Special features section of the Introduction to learn about features that are uncommon or unique to this computer as well as the section on HW Setup to understand how to setup and configure ...

Страница 16: ...10 Legal Footnotes The Appendices provide technical information about your computer The Glossary defines general computer terminology and includes a list of acronyms used in the text The Index quickly directs you to the information contained in this manual Conventions This manual uses the following formats to describe identify and highlight terms and operating procedures Abbreviations On first app...

Страница 17: ...ows ABC When procedures require an action such as clicking an icon or entering text the icon s name or the text you are to type in is represented in the typeface you see to the left ABC Names of windows or icons or text generated by the computer that appear on its display screen are presented in the type face you see to the left Pay attention A caution informs you that improper use of equipment or...

Страница 18: ... when the power is turned on or when an AC adaptor is connected to a power outlet even if your computer is in Sleep Mode In this condition observe the following Never cover your computer or AC adaptor with any object Never place your computer or AC adaptor near a heat source such as anelectric blanket or heater Never cover or block the air vents including those located at the base of the computer ...

Страница 19: ... Manual for Safety and Comfort also includes information on work space design posture and lighting that can help reduce physical stress Heat injury Avoid prolonged physical contact with the computer If the computer is used for long periods its surface can become very warm While the temperature will not feel hot to the touch if you maintain physical contact with the computer for a long time for exa...

Страница 20: ...tion Manual for Safety and Comfort Be sure to read it before using the computer The cautions on use of a Qosmio X300 series computer 1 Clean any dust accumulated on the computer s cooling vents The cooling vents are located on the back and underside of the computer 2 Cooling vents on the underside and back of the computer When you use your computer in a dusty area dirt and debris may accumulate on...

Страница 21: ...by creating a vacuum If the fan is blocked it could cause the CPU to run at a lower performance level or cause the computer to shut down Loose items such as notebook and tissue paper plastic wrappers or other similar materials can block the air intake preventing air from reaching the CPU Do not use the computer on surfaces with objects that can be drawn in by the cooling fan ...

Страница 22: ...016 battery for Slim size remote controller Modular cable for modem Is included with some models Cleaning cloth Is included with some models Documentation Qosmio X300 Portable Personal Computer User s Manual Qosmio X300 Quickstart Instruction Manual for Safety and Comfort Warranty Information If any of the items are missing or damaged contact your dealer immediately Some of the features described ...

Страница 23: ...alled dependent on the model purchased The availability of this software is dependent on the model you purchased Hardware This section describes the hardware of your computer The actual specifications may vary depending on the model you purchased Processor Built in The processor type varies depending on the model To check which type of processor is included in your model open the TOSHIBA PC Diagno...

Страница 24: ...mory space available to the operating system Because Windows only displays the available memory instead of the computer s physical memory you will only see approximately 3 GB Slots 1 024 MB 2 048 MB or 4 096 MB memory modules can be installed in the two memory slots Maximum system memory size and speed are depending on the model you purchased Video RAM The amount of Video RAM available is dependen...

Страница 25: ...olts however you should note that the output current varies among different models Using the wrong adaptor can damage your computer Refer to the AC adaptor section in Chapter 2 The Grand Tour Hard disk drive or Solid state drive This computer is equipped with the following types of hard disk drive HDD The capacity of each hard disk drive model is different HDD 200 GB 250 GB 320 GB 400 GB 500 GB SS...

Страница 26: ...M s at a maximum 8x speed and CD ROM s at a maximum 24x speed and writes CD R s and CD RW s at up to 24x speed DVD R s DVD R s and DVD W s at up to 8x speed DVD RW DVD R Dual Layer and DVD R Double Layer at up to 6x speed DVD RAM at up to 5x speed and supports the following formats CD R CD RW DVD ROM DVD Video CD DA CD Text Photo CD single multi session CD ROM Mode 1 Mode 2 CD ROM XA Mode 2 Form1 ...

Страница 27: ...egal Footnote Graphics Processor Unit GPU 6 For more information regarding the Graphics Processor Unit GPU please refer to the Legal Footnotes section in Chapter 10 or click the 6 above Built in The internal keyboard provides the embedded numeric overlay keys dedicated cursor control keys and Keys The keyboard is compatible with the IBM enhanced keyboard Refer to Chapter 5 The Keyboard for details...

Страница 28: ...tem The integrated sound system provides support for the computer s internal speakers and microphone as allowing an external microphone and headphones to be connected via the appropriate jacks Web Camera Web Camera is a device that allows you to record video or take photographs with your computer You can use it for video chatting or video conferences using a communication tool such as Windows Live...

Страница 29: ...pability for data and fax communications that support the V 90 V 92 standards and includes a modem jack for connection to the telephone line Please note that both the V 90 and V 92 standards are only supported in the USA and Canada Australia only the V 90 standard is supported in other regions You should also be aware that the speed of data and fax transfer will depend on the analog telephone line...

Страница 30: ...are hardware configurations The Transmit Rate at X Mbit s is the theoretical maximum speed under the IEEE802 11 a b g standard The actual transmission speed will be lower than the theoretical maximum speed Legal Footnote Wireless LAN 7 For more information regarding Wireless LAN please refer to the Legal Footnotes section in Chapter 10 or click the 7 above Wireless communication switch This switch...

Страница 31: ...r on password Two levels of password security supervisor and user are available to prevent unauthorized access to your computer Instant security A specific hot key function automatically locks the system providing data security Intelligent power supply 1 A microprocessor in the computer s intelligent power supply detects the battery s charge automatically calculates the remaining battery capacity ...

Страница 32: ...r software The contents of main memory are automatically saved to the hard disk drive so that when you next turn the power on again you can continue working right where you left off Refer to the Turning off the power section in Chapter 3 Getting Started for more details Sleep Mode If you have to interrupt your work you can use this feature to allow you to turn off power to the computer without exi...

Страница 33: ...he computer TOSHIBA Flash Cards The TOSHIBA Flash Cards provide a quick way to modify selected system functions and to launch applications Hot key function TOSHIBA utility launcher function HW Setup This utility allows you to customize your hardware settings according to the way you work with the computer and the peripherals you use TOSHIBA Accessibility The TOSHIBA Accessibility utility provides ...

Страница 34: ...d homepage through Internet Explorer Files and folders can be encrypted decrypted and third party access to them is prevented Disable the password protected screen saver when returning from a power saving mode such as Sleep Mode Authentication of the User Password and if applicable the HDD Hard Disk Drive Password when booting up the computer Power on Security Single Swipe Sign On feature Fingerpr...

Страница 35: ...the setup module of TOSHIBA Disc Creator To access this utility click Start All Programs TOSHIBA CD DVD Applications DVD RAM Utility Ulead DVD MovieFactory for TOSHIBA Ulead DVD MovieFactory for TOSHIBA allows users to instantly create DVD video or slideshow discs via a user friendly wizard interface with specific task oriented features TOSHIBA DVD PLAYER This utility allows you to easily play DVD...

Страница 36: ...ce verification library to verify the face data of users when they log in to Windows If the verification is successful the user will be logged into Windows automatically The user can thus avoid having to enter a password or the like which makes the login process easier Memory expansion Two memory modules DDR3 1066 can be easily installed in this computer Battery Pack An additional battery pack can...

Страница 37: ... 8 For more information regarding Non applicable Icons please refer to the Legal Footnotes section in Chapter 10 or click the 8 above Please handle your computer carefully to avoid scratching or damaging the surface Optical disc drive Wireless Communication Switch Infrared receiver window Wireless communication switch Slide this switch to the right to turn on Wireless LAN and Bluetooth functions S...

Страница 38: ...alfunction of such equipment possibly resulting in serious injury Do not use the Wi Fi or Bluetooth functionalities near a microwave oven or in areas subject to radio interference or magnetic fields Interference from a microwave oven or other source can disrupt Wi Fi or Bluetooth operation Infrared receiver window This is a sensor window that receives signals from the remote control provided with ...

Страница 39: ...rs Foreign metal objects can create a short circuit which can cause damage and fire possibly resulting in serious injury Please note that it is not possible to confirm the operation of all functions of all USB devices that are available In view of this it may be noted that some functions associated with a specific device might not operate properly If you connect an eSATA device after the computer ...

Страница 40: ...mum When you connect a digital speaker or headphones the internal speaker is automatically disabled This jack can be used also as S PDIF jack and enables connection of optical digital correspondence apparatus Microphone jack A 3 5 mm mini microphone jack enables connection of a three conductor mini jack for monaural microphone input and connection of a stereo device for audio input Universal Seria...

Страница 41: ...torm There may be a remote risk of electric shock from lightning Bridge media slot This slot lets you insert an SD SDHC memory card miniSD microSD Card Memory Stick PRO PRO Duo xD picture card memory stick Duo and MultiMediaCard Refer to Chapter 8 Optional Devices In order to use the computer s Bridge media slot Modem jack open the right side cover first LAN Jack Link indicator green LAN active in...

Страница 42: ...nal Some models are equipped with a Display port Display port DP can connect DP connector with DP cable DP cable can send video signals In addition to this it can send and receive control signals External monitor port This port allows you to connect an external video display to the computer LAN jack This jack lets you connect to a LAN The adaptor has built in support for Ethernet LAN 10 megabits p...

Страница 43: ...the subwoofer do not have cooling vents in the subwoofer location pictured above Thermal Fans These fans draw cool air up from area around the base of the computer Speaker subwoofer The subwoofer will reproduce the low frequency sounds generated Battery pack The battery pack provides power to the computer when the AC adaptor is not connected For more detailed information on the use and operation o...

Страница 44: ...mation on removing the battery pack please refer to Chapter 6 Power Battery safety lock Slide this latch into its Unlock position in order to release the battery pack ready for removal Wireless LAN antenna Non shown Web camera Web camera LED Display Screen Stereo speaker tweeter LCD Sensor switch Stereo speaker Touchpad Control buttons Fingerprint Sensor Touch Pad Stereo speaker Wireless LAN anten...

Страница 45: ...when operating on batteries For more information on the computer s display please refer to the Display Controller and Video modes section in Appendix B Front operation panel nine panels Nine panels are available for use CD DVD Play Pause Stop Previous Next Mute Illumination On Off Camera and DOLBY These panels allow you to manage Audio Video run applications and access utilities Power button Press...

Страница 46: ...witch senses when the display panel is either closed or opened and activates the Panel Power Off On feature as appropriate For example when you close the display panel the computer enters Hibernation Mode and shuts itself down and then when you next open the display the computer will automatically start up and return you to the application you were previously working on You can specify within the ...

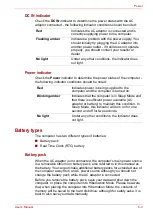
Страница 47: ...the computer off into Sleep Mode this indicator will flash amber approximately one second on two seconds off both while the system is shutting down and while it remains turned off Battery The Battery indicator shows the condition of the battery s charge Red indicates the battery is fully charged amber indicates the battery is charging and flashing amber indicates a low battery condition Please ref...

Страница 48: ...hen any letter is typed When the NUMLOCK indicator glows the ten key allows you to enter numbers Keypad indicators NUM LOCK indicator CAPS LOCK indicator CAPS LOCK This indicator glows green when letter keys are locked into their uppercase format NUM LOCK When the Num Lock indicator is lit you can use the numeric keypad for entering numbers When it is off you can use it to navigate through pages P...

Страница 49: ...mputer optical drive in order to understand the type of discs that can be written Please refer to Chapter 4 Operating Basics for further information CDs CD R media can only be written to once the recorded data cannot subsequently be erased or changed CD RW media including multi speed CD RW discs high speed CD RW discs and ultra speed CD RW discs can be recorded to more than once DVDs DVD R DVD R D...

Страница 50: ... ROM XA Mode 2 Form1 Form2 CD ROM Mode 1 Mode 2 Photo CD single multi session Enhanced CD CD EXTRA Addressing Method 2 Some types and formats of DVD R Dual Layer and DVD R Double Layer discs may be unreadable The read speed is slower at the centre of a disc and faster at the outer edge DVD read 8 speed maximum DVD R write 8 speed maximum DVD R DL write 6 speed maximum DVD RW write 6 speed maximum ...

Страница 51: ...l be bundled with the computer Do not use a 3 pin to 2 pin conversion plug The supplied power cord conforms to safety rules and regulations in the region the product is bought and should not be used outside of this region In order to use the adaptor computer in other regions you should please buy a power cord that conforms to the safety rules and regulations in that particular region Always use th...

Страница 52: ... the enclosed Instruction Manual for Safety and Comfort for information on the safe and proper use of this computer It is intended to help you be more comfortable and productive while using a notebook computer By following the recommendations in it you may reduce your chance of developing a painful or disabling injury to your hand arms shoulders or neck Use a virus check program and make sure it i...

Страница 53: ... possibly resulting in serious injury Always use or purchase power cables that comply with the legal voltage and frequency specifications and requirements in the country of use Failure to do so could result in a fire or electric shock possibly resulting in serious injury The supplied power cord conforms to safety rules and regulations in the region the product is bought and should not be used outs...

Страница 54: ...he computer should glow Opening the display The computer s display panel can be opened to a wide range of angles for optimal viewing Lift up the display panel of the computer and adjust the panel to create a comfortable viewing angle While holding down the palm rest with one hand so that the main body of the computer is not raised slowly lift the display panel this will allow the angle of the disp...

Страница 55: ... open the display panel too far as this could put stress on the display panel s hinges and cause damage Do not press or push on the display panel Do not lift the computer by the display panel Do not close the display panel with pens or any other objects left in between the display panel and the keyboard When opening or closing the display panel place one hand on the palm rest to hold the computer ...

Страница 56: ...or the first time The Microsoft Windows VistaTM Startup Screen will be the first screen displayed when you turn on the power Follow the on screen instructions on each screen in order to properly install the operating system After you turn on the power for the first time do not turn it off until you have set up the operating system Please refer to the section Starting up for the first time for more...

Страница 57: ...the power again you can continue working right where you left off Make sure the Hard Disk Drive indicator is off If you turn off the power while a disk disc is being accessed you may lose data or damage the disk Never turn off the power while an application is running Doing so could cause loss of data Never turn off the power disconnect an external storage device or remove storage media during dat...

Страница 58: ...maged Do not remove the battery pack while the computer is in Sleep Mode unless the computer is connected to an AC power source Data in memory could be lost When the AC adaptor is connected the computer will go into Sleep Mode according to the settings in the Power Options to access it Start Control Panel System and Maintenance Power Options To restore the operation of the computer from Sleep Mode...

Страница 59: ...computer Benefits of Hibernation Mode The Hibernation Mode feature provides the following benefits Saves data to the hard disk drive when the computer automatically shuts down because of a low battery condition You can return to your previous working environment immediately when you turn on the computer Saves power by shutting down the system when the computer receives no input or hardware access ...

Страница 60: ...During this time the Hard Disk Drive indicator will glow After you turn off the computer and the content of memory has been saved to the hard disk drive turn off the power to any peripheral devices Restarting the computer Certain conditions require that you reset the computer for example if You change certain computer settings An error occurs and the computer does not respond to your keyboard comm...

Страница 61: ... Follow the instructions shown on the on screen menu 1 Turn off the computer 2 While holding the F8 key turn on the computer 3 The Advanced Boot Options menu will be displayed Use the arrow keys to select Repair Your Computer and press ENTER 4 Follow the on screen instructions Restoring the pre installed Software Depending on the model you purchased different ways for restoring the pre installed s...

Страница 62: ... be created Be sure to connect the AC adaptor when you create Recovery Discs Be sure to close all other software programs except the Recovery Disc Creator Do not run software such as screen savers which can put a heavy load on the CPU Operate the computer at full power Do not use power saving features Do not write to the disc when the virus check software is running Wait for it to finish then disa...

Страница 63: ...nally installed factory state If you subsequently set up your hard disk drive again do not change delete or add partitions in a manner other than specified in the manual otherwise you may find that space for the required software is not available In addition if you use a third party partitioning program to reconfigure the partitions on your hard disk drive you may find that it becomes impossible t...

Страница 64: ...ive your Recovery Discs within two weeks after placing your order Restoring the pre installed software from your ordered Recovery Discs If the pre installed files are damaged you are able to use the Recovery Discs you have ordered to restore the computer to the state it was in when you originally received it To perform this restoration follow the steps below 1 Load the Recovery Discs into the opti...

Страница 65: ...d 3 Use the cursors key to select the CD ROM icon from the menu Please refer to the Boot Priority section in Chapter 7 HW Setup for further information 4 A menu will be displayed from which you should follow the on screen instructions ...

Страница 66: ...To use the Touch Pad simply touch and move your fingertip across it in the direction you want the on screen pointer to go Touch Pad and Touch Pad control buttons The two buttons below the Touch Pad are used like the buttons on a standard mouse press the left button to select a menu item or to manipulate text or graphics designated by the pointer and press the right button to display a menu or othe...

Страница 67: ...n feature it is no longer necessary to input the password from the keyboard Fingerprint feature enables you to Logon to Windows and access a security enabled homepage through Internet Explorer Files and folders can be encrypted decrypted and third party access to them prevented Disable the password protected screen saver when returning from a power saving mode such as Sleep Mode Authentication of ...

Страница 68: ...ngerprint recognition problems or a lower fingerprint recognition success rate Do not scratch or poke the sensor with your nails or any hard or sharp objects Do not press the sensor strongly Do not touch the sensor with a wet finger or any wet objects keep the sensor surface dry and free from water vapor Do not touch the sensor with a soiled or dirty finger as minute foreign particles of dust and ...

Страница 69: ...he following to improve the fingerprint recognition success rate Enroll two or more fingers Enroll additional fingers if a recognition failure often occurs when using already enrolled fingers Check the condition of your finger any conditions which have changed since enrollment such as injury rough skin and extremely dry wet soiled dirty oily soaked or swollen fingers may lower the recognition succ...

Страница 70: ...ree times your finger to ensure you use the correct method Click Try again to if you wish to practice again You have finished practicing click Next button 6 Register your fingerprint on the Fingerprint Image Capture screen Let the computer read the finger to be registered 3 times An image of your fingerprint will be shown on the screen each time the fingerprint is successfully read Once the finger...

Страница 71: ...s administrator privileges 3 Are you sure you want to delete this fingerprint will be displayed on the screen click Yes button To delete individual fingerprints 1 Click the fingerprint mark above the registered finger 2 Are you sure you want to delete this fingerprint will be displayed on the screen click Yes button In use please be aware of the following limitations of the fingerprint sensor A wa...

Страница 72: ...sword authentication system that is used when the computer is turned on If you do not want to use the fingerprint authentication system for password authentication while booting up the computer instead you prefer using the keyboard entry method simply press the BACK SPACE key when the Fingerprint Pre OS Authentication screen is displayed Using this process will switch the password input screen acr...

Страница 73: ...e Enable Pre OS Fingerprint Authentication check box and then click OK 6 Click the Exit button at the TrueSuiteAccessManager screen You must ensure that you use the TOSHIBA Password Utility to register a User Password before using the Fingerprint Pre OS Authentication and its extended function to allow fingerprints to be used to access the computer when it is turned on If the fingerprint authentic...

Страница 74: ...nrollment for further instructions 1 To run this program click Start All Programs TrueSuite Access Manager TrueSuite Access Manager with Admin Privileges 2 UserAccountControl screen is displayed click the Allow button This setting can only be changed if the currently logged in user has administrator privileges 3 Swipe a registered finger on the fingerprint sensor 4 Click the Settings at the TrueSu...

Страница 75: ...er Camera Assistant Software will help you to add various video effects to your video or photograph Enables the transmission of video and use of video chat via the internet using specialized applications The effective pixel count for this web camera is 1 3 million Please refer to the Camera Assistant Software Online Help for details Web Camera Please unstick the protective plastic film before usin...

Страница 76: ...n Night Mode This may result in the playback of the recorded video file seeming unsmooth TOSHIBA Face Recognition does not guarantee the correct identification of a user Changes to the likeness of a registrant such as hairstyle changes wearing a cap or wearing glasses may affect the recognition rates when such changes occur after the registrant had registered TOSHIBA Face Recognition may incorrect...

Страница 77: ... Recognition Data Take a picture for facial verification purposes and register the data needed when you log in To register the data needed when you log in follow the steps as described below 1 To launch this utility click Start All Programs TOSHIBA Utilities TOSHIBA Face Recognition 2 Click the Next button to start the guide 3 First take a picture while moving your neck slightly to the left and ri...

Страница 78: ...w the steps as described below 1 To launch this utility click Start All Programs TOSHIBA Utilities TOSHIBA Face Recognition The Management screen is displayed 2 Select a user which is deleted in the Management screen 3 Click the Delete button You are about to delete the user data Would you like to continue will be displayed on the screen If you do not want the data to be deleted click the No butto...

Страница 79: ...e displayed 3 Select Start face recognition 4 The Select Account screen will be displayed 5 Select the account and click the Arrow button 6 Please turn your face to the camera will be displayed 7 Verification will be performed If the authentication is successful the image data taken in step 6 will be faded in and placed over one another 8 Windows Welcome screen will be displayed and will be logged...

Страница 80: ...steps as listed below and refer to figures 4 4 to 4 6 1 When the computer s power is on press the eject button to open the disc tray slightly Pressing the eject button 2 Grasp the disc tray gently and pull until it is fully opened Pulling the disc tray open Eject button Disc tray ...

Страница 81: ... need to turn it slightly at an angle when you place it in the disc tray After loading the CD DVD you should ensure that it is properly positioned over the central spindle and that it lies flat within the tray Do not touch either the laser lens or the area immediately around it doing so could cause misalignment and may damage the drive Make sure that no foreign objects are inserted into or otherwi...

Страница 82: ...hen it is locked How to remove a CD DVD when the disc tray will not open Pressing the eject button will not open the disc tray when the computer is turned off although in these circumstances you can open the tray by inserting a slender object such as a straightened paper clip about 15mm into the eject hole just to the right of the drive s eject button Do not press the eject button while the comput...

Страница 83: ...inning when you open the disc tray it may fly off of the spindle and cause injury The optical drive installed on this computer cannot write multiple sessions on DVD R Dual Layer disc sessions Once a disc has been written to once it will be finalized Once finalized no further writing to the disc will be possible regardless of what portion of the total disc capacity was used Please refer to the Writ...

Страница 84: ...sed by the change or loss of the recorded contents Damage that may be caused by using third party equipment or software Given the technological limitations of current optical disc writing drives you may experience unexpected writing or rewriting errors due to disc quality or problems with hardware devices In view of this it is good practice to make two or more copies of important data in case of a...

Страница 85: ...media DVD R MITSUBISHI KAGAKU MEDIA CO LTD for 8x and 16x speed media Ricoh Co Ltd for 8x and 16x speed media TAIYO YUDEN CO Ltd for 8x and 16x speed media DVD R Double Layer MITSUBISHI KAGAKU MEDIA CO LTD for 2 4x and 8x speed media DVD RW DVD Specifications for Recordable Disc for Version 1 1 or version 1 2 Victor Company of Japan Ltd JVC for 2x 4x and 6x speed media MITSUBISHI KAGAKU MEDIA CO L...

Страница 86: ...ully before you delete it taking care that if multiple drives that can write data to discs are connected you do not delete data from the wrong one In writing to DVD R DVD R Dual Layer DVD RW DVD R DVD R Double Layer DVD RW or DVD RAM media some space is required for file management so you may not be able to write to the full capacity of the disc Since the disc is based on the DVD standard it might...

Страница 87: ...ared devices such as a server or any other network device Writing with software other than TOSHIBA Disc Creator has not been confirmed therefore operation with other software applications cannot be guaranteed When writing or rewriting Please observe the following points while you write or rewrite data to CD R CD RW DVD R DVD R Dual Layer DVD RW DVD R DVD R Double Layer DVD RW or DVD RAM media Alwa...

Страница 88: ...Disc Creator s Audio CD for Car or Home CD Player function to record music to DVD R DVD R Dual Layer DVD RW DVD R DVD R Double Layer or DVD RW media Do not use the Disc Backup function of TOSHIBA Disc Creator in order to copy DVD Video or DVD ROM material that has copyright protection DVD RAM discs cannot be backed up using the Disc Backup function of TOSHIBA Disc Creator You cannot back up CD ROM...

Страница 89: ...t the case then the source disc might not be backed up correctly When you back up a DVD R DVD R Dual Layer DVD RW DVD R DVD R Double Layer or DVD RW disc be sure to use the same type of disc You cannot partially delete any data written to a CD RW DVD RW or DVD RW disc Data Verification To verify that data has been written or rewritten correctly to a data CD DVD you should follow the steps below be...

Страница 90: ... for TOSHIBA Launcher to launch DVD MovieFactory 2 Click Video Disc New Project to invoke 2nd Launcher choose your project type then invoke DVD MovieFactory 3 Add source from HD Disk by click Add Video files button to invoke browser dialog box 4 Choose the source video then go to Next page to apply Menu 5 After choose the menu template press Next button to go to Burning Page 6 Choose the output ty...

Страница 91: ...t a heavy load on the CPU Do not support mp3 decode and encode 2 Before recording the video to DVD When you record DVD disc please use only discs recommended by the Drive manufacturer Do not set the working drive to a slow device like a USB1 1 hard disk drive or it will fail to write DVD Do not perform any of the following actions Operate the computer for any other function including using a mouse...

Страница 92: ...eated on home DVD recorders may not be playable on the computer 4 Do not playback DVD discs Video while watching or recording television programs using other applications Doing so may cause DVD Video playback or television program recording errors In addition if pre scheduled recording starts during DVD Video playback it may cause DVD Video playback or television program recording errors Please vi...

Страница 93: ...DVD Video on an external display or TV change the display device before playing DVD Video cannot be displayed simultaneously in clone mode on both the computer s display panel and an external display 5 Do not change the screen resolution while running the TOSHIBA DVD PLAYER TOSHIBA DVD PLAYER 1 TOSHIBA DVD PLAYER software is supported for playback of DVD Video and DVD VR 2 The TOSHIBA DVD PLAYER d...

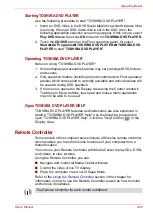
Страница 94: ...back 3 If the menu is opened in the Display Area using the Control window s Top Menu or Menu buttons touch pad and mouse menu operations may not be able to be used Open TOSHIBA DVD PLAYER HELP TOSHIBA DVD PLAYER features and instructions are also explained in detail in TOSHIBA DVD PLAYER Help Use the following procedure to open TOSHIBA DVD PLAYER Help Click the Help button in the Display Area Remo...

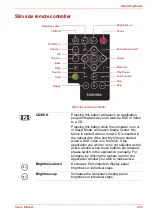
Страница 95: ...e the computer is on or in Sleep Mode will launch Media Center My Music is started when a music CD is inserted in the optical disc drive and My Video is started when a DVD video is in the drive If the application you wish to run is not selected as the active window when these buttons are pressed please switch to the application manually For example by clicking the taskbar item for the application ...

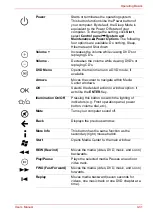
Страница 96: ...e if available Arrows Moves the cursor to navigate within Media Center windows OK Selects the desired action or window option It acts like the ENTER Key Illumination On Off Pressing this button to switch the lighting of indicators e g Front operation panel power button volume dial etc Mute Turns your computer sound off Back Displays the previous window More Info This button has the same function a...

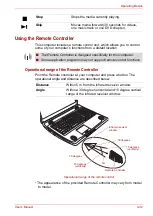
Страница 97: ...ol The appearance of the provided Remote Controller may vary from model to model Stop Stops the media currently playing Skip Moves media forward 30 seconds for videos one music track or one DVD chapter The Remote Controller is designed specifically for this computer Some application programs may not support remote control functions Distance Within 5 m from the infrared receiver window Angle Within...

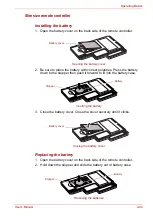
Страница 98: ...battery this might result in choking If it happens contact a doctor immediately Observe the following precautions when using the battery of the Remote Controller Do not use batteries other than those specified Ensure that you insert the batteries with their polarities correctly aligned or Do not recharge heat disassemble or short the battery or put it into a fire or flame Do not use a battery whos...

Страница 99: ...ess the battery down to the stopper then push it forward to fit into the battery case Inserting the battery 3 Close the battery cover Close the cover securely until it clicks Closing the battery cover Replacing the battery 1 Open the battery cover on the back side of the remote controller 2 Hold down the stopper and slide the battery out of battery case Removing the batteries Battery cover Stopper...

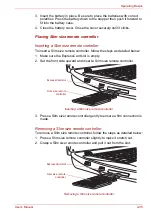
Страница 100: ...d below 1 Make sure the ExpressCard slot is empty 2 Set the front side upward and insert a Slim size remote controller Inserting a Slim size remote controller 3 Press a Slim size remote controller gently to ensure a firm connection is made Removing a Slim size remote controller To remove a Slim size remote controller follow the steps as detailed below 1 Press a Slim size remote controller slightly...

Страница 101: ...or any similar cleaning solution Floppy diskettes 1 Store your floppy diskettes in the container they came in to protect them and keep them clean If a floppy diskette becomes dirty clean it with a soft lightly dampened cloth do not use cleaning fluid 2 Never open the shutter or touch the magnetic surface of your floppy diskette doing this could permanently damage it and lose data 3 Always handle f...

Страница 102: ... icon on the task tray 3 Select Open Volume Mixer from the menu Click the Device button to display available playback devices Select Speakers to use the internal speakers for listening Adjust speaker volume by moving the slider up or down to raise or lower the volume Click the Mute button to mute the sound You may see another control under Applications in Volume Mixer It is the control for an appl...

Страница 103: ...jack to record sound If an external microphone or audio cable is connected to the Microphone and Line in jack the Realtek HD Audio Manager Connector Settings dialog will be displayed allowing selection of either Line In or Mic In input Information Click the information button to view hardware information software information and language setting Speaker Configuration Click the playback button to c...

Страница 104: ... the steps below 1 Connect an optical cable to the Headphone S PDIF Line out jack 2 The pop up dialog of The current connected device is will automatically open 3 Select S PDIF Out and click OK 4 On the Realtek HD Audio Manager click Digital Output 5 Click the Dolby Digital Live button 6 Set up an optical digital correspondence apparatus 7 Then connect the other end of the optical cable to the app...

Страница 105: ... created within the Windows Control Panel Phone and Modem Options When you select a telephony location the corresponding region is automatically selected and becomes the modem s default setting Properties menu Click the icon with the secondary right mouse button in order to display a Properties menu on the screen Settings Within the Properties menu you can are able to either enable or disable the ...

Страница 106: ...lephony Current Location region code do not match Displays a warning if the current settings for both region code and telephony location are different Modem Selection If the computer cannot recognize the internal modem a dialog box is displayed from which you should select the appropriate communications port for your modem to use Dialing Properties You should select this item in order to display t...

Страница 107: ...models are provided with Wireless Communication switch Some models are equipped with both Wireless LAN and Bluetooth functions Connection to any communication line other than an analog phone line could cause a computer system failure Connect the built in modem only to ordinary analog phone lines Never connect the built in modem to a digital line ISDN Never connect the built in modem to the digital...

Страница 108: ...the name of the wireless network together with security settings Consult the documentation accompanied with your router or ask your wireless network administrator for the settings Security TOSHIBA strongly recommend that you enable encryption functionality otherwise your computer will be open to illegal access by an outsider using a wireless connection If this occurs the outsider may illegally acc...

Страница 109: ...if the devices are not within a line of sight of each other Security Two advanced security mechanisms ensure a high level of security Authentication prevents access to critical data and makes it impossible to falsify the origin of a message Encryption prevents eavesdropping and maintains link privacy BluetoothTM Stack for Windows by TOSHIBA Please note that this software is specifically designed f...

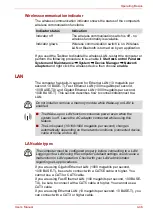
Страница 110: ...turn it off and to the right to turn it on Do not use the Wireless LAN Wi Fi WiMax or Bluetooth functionalities near a microwave oven or in areas subject to radio interference or magnetic fields Interference from a microwave oven or other source can disrupt Wi Fi WiMax or Bluetooth operation Turn Wi Fi WiMax and Bluetooth functionalities off when near a person who may have a cardiac pacemaker impl...

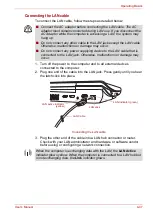
Страница 111: ... cable If you are using Fast Ethernet LAN 100 megabits per second 100 BASE TX be sure to connect with a CAT5 cable or higher You cannot use a CAT3 cable If you are using Ethernet LAN 10 megabits per second 10 BASE T you can connect with a CAT3 or higher cable Indicator status Indication Indicator off The wireless communication switch is off no wireless functionality is available Indicator glows Wi...

Страница 112: ...k connection Connect the AC adaptor before connecting the LAN cable The AC adaptor must remain connected during LAN use If you disconnect the AC Adaptor while the computer is accessing a LAN the system may hang up Do not connect any other cable to the LAN jack except the LAN cable Otherwise malfunctions or damage may occur Do not connect any power supplying device to the LAN cable that is connecte...

Страница 113: ...cted by an authorized service provider in order to assess the scope of any damage Clean the plastics of the computer using a slightly water dampened cloth You can clean the display screen by spraying a small amount of glass cleaner onto a soft clean cloth and then wiping the screen gently with the cloth Using the cleaning cloth Some models include 1 cleaning cloth The cleaning cloth can be used to...

Страница 114: ...y result in minor heat injury Be careful not to subject the computer to impact or shock a failure to follow this instruction could result in damage to computer computer failure or loss of data Never transport your computer with any cards installed this may cause damage to either the computer and or the card resulting in product failure Always use a suitable carry case when transporting the compute...

Страница 115: ...pecial symbols that appear on the screen However there are some differences between using a typewriter and using a computer keyboard Letters and numbers produced in computer text vary in width Spaces which are created by a space character may also vary depending on line justification and other factors The lowercase l el and the number 1 one together with the uppercase O oh and the 0 zero are not i...

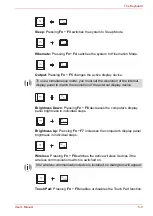
Страница 116: ...cuted by individual keys will depend on the software you are using Soft keys Fn key combinations The Fn function is unique to TOSHIBA computers and is used in combination with other keys to form soft keys Soft keys are key combinations that enable disable or configure specific features Hot keys Hot keys pressing Fn a function or ESC key let you enable or disable certain features of the computer Mu...

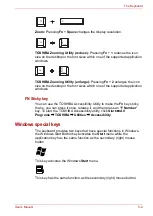
Страница 117: ...l steps Brightness Up Pressing Fn F7 increases the computer s display panel brightness in individual steps Wireless Pressing Fn F8 switches the active wireless devices if the wireless communication switch is switched on Touch Pad Pressing Fn F9 enables or disables the Touch Pad function To use a simultaneous mode you must set the resolution of the internal display panel to match the resolution of ...

Страница 118: ...icky key You can use the TOSHIBA Accessibility Utility to make the Fn key sticky that is you can press it once release it and then press an F Number key To start the TOSHIBA Accessibility utility click Start All Programs TOSHIBA Utilities Accessibility Windows special keys The keyboard provides two keys that have special functions in Windows the Windows Start Button key activates the Start menu wh...

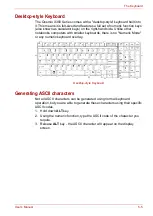
Страница 119: ...otebooks computers with smaller keyboards there is no Numeric Mode or any numeric keyboard overlay Desktop style Keyboard Generating ASCII characters Not all ASCII characters can be generated using normal keyboard operation but you are able to generate these characters using their specific ASCII codes 1 Hold down ALT key 2 Using the numeric function type the ASCII code of the character you require...

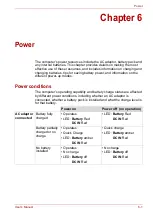
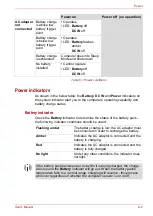
Страница 120: ...s operating capability and battery charge status are affected by different power conditions including whether an AC adaptor is connected whether a battery pack is installed and what the charge level is for that battery Power on Power off no operation AC adaptor connected Battery fully charged Operates LED Battery Red DC IN Red LED Battery Red DC IN Red Battery partially charged or no charge Operat...

Страница 121: ...IN off Battery charge is exhausted Computer goes into Sleep Mode and shuts down No battery installed Cannot operate LED Battery off DC IN off Power on Power off no operation Flashing amber The battery charge is low the AC adaptor must be connected in order to recharge the battery Amber Indicates the AC adaptor is connected and the battery is charging Red Indicates the AC adaptor is connected and t...

Страница 122: ...ata and shut down the computer or place the computer into Hibernation Mode Please be aware that when placing the computer into Hibernation Mode the contents of memory will be saved to the hard disk drive although for safety sake it is best to also save your data manually Red Indicates the AC adaptor is connected and is correctly supplying power to the computer Flashing amber Indicates a problem wi...

Страница 123: ...placed used handled or disposed of Dispose of the battery as required by local ordinances or regulations Use only batteries recommended by TOSHIBA as replacements Always use the battery pack supplied as an accessory or an equivalent battery pack specified in the User s Manual Other battery packs have different voltage and terminal polarities Use of non conforming battery packs could generate smoke...

Страница 124: ...message after performing the above actions please contact your TOSHIBA service representative Make sure the battery is securely installed in the computer before attempting to charge the battery pack Improper installation could generate smoke or fire or cause the battery pack to rupture Keep the battery pack out of reach of infants and children It can cause injury The battery pack is lithium ion ba...

Страница 125: ... following conditions The battery is extremely hot or cold if the battery is extremely hot it might not charge at all To ensure the battery charges to its full capacity you should charge it at room temperature of between 5 to 35 C 41 to 95 F The battery is nearly completely discharged In this instance you should leave the AC adaptor connected for a few minutes and the battery should begin charging...

Страница 126: ...bar Via the Battery Status in the Windows Mobility Center window Maximizing battery operating time A battery s usefulness depends on how long it can supply power on a single charge while how long the charge lasts in a battery depends on Processor speed Screen brightness System Sleep Mode System Hibernation Mode Display power off period Hard disk drive power off period How often and for how long yo...

Страница 127: ...e computer from a power source and operate it on battery power until the battery pack fully discharges Before doing so follow the steps as detailed below 1 Turn off the computer s power 2 Disconnect the AC adaptor and turn on the computer s power if it does not turn on then go to Step 4 3 Operate the computer on battery power for five minutes If you find that the battery pack has at least five min...

Страница 128: ...d spare when you are operating your computer away from an AC power source for an extended period of time This section explains how to remove and install the battery pack and begins with the removal process which is detailed through the following steps To remove a discharged battery follow the steps as detailed below 1 Save your work 2 Turn the computer s power off ensure that the Power indicator i...

Страница 129: ...ve it from the computer 2 Releasing the battery pack 2 To install a battery follow the steps as detailed below 1 Insert the battery pack as far as it will go into the computer 1 2 Ensure that the battery pack is securely in place and the battery safety lock 2 is in its position Battery Pack Battery Safety Lock Battery Safety Lock Battery Pack ...

Страница 130: ...To start the utility point to or click the following items Start All Programs TOSHIBA Utilities Password Utility User Password field Set button Click this button to register a password of up to 50 characters After a password is set you will be prompted to enter it when you start the computer Step 2 Battery Pack Passwords set by the TOSHIBA Password Utility function are different from the Windows p...

Страница 131: ...iskette or other media If you forget the password you can open the password file on another computer Be sure to keep the media in a safe place When entering the character string to register the password enter from the keyboard character by character and do not enter as ASCII code or copy and paste the character string In addition ensure that the registered password is correct by outputting the cha...

Страница 132: ...the Password 3 Press Enter Power up modes The computer has three different power up modes as follows Shut down mode The computer will shut down without saving data in view of this you must always save your work before you turn the computer off Hibernation Mode Data in memory will be saved to the hard disk drive Sleep Mode Data will maintained in the computer s memory Windows utilities You can conf...

Страница 133: ...ou open it Please note that this function is only available for Sleep Mode or Hibernation Mode not for Shut down mode System automatic Sleep Hibernation This feature automatically turns off the system in Sleep or Hibernation Mode if the computer is not used for a set duration Refer to Special features in Chapter 1 for an explanation of how to set the duration If the panel power off function is ena...

Страница 134: ...ay Boot Priority Keyboard LAN and USB There are also these three buttons General This window displays the BIOS version and contains two buttons Setup This field displays BIOS Version and date OK Accepts your changes and closes the HW Setup window Cancel Closes the window without accepting your changes Apply Accepts all your changes without closing the HW Setup window Default Return all HW Setup va...

Страница 135: ... boot drive you want follow the steps below 1 Boot up your computer and press F12 to enter the boot menu 2 The boot select screen will be displayed HDD1 HDD2 CD DVD and LAN 3 Use the upper lower cursor keys to highlight the boot device you want and press Enter Keyboard Wake up on Keyboard When this feature is enabled and the computer is in Sleep mode you can turn on the computer by pressing any ke...

Страница 136: ...rnation Mode or shutdown state This function can be used for ports that support the USB Sleep and Charge function hereinafter called compatible ports Compatible ports are USB ports that have the symbol icon You can use the USB Sleep and Charge function to charge certain USB compatible external devices such as mobile phones or portable digital music players However the USB Sleep and Charge function...

Страница 137: ...g the USB sleep and charge function External devices connected to the USB bus power DC5V function that interfaces with the power ON OFF of the computer may always be in an operational state When there is a current overflow of the external devices connected to the compatible ports USB bus power DC5V supply may be stopped for safety reasons When USB Sleep and Charge function is set to Enabled the US...

Страница 138: ...les the Built in LAN Enabled Enables Wake up on LAN Disabled Disables Wake up on LAN Default The Wake up on LAN function consumes power even when the system is off Leave the AC adaptor connected while using this feature Do not install or remove an optional memory module while Wake up on LAN is enabled Enabled Enables Built in LAN function Default Disabled Disables Built in LAN function ...

Страница 139: ...lot Secure Digital SD Card SD memory card SDHC memory card miniSD Card microSD Card Memory Stick Memory Stick Memory Stick PRO Memory Stick PRO Duo xD picture card MultiMediaCard Memory expansion Power devices Battery packs Universal AC Adaptor Peripheral devices USB floppy diskette drive External monitor HDMI i LINK IEEE1394 Display port Other Security lock To connect optional devices such as USB...

Страница 140: ...an ExpressCard follow the steps as detailed below 1 Press the PC Card to partially extend it out of the computer 2 Press the extended PC Card in order to eject the Dummy card partially out of the computer 3 Grasp the Dummy card and draw it 4 Insert the ExpressCard into the ExpressCard slot on the side of the computer 5 Press the ExpressCard gently to ensure a firm connection is made Inserting the ...

Страница 141: ... extend it out of the computer 4 Grasp the ExpressCard and remove it Removing the ExpressCard 5 Insert the Dummy card into the PC Card slot If the ExpressCard is not inserted all the way into the computer the eject button may not cause it to pop out sufficiently to allows it to be grasped In this instance simply push the ExpressCard firmly back into the computer and then press the eject button aga...

Страница 142: ...sert Memory Stick Duo into the slot or you may not be able to remove it Data may be lost or damaged if you use any memory media other than those supported This Bridge media slot supports the following memory media Secure Digital SD Card SD memory card SDHC memory card miniSD Card microSD Card Memory Stick Memory Stick Memory Stick Duo Memory Stick PRO Memory Stick PRO Duo xD picture card MultiMedi...

Страница 143: ...e logo on SD and SDHC memory cards is different so pay careful attention to the logo when purchasing The maximum capacity of SD memory cards is 2 GB The maximum capacity of SDHC memory cards is 16 GB Memory media format New media cards are formatted according to specific standards If you wish to reformat a media card be sure to do so with a device that uses media cards Formatting an SD SDHC memory...

Страница 144: ... the slot Press the card until you hear it click into place Memory card care Set the write protect switch to the lock position if you do not want to record data Memory cards have a limited lifespan so it is important to backup important data Do not write to a card if the battery power is low Low power could affect writing accuracy Do not remove a card while read write is in progress About the writ...

Страница 145: ... as detailed below 1 Open the Safely Remove Hardware icon on the Windows Task Bar 2 Point to memory media and click the left Touch Pad control button 3 Press the memory media to partially extend it out of the computer 4 Grasp the media and remove it In order to use the computer s Bridge media slot open the right side cover first Memory media Bridge media slot Make sure memory media is oriented pro...

Страница 146: ... the computer is in Sleep or Hibernation Mode The computer could become unstable or data in the memory media could be lost Do not remove only the miniSD microSD Card while leaving the adaptor in the Bridge Media slot You should place a mat beneath the computer in order to prevent the computer s lid from becoming scratched or damaged when you are installing replacing the memory module In this insta...

Страница 147: ...n Chapter 3 Getting Started if required 2 Remove the AC adaptor and all cables and peripherals connected to the computer Use only memory modules approved by TOSHIBA Do not try to install or remove a memory module under the following conditions a The computer is turned on b The computer was shut down in either Sleep or Hibernation Mode c Wake up on LAN is enabled d The wireless communication switch...

Страница 148: ...gn the notch of the memory module with that of the memory slot and gently insert the module into the slot at about a 45 degree angle before pressing it down until the latches on either side snap into place Memory module cover Screws Slot B Slot A Align the grooves along the edges of the memory module with the locking tabs on the connector and insert the module into the connector firmly if you find...

Страница 149: ...from being lost 5 Slide your fingernail or a thin object under the cover and lift it off 6 Push the latches away from the module in order to release it a spring will force one end of the module up at an angle 7 Grasp the module by its edges and remove it from the computer 8 Seat the memory module cover in place and secure it with a screw Never allow metal objects such as screws staples and paper c...

Страница 150: ...information Universal AC Adaptor If you frequently use your computer at more than one site it may be convenient to purchase an additional AC adaptor to be kept at each site in order to remove the need to always carry the adaptor with you USB floppy diskette drive The USB floppy diskette drive accommodates either a 1 44MB or 720KB a 3 2 1 floppy diskette and connects to one of the computer s USB po...

Страница 151: ... fully seated in the drive the eject button will pop out In order to remove the diskette push the eject button in order to cause it to partially pop out of the drive and then remove it Check the Disk In Use indicator when you use the floppy diskette drive Do not press the eject button or turn off the computer while the light is glowing Doing so could destroy data and damage the floppy diskette or ...

Страница 152: ... corresponding to eSATA function can be connected to the USB eSATA combo port on the computer Connecting the eSATA device To connect an eSATA device follow the steps as detailed below 1 Connect an eSATA cable to the eSATA USB combo port USB port USB connector If you connect the USB floppy diskette drive after the computer has already been turned on it will take about ten seconds for it to be recog...

Страница 153: ... computer s USB eSATA combo port eSATA USB combo port eSATA cable A connected eSATA device may not be recognized if it is connected to the computer s eSATA USB combo port while the computer is in Sleep Mode or Hibernation Mode If this occurs disconnect the eSATA device and then reconnect the device while the computer is turned on If you connect an eSATA device after the computer has already been t...

Страница 154: ... find that there are issues getting an image displayed on the correct monitor you should consider using the Fn F5 hot key to change the display settings if you then disconnect the external monitor before you turn the computer s power off be sure to press Fn F5 hot key again to switch to the internal display Please refer to Chapter 5 The Keyboard for further details on using hot keys to change the ...

Страница 155: ... Definition Multimedia Interface monitors have not been confirmed some HDMI monitors may not function properly HDMI out port HDMI cable When connecting or disconnecting an HDMI device to or from the computer only do so when the computer is turned on or when the computer is completely turned off Do not do so when the computer is in Sleep Mode or Hibernation Mode Be sure to use the Fn F5 HotKey to s...

Страница 156: ...e used to operate some of the computer functions Using REGZA Link PC Control Toshiba notebooks with REGZA Link include a Toshiba utility dedicated to take advantage of its capabilities which can allow you to Use the TV remote control to output the computer screen onto the TV screen Use the TV remote control to launch operate and close applications on your computer Turn on the TV when the HDMI outp...

Страница 157: ...n data being destroyed If you are transferring data through an IEEE1394 hub do not connect or disconnect other devices from the hub during the transfer operation there is a likelihood that data will be damaged In addition you should connect all required devices to the hub before you turn on the computer s power You may not use any copyrighted video or music data copied from a video camera except f...

Страница 158: ... be destroyed Disconnecting To remove an i LINK device follow the steps as detailed below 1 Open the Safely Remove Hardware icon on the Windows Task Bar 2 Point to i LINK IEEE1394 device and click the left Touch Pad control button 3 Disconnect the cable from the computer and then from the i LINK device Security lock A security locks enable you to anchor your computer to a desk or other heavy objec...

Страница 159: ...ecurity lock In order to connect a security cable to the computer follow the steps as detailed below 1 Turn the computer so its left hand side faces you 2 Align the security cable with the lock hole and secure it in place Security lock Security lock slot ...

Страница 160: ...ore the problem occurred If you have a printer attached print a copy of the screen using the computer s PRTSC key Please also be aware that the questions and procedures described in this chapter are meant only as a guide they are not definitive problem solving techniques In reality many problems can be solved simply but a few may require help from your reseller dealer or service provider if you fi...

Страница 161: ...identify why it is malfunctioning In view of this you should keep the following questions in mind Which part of the computer is not operating properly keyboard floppy diskette drive hard disk drive optical disc drive display touch pad touch pad control buttons as each device will produce different symptoms Check the options within the operating system to ensure that its configuration is set proper...

Страница 162: ...Next you should check any error messages against the operating system documentation Hardware If you cannot find a software problem you should then check the setup and configuration of your hardware First run through the items in the preliminary checklist as described previously then if you still cannot correct the problem try to identify the source the next section provides checklists for individu...

Страница 163: ...he screen for a few seconds If the self test is successful the computer tries to load the operating system according to how the Boot Priority option is set within the TOSHIBA HW Setup program System start up Self test Power Password Keyboard Internal display panel Hard disk drive USB floppy diskette drive PC Card ExpressCard SD SDHC memory card miniSD microSD Card Memory Stick Memory Stick Duo Mem...

Страница 164: ...provides checklists for AC power and the battery If you cannot resolve a problem after following them the cause may lie with another power related resource in such an instance you should contact your reseller dealer or service provider Overheating power down In the event that the computer s internal operating temperature becomes too high the system will automatically enter either Hibernation Mode ...

Страница 165: ...is frayed or damaged it should be replaced while if the terminals are soiled they should be cleaned with a clean cotton cloth If the AC adaptor still does not power the computer you should contact your reseller dealer or service provider Problem Procedure Battery doesn t power the computer The battery may be discharged connect the AC adaptor to recharge the battery Battery doesn t charge when the ...

Страница 166: ...at the end of its operating life you should speak to your reseller dealer or service provider Battery doesn t power the computer as long as expected If you frequently recharge a partially charged battery the battery might not charge to its full potential in these instances you should fully discharge the battery and then attempt to charge it again Check the Power saver option under Select a power p...

Страница 167: ...o adjust the display priority and to make sure it is not set for output to an external monitor Markings appear on the LCD screen These marks may have come from contact with the keyboard Touch Pad while the display has been closed You should try to remove the marks by gently wiping the display panel with a clean dry cloth or if this fails with a good quality LCD screen cleaner In this latter instan...

Страница 168: ...may be fragmented in this instance you should run the disk Defragmentation utility to check the condition of your files and the hard disk drive Please refer to the operating system s documentation or online Help File for further information on operating and using the Defragmentation utility As a last resort you should reformat the hard disk drive and then reload the operating system and all other ...

Страница 169: ...D ROM XA Mode 2 Form1 Form2 Enhanced CD CD EXTRA Addressing Method 2 For DVD Videos you should check the region coding on the DVD to ensure that it matches that on the DVD ROM drive For reference region codes are listed in the Optical disc drives section in Chapter 2 The Grand Tour Problem Procedure Problem Procedure Drive does not operate Check the connection between the computer and the drive to...

Страница 170: ...still unable to resolve the problem contact your reseller dealer or service provider Problem Procedure SD SDHC memory card miniSD microSD Card error occurs Remove the SD SDHC memory card miniSD microSD Card from the computer and then reinsert it in order to ensure it is firmly connected If the problem persists then you should refer to the documentation supplied with your SD SDHC memory card miniSD...

Страница 171: ... Remove the Memory Stick Memory Stick Duo Memory Stick PRO Memory Stick PRO Duo from the computer and check to ensure that it is not write protected You cannot read a file Check to ensure the required file is actually on the Memory Stick Memory Stick Duo Memory Stick PRO Memory Stick PRO Duo that is inserted into the computer If you are still unable to resolve the problem contact your reseller dea...

Страница 172: ...irmly connected If the problem persists then you should refer to the documentation supplied with your MultiMediaCard for further information You cannot read a file Check to ensure the required file is actually on the MultiMediaCard that is inserted into the computer If you are still unable to resolve the problem contact your reseller dealer or service provider Problem Procedure Infrared devices do...

Страница 173: ...ndow click the Pointer Options tab 3 Set the pointer speed as required and click OK If you are still unable to resolve the problem contact your reseller dealer or service provider The reaction of Touch pad is either too sensitive or not sensitive enough Adjust the touch Sensitivity 1 Click Start Control Panel Hardware and Sound Mouse icon 2 Within the Mouse Properties window click the Device Setti...

Страница 174: ...ed and click OK The mouse pointer moves too fast or too slow In this instance you should initially try changing the speed setting within the Mouse Control utility 1 To access this utility click Start Control Panel Hardware and Sound Mouse icon 2 Within the Mouse Properties window click the Pointer Options tab 3 Set the pointer speed as required and click OK The mouse pointer moves erratically The ...

Страница 175: ...he fingerprint cannot be read due to injuries to the finger In this instance you should try the recognition process again using another enrolled finger However if fingerprints from all the enrolled fingers cannot be read you should instead log into the computer by using the keyboard to input the password If you are still unable to resolve the problem contact your reseller dealer or service provide...

Страница 176: ...omputer Some external devices may not be able to use the USB Sleep and Charge function In this case please try one or more of the following methods Change a mode setting of Enabled Turn OFF the computer while external devices are connected Connect external devices after turning OFF of the computer If this function can not be still used change the setting to Disabled and stop using this function Th...

Страница 177: ...tion setting to Disabled The USB WakeUp function does not work When USB Sleep and Charge function is set to Enabled the USB WakeUp function does not work for ports that support the USB Sleep and Charge function In that case use an USB port that does not have the USB Sleep and Charge function compatible icon or change the USB Sleep and Charge function setting to Disabled Problem Procedure Problem P...

Страница 178: ...ashes when the computer is turned on you should initially ensure that the installed memory module s are compatible with the computer If you determine that an incompatible module has been installed you should follow the steps as detailed below 1 Turn off the computer 2 Disconnect the AC adaptor and all peripheral devices 3 Remove the battery pack 4 Remove the incompatible memory module 5 Install th...

Страница 179: ...not set for the internal display panel only Check to see if the external monitor is connected When the external monitor is set as the primary display device in extended desktop mode it will not display when the computer wakes up from Sleep Mode if the external monitor has been disconnected while in Sleep Mode To keep this from happening do not disconnect the external monitor while the computer is ...

Страница 180: ...or pule dialling selection feature is set correctly Communication is cut off unexpectedly The computer will automatically cut off communication when connection with the carrier is not successful for a set time interval try lengthening this time interval within your communication application A CONNECT display is quickly replaced by NO CARRIER Ensure that the communication application s error contro...

Страница 181: ...cedure Cannot access Wireless LAN Make sure the computer s wireless communication switch is set to on Wake up on Wireless LAN does not work Make sure the AC adaptor is connected The Wake up on Wireless LAN function consumes power even when the system is off If problems persist consult your LAN administrator Problem Procedure Cannot access Bluetooth device Check to ensure the computer s wireless co...

Страница 182: ... are still unable to resolve the problem contact your reseller dealer or service provider Problem Procedure DVD does not play smoothly when using the Windows Media Center of the DVD playing software Try setting the configuration in the BIOS setup However note that when the BIOS setup configuration is modified the power saving function of PCI Express becomes disabled Refer to Chapter 7 HW Setup for...

Страница 183: ... in the documentation supplied with your software and or peripheral devices If a problem occurs when you are running software applications consult the software documentation for troubleshooting suggestions and consider calling the software company s technical support department for assistance Consult the reseller or dealer from where you purchased your computer and or software they are your best r...

Страница 184: ...er instead of AC power Use of certain multimedia computer generated graphics or video applications Use of standard telephone lines or low speed network connections Use of complex modeling software such as high end computer aided design applications Use of several applications or functionalities simultaneously Use of computer in areas with low air pressure high altitude 1 000 meters or 3 280 feet a...

Страница 185: ...may not be compatible with a 64 bit CPU and therefore may not function properly A 32 bit version of the operating system is preinstalled on your computer unless explicitly stated that the operating system is 64 bit Memory Main System 2 Part of the main system memory may be used by the graphics system for graphics performance and therefore reduce the amount of main system memory available for other...

Страница 186: ...C power mode Screen will dim when the computer is operated on battery power and you will not be able to increase the brightness of the screen Graphics Processor Unit GPU 6 Graphics processor unit GPU performance may vary depending on product model design configuration applications power management settings and features utilized GPU performance is only optimized when operating in AC power mode and ...

Страница 187: ... Applicable copy protection standards included in certain media may prevent or limit recording or viewing of the media LCD Brightness and Eye Stain 11 Your display panel has a brightness approaching that of a TV device We recommend that you adjust the brightness of your LCD to a comfortable level to prevent possible strain on your eyes USB Sleep and Charge 13 The USB Sleep and Charge function may ...

Страница 188: ...s that extend beyond the main body Environmental Requirements Power Requirements Conditions Ambient temperature Relative humidity Operating 5 C 41 F to 35 C 95 F 20 to 80 Non operating 20 C 4 F to 65 C 149 F Conditions Altitude from sea level Operating 9 to 3 000 meters Non operating 9 to 12 000 meters maximum AC adaptor 100 240 volts AC 50 or 60 hertz cycles per second Computer 19 VDC 9 47 ampere...

Страница 189: ...ec Former CCITT V 21 V 22 V 22bis V 32 V 32bis V 34 V 90 103 212A V 17 V 29 V 27ter V 21 ch2 Communication speed Data transmission and reception 300 1200 2400 4800 7200 9600 12000 14400 16800 19200 21600 24000 26400 28800 31200 33600 bps Data reception only with V 90 28000 29333 30666 32000 33333 34666 36000 37333 38666 40000 41333 42666 44000 45333 46666 48000 49333 50666 52000 53333 54666 56000 ...

Страница 190: ...on any computer that supports that mode Video modes Video mode settings are configured via the Display Properties dialog To open the Display Properties dialog click Start Control Panel Appearance and Personalization Personalization Display Settings Due to the display panel s increased resolution lines may appear broken in when displaying images in full screen text mode If you are running some appl...

Страница 191: ...ense free 2 4GHz and 5GHz band local radio regulations may impose a number of limitations to the use of wireless communication equipment Form Factor PCI Express Mini Card Compatibility IEEE 802 11 Standard for Wireless LAN Wi Fi Wireless Fidelity certified by the Wi Fi Alliance The Wi Fi CERTIFIED logo is a certification mark of the Wi Fi Alliance Network Operating System Microsoft Windows Network...

Страница 192: ...less LAN or TOSHIBA Sales office for information about the radio regulations that apply in the countries regions Wireless IEEE 802 11 Channels Sets Revision B G and N Draft Ver 2 0 1 Factory set default channels 2 Refer to the sheet Approved Countries Regions for use for the countries regions that in which these channels can be used When installing Wireless LAN cards the channel configuration is m...

Страница 193: ...s Point device Wireless IEEE 802 11 Channels Sets Revision A and N Draft Ver 2 0 The approved channels on using are different at each country or region When using these channels in any country or region refer to the addendum sheet which is Approved Countries Regions for use The channel configuration is managed as follows Frequency Range Channel ID 5150 5850 MHz 36 5180 40 5200 44 5220 48 5240 52 5...

Страница 194: ...rent access points the station can dynamically switch to another channel if required For Wireless LAN modules installed in wireless clients that operating in a peer to peer mode the module will use the default channel 10 In a Wireless LAN Access Point the Wireless LAN module will use the factory set default channel printed in bold unless the LAN Administrator selected a different channel when conf...

Страница 195: ...use Bluetooth Adaptor from TOSHIBA always change the frequency move your computer to the area outside of the interference range of 2 4 GHz Wireless LAN devices 40 meters 43 74 yards or more or stop transmitting from your computer Please visit the following TOSHIBA PC product support website Bluetooth and Wireless LAN devices operate within the same radio frequency range and may interfere with one ...

Страница 196: ...ive research literature In some situations or environments the use of Bluetooth wireless technology may be restricted by the proprietor of the building or responsible representatives of the organization These situations may for example include Using the equipment with Bluetooth wireless technology on board of airplanes or In any other environment where the risk of interference to other devices or ...

Страница 197: ...ed States and Canada two pin plug configuration must be a 2 15P 250V or 1 15P 125V and three pin plug configuration must be 6 15P 250V or 5 15P 125V as designated in the U S National Electrical code handbook and the Canadian Electrical Code Part II Length Minimum 1 7 meters Wire size Minimum 0 75 mm2 Current rating Minimum 2 5 amperes Voltage rating 125 or 250 VAC depending on country region s pow...

Страница 198: ...ors The following illustrations show the plug shapes for the U S A and Canada the United Kingdom Australia and Europe Australia Europe AS approved CSA approved Canada BS approved UL approved USA United Kingdom Approved by the appropriate agency ...

Страница 199: ...a broadcasting channel to send a signal to prevent a motion picture from being copied The Microsoft Windows VistaTM s radio features cannot be used because the TV feature does not include a radio receiver FM tuner If your computer is equipped with single tuner it is not possible to record a TV program on one channel and simultaneously view a TV program on another channel because the computer only ...

Страница 200: ...form to the address below To register the theft online please follow these procedures Visit http www toshiba europe com on the Internet In the product area choose Computer Systems In the Computer Systems page open the Support Downloads menu and choose the Stolen Units Database option Your entries are used to track your computer at our service points Always take care of your computer and try to pre...

Страница 201: ...nical Service and Support Leibnizstr 2 93055 Regensburg Germany Fax number 49 0 941 7807 921 Owner s details Country stolen Machine type e g Qosmio X300 Model number e g PSA30EYXT Serial number e g 12345678G Date stolen Year Month Day Last name first name Company Street Postal Code City Country Phone Fax ...

Страница 202: ... ReWritable CMOS complementary metal oxide semiconductor CPU central processing unit CRT cathode ray tube DC direct current DDC display data channel DMA direct memory access DOS disk operating system DVD digital versatile disc DVD R Digital Versatile Disc Recordable DVD RAM Digital Versatile Disc Random Access Memory DVD R Dual Layer Digital Versatile Disc Recordable Dual Layer DVD ROM Digital Ver...

Страница 203: ...PCB printed circuit board PCI peripheral component interconnect RAM random access memory RGB red green and blue ROM read only memory RTC real time clock SCSI small computer system interface SIO serial input output TFT thin film transistor UART universal asynchronous receiver transmitter USB Universal Serial Bus VESA Video Electronic Standards Association VGA video graphics array VRT voltage reduct...

Страница 204: ... An organization established to adopt and define standards for a variety of technical disciplines For example ANSI defined the ASCII standard and other information processing requirements antistatic A material used to prevent the buildup of static electricity application A group of programs that together are used for a specific task such as accounting financial planning spreadsheets word processin...

Страница 205: ...often compensate for differences in the rate of flow from one device to another bus An interface for transmission of signals data or electric power byte The representation of a single character A sequence of eight bits treated as a single unit also the smallest addressable unit within the system C cache memory High speed memory which stores data that increases processor speed and data transfer rat...

Страница 206: ...he computer or its peripheral devices communications The means by which a computer transmits and receives data to and from another computer or device compatibility 1 The ability of one computer to accept and process data in the same manner as another computer without modifying the data or the media upon which it is being transferred 2 the ability of one device to connect to or communicate with ano...

Страница 207: ...f data bits 8 the computer can generate 256 unique characters DC Direct Current Electric current that flows in one direction This type of power is usually supplied by batteries default The parameter value automatically selected by the system when you or the program do not provide instructions Also called a preset value delete To remove data from a disk or other data storage device Synonymous with ...

Страница 208: ... from the disc DVD R Dual Layer A disc having two layers on one side with the DVD R storage capacity about 1 8 times larger than before The DVD RW drive uses a laser to read data from the disc DVD ROM A Digital Versatile Disc Read Only Memory is a high capacity high performance disc suitable for play back of video and other high density files The DVD ROM drive uses a laser to read data from the di...

Страница 209: ...unique characteristics in a fingerprint firmware A set of instructions built into the hardware which controls and directs a microprocessor s activities floppy diskette A removable disk that stores magnetically encoded data floppy diskette drive FDD An electromechanical device that reads and writes to floppy diskettes Fn esse A TOSHIBA utility that lets you assign functions to hot keys folder An ic...

Страница 210: ...eters such as speaker volume HW Setup A TOSHIBA utility that lets you set the parameters for various hardware components I icon A small graphic image displayed on the screen or in the indicator panel In Windows an icon represents an object that the user can manipulate i LINK IEEE1394 This port enables high speed data transfer directly from external devices such as digital video cameras input The d...

Страница 211: ...marked keys Each keystroke activates a switch that transmits a specific code to the computer For each key the transmitted code is in turn representative of the ASCII character marked on the key kilobyte KB A unit of data storage equal to 1024 bytes See also byte and megabyte L level 2 cache See cache Light Emitting Diode LED A semiconductor device that emits light when a current is applied Liquid ...

Страница 212: ...s modulated data demodulates to digital format where received monitor A device that uses rows and columns of pixels to display alphanumeric characters or graphic images See also CRT motherboard A name sometimes used to refer to the main printed circuit board in processing equipment It usually contains integrated circuits that perform the processor s basic functions and provides connectors for addi...

Страница 213: ...ven 0 or 1 2 In serial communications an error detection bit that is added to a group of data bits making the sum of the bits even or odd Parity can be set to none odd or even password A unique string of characters used to identify a specific user The computer provides various levels of password protection such as user and supervisor pel The smallest area of the display that can be addressed by so...

Страница 214: ...e amount of signals a computing device can allow past its shielding A Class A device is sufficient for office use Class B provides a more stringent classification for home equipment use TOSHIBA portable computers comply with Class B computing device regulations Random Access Memory RAM High speed memory within the computer circuitry that can be read or written to restart Resetting a computer witho...

Страница 215: ...m s activities See also hardware stop bit One or more bits of a byte that follow the transmitted character or group codes in asynchronous serial communications subpixel Three elements one red one green and blue RGB that make up a pixel on the color LCD The computer sets subpixels independently each may emit a different degree of brightness See also pixel synchronous Having a constant time interval...

Страница 216: ...ftware volatile memory Random access memory RAM that stores information as long as power is supplied to the computer W warm start Restarting or resetting a computer without turning it off window A portion of the screen that can display its own application document or dialog box Often used to mean a Microsoft Windows window Wireless LAN Local Area Network LAN through wireless communication write pr...

Страница 217: ...ems 9 22 Bridge media slot 1 7 2 5 8 4 indicator 2 11 using 8 4 C Cache memory 1 2 Cleaning the computer 4 48 Cooling vents 2 6 D DC IN indicator 2 11 6 3 Display 1 6 2 8 automatic power off 1 10 controller B 1 hinge 2 9 opening 3 3 Documentation list 1 1 E Equipment checklist 1 1 ExpressCard 1 7 8 2 inserting 8 2 problems 9 11 removing 8 3 External monitor 1 6 2 6 8 16 problems 9 20 F Fingerprint...

Страница 218: ... expansion 1 15 8 8 installing 8 9 removing 8 11 Memory Stick Memory Stick PRO Memory Stick PRO Duo problems 9 12 Modem 1 8 4 39 connecting 4 41 disconnecting 4 42 problems 9 21 properties menu 4 40 region selection 4 40 Moving the computer 4 49 MultiMediaCard problems 9 13 P Password power on 1 10 problems 9 7 starting the computer by 6 13 supervisor 6 12 user 6 11 Pointing device Touch Pad 2 9 4...

Страница 219: ...em start up 9 4 TOSHIBA support 9 24 Touch Pad 9 13 USB device 9 16 USB floppy diskette drive 9 10 USB mouse 9 14 USB Sleep and Charge 9 7 Video Playback 9 23 Wireless LAN 9 22 xD picture card 9 12 Processor 1 2 R Recovery Discs 3 12 3 13 Recovery hard disk drive 3 10 3 12 Restarting the computer 3 9 S SD SDHC memory card miniSD microSD Card problems 9 11 Security lock attaching 8 20 Sleep Mode 1 ...

Страница 220: ...kette drive 8 12 problems 9 10 using 8 13 V Video modes B 1 Video RAM 1 3 W Web Camera 1 7 Wireless communication 4 42 indicator 4 46 Wireless communication switch 1 9 2 1 4 45 Wireless LAN 1 9 4 43 problems 9 22 X xD picture card problems 9 12 ...

Отзывы: