background image

Getting

Ready

26

△△△

@ezweb.ne.jp

Part you can change

Domain name

E-mail address

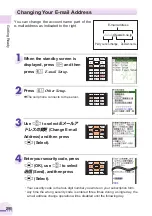
When the standby screen is

displayed, press 

L

and then

press 

6

E-mail Setup

.

1

Press 

4

Other Setup

.

a

The cell phone connects to the server.

2

Use 

G

to select 

Eメールア

ドレスの変更

(Change E-mail

Address) and then  press 

@

(Select).

3

Enter your security code, press

@

(OK), use 

G

to select

送信

(Send), and then press

@

(Select).

4

You can change the account name part of the
e-mail address as indicated to the right.

Your security code is the four-digit number you wrote on your subscription form.

Any time the wrong security code is entered three times during a single day, the
e-mail address change operation will be disabled until the following day.

Changing Your E-mail Address

Содержание A5523T

Страница 1: ...a EZweb EZ Navi EZ FM Limit Mode Simple Mode Others Remote Auto Lock Troubleshooting Index Contents Getting Ready Making and Answering Calls Character Input Phone Book Pair Function Mail Hello Messenger Camera EZweb EZ Navi EZ FM Limit Mode Simple Mode Others Remote Auto Lock Troubleshooting Index Basic Manual A5523T ...

Страница 2: ...1Top Menu auお客さまサポート au Customer Support 調べる Search オンラインマニュアル Online Manual Introduction Printed Manuals for the A5523T Japanese Thank you for purchasing the A5523T Before using your A5523T be sure to read the A5523T Basic Manual this PDF manual to ensure correct usage After you have finished reading this manual store this PDF manual and the printed manuals in safe places so you can retrieve them...

Страница 3: ...such places Abide by the rules of hospitals and other medical institutions where it is forbidden to use or carry cell phones Be considerate of where you use the cell phone and how loudly you talk Do not make calls from cinemas theaters museums libraries and other similar places Turn power off or turn on manner mode to prevent others around you from being inconvenienced by ring tones for incoming c...

Страница 4: ...y used functions EZ Navi Provides useful positional information services including EZ Navi Walk and Safety Navi EZweb You can download Chaku Uta and access sites Simple Mode Limit Mode 97 Page 82 Page 75 Page 69 Page 90 Page You can take photos and movie clips and then send them easily by e mail Camera Up to four members can exchange text photos and sound in real time using au cell phones that sup...

Страница 5: ... not function properly To make and receive calls you need to turn on power indicates the signal strength Manner Mode You can use manner mode to turn off the incoming call ring tone and other tones so as not to inconvenience other people When the standby screen is displayed hold down vV for at least one second Voice Memo When you cannot answer calls the cell phone can play an answering message Japa...

Страница 6: ...ne display to send mail or perform some other operation while driving is against the law in Japan Revised Traffic Control Law effective November 1 2004 Turn off your cell phone or put it in Drive Mode while driving Looking at mail on a cell phone display When the standby screen is displayed pressvvV usegGto select Drive Mode and then press Select Holding a cell phone in your hand for talking I m d...

Страница 7: ...solicited Advertisement Filter アドレスフィルター Address Filters 指定拒否設定 for not receiving specific mail 指定受信設定 for receiving specific mail only If you receive a call from an unknown phone number in the Incoming History indicates that there was a call which rang three seconds long or shorter Danger It may be an attempt to get you to return a call to a service with very high charges Incoming call 03 0002 XX...

Страница 8: ...reated on the EZweb After the registration of your safety information you can notify by e mail your family or acquaintances you have previously designated that you registered your safety information on the 災害用伝言板 Disaster Message Board You can refer to the safety information of the person whom you want to know the information of by entering the phone number of the person from EZweb or Internet Whe...

Страница 9: ...for reference Safety information reference display Safety information registration display We are in the city hall The maximum preservation period of the registered information is 72 hours The maximum available number of each registration is 10 When the number of registration exceeds 10 old information will be overwritten in order of registration The demonstration of this service can be referred t...

Страница 10: ...a Call 30 Redialing Outgoing History Incoming History 31 One ring Calls 32 Turning On Manner Mode 33 Turning On Voice Memo 34 Playing a Voice Memo 35 Changing the Incoming Ring Tone 36 Adjusting the Incoming Ring Tone Volume 38 Adjusting the Earpiece Volume during a Call 39 Character Entry Modes 40 Entering Single byte Alphanumeric Characters 40 Entering E mail Addresses 42 Entering Pictograms 44 ...

Страница 11: ...Checking Charges 79 Downloading Chaku Uta 80 EZ Navi Features 82 What You Can Do with Safety Navi 84 Antenna 86 Listening to EZ FM 87 Switching to Background Music Reception or Exiting EZ FM 89 Registering Permitted Members 90 Limiting Calls and C mail 92 Setting Use Limits 94 Turning Limit Mode On and Off 96 Entering Simple Mode 97 Exiting Simple Mode 98 Viewing the Display in Simple Mode 99 View...

Страница 12: ...stereo earphone 04 Instruction Manual Japanese EZナビ 目次 ご利用いただく前に 基本機能 メ ール Hello Messenger カメ ラ データフ ォルダ EZweb microSD カー ド EZアプリ EZ FM 赤外線通信 付録 索引 クイ ックガイ ド かんたんモー ド 各種設定 便利な機能 auのネッ トワークサービス A5523T A5523T A5523T Warranty Japanese Safety Precautions Japanese An AC adapter and microSD memory card are not included Purchase a common AC adapter 01 and a commercially available microSD memory card sepa...

Страница 13: ... Power key End key Microphone Send key Pair key From the Front From the Side From the Back Side key 1 Memory card slot Camera key Side key 2 Flat type earphone jack External power terminal Infrared port Hand strap eyelet Charge indicator Incoming LED Sub display Macro focus switch Camera lens Mobile light Speaker Battery pack Cover Power terminal Built in antenna ...

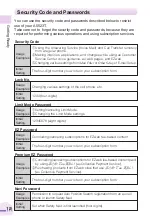
Страница 14: ...n form The four digit number you wrote on your subscription form Usage Examples Usage Examples Initial Setting Initial Setting Lock No Changing various settings of the cell phone etc 1234 four digits Limit Mode Password Setting canceling Limit Mode Changing the Limit Mode settings 12345678 eight digits Usage Examples Usage Examples Initial Setting Initial Setting Premium EZ Password EZ Password Co...

Страница 15: ...Fit the common AC adapter 01 cord into the cord retainer 2 While the A5523T is closed with the battery pack attached insert it into the desktop holder as shown in the figure 4 Confirm that the charge indicator lights Charging The charge indicator lights Charging finished The charge indicator goes out If you charge the A5523T battery pack while the phone is turned on it beeps when charging starts o...

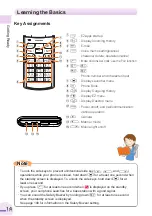
Страница 16: ...ation cancel operation Camera Manner mode Mobile light on off Learning the Basics To lock the side keys to prevent unintentional side key P V and U operations while your phone is closed hold down for at least one second when the standby screen is displayed To unlock the side keys hold down for at least one second If you press Q for at least one second when is displayed on the standby screen your c...

Страница 17: ...e track of where you are or if you make a mistake Perform one of the following operations when you lose track of where you are or if you make a mistake while operating the cell phone gG fF Selects items and moves the cursor up down left and right Confirms the selected item or starts the selected operation Soft key 1 jJ Performs the operation indicated at the bottom left of the screen Center key Pe...

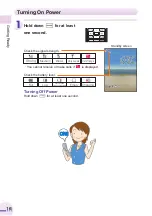
Страница 18: ... cannot receive or make calls if is displayed Check the battery level Getting Ready 16 Standby screen Turning On Power Strong Medium Weak Very weak Out of range Full Low Very low requires charging Empty Charging ON Turning Off Power Hold down S for at least one second ...

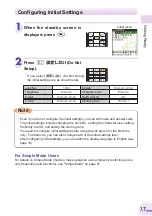
Страница 19: ...ting the call ring tone You need to configure initial settings before using the cell phone for the first time only Furthermore you can also change each of the initial settings later After configuring initial settings you can switch the display language to English see page 18 Note Note Lock No 1234 EZweb Medium small Telephone Medium Character Input Medium E mail Medium small Notify Call ID ON C ma...

Страница 20: ... displayed press 2 Use E to select 機能 Function and then press 選択 Select 3 Press 3 画面表示 Screen Setup 4 Press 6 Set Language You can switch the display language for function names and other items to English Switching the Display Language to English ...

Страница 21: ...Getting Ready 19 5 Use G to select English and then press Select 6 Use G to select Alphabet and then press Select ...

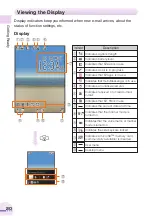
Страница 22: ...tes an unanswered call Indicates that EZapps is in use Indicates that Hello Messenger is in use Indicates the current date and time Indicates that the manner mode is turned on Indicates that the voice memo or manner mode is turned on Indicates the side keys are locked Indicates a microSD memory card commercially available is inserted User menu Desktop menu Indicates received or unread e mail c mai...

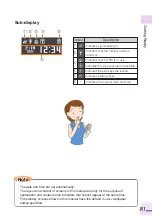
Страница 23: ...r at the same time The standby screens shown in this manual have the default Hamabe wallpaper setting specified Note Note Sub display Indicator Description Indicates signal strength Indicates that the manner mode is turned on Indicates that EZ FM is in use Indicates the side keys are locked Indicates the voice recorder is recording Indicates battery level Indicates the current date and time ...

Страница 24: ... menu contains the following items Launcher menu Using Menus 1 When the standby screen is displayed press 2 Use E to select an item 3 Press Select aThe item selected in the Launcher menu appears Alarm EZ FM Safety Navi SD Card Menu Limit Mode Function Data Folder Camera Hello Messenger Ir Receiving Simple Mode Tool ...

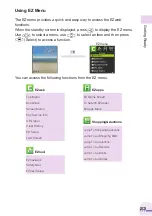
Страница 25: ...ess Select to access a function You can access the following functions from the EZ menu EZ Game Street To Search EZapps EZapps Menu Top Menu Bookmark Screen Memo Pay Service Info URL Input Clear History EZ Setup Last Screen EZnaviwalk Safety Navi EZnavi Setup Jump To Shopping Auctions Jump To au Shopping Mall Jump To au Auctions Jump To au Records Jump To au Books Jump To au Games EZweb EZnavi EZa...

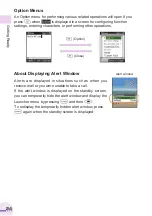
Страница 26: ...perations About Displaying Alert Window Alerts are displayed in situations such as when you receive mail or you were unable to take a call If the alert window is displayed on the standby screen you can temporarily hide the alert window and display the Launcher menu by pressing S and then To redisplay the temporarily hidden alert window press S again when the standby screen is displayed K Option K ...

Страница 27: ...ail and EZweb you need to apply for an EZweb subscription If you did not apply for an EZweb subscription at the time of purchase contact an au shop or the au Customer Service Center Also before use be sure to configure initial settings Your e mail address is assigned automatically when you initialize e mail and EZweb 1 When the standby screen is displayed press L 2 Press OK aAfter a short while th...

Страница 28: ...ddress and then press Select 3 Enter your security code press OK use G to select 送信 Send and then press Select 4 You can change the account name part of the e mail address as indicated to the right Your security code is the four digit number you wrote on your subscription form Any time the wrong security code is entered three times during a single day the e mail address change operation will be di...

Страница 29: ...ress using single byte alphanumeric characters and then press OK For details on entering e mail addresses see page 42 6 Use G to select OK and then press Select Check that the e mail address has been updated and then press OK 8 Your e mail address will not be changed if the address you enter above is already being used If this happens enter a different e mail address Note Note ...

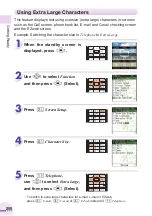
Страница 30: ...the character size in Telephone to Extra Large Using Extra Large Characters 1 When the standby screen is displayed press 2 Use E to select Function and then press Select 3 Press 3 Screen Setup 4 Press 4 Character Size 5 Press 1 Telephone use G to select Extra Large and then press Select To switch to extra large characters for e mail c mail or EZweb press 2 E mail 3 C mail or 4 EZweb instead of 1 T...

Страница 31: ...o call 212 123 in the USA Calling charges for this service are added to monthly mobile phone calling charges and billed together Check the Country code at the au Customer Center For charges refer to au MOBILE PHONE SERVICE GUIDE or au Customer Center Making an International Call 0 0 5 3 4 5 1 2 1 2 1 2 3 PressQ International access code Country code USA Area code Phone number After you enter a pho...

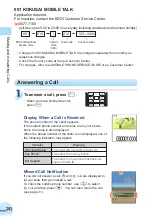
Страница 32: ...Call and then press You can then return the call see page 31 ID Unsent Setup Indicator The caller did not send a Caller ID Meaning Pay Phone The call is from a pay phone Not Support The call is from a phone that does not support Caller ID 001 KOKUSAI MOBILE TALK Application required For inquiries contact the KDDI Customer Service Center 0077 7160 toll free open 9 00 to 20 00 on everyday including ...

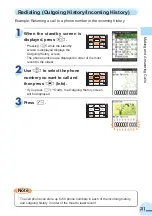
Страница 33: ...y screen The phone numbers are displayed in order of the most recent to the oldest 2 Use G to select the phone number you want to call and then press Info If you press J OutH the Outgoing History screen will be displayed 3 Press Q The cell phone can store up to 50 phone numbers in each of the incoming history and outgoing history in order of the most to least recent Note Note Redialing Outgoing Hi...

Страница 34: ...o return the call which will connect you to a dating service or some other service that charges caller at high rates One ring Indicator one ring call icon indicator on the display indicates you have received a one ring call a call rang for three seconds or shorter and the call is marked with on the Incoming History screen Be careful when you return a call to an unknown caller Incoming call 03 0002...

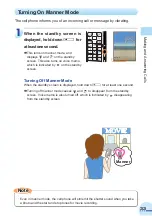
Страница 35: ...h is indicated by on the standby screen Turning Off Manner Mode When the standby screen is displayed hold down V for at least one second aTurning off manner mode causes and to disappear from the standby screen Voice memo is also turned off which is indicated by disappearing from the standby screen Manner Even in manner mode the cell phone will still emit the shutter sound when you take a photo and...

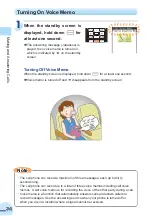
Страница 36: ...rom the standby screen I can t answer your call now Japanese The cell phone can record a maximum of three messages each up to thirty seconds long The cell phone can record up to a total of three voice memos including call voice memos A call voice memo is for recording the voice of the other party during a call Voice memo is a function that automatically answers calls and allows callers to record m...

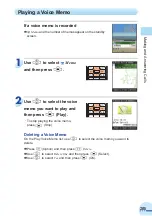
Страница 37: ...Use G to select the voice memo you want to play and then press Play To stop playing the voice memo press Stop Deleting a Voice Memo On the Play Voice Memo list use G to select the voice memo you want to delete aPress K Option and then press 1 Delete aUse G to select Delete One and then press Select aUse G to select Yes and then press OK Playing a Voice Memo ...

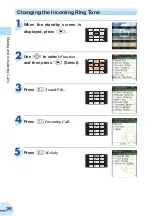
Страница 38: ...and Answering Calls 36 1 When the standby screen is displayed press 2 Use E to select Function and then press Select 3 Press 2 Sound Vib 4 Press 1 Incoming Call 5 Press 2 Melody Changing the Incoming Ring Tone ...

Страница 39: ...ss J Play If you press J Back or R the tone stops playing and you can select another tone 8 Press OK aThe incoming ring tone is set You can select from among fixed patterns fixed melodies fixed sounds data folder contents and EZweb search for your ring tone The initial default setting is the Pattern 1 fixed pattern Note Note ...

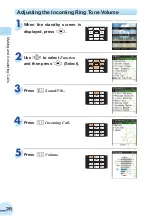
Страница 40: ...Answering Calls 38 1 When the standby screen is displayed press 2 Use E to select Function and then press Select 3 Press 2 Sound Vib 4 Press 1 Incoming Call 5 Press 1 Volume Adjusting the Incoming Ring Tone Volume ...

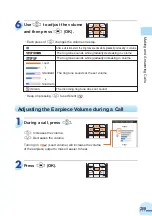
Страница 41: ...d then press OK Each press of G changes the volume one step After a vibration alert the ring tone sounds while gradually increasing in volume The ring tone sounds while gradually decreasing in volume The ring tone sounds while gradually increasing in volume Loud Standard The ring tone sounds at the set volume Minimum Silent The incoming ring tone does not sound Keep on pressing B to set Silent Adj...

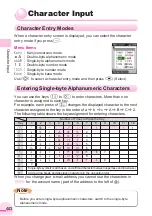
Страница 42: ...e the keys 1 to 0 to enter characters More than one character is assigned to each key For example each press of 2 changes the displayed character to the next character assigned to the key in the order of a b c A B C 2 The following table shows the key assignment for entering characters When you change your e mail address you cannot use the characters in for the account name part of the address to ...

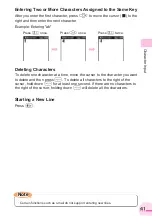
Страница 43: ...mple Entering ab Deleting Characters To delete one character at a time move the cursor to the character you want to delete and then press R To delete all characters to the right of the cursor hold down R for at least one second If there are no characters to the right of the cursor holding down R will delete all the characters Starting a New Line Press Certain functions such as c mail do not suppor...

Страница 44: ...e and then press C a Press 2 once 3 How to Enter E mail Addresses Use 1 to 0 to enter characters and numbers Example Entering taro 23 toshiba co jp for the recipient s e mail address E mail Address Compatible Characters Before you enter an e mail address switch to the single byte alphanumeric mode When changing your e mail address you can enter up to 30 single byte alphanumeric and symbol characte...
Страница 45: ...and then press Phrase 4 Use G to select Internet and then press Select 5 Use G to select co jp and then press Select a co jp is entered 6 Character Input 43 To enter co jp etc you can use the Sentence menu Note Note ...

Страница 46: ...seful sentences fixed text from the character entry mode menu 1 Press 9 You can switch the Pictogram screen by category such as Face if you press L or M 2 Use E to select the pictogram you want to enter and then press Select aThis enters the pictogram You can enter pictograms consecutively if you press K Repeat instead of Select Pictograms are not displayed properly on some non au cell phones pers...

Страница 47: ...for the name is entered automatically For details on entering characters see page 40 2 Use G to select Tel 1 and then press Select 3 Enter a phone number and then press OK If the phone number is for a regular phone enter the phone number starting with the area code 4 Phone Book 45 Hold down K for at least one second New screen ...

Страница 48: ...next two steps to enter an e mail address If you do not want to enter an e mail address proceed to Step 9 5 Use G to select E mail 1 and then press Select 6 The phone book can store up to 1 000 entries The cell phone automatically saves an entry to the lowest available memory number from 000 to 999 You can save five phone numbers and five e mail addresses for each phone book entry You can also ass...

Страница 49: ...mber you want to dial and then press Select 2 Press Q 3 Dialing from the Phone Book Phone Book 47 When Simple Mode is set you can make calls to pair partners registered using the Pair function by simply holding down one of the keypad keys 1 to 5 for at least one second one touch dialing Note Note ...

Страница 50: ...lect K Press K Option and then press 1 Edit 1 Edit the contents and then press J Add 2 Use G to select Overwrite and then press OK 3 Editing Phone Book Entries In step 1 you can delete the selected address by pressing 2 Delete after you press K Option Note Note ...

Страница 51: ... Phone Book 2 Use G to select New and then press Select 3 Saving a Phone Number from the Incoming or Outgoing History For details on saving a phone book entry see page 45 To open the Outgoing History screen for saving a phone number to the phone book press C in Step 1 Note Note Example Saving a phone number from the incoming history to the phone book ...

Страница 52: ...w and then press Select You can also register a pair partner from Use Phone Book 3 You can register a maximum of five pair partners you contact often to easily call or send mail You can also invite pair partners to a Hello Messenger meeting Perform the procedure under Saving a Phone Book Entry on page 45 4 The member that you register in the Pair function is also registered in the phone book When ...

Страница 53: ...th the Pair function When Simple Mode is set you can call pair partners by simply holding down one of the keypad keys 1 to 5 registered for up to five partners for at least one second Note Note When the standby screen is displayed press Q 1 Use F to select the person you want to call 2 Use G to select Call and then press Select 3 Making a Call to a Pair Partner ...

Страница 54: ...ing on page 67 2 Inviting Members to a Hello Messenger Meeting from the Pair Partner Function When the standby screen is displayed press Q and then use F to select the person you want to send a mail 1 Use G to select E mail or C mail and then press Select To create an e mail message see Creating and Sending E mail Messages on page 54 To create a c mail message see Creating and Sending C mail Messa...

Страница 55: ...double byte or 10 000 single byte characters you can also send photos and movies by e mail You can send messages to au cell phones and also to cell phones of other companies You can send messages to personal computers A message is sent to an e mail address Example ezweb ne jp Internet You can send an e mail message to up to five different addresses at one time You can send up to 1 000 e mail messa...

Страница 56: ... Press Select and then press 1 Use Phone Book You can specify up to five addresses for the To Cc and Bcc fields You can also select Use Sent Hist to specify an address or Direct Input to enter an address directly 3 Use E to select an address press Select and then press J OK 4 Press J OK 5 Creating and Sending E mail Messages ...

Страница 57: ... You cannot enter single byte Japanese characters or a new line in a subject 7 Use G to select Text and then press Select 8 Enter the text of the message and then press OK You cannot enter single byte Japanese characters in the text of a message 9 Press J Send aThe e mail message is sent 10 ...

Страница 58: ...s on the standby screen along with the number of messages received Use G to select Email and then press Indicators Indicates a folder containing a new message 1 Press Select Indicators Indicates a read message Indicates an unread message Indicates a message that has an attachment 2 Reading Received E mail Messages ...

Страница 59: ...age 58 Message text Reading an E mail Message from the E mail Menu When the standby screen is displayed press L to display the E mail menu and then press 2 Inbox Indicators X X The number on the right of the indicator indicates the number of unread messages For subsequent operations see Reading Received E mail Messages Steps 2 and 3 on page 56 The procedure may differ depending on the e mail setti...

Страница 60: ...t the file name and then press Rcv 2 Press Play 3 Some files will already be displayed on the screen in Step 1 while other files will require that you select the file name Step 2 and then press Play It depends on the file size Note Note Reading an E mail Message with an Attached Photo or Movie ...

Страница 61: ...reply to and then press Select 3 Press J Reply aThe Create Mail screen appears Re is prefixed to the subject and the text of the message is quoted 4 Replying to Received E mail Messages Refer to Creating and Sending E mail Messages Steps 8 and 9 on page 55 and enter the text of the message 5 Press J Send aThe e mail message is sent 6 ...

Страница 62: ...n form Rejecting Spam Mail filter setting screen サポート設定 Supportive Settings Set mail filters by just answering questions This is recommended for users who want to configure settings while confirming conditions フィルターレベル 高 Filter Level High Shut out all mail from personal computers This is recommended for users who only want to receive mail from cell phones フィルターレベル 中 Filter Level Medium Specify the...

Страница 63: ...can contain up to 50 double byte or 100 single byte characters Using C mail C mail Safety Block C mail safety block is a function that allows you to reject to receive c mails that include accessing URL http https or phone numbers in the c mail message text C mail safety block is valid by default You can cancel the setting if you want to receive c mails that include accessing URL or phone numbers i...

Страница 64: ...hen press OK 2 Use G to select Use Phone Book and then press Select You can also select Use Sent Hist Use Received Hist or Clipboard No to specify an address or Input Phone Number to enter an address directly 3 Use E to select an address and then press Select twice 4 Press J Send aThe c mail message is sent 5 Creating and Sending C mail Messages ...

Страница 65: ...dicates an unread message 1 Use G to select the new message and then press Select Reading a C mail Message from the C mail Menu When the standby screen is displayed hold down L for at least one second to display the C mail menu and then press 2 Inbox Indicators X X The number on the right of the indicator indicates the number of unread messages Use G to select the message you want to read and then...

Страница 66: ...nes that support Hello Messenger The host can select up to four members from the phone book to join the meeting Hello Member 1 Sends a text message Member 2 Talks Member 3 Takes a photo and then sends it Member 4 Sends a text message Hello Host Conditions such as frequent use location and signal strength may result in battery power not lasting as long as usual This service can be used by two to fi...

Страница 67: ... your character and then press 設定 Set Yamashita Kohei mountain mountain 2 You can select from 12 different characters for Hello Messenger Hello Messenger menu スタート Start Select the members to invite and then start the meeting コメントログ Comment Log Display the comment log meeting history ヒント Hint Display information on the basic operations of Hello Messenger オプション Options Configure Hello Messenger set...

Страница 68: ...rson use G to select Hello Messenger and then press Select Call screen Select a group and then press 選択 Select Select Start and then press 選択 Select スタート Character area Displays the character and name of each member 1 2 and 3 Message area Displays the comments of members sent and received photos reduced size images and status of members You can use G L and M to scroll Guide area Indicates you have...

Страница 69: ...ed in the members list When the message さんが参加し ました XXX Has Joined the Meeting appears the meeting can start 4 You can start a meeting by inviting members registered in the members list Use G to select スタート Start from the Hello Messenger menu see page 65 and then press 選択 Select 1 Use G to select アドレス帳 Phone Book and then press 選択 Select You can also select ハローランキン グ グループ Hello Ranking Group to spe...

Страница 70: ...s However if 着信モード Incoming Mode is set to 自動応答モード Auto Answer Mode you join the meeting automatically without the ring tone sounding 1 Accepting an Invitation to Join a Meeting Use G to select 参加 Join and then press OK aThe meeting screen appears and you can join the meeting To reject the invitation to join the meeting use G to select 不参加 Do Not Join and then press OK 1 The ring tone is not heard...

Страница 71: ...ages Using Images Captured Images Sending Images Displaying and Printing Images You can use a microSD memory card to transfer captured images to a personal computer or printer Print out Display with a personal computer Commercially available microSD memory card You can use images for screens such as the standby screen and call screen and you can include them in phone book entries You can attach im...

Страница 72: ...W 320 H dots VGA 640 W 480 H dots SXGA 1280 W 960 H dots The Photo Folder in the Data Folder of the cell phone The Digi Came Fldr in the microSD memory card Mode Save Location STD S 96 W 80 H dots STD M HIGH M 128 W 96 H dots HIGH L 176 W 144 H dots FULL 320 W 240 H dots The Movie Folder in the Data Folder of the cell phone The Movie Folder in the microSD memory card When a microSD memory card com...

Страница 73: ...ook appears Saving a Photo Press Save in the preview screen 2 Monitor screen Preview screen Taking a Photo If you do not want to save the photo press R in the preview screen The following shows how to read the file name in the Data Folder when you take a photo in the Wallpaper mode Note Note File Name Example 070214 1234 01 Recording Date February 14 2007 Time 12 34 Serial Number Photo 1 ...

Страница 74: ...he Recording Time Elapses The first frame of the movie you just recorded appears preview screen Playing Back a Movie Before it is Saved Press K Option use G to select Play and then press Select Saving a Movie Press Save in the preview screen Recording a Movie Use E to select Camera and then press Select 2 When the standby screen is displayed press 1 Press 2 Movie aThe monitor screen appears 3 Prev...

Страница 75: ...hat an image has been attached For details on creating an e mail message see page 54 1 Attaching Photos or Movies to E mail Messages If you do not want to save the movie press R in the preview screen use G to select Yes and then press OK The following shows how to read the file name in the Data Folder when you record a movie in the High L mode Note Note Recording Date February 14 2007 Time 12 34 S...

Страница 76: ... Select To view a movie select Movie Folder 3 Use G to select a folder and then press Select 4 Use E to select the photo you want to view and then press Play You can attach the photo to an e mail message by pressing K Option and 1 AttachToE mail 5 Viewing Photos or Movies Use E to select Data Folder and then press Select 2 ...

Страница 77: ...an au shop or the au Customer Service Center Also before use be sure to configure initial settings EZweb Internet Chaku Uta Wallpaper Latest news Games Traffic information etc Weather forecast Connect to the Internet EZwebSubscriptionRequired The layout and content of the screens in this manual are only for the purpose of explanation The layout and content of actual screens may be different from t...

Страница 78: ...s Provides shopping and auction information that you can use from your cell phone ライフ Daily Life Provides useful information for daily living ホビー カルチャー Hobbies Culture Provides the latest information such as games music and books and popular information such as hobbies and entertainment コミュニティ Community Provides interesting and useful information that you can use for SNS or blogs au My Page Provid...

Страница 79: ...e second Select the item you want to display and then press Select The following describes the basic operations that are available while accessing sites Key Operation Description S Exits EZweb G Moves the cursor up and down When there is data available above or below the current screen scrolls the screen line by line L M D R When there is data available above or below the current screen scrolls th...

Страница 80: ...he page you want to bookmark is displayed press K Browser menu 1 Press 1 New bookmark Some pages cannot be bookmarked 2 Press J Regist aThe displayed page is bookmarked and its title and URL are added to the Bookmark 3 Bookmarking Frequently Accessed Pages The Bookmark can contain up to 100 titles and URLs Note Note ...

Страница 81: ...you want to view and then press Access aThe cell phone connects to the site 3 You can use EZweb to check call charges communication charges and other information When the standby screen is displayed press 1 Press 11 and then press OK Select the item you want to check and then follow the on screen instructions 2 Viewing Bookmarked Pages Checking Charges ...

Страница 82: ... then press Select aThe download procedure appears To use information sites that charge for providing information you need to enter your EZ password or Premium EZ password Follow the on screen instructions to enter the password See page 12 for details 5 Downloading Chaku Uta When the standby screen is displayed press M and then use F to select the EZweb 1 Press 1 Top Menu 2 ...

Страница 83: ...ect the tone you want to use the Chaku Uta for and then press OK aThe Chaku Uta is set as a tone You can use the same operation to download an image and set it to the standby screen etc 9 Press J Play aThe downloaded Chaku Uta plays 7 This procedure is only an example for the purpose of explanation and may differ from actual procedures Follow the instructions on the site from which you want to dow...

Страница 84: ...with Position Search エリア通知 Area Message no monthly charge When you enter or are in or leave or are no longer in a specified area during a predetermined time period this feature automatically sends a notification e mail to a designated au cell phone Using GPS Global Positioning System EZ Navi provides useful positional information services EZ Navi 82 You can also launch Safety Navi from the Launche...

Страница 85: ...this function provides simple navigation instructions Selecting A Map of Your Current Location displays the current map in real time When for example you have arranged to meet someone you can send a message to let the person know your current location Map screen Current Mail represents your initial location As you start moving changes of your location are tracked by continuous positioning and indi...

Страница 86: ...523T to check on the location of an au cell phone or have it sound an alarm to notify you when the au cell phone is in a particular area during a specified time period What You Can Do with Safety Navi 位置確認メール Position Search Mail Features You and your child can pre register each other s cell phones When you check your child s position you will be able to know the current location automatically wit...

Страница 87: ...ition Search is not available in such cases as when the cell phone you are searching for is out of range rejecting to be searched or operating some other application or when it is no longer compatible with Position Search because the relevant application has been deleted etc This service becomes unavailable when The Use Suspension Course of Price Safety Service is activated and the charge reaches ...

Страница 88: ...t in antenna for listening to the FM radio When you want to listen to EZ FM radio be sure to connect the earphone so that you can receive the signal Flat type earphone jack Use this groove to pull open the cover Toshiba flat type stereo earphone 04 connector When you use the Toshiba flat type stereo earphone 04 be sure to keep the connector straight when you plug it into the flat type earphone jac...

Страница 89: ... in this manual are only for the purpose of explanation The layout and content of actual screens may be different from the ones shown here If you are listening indoors you may be able to improve the reception by moving closer to a window Note Note When the standby screen is displayed press 1 Use E to select EZ FM press Select use G to select 承諾する Agree and then press Important notes are displayed ...

Страница 90: ...the artist name and song name by pressing song name display Information may not be provided depending on the program gF Key used Changes the station By pressing any key from 1 to 9 you can switch between the radio stations assigned to the different keys rS Exits EZ FM Use G to select Exit and then press OK gA uU gB uV Raises the volume Lowers the volume rR gF Tunes the radio in 0 1 MHz increments ...

Страница 91: ...tomatically exit EZ FM if you do not press any of the keys for approximately 2 hours You can change this in the ラ ジオ自動終了 Auto Radio Exit setting Note Note Press S and then press 1 Suspend BGM or 2 Exit 1 Switching to Background Music Reception or Exiting EZ FM ...

Страница 92: ...tering Permitted Members Limit Mode allows a parent or superior to limit how much each function can be used to prevent overuse of the cell phone by a child or subordinate Limits can be placed on incoming and outgoing calls and c mail When the standby screen is displayed press 1 Use E to select Limit Mode and then press Select 2 Press 1 Permitted Member 3 Limit Mode ...

Страница 93: ...Limit Mode 91 Use E to select a phone book entry and then press Select 4 Press J OK 5 Use G to select Yes and then press OK 6 ...

Страница 94: ...Only allowing outgoing calls to permitted members Limiting Calls and C mail When the standby screen is displayed press 1 Use E to select Limit Mode and then press Select 2 Press 4 Limit Mode Setup 3 Enter your Limit Mode password and then press OK The initial default password is 12345678 4 ...

Страница 95: ...93 Use G to select Limit Setup and then press Select 5 Use G to select Access Limit and then press Select 6 Use G to select Outgo and then press Select 7 Use G to select Only Permit Member and then press Select 8 ...

Страница 96: ...e exceeded Example Limiting the call amount When the standby screen is displayed press 1 Use E to select Limit Mode and then press Select 2 Press 4 Limit Mode Setup 3 Enter your Limit Mode password and then press OK The initial default password is 12345678 4 Use G to select Limit Setup and then press Select 5 Setting Use Limits ...

Страница 97: ... to select Call and then press Select 7 Use G to select Limited and then press Select 8 Enter the call amount and then press OK 9 Your cell phone does not place limits on outgoing calls and c mail to permitted members even if the set use amount will be exceeded Note Note ...

Страница 98: ...ial default password is 12345678 4 Use G to select ON and then press OK 5 Turning Limit Mode On and Off When the standby screen is displayed press 1 Use E to select Limit Mode and then press Select 2 Press 5 Limit Cancel 3 You can change your Limit Mode password Note Note ...

Страница 99: ...displayed press 1 Use E to select Simple Mode and then press Select 2 Use G to select ON and then press OK aThis enters Simple Mode 3 Setting Simple Mode enables limited and simplified operations of the phone function phone book camera mail EZweb and other often used functions ...

Страница 100: ...imple Mode is still displayed in normal mode Note Note Exiting Simple Mode When the standby screen is displayed press 1 Use G to select Setup and then press Select 2 Use G to select End Simple Mode and then press Select 3 Use G to select Yes and then press OK aThis exits Simple Mode 4 ...

Страница 101: ...is selected as the standby screen wallpaper in normal mode the same wallpaper is displayed when you switch to Simple Mode Note Note Viewing the Display in Simple Mode About the Alert Window The alert window appears when you are unable to answer a call or a message is received Use G to select an item and press to check its details is displayed when you missed a call to notify you that someone calle...

Страница 102: ...mera menu Indicator Function Name Camera Alarm Useful Function Calendar Notepad Calculator Ir EZ FM Toshiba Site All Photo Folder Movie Folder SD Card Photo Movie Barcode Reader Data Folder Setup My Number Volume Melody Standby Screen Character Pict Size Manner Mode Pay Apply End Simple Mode G for at least two seconds Select G Shortcut menu Menu For details on the key assignment and basic operatio...

Страница 103: ...quick and simple way to access functions such as EZweb and EZ Navi When the standby screen is displayed press M to display the Simple EZ menu Use G to select a menu item press Select use G to select a function and then press Select You can access the following functions from the EZ menu while the cell phone is in Simple Mode EZnaviwalk Safety Navi EZweb EZnavi EZ Game Street To Search EZapps EZapp...

Страница 104: ...r use G to select Not Input press Select and then proceed to Step 6 You can also use G to select Outgo History or Incom History and enter a phone number from there 4 Enter a phone number and then press OK If the phone number is for a regular phone enter the phone number starting with the area code 5 When the standby screen is displayed press K 1 Use G to select Yes and then press OK 2 ...

Страница 105: ... entered or to configure call ring tone and mail ring tone settings 7 When you have already stored data in the phone book pressing K while the standby screen is displayed displays a phone book list To store new phone book data press J New and perform Steps 3 through 8 of the above procedure To edit phone book contents press K while the standby screen is displayed Use E to select the phone book ent...

Страница 106: ...ct C mail With c mail you enter the text first and then enter the address 2 Use G to select Create New and then press Select 3 Use G to select Phone Book and then press Select You can specify only one address Only entries that include an e mail address are displayed You can also use G to select Sent History Received Hist or Direct Input and select an address from there 4 Use E to select the recipi...

Страница 107: ... Enter a subject and then press OK 6 Enter the text of the message and then press OK You can use G to select an item and then press Edit to edit the currently selected item 7 Press J Send aThe e mail message is sent 8 ...

Страница 108: ...ect 2 Use G to select Photo and then press Select aThe monitor screen appears 3 Point the lens at the subject and then press Shot aThe photo you just took appears 4 When the standby screen is displayed press 1 Monitor screen Preview screen Saving a Photo Press Save in the preview screen ...

Страница 109: ...press 1 Use G to select DataFolder and then press Select 2 Use G to select PhotoFolder and then press Select 3 Use G to select a folder and then press Select 4 Use E to select the photo you want to view and then press Play 5 Viewing Photos in Simple Mode ...

Страница 110: ...eo earphone 04 is connected or manner mode is selected The Safety Buzzer is not necessarily intended to prevent crime or to protect your safety Do not sound the Safety Buzzer close to your ear This could damage your hearing Take care when setting up or using the Safety Buzzer as it can be activated accidentally by a child etc The Safety Buzzer will not sound from screens other than the standby scr...

Страница 111: ...re shooting photos or movies or playing music etc Open Close Lock Whenever you close the A5523T it automatically locks itself to prevent other people from using it to access EZweb or make calls etc Extra Large Icons When you set the A5523T to Simple Mode this feature displays the battery level and signal strength icons at a larger size E mail Voice Read This function enables the A5523T to automati...

Страница 112: ...dby screen is displayed press 412 enter a Lock No and then press OK 1 Use G to select ON and then press OK 2 Use G to select Time press Select enter a time and then press OK This sets the time limit for receiving the number of calls set for No of Ring after the first call is received You can set the time in minutes from 01 to 10 two digits 3 If you set the Remote Auto Lock to ON in advance you wil...

Страница 113: ...hone number repeatedly within the time limit set in Setting Conditions for Enabling the Remote Auto Lock When your A5523T receives the number of calls specified in No of Ring within the time specified in Time Remote Auto Lock is activated and a message is played notifying you that the cell phone is locked 1 Remotely Enabling the Auto Lock on Your A5523T The Remote Auto Lock cannot be enabled when ...

Страница 114: ...r displayed 16 Is power turned on Hold down S for at least one second 16 Is power turned on Hold down S for at least one second 16 No response when a side key is pressed Is displayed on the main display or is displayed on the sub display Press for at least one second to unlock the side keys 20 13 A warning tone sounds and power turns off Is there enough power left in the battery pack Charge the ba...

Страница 115: ...phone inserted in the desktop holder properly Are the plug and connector of the common AC adapter 01 sold separately inserted properly Insert the cell phone in the desktop holder properly Check that the AC adapter connector is properly inserted and that the adapter is plugged into the AC outlet securely 13 When the camera function is started no subject is displayed Is a finger or other object cove...

Страница 116: ...4 Initial settings 25 Reading 56 Received mail 56 Replying 59 Viewing attached images 58 E mail address 25 Changing 26 Entering 42 Entering characters 40 Entering characters from the same key 41 Entering pictograms 44 Extra large characters 28 EZ FM 86 Antenna 86 Exiting 89 Listening 87 Switching to background music reception 89 EZ menu 23 EZ Navi 82 EZ Navi Walk 83 EZweb 75 Accessing sites 76 Ini...

Страница 117: ...m the incoming or outgoing history 49 Phone number 25 Photos Attaching to an e mail 73 Taking 71 Viewing 74 Playback Voice memo 35 Power supply Turning off power 16 Turning on power 16 R Ring tones Changing the type 36 Changing the volume 38 Remote Auto Lock 110 S Safety Navi 82 84 85 Security code 12 Signal strength 16 Simple Mode 97 Entering 97 Exiting 98 Saving a phone book entry 102 Sending me...

Страница 118: ...enu auお客さまサポー ト au Customer Support お問い合わせ Inquiries Menus are subject to change without prior notice Read this code for an easy access to au Online Manual Sales KDDI CORPORATION OKINAWA CELLULAR TELEPHONE COMPANY Manufactured by TOSHIBA CORPORATION February 2007 Edition Cellphone and PHS operators collect and recycle unused telephones batteries and battery chargers at stores bearing the logo rega...

Отзывы: