Steering
and Brakes
Reelmaster 5500-D
Steering and Brakes
Page 7 - 13
Wheel Bearings
Front Wheel Bearings
See Chapter 6−Differential Axle “Axle Shafts and Wheel
Bearings” in this manual.
Rear Wheel Bearings
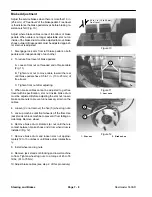
Rear wheel bearing buddies should be lubricated every
50 operating hours. Disassemble, clean, repack and ad-
just the rear wheel bearings after 800 hours of operation
or once a year. Use No. 2 general purpose lithium
grease containing E.P. additive. If operating conditions
are extremely dusty and dirty, it may be necessary to
perform this maintenance more often.
1. Jack up the rear of the machine until the tire is off the
floor. Support the machine with jack stands or blocks to
prevent it from falling.
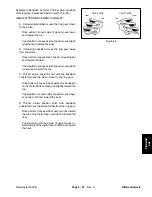
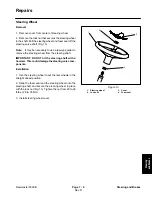
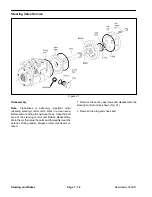
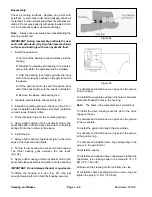
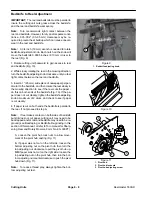
1. Cotter
pin
2. Dust
cap
3. Bearing
buddy
4. Seal
5. Bearing
cone
6. Bearing
race
7. Wheel
hub
8. Washer
9. Retainer
10. Locknut
Figure 15
1
3
2
8
4
5
6
7
9
10
5
6
2. Remove the dust cap and bearing buddy from the
end of the wheel spindle (Fig. 15).
3. Remove the cotter pin, retainer, slotted nut, and
washer. Slide the wheel off spindle shaft.
4. Pull the seal out of the wheel hub.
5. Remove the bearings from both sides of the wheel
hub. Clean the bearings in solvent. Make sure the bear-
ings are in good operating condition. Clean the inside of
the wheel hub. Check the bearing cups for wear, pitting
or other noticeable damage. Replace worn or damaged
parts.
6. If bearing cups were removed from the wheel hub,
press them into the hub until they seat against the shoul-
der.
7. Pack both bearings with grease. Install one bearing
into the cup on inboard side of the wheel hub. Lubricate
the inside of the new lip seal and press it into the wheel
hub.
IMPORTANT: The lip seal must be pressed in so it is
flush with the end of the hub. The lip of the seal must
be toward the bearing.
8. Pack inside of wheel hub with some grease (not full).
Install remaining bearing into the bearing cup.
9. Slide the wheel onto the spindle shaft and secure it
in place with the flat washer and slotted nut. DO NOT
tighten the nut or install the cotter pin.
10.Rotate the wheel by hand and tighten the slotted nut
(Fig. 15) to 75 - 100 in-lb (8.5 - 11.3 Nm) to set the bear-
ing. Then, loosen the nut until the hub has endplay.
11. Rotate the wheel by hand and re-tighten the slotted
nut to 15 - 20 in-lb (1.7 - 2.3 Nm).
12.If necessary rotate the slotted nut counterclockwise
to align slot with cotter pin hole in spindle, and install re-
tainer and cotter pin.
13.Remove jack stands or blocks and lower machine to
floor.
14.Fill the inside of the bearing with grease. Install bear-
ing buddy and dust cap.
Содержание 00075SL
Страница 2: ...Reelmaster 5500 D ...
Страница 4: ...Reelmaster 5500 D ...
Страница 6: ...Reelmaster 5500 D ...
Страница 12: ...0 09375 Rev D Reelmaster 5500 D Page 2 2 Product Records and Maintenance Equivalents and Conversions ...
Страница 49: ...Hydraulic System Reelmaster 5500 D Hydraulic System Rev C Page 4 11 This page is intentionally blank ...
Страница 64: ...Reelmaster 5500 D Hydraulic System Rev C Page 4 26 This page is intentionally blank ...
Страница 89: ...Hydraulic System Reelmaster 5500 D Hydraulic System Rev C Page 4 51 This page is intentionally blank ...
Страница 109: ...Hydraulic System Reelmaster 5500 D Hydraulic System Rev C Page 4 71 This page is intentionally blank ...
Страница 115: ...Hydraulic System Reelmaster 5500 D Hydraulic System Rev C Page 4 77 This page is intentionally blank ...
Страница 170: ...Reelmaster 5500 D Page 5 40 Electrical System Rev C ...
Страница 192: ...Reelmaster 5500 D Differential Axle Page 6 22 ...
Страница 254: ...Reelmaster 5500 D Groomer Rev C Page 8 1 14 ...
Страница 278: ...Reelmaster 5500 D Page 10 2 Electrical Diagrams Rev C ...
Страница 284: ...Rev C Page 10 8 Harness Drawing Reelmaster 5500 D Serial Number 210000401 to 210999999 ...
Страница 285: ...Rev C Page 10 9 Harness Diagram Reelmaster 5500 D Serial Number 210000401 to 210999999 ...
Страница 286: ...Rev C Page 10 10 Harness Drawing Reelmaster 5500 D Serial Number 220000001 to 220999999 ...
Страница 287: ...Rev C Page 10 11 Harness Diagram Reelmaster 5500 D Serial Number 220000001 to 220999999 ...
Страница 288: ...Rev C Page 10 12 Harness Drawing Reelmaster 5500 D Serial Number Above 230000000 ...
Страница 289: ...Rev C Page 10 13 Harness Diagram Reelmaster 5500 D Serial Number Above 230000000 ...
Страница 290: ...Reelmaster 5500 D ...

