


4
5
GB
Replacing the batteries
Replacing the batteries in the remote control
and in the base
Remote Control:
Use 2 AAA 1.5Volt batteries
1. Open the cover on the back of the remote control by
pushing down on the tab and lifting the cover off.
2. Check the +/– polarity on the batteries and inside
the compartment.
3. Insert the batteries.
4. Press the battery cover back into place.
When exchanging the batteries, it may be necessary to
reprogram the unit. Hence it is advisable to record the
codes needed for your devices.
Other functions
Placing all devices on standby
Press the
G
key twice in less than one second, keeping
it held down the second time. All the devices go on
standby one after the other (the devices which were
already on Standby may turn on).
Adjustment of ALL volume controls under a
specifi c mode
In its delivered state, the
ROC6411
is programmed
such that all modes will use their own Volume and
Mute functions if present.
You can allocate the volume control to one of the
modes of the remote control on condition that the
volume control exists on the corresponding device
(e.g. control of TV sound in TV mode, DVD mode, VCR
Mode, etc.).
1. Hold the
SETUP
key down until the indicator lamp
blinks and then remains lit.
2. Release the
SETUP
key
3. Press the
H
key until the indicator lamp blinks
once.
4. Press once on the mode key (
TV
,
DVD
, …)
corresponding to the device whose volume will
always be controlled by the
VOL
and
H
keys.
5. Press the
H
key once. The indicator lamp goes off.
6. All other mode will now punch-through to your
chosen mode for Volume and Mute control.
Adjustment of the volume controls for EACH
mode.
You can decide that the volume control is functional
for each mode selected on condition that the volume
control exists on the corresponding device (e.g. control
of the television set sound in TV mode, the control of
the sound of the SAT receiver in SAT/STB mode, …).
1. Hold the
SETUP
key down until the indicator lamp
blinks and then remains lit.
2. Release the
SETUP
key
3. Press the
H
key until the indicator lamp blinks
once.
4. Press once on the mode key (
TV
,
DVD
, …)
corresponding to the device whose volume will
always be controlled by the
VOL
and
H
keys.
5. Press the
VOL-
key once.
6. Press the
H
key once. The indicator lamp goes off.
7. The chosen mode key will now use its own Volume
and Mute functions
Restoring the universal Volume/Mute
functions
If you have changed the universal volume and mute
functions, as described in the previous two sections,
you can reset the functions back to the factory settings:
1. Hold the
SETUP
key down until the indicator lamp
blinks and then remains lit.
2. Release the
SETUP
key
3. Press the
H
key until the indicator lamp blinks
once.
4. Press and release the
H
key. The indicator lamp
will go off completely. The volume and mute
functions are now restored to their factory defaults.
F
Description des touches
Essai de la télécommande sans
l’avoir programmée
1. Mettez en marche l’appareil que vous souhaitez
commander.
2. Appuyez sur la touche correspondant au type
d’appareil à commander :
TV
: Téléviseur,
VCR
: Magnétoscope,
DVD
: Lecteur DVD,
SAB
: Satellite, Câble, Adaptateur TNT, boîtier
ADSL, …
AMP
: Amplifi cateur, Système HiFi,
lecteur CD, …
AUX
: Autre appareil de votre choix
(ex : second téléviseur ou lecteur DVD, etc.).
3. Dirigez la télécommande vers l’appareil à
commander et essayez de l’éteindre avec la
touche
G
. Si l’appareil ne s’éteint pas, vous devrez
programmer la télécommande en suivant une des
méthodes
A
,
B
,
C
ou
D
décrites ci-après.
Note 1: Exceptée la touche TV, chaque touche de mode
(DVD, VCR, SAT) est programmable pour commander
un appareil autre que celui indiqué sur la touche. Il
est donc possible d'attribuer, par exemple, le mode
SAT à la touche DVD. Vous devrez entrer le code
correspondant à la marque et à l'appareil désiré en
suivant une des méthodes indiquées dans ce manuel.
Cependant, la méthode D (recherche automatique d'un
code) vous simplifi era la tâche. Il vous suffi ra d'entrer
n'importe quel code de la liste correspondant au
type d'appareil (ex : 0603 pour un récepteur satellite
Thomson) puis de lancer la procédure de recherche
automatique. La télécommande testera ainsi tous les
codes jusqu'à trouver celui qui fera réagir le récepteur.
Note 2: Pour commander 2 appareils de mêmes types
et de mêmes marques (2 magnétoscopes Thomson,
2 récepteurs satellite Thomson, ...) assurez vous au
préalable, que ces deux appareils sont déjà paramétrés
pour ne réagir qu'à un sous code pour l'un et à un autre
sous code pour l'autre (code A et B pour les appareils
Thomson). Programmez ensuite et successivement 2
touches de mode en utilisant la méthode D.
Programmation
de la télécommande
Méthode A - Programmation rapide
avec un sous-code à 1 chiffre
Avant de commencer la programmation, recherchez
le sous-code de l’appareil que vous souhaitez
commander. L'entrée d'un sous-code permet à la
télécommande de tester une liste prédéfi nie de codes.
Reportez-vous à la liste jointe à cette notice, page I des
sous-codes
.
1. Mettez en marche l’appareil que vous souhaitez
commander.
2. Maintenez appuyée la touche
SETUP
jusqu'à ce que
le voyant clignote puis reste allumé (le voyant restera
allumé quelques secondes pour vous laissez le temps
de procéder aux étapes suivantes. Le clignotement
du voyant indique la fi n du temps disponible, puis il
s’éteint).
3. Appuyez sur la touche correspondant au type
d’appareil à commander :
TV
: Téléviseur,
VCR
: Magnétoscope,
DVD
: Lecteur DVD,
SAB
: Satellite, Câble, Adaptateur TNT, boîtier
ADSL, …
AMP
: Amplifi cateur, Système HiFi, lecteur
CD, …
AUX
: Autre appareil de votre choix (ex :
second téléviseur ou lecteur DVD, etc.).
4. Pendant que le voyant est allumé, tapez le sous-code
(ex : 1 pour Thomson).
5. Dirigez la télécommande vers l’appareil et essayez
de l’éteindre en appuyant une fois sur la touche
G
.
6. Si l’appareil à commander s’éteint, appuyez sur
OK
pour mémoriser le code.
7. Si l’appareil ne s’éteint pas, appuyez de nouveau
sur la touche
G
, plusieurs fois jusqu’à ce que
l’appareil s’éteigne. Entre deux appuis, laissez le
temps au voyant de s’éteindre puis de se rallumer
(environ 1 seconde). Ceci vous permet de vous
rendre compte de la réaction de l’appareil.
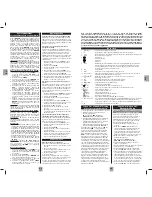
1 Mode
keys
:
Pour la sélection de l’appareil à commander (TV, DVD, etc.).
2
: Marche/Veille ou Veille uniquement, en fonction des appareils utilisés.
3 Learn
: Cette touche est utilisée pour la procédure d’apprentissage des codes (copie de touches) (voir page 7).
4 Macro
: Sélection de macros (voir page 8).
5
:
Télétexte
activé.
:
Télétexte
fi gé.
:
Télétexte
mixte.
:
Télétexte
désactivé.
6 Setup
: Cette touche vous permet de programmer votre télécommande avant la première utilisation. Elle vous
permet également d’accéder aux fonctions secondaires de certains appareils A/V (Shift). Appuyez
brièvement sur la touche « Setup », suivie de la touche de fonction désirée.
7 i
: Affi che les informations de l’appareil sélectionné.
8 P<P
: Canal
précédent.
9 Wide
: Pour
modifi er la taille de l’image (4/3, 16/9, etc...).
10 Coloured keys
: Pour la sélection de rubriques lorsque le télétexte est activé, ainsi que de fonctions
spécifi ques en fonction de la marque.
11 / / /
: Pour naviguer horizontalement et verticalement dans les menus.
OK
:
Pour
confi rmer votre sélection.
12 Exit
: Pour désactiver le menu du produit sélectionné.
13 Menu
: Pour activer le menu du produit sélectionné.
14 CH /CH
: Chaîne suivante et chaîne précédente.
15 Guide
: Guide électronique des programmes.
16
(Mute)
: Coupe le son de l’appareil sélectionné.
17 Vol+/Vol-
: Augmente (+) ou diminue (-) le volume de l’appareil sélectionné.
18
(Play)
: Lecture (DVD, VCR, etc.).
(FF)
: Avance rapide (DVD, VCR, etc.).
(RW)
: Retour (DVD, VCR, etc.).
(Pause)
: Interrompt la lecture avec arrêt sur image.
(Stop)
: Stoppe la lecture (DVD, VCR, etc.).
(Record)
: Appuyez deux fois sur cette touche pour démarrer l’enregistrement.
19 Numeric keys 0-9 : Ces touches ont les mêmes fonctions que celles de votre télécommande d’origine et sont
également utilisées pour saisir les codes de différents appareils. Sélection d’une macro (M1, M2, M3)
20 -/--
: Accès aux chaînes > 9 et sélection radio, en fonction de l’appareil.
21 AV
: Pour la sélection d’une source externe (SCART, HDMI, etc.).
Programming a sequence
of commands (Macro)
The
MACRO
key in coordination with one of the keys
1
,
2
, or
3
, allows the programming and memorisation
of up to 3 command sequences (the automatic and
successive pressing of several keys of your choice). Thus
any sequence of key commands can be reduced to
merely 2 commands (
MACRO
key + key
1
,
2
, or
3
).
For example after programming, by pressing
MACRO
then key
1
you could turn on your television set, turn on
your satellite or cable receiver, zap to a preferred
channel, turn on your video cassette recorder and start
a recording session (providing a cassette was
previously loaded). You can memorise a sequence of
10 commands with each key
1
,
2
, or
3
.
Note:
during the programming of a macro, the time
between each step is limited to a few seconds. This
leaves little time for reading the instructions and then
carrying them out. If the mode indicator light blinks
and then goes out, it is because this time limit has
been exceeded, you must start again from step 1.
To record a MACRO
:
1. Press and hold down the
SETUP
key until a (
TV
,
DVD
, …) mode key blinks and remains lit (after 2
or 3 seconds).
2. Release the
SETUP
key.
3. Press the
MACRO
key once. The mode key blinks.
4. Press once the
1
,
2
or
3
key which you are going
to use to memorise the sequence.
5. Press once on the (
TV
,
DVD
, …) mode key of the
first device you wish to control (the first key must
always be a mode key.)
6. Successively press the keys corresponding to the
commands you wish to send to the device(s) (9 keys
maximum, including other mode keys). The mode
key blinks when each key is pressed.
7. Memorise your key sequences by pressing the
MACRO
key once. The mode key is no longer lit
and your Macro is complete.
Note:
a sequence will be automatically memorised
after the tenth key press (counted from the mode key)
and the mode key light will go out.
To use a MACRO
:
Press the
MACRO
key once and, within 20 seconds,
press the
1
,
2
or
3
key you used to memorise the
sequence.
Note:
when running a Macro (which takes a few
seconds), ensure that the remote control is aimed at
the device being controlled.
Remarks
:
• The default time between sending 2 commands when
using a macro is half a second.. However, it is
possible that you will need to add longer periods in
your sequence in order to allow enough time for
certain devices to turn themselves on. To lengthen the
time period between 2 commands, press once on the
K
key and then press one of the keys from
1
to
9
in
order to insert a pause from 1 to 9 seconds.
• The first key in a sequence must always be a mode
key (
TV
,
DVD
, …).
Note:
the indications
TV
,
DVD
,
STB
(below keys
1
,
2
,
3
) are only an aid to memory. You may decide, for
example, to memorise a
MACRO
for the television
set using key
1
, etc.
Deleting a MACRO
:
1. Press and hold down the
SETUP
key until the (
TV
,
DVD
…) mode key blinks and then remains lit (after
2 or 3 seconds).
2. Release the
SETUP
key.
3. Press once on the
MACRO
key. The mode key
begins to blink.
4. Press once the
1
,
2
or
3
key that represents the
sequence to delete.
5. Press and hold down the
SETUP
key. The mode key
light goes out and the sequence is now deleted.
B
Cette télécommande universelle (6 en 1) est compatible avec la plupart des téléviseurs,
lecteurs DVD, magnétoscopes, les amplifi cateurs et les systèmes Hi-Fi et Home Cinéma
ainsi que la plupart des boîtiers numériques tels que les récepteurs satellite ou câble, les
récepteurs TNT, les décodeurs ADSL, etc… La télécommande a été programmée en usine
pour vous permettre de l’utiliser immédiatement avec la plupart des appareils des marques
du groupe Thomson. Nous vous conseillons donc de l’essayer avant de la programmer en
suivant une des méthodes de cette notice. Mais avant tout, vous devez installer 2 piles (AAA)
dans la télécommande. Conservez cette notice et la liste des codes séparée afi n de pouvoir
reprogrammer ultérieurement la télécommande pour commander d’autres appareils.


