background image

Engine Maintenance (Rev. 04/03)

85

Installation Procedure

To perform a seal change the following procedure is recom-

mended:

1.

Remove idler pulley from the unit.

2.

Remove the two seals and the retaining snap ring

(DISCARD OLD SEALS AND SNAP RING).

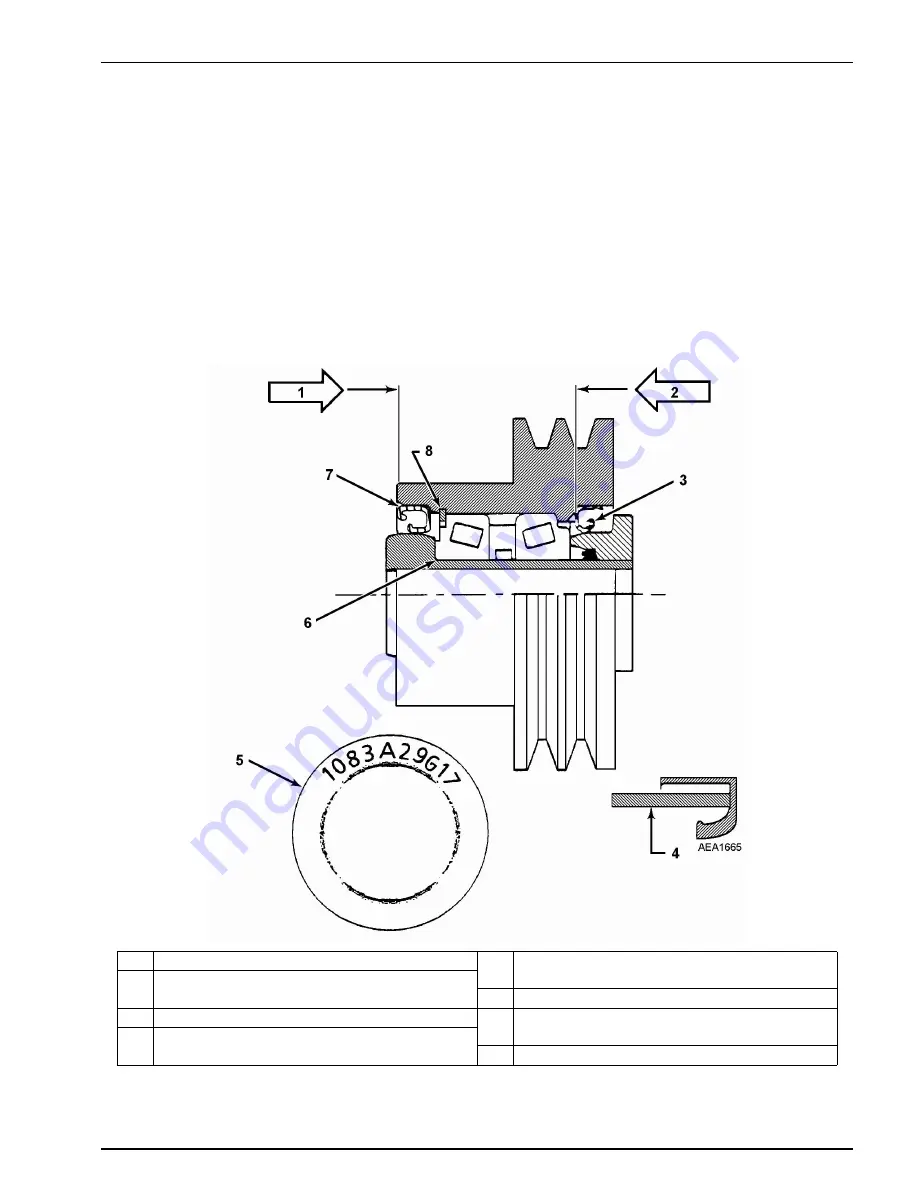
KD-II SR IDLER PULLEY SEAL 
INSTALLATION

NOTE: KD-II SR Idler Pulleys use seal assembly P/N

33-1924. The retaining spring is deleted and to prevent

pressure buildup in the pulley assembly, the seals are

installed with the seal lip facing outward. See diagram

below.

1.

MAJOR: FLUSH SEAL THIS SIDE

5.

Thermo King Drawing Number on Seal

(P/N 33-1924)

2.

MAJOR: INSTALL SEAL SEATED AGAINST 

SHOULDER

6.

Bearing F(P/N 77-0889)

3.

Apply Grease to Lip of Seal (P/N 203-386)

7.

Install Seal with Seal Lip Facing Outward 

“Backwards”

4.

Use a Pipe with a 1-3/4 in. O.D. and 1/8 in. Wall 

Thickness to Install the Seal

8.

Snap Ring

KD-II SR Idler Pulley Seal Installation

Содержание KD-II SR

Страница 1: ...KD II SR TK 41079 1 MM Rev 3 04 03 Copyright 1996 Thermo King Corp Minneapolis MN U S A Printed in U S A...

Страница 2: ...gencies If further information is required Thermo King Corporation should be consulted Sale of product shown in this manual is subject to Thermo King s terms and conditions including but not limited t...

Страница 3: ...o the atmosphere We strictly adhere to a policy that promotes the recovery and limits the loss of refrigerant into the atmosphere In addition service personnel must be aware of Federal regula tions co...

Страница 4: ......

Страница 5: ...25 Microprocessor Power Switch 25 Optional Electric Standby Model 50 Units Only 25 Standard Model 50 Features 26 Optional Model 50 Features 26 Serial Number Locations 27 Remote Control Panel Features...

Страница 6: ...Screw 76 Engine Mounts for KD II SR Unit 77 Belt Tensions Units Manufactured Prior to 1 97 78 Auto Start Stop 79 Idler Assembly 81 KD II SR Idler Pulley Seal Installation 85 KD II SR Idler Pulley Sea...

Страница 7: ...04A 117 Equipment Recommendations for use with R 134a and R 404A 120 Refrigerant Recovery System THE COLLECTOR 121 Hilliard Clutch Maintenance Prior 4 97 123 Hilliard Clutch Maintenance Starting 4 97...

Страница 8: ......

Страница 9: ...nds to displace air and can cause oxygen depletion resulting in suffocation and possible death 11 Use caution when using ladders or work platforms Follow manufacturer s instructions AUTO START STOP CA...

Страница 10: ...r Service Precautions must be taken to prevent electrostatic discharge when servicing the microprocessor controller and related components Potential differences considerably lower than those which pro...

Страница 11: ...ing and circuit breakers must be restored to their normal condition High Voltage When servicing or repairing a temperature control unit the possibility of serious or even fatal injury from electrical...

Страница 12: ...r the presence of a pulse and respiration If a pulse is not present start CPR Car diopulmonary Resuscitation and call for emergency medi cal assistance If a pulse is present respiration may be restore...

Страница 13: ...Safety Precautions Rev 04 03 v AEA40...

Страница 14: ...Safety Precautions Rev 04 03 vi AEA38...

Страница 15: ...l Pressure Sensor 10 3 psig 69 21 kPa shutdown High Coolant Temperature Sensor 220 5 0 F 104 4 2 8 C shutdown Engine Thermostat 180 to 190 F 82 2 to 87 8 C Coolant System Capacity 4 quarts 3 81 liters...

Страница 16: ...be measured so that the same amount of oil can be added before placing the replacement compressor in the unit HIGH PRESSURE RELIEF VALVE Opens 500 50 psig 3448 345 kPa Closes 400 psig 2758 kPa ENGINE...

Страница 17: ...lug 8 3 1 5 15 Fuel Solenoid Pull In Hold In 18 to 25 0 5 to 0 7 0 9 to 1 1 11 to 13 Pilot Solenoid 0 657 19 Starter Motor 90 to 105 cranking Damper Solenoid 5 7 2 2 DC Circuit Breakers 50 amp High Sp...

Страница 18: ...ations Rev 04 03 4 STANDBY POWER REQUIREMENTS Supply Circuit Breaker 30 amp 230 V 20 amp 460 V Extension Cord Size Up to 50 ft 12 gauge 75 ft 10 gauge AIR SWITCH Air Switch Setting 0 7 05 in 17 78 1 3...

Страница 19: ...se for damage Change fuel filter Drain water from fuel tank and check vent Inspect clean electric fuel pump filter Change engine coolant every two years Maintain year around anti freeze protection at...

Страница 20: ...akage and bearing wear noisy Clean entire unit including condenser and evaporator coils and defrost drains Check all unit fuel tank and electric motor mounting bolts brackets lines hoses etc Check dam...

Страница 21: ...the P T micropro cessor optimizes the Thermo King unit s performance thereby reducing fuel consumption and unit down time The unit s self check can be run before the daily distribution route to ident...

Страница 22: ...rant 4 COMPRESSOR OIL SIGHT GLASS The compres sor oil sight glass is used to check the relative level of compressor oil in the compressor sump 5 AIR RESTRICTION INDICATOR An air restric tion indicator...

Страница 23: ...sed for a specified time the microprocessor will shut the unit down and record alarm code 66 6 PREHEAT BUZZER The preheat buzzer sounds when the CYCLE SENTRY system energizes the glow plugs 7 OIL PRES...

Страница 24: ...he condenser and evaporator coils should be clean and free of debris Check the defrost drain hoses and fittings to be sure they are open The damper in the evaporator outlet must move freely with no st...

Страница 25: ...refrigeration fuel costs The savings vary with the com modity ambient temperatures and trailer insulation CYCLE SENTRY is designed for use only with products which do not require tight temperature con...

Страница 26: ...e the unit will operate in whichever operating mode the unit thermostat is calling for until the battery is fully charged optional and the engine block tem perature rises to 120 F 49 C on SR models or...

Страница 27: ...oading the truck This provides a good test of the refrigeration system while removing residual heat and the moisture from the truck interior to prepare it for a refrigerated load 5 DEFROST When the un...

Страница 28: ...or coil sensor temperature is below 45 F 7 2 C the unit will defrost The microprocessor will terminate defrost automatically when the evaporator coil temper ature reaches 57 F 13 9 C or the unit has b...

Страница 29: ...Unit Description Rev 04 03 15 Unit Photographs Front Curbside View KD II SR Front Roadside View KD II SR AEA35 AEA36...

Страница 30: ...nit Description Rev 04 03 16 1 Note Apply Thread Sealant When Installing High Pressure Cutout 2 Oil Seal Location Not Shown 3 Crankshaft 4 Discharge Port 5 Cylinder Head X214 Compressor aea04 1 2 3 4...

Страница 31: ...Head 2 Crankshaft 3 Oil Fill Plug 4 Sight Glass 5 Serial Number 6 Oil Drain Plug 7 Oil Pump Cover 8 Pressure Regulator Assembly 9 Oil Pump Gauge Access 10 Suction Port 11 Suction Valve Adapter X214 C...

Страница 32: ...Unit Description Rev 04 03 18 1 Engine Air Filter 2 Fuel Filter 3 Throttle Solenoid 4 Oil Drain Tube 5 Oil Filter Access Panel Open Curbside KD II SR 1 aea37 2 3 4 5...

Страница 33: ...Unit Description Rev 04 03 19 1 Evaporator 2 Access Door Rear View Curbside KD II SR 1 2 AEA38...

Страница 34: ...Unit Description Rev 04 03 20 1 Microprocessor Switch 2 Coil Sensor Location 3 Return Air Sensor Side View Roadside AEA39 3 1 2...

Страница 35: ...Suction Pressure Regulator 10 Drier 3 Compressor 11 Condenser Coil 4 Alternator 12 Three Way Valve 5 Nameplate 13 Expansion Tank 6 High Pressure Relief Valve 14 Fuel Filter 7 Receiver Tank 15 Muffler...

Страница 36: ...1 Relay 3 Overload Contactor 11 K3 Relay 4 Overload Reset Solenoid 12 K2 Relay 5 Remote Control Cab Box Harness Connector 13 K5 Relay 6 Preheat Buzzer 14 K6 Relay 7 K8 Relay 15 K4 Relay 8 K7 Relay 16...

Страница 37: ...Unit Description Rev 04 03 23 Power Receptacle Box KD II SR 50 AEA42...

Страница 38: ...Unit Description Rev 04 03 24 1 Keypad 2 LED Display THERMOGUARD Remote Control Panel AEA43 1 2...

Страница 39: ...essor Power Switch Remote Control Panel P T Microprocessor Interface Board Sensors Refrigeration System Controls Engine Controls High Voltage Tray Model 50 Units Microprocessor Power Switch The microp...

Страница 40: ...on units equipped with Electric Standby Automatic Diesel Electric Selection The unit will automatically switch to electric operation when a power cord is connected and the standby power is switched O...

Страница 41: ...SERIAL NUMBER LOCATIONS Unit Nameplate on top of the unit frame above the switch panel Engine Nameplate on top of the rocker arm cover Compressor Stamped on the side below the sight glass Standby Elec...

Страница 42: ...P T System Description Rev 04 03 28 High Voltage Tray No Options High Voltage Tray with Phase Correction...

Страница 43: ...P T System Description Rev 04 03 29 High Voltage Tray with Electric Heat High Voltage Tray with Phase Correction and Electric Heat...

Страница 44: ...P T System Description Rev 04 03 30 High Voltage Tray with Single Phase Power and Electric Heater...

Страница 45: ...anel on the truck box KEYPAD KEYS ON KEY Turns the unit ON OFF KEY Turns the unit OFF SELECT KEY Scrolls through the prompt and display screens UP ARROW KEY Chooses prompt screen actions or increases...

Страница 46: ...and setpoint In addition the icons located at the sides of the display indicate the operating mode of the unit and shows if any alarm codes are present Pressing the SELECT key will show the prompt an...

Страница 47: ...setpoint is being shown in the lower display WHISPER ICON Appears when Whisper mode has been selected These icons appear during a remote control panel test but are not used on truck units READING A TY...

Страница 48: ...tpoint appears in the lower display This display shows a box temperature of 35 8 F and a setpoint of 35 F The Standard Display is the starting point used to reach all other prompts and displays To ret...

Страница 49: ...10 seconds if the Enter key is not pressed SELECTING CYCLE SENTRY or CONTINUOUS MODE 1 Press the ON key to turn the unit ON 2 Press the Select key to display CYCLS and YES or no 3 Press the or Arrow...

Страница 50: ...r example to change the setpoint or view display screens the engine will automatically preheat and start about 10 seconds after the last key is pressed INITIATING A MANUAL DEFROST CYCLE 1 The unit mus...

Страница 51: ...1 Press the ON key to turn the unit ON 2 Press and hold the TK Logo key to display USC 3 Press the Select key to display rEU and the software revision The software revision shown here is Revision 1520...

Страница 52: ...rs if this hourmeter is set to Type 1 2 or 3 Hr5 Total accumulated hours on hourmeter 5 only appears if this hourmeter is set to Type 1 2 or 3 Hr6 Total accumulated hours on hourmeter 6 only appears i...

Страница 53: ...how the Alarm display screen If more than one alarm code exists each will be displayed for several seconds The alarm code shown here is alarm code 66 Low Engine Oil Level To Clear Alarm Codes 1 Correc...

Страница 54: ...alarm after the alarm condition is corrected press the Select key to display the alarm and then press the Enter key to clear it Repeat this process for any additional alarms Types of Alarms There are...

Страница 55: ...LE SENTRY X 18 High Engine Water Temperature X 19 Low Engine Oil Pressure X 20 Engine Failed to Start CYCLE SENTRY X 21 Cooling Cycle Check X 22 Heating Cycle Check X 23 Cooling Cycle Fault X 24 Heati...

Страница 56: ...ly preheat and start the diesel engine Display Check All segments of the display will be lighted at the same time X 74 Microprocessor Reverted to Default Settings X 77 Internal Fault Code Factory or D...

Страница 57: ...e detected during the Unit Self Check and the unit has been shut down to pre vent possible damage This will occur as soon as a shut down condition is detected The Unit Self Check will not be completed...

Страница 58: ...Remote Control Panel Features Rev 04 03 44...

Страница 59: ...if used on CYCLE SENTRY units using alternators with external regulators See TK Bulletin 300 for correct Battery Sentry module to use 1 EXC Terminal 8D 7K 7KK F1 or EXC Wire 2 F2 Terminal GRN BTS or...

Страница 60: ...ck the alternator brushes Check the 2A circuit from the alternator to the battery Properly tension the alternator belt Check the battery cable connections and the alternator ground They must be clean...

Страница 61: ...show a slight charge condition If the voltmeter indicates a low voltage after start up check the alternator belt tension and all charging circuit connections including the battery NOTE On installatio...

Страница 62: ...d RPM wires on rpm sensor If the rpm sensor passes the above test the sensor may be considered good If the unit is not available an alternate less reliable test may be performed as follows Disconnect...

Страница 63: ...ich is normally GREEN 1 Ohmmeter 2 1 5 Ohms 3 Remove Bar Checking Glow Plugs Defrost Air Switch Checkout and Adjustment Before testing or adjusting the air switch check the clear plastic tubing and bl...

Страница 64: ...h The BLACK hose from the high pressure or air inlet side of the evap orator coil goes on the hose fitting on the side of the air switch stamped BLACK The CLEAR hose from the low pressure or air outle...

Страница 65: ...of the power source Wire L1A is normally connected to the 208 volt tap Conversion System The phase conversion system itself consists of a start system and a run system The start system is energized by...

Страница 66: ...art contactor and a start capaci tor to become T3F which is connected to the third winding in the other set First and Second Phase Connections L1 and L2 supply power directly to the first and second w...

Страница 67: ...otor start contactor Motor Start Contactor Control Coil Circuit 7EA energizes the motor start contactor through the start relay when the current in T2 T2A exceeds 27 amps A branch of wire 7EA also sup...

Страница 68: ...he start system is now disconnected from the motor circuit and the run system provides the phase shift necessary to operate the motor at normal running speed Third Phase Connection During a Start L2 s...

Страница 69: ...te the motor at its normal running speed Third Phase Connection While Running Normally L1 and L2 supplies power to the third windings in both sets of motor windings through the run transformer and the...

Страница 70: ...he sets of wires If the volt ages are out of these ranges check the power source The start current should be approximately 75 amps The run current should not exceed 14 5 amps The current should not va...

Страница 71: ...High voltage on the 208 volt tap will cause high run currents Test 3 The unit Starts but does not shift to the run system If the motor starts correctly but the current remains at approximately 20 amp...

Страница 72: ...circuit and control coil If the contactor closes check the voltage between L1A and L2A and between L1A and T3 If either voltage is low inspect the connector for burned or pitted points Replace the co...

Страница 73: ...Motor Start Relay Check the voltage on 7EC at the motor start relay with unit control voltage 12 to 14 volts dc present on 7EA and 7EB at the motor start relay If there is no control voltage or low c...

Страница 74: ...rents is low the start capacitor in that circuit is faulty If both the currents are low the motor start contactor did not close Replace as necessary Motor Starts But Runs Poorly Or Slows Down and Rest...

Страница 75: ...he voltage is low the run capacitor in that circuit is defective Replace as necessary Current Test This test is valid only if the motor is running at normal speed and the motor start contactor is de e...

Страница 76: ...ollowing 1 Check the T2 and T3 circuits through the motor contactor to make sure they are open during diesel operation Replace or repair the motor contactor as necessary 2 Check the connections betwee...

Страница 77: ...ill exhibit a slight imbalance of currents A difference of as much as 6 amps is possible The currents through L1 and L2 can be as high as 85 amps while starting and as high as 23 amps when running at...

Страница 78: ...allow liquid refrigerant to flow from the liquid line through the TherMax solenoid line to the accumulator Heat Condenser Evacuation Mode When the P T controller initiates a heat or defrost cycle both...

Страница 79: ...ains out When changing oil try to make sure that the trailer is not tipped away from the direction that the oil is supposed to flow from the oil pan It is important to get as much of the residual oil...

Страница 80: ...the engine Remove the oil cup wash thoroughly and dry every 1000 operating hours 500 hours under dusty conditions Refill using the same weight oil used in the engine crank case Inspect the cleaner bo...

Страница 81: ...om the cylinder head to the radiator automatically maintains coolant temperature within the specified temperature range Engine Cooling Components 1 Accumulator 4 Thermostat Housing 2 Engine 5 Fuel Hea...

Страница 82: ...factory recommends the use of a 50 50 antifreeze mixture in all units even if they are not exposed to freezing temperatures Even in summer the accumulator tank can get cold enough to freeze the water...

Страница 83: ...2 Gasket 3 Thermostat 4 Water Pump Water Pump Assembly and Thermostat ENGINE FUEL SYSTEM The fuel system used on the Thermo King TK 3 74 diesel is a high pressure system used in conjunction with a pr...

Страница 84: ...03 70 1 Oil Pressure Sensor 6 Pre Filter Screw In Pump 2 Oil Filter 7 Fuel Pump 3 Bypass Oil Filter Optional 8 Mounting Plate 4 Fuel Filter 9 To Fuel Tank 5 Diesel Fuel Heater Optional KD II SR Fuel...

Страница 85: ...ment and facilities to service these components is quite high Therefore this equipment is not found in most repair shops The following procedures can be done under field condi tions 1 Bleeding air fro...

Страница 86: ...her than pull fuel Make sure the pump case completes a good ground with the battery The pump will not operate at less than 9 Vdc The pump is self priming as long as it is not higher than 30 in 762 mm...

Страница 87: ...ming is so minimal the procedure for timing the pump to the engine will be covered first The procedure for individual cylinder timing is very similar to timing the injection pump so it will be covered...

Страница 88: ...g mark until fuel flows from the drip tube 7 Slowly rotate the engine in the direction of rotation while watching the drip tube When the fuel flow slows to approximately one drip every 10 to 15 second...

Страница 89: ...mber 1 The cylinders should time on their respective flywheel timing marks If the injection pump plungers are not correctly timed to each other the pump must be removed and sent to a diesel injection...

Страница 90: ...viewed next to the flywheel from the water pump end CAUTION Make sure the fuel rack is off to prevent the engine from starting a Turn the engine so number 1 cylinder is on com pression with piston to...

Страница 91: ...and Engine Bracket When Assembled Snubbers Only 6 Roadside Engine Mount Bracket 91 3202 7 Vibration Mount 91 2276 2 Snubber Mount 99 4820 8 Snubber Bracket 91 3201 3 Curbside Engine Mount Bracket 91...

Страница 92: ...n along with pre mature belt and bearing failures KD II SR Belt Arrangement 1 Engine 6 Fan Pulley 2 Engine Clutch 7 Compressor Drive Motor Model 50 3 Fan Pulley 8 Compressor 4 Idler 9 Water Pump 5 Alt...

Страница 93: ...on on new belts should be 75 3 Gauge tension on used belts should be 70 3 This tension allows 1 2 in 13 mm deflection in the center of the span NOTE DO NOT overtighten the compressor drive belt Belt t...

Страница 94: ...nting Bolt Plate 91 4976 3 Belt Tension Stop 91 5194 4 Spring 91 5140 5 Belt Tension Adjuster 91 5137 6 Calibrated Belt Tension Spring Belt Adjustor NOTE Kits are available to upgrade your unit to the...

Страница 95: ...KD II SR units are manufactured with a different idler assembly The belt tensioning procedure is described on the following page 1 Sprocket 2 Idler Bracket 3 Special Water 1 2 STL 4 Pulley Assembly 5...

Страница 96: ...reading of 70 to 80 on the Thermo King Belt Tension Gauge P N 204 427 Install New Idler Assembly 1 Idler Bracket 2 Slot 3 Sprocket b The belt should deflect 1 2 in 13 mm at the center of the longest...

Страница 97: ...t at a reading of 64 to 70 on the Thermo King Belt Tension Gauge P N 204 427 If the Thermo King Belt Tension Gauge is not used the belt should deflect 1 2 in 13 mm at the center of the longest span Th...

Страница 98: ...the long est span of the Compressor Evaporator Fan Alternator belts and 1 2 inch 13 mm deflection at the center of the span on the Alternator Evaporator Fan belt Alternator Mounting and Belt Tension S...

Страница 99: ...The retaining spring is deleted and to prevent pressure buildup in the pulley assembly the seals are installed with the seal lip facing outward See diagram below 1 MAJOR FLUSH SEAL THIS SIDE 5 Thermo...

Страница 100: ...a slip fit bearing and snap ring 5 Install seal assembly P N 33 1924 with seal lip facing outward Press pulley side seal until it bottoms on pulley shoulder Press the opposite seal until it is flush w...

Страница 101: ...STALL SEAL SEATED AGAINST SHOULDER 6 Bearing F P N 77 0889 3 Apply Grease to Lip of Seal P N 203 386 7 Install Seal with Seal Lip Facing Outward Backwards 4 Use a Pipe with a 1 3 4 in O D and 1 8 in W...

Страница 102: ...l it is flush with the pulley edge 6 Install bearing seal and O in the pulley assembly 7 Reinstall the pulley assembly back into the unit Integral Fuel Solenoid The fuel stop solenoid is located on th...

Страница 103: ...to move the injection pump rack to the Fuel Off position 1 Fuel Stop Solenoid 2 Fuel Injection Pump Groove 3 O Ring Fuel Solenoid Components When the fuel solenoid is energized current is applied to...

Страница 104: ...e speed Turn the screw in to increase the engine speed Turn the screw out to decrease the engine speed 5 Set the engine speed at 1625 25 rpm and tighten the jam nut Integral Fuel Solenoid Parts List P...

Страница 105: ...Local laws All regulated refrigeration service procedures must be performed by an EPA certified technician using approved equip ment and complying with all Federal State and Local laws SYSTEM EVACUATI...

Страница 106: ...re prone to leak Never attempt evacuation without a micron or vacuum gauge The micron gauge will help determine a If the pump is capable of pulling a deep vacuum b When the vacuum pump oil is contamin...

Страница 107: ...Refrigeration Maintenance Rev 04 03 93 1 Calibration Standard 6 V 2 2 Vacuum or Micron Gauge 7 V 1 3 V 4 8 Two Stage Vacuum Pump 4 V 3 9 To 110 Vac Power 5 Thermistor...

Страница 108: ...rons 2 500 Microns 3 1000 Microns 4 2500 Microns 5 5000 Microns 6 20 000 Microns 7 Atmospheric Pressure 8 Calibration Adjustment Screw 9 Example Meter needle shown at calibration position when Calibra...

Страница 109: ...at a leak exists in the unit or the connect ing line The leak must then be located and eliminated NOTE If the vacuum pump is okay and there are no leaks between V 1 and V 3 the micron gauge should sho...

Страница 110: ...e valves fully back seated turn the evac uation pump ON Open valve V 1 at the pump The micron gauge should move to a deep vacuum 5 Open valve V 4 The micron reading will rise If the micron gauge retur...

Страница 111: ...gauge manifold hand valve and charge liquid refriger ant until the system has the proper charge or until the system will take no more liquid The remainder of the charge will be added as a liquid thro...

Страница 112: ...Refrigeration Maintenance Rev 04 03 98...

Страница 113: ...Refrigeration Maintenance Rev 04 03 99 1 Calibration Standard 6 V 3 2 Vacuum or Micron Gauge 7 V 1 3 V 4 8 Two Stage Vacuum Pump 4 V 2 9 To 110 Vac Power 5 Thermistor...

Страница 114: ...harge decreases The charge may be determined by inspection of the refrigeration through the receiver tank sight glass with the following con ditions established 1 Place a test box over the evaporator...

Страница 115: ...imum suction pressure and 185 psig 1275 kPa minimum discharge pressure for 15 minutes or more After the unit has maintained the above conditions for 15 minutes observe the oil level The oil should be...

Страница 116: ...gizing the fuel solenoid To test the switch rework a gauge manifold per illustration 1 Connect the gauge manifold to the compressor dis charge service valve with a heavy duty black jacketed thick wall...

Страница 117: ...sure Gauge 0 to 500 psig 4 Discharge Service Valve Install Gauge Manifold Compound Gauge Indicating 20 in Vacuum WARNING Any time the discharge valve is front seated disconnect the unit battery or pow...

Страница 118: ...to the level of the discharge pressure The purpose of the valve is to improve heating defrosting ability and three way valve response To check the operation of the valve 1 Remove the condenser pressur...

Страница 119: ...Refrigeration Maintenance Rev 04 03 105 1 Check Valve 2 Heating Defrost Position 3 Cooling Position Three way Valve Condenser Pressure Bypass Check Valve...

Страница 120: ...106...

Страница 121: ...lightly positive 2 Loosen and remove the compressor electric motor belt from the compressor pulley 3 Front seat the discharge and suction service valves Release remaining refrigerant pressure from the...

Страница 122: ...d refill the expansion tank with 50 50 ethylene glycol water solu tion 6 Recharge the unit with refrigerant and check the com pressor oil 7 Reinstall the front grille LIQUID LINE CHECK VALVE REPLACEME...

Страница 123: ...from the evaporator housing Installation 1 Place the evaporator coil in the housing 2 Install the mounting bolts and tighten 3 Clean the tubes for soldering 4 Solder the suction line and drain pan hot...

Страница 124: ...y Bulb 3 End View Location of Expansion Valve Bulb 1 Top View Completely Wrap Bulb with Tape 2 Remove the liquid line fitting 3 A small tool with a slight hook may be needed to pull screen from the ex...

Страница 125: ...nd evacuate the unit 8 Clean the suction tube to a bright polished condition Install the feeler bulb clamps and feeler bulb on the side of the suction line in its former position The feeler bulb must...

Страница 126: ...to the pilot solenoid will leak refrigerant at a high velocity and should be capped 3 Disconnect the electrical wires and remove the pilot solenoid Installation 1 Replace the pilot solenoid in the un...

Страница 127: ...Recharge the unit with refrigerant THREE WAY VALVE CONDENSER PRESSURE BYPASS CHECK VALVE REPAIR Removal 1 Remove the refrigerant charge 2 Unscrew the condenser pressure bypass check valve cap from the...

Страница 128: ...per line from the three way valve to the pilot solenoid 4 Loosen the four 1 4 in Allen head screws DO NOT REMOVE use tool 204 424 to break the gasket at each side of the center section CAUTION Do not...

Страница 129: ...lled immediately 6 Install the spring and top cap 7 Line up the passageways in the cap and body Failure to line up the holes will result in improper operation of the valve 8 Install bolts and tighten...

Страница 130: ...and hub and the mounting screws Anti Seize Lubricant Application 1 Apply Anti Seize Lubricant to the Tapered Surface of the Bushing Only 2 Bushing 3 Torque Evenly to 7 to 10 ft lb 23 to 14 N m 4 Clea...

Страница 131: ...orporated in the model designation on the sides of the unit such as KD II SR HFC 3 Decals will be applied to unit as shown below Availability Refrigerants 134a and 404A are available from wholesalers...

Страница 132: ...stem stays clean the oil filter and filter drier MUST be changed every 2 years or whenever a major service procedure has been performed Compressor Oil Filter Prior April 1997 1 Bracket Screw 7 O Ring...

Страница 133: ...12 3 8 O ring 3 Flatwasher 13 Compressor Inlet Tube 4 Lockwasher 14 Filter Assembly 5 Nut 15 1 4 O ring 6 Cylinder Head Stud 16 3 8 O ring 7 Bracket Nut 17 Clamp 8 Flatwasher 18 Compressor Outlet Tube...

Страница 134: ...sed but extreme care should be taken to prevent contami nation of R 134a or R 404A systems with other refrigerants An oil filter P N 66 7462 is added The Thermo King Evacuation Station is recommended...

Страница 135: ...d reliable it meets and exceeds government regula tions and the Collector is automatic It automatically switches from liquid recovery to vapor recovery Recovers both liquid and vapor refrigerant from...

Страница 136: ...on Service Operations Rev 04 03 122 1 Recovery Complete Light 2 Reset Switch 3 Vapor Recovery Light 4 Power Switch 5 Liquid Valve 6 Vapor Valve 7 Recovery Tank Liquid Hose Valve 8 Recovery Tank Vapor...

Страница 137: ...tch Maintenance Prior 4 97 Clutch Assembly 1 Hub 2 Bushing Shoe Pivot 3 Bearings and Spacers 4 Washer 5 Screw 6 Snap Ring 7 Elastic Stop Nuts 6 8 Link Connector 9 Spring 10 Shoe 11 Hex Head Screws 6 1...

Страница 138: ...3 394 Clutch Disassembly 1 Remove retaining ring from hub bore 2 Remove the 3 8 16 flat head cap screw and washer NOTE This screw was installed using Loctite 680 and will require the use of an impact...

Страница 139: ...hould be on flange side of hub See drawing for correct position 9 Install remaining links and 1 4 28 locknuts torquing them to 85 to 90 in lb 9 9 to 10 5 N m NOTE Shoes must be held tightly against hu...

Страница 140: ...ce Prior 4 97 Rev 04 03 126 12 Install retaining ring 1 Torque nuts to 85 to 90 in lb 9 9 to 10 5 N m Shoes must be held in disengaged position while tightening these 6 bolts and nuts 2 Torque to 215...

Страница 141: ...trifugal clutch P N 104 272 which supersedes P N 104 257 Centrifugal clutch P N 107 272 has three belt grooves and its engagement speed is 600 100 rpm When this clutch is installed on a unit equipped...

Страница 142: ...ing Inner Race 3 Snap Ring 12 Pulley Housing 4 Ball Bearing 13 Elastic Stop Nuts 6 5 Large Small Spacers 14 Connector Link 6 6 Rolling Bearing 15 Spring 6 7 Lockwasher 12 16 Shoe Assembly 3 8 Bushing...

Страница 143: ...sembly Procedure 1 Remove retaining ring 2 Remove the 3 8 16 flat head cap screw and washer NOTE This screw was installed using Loctite 680 and will require the use of an impact tool for removal NOTE...

Страница 144: ...essing in bushing to hub is a 1 4 in screw x 3 in or 4 in long and 1 4 in nut Thread nut onto screw approximately 3 4 to 1 in Bushing Insertion Insert threaded end of screw into bushing Lubricate bush...

Страница 145: ...ashers then links and 1 4 28 locknuts torquing them to 110 5 in lbs 12 5 6 N m NOTE Shoes MUST be held tightly against hub while nuts are tightened 14 Place the hub and shoe assembly into the housing...

Страница 146: ...132...

Страница 147: ...unit performance and require repair or replacement of parts EVAPORATOR COIL Clean the evaporator coil during scheduled maintenance inspections by blowing compressed air opposite normal air flow Inspec...

Страница 148: ...ess b If damper blade closes proceed to step 2 If not proceed to step 1 c c Remove the jumper wire loosen the evaporator outlet adjustment angle and move so when ener gized the damper will close d Ret...

Страница 149: ...ssure inside the jackshaft Disassembly 1 Remove jackshaft assembly from the unit and remove the pulleys 2 Remove the level and fill plugs and drain oil reservoir 1 Shim 2 O Ring 3 Seal 4 Bearing 5 Sha...

Страница 150: ...e oil sling retainer onto the shaft through the opening in the top of the oil sling retainer 1 End Cap 2 Oil Sling Retainer 3 Tie Band 4 Air Vent P N 55 6417 5 Shaft Installing Oil Sling Retainer 4 Us...

Страница 151: ...side for proper fan per formance 1 Fill Plug and Vent 2 Oil Level Plug Fan Blade Position in Orifice FAN SHAFT ASSEMBLY The unit is equipped with two one piece fan shaft assem blies containing tapered...

Страница 152: ...assembly tap the opposite end of the shaft with a soft hammer After the shaft has been removed clean all parts in clean solvent Removing Oil Seal 4 Using a punch remove the oil seal from the evaporato...

Страница 153: ...eplaced in the same manner Reassembly 1 Install the new bearings on the shaft with a 1 0 in I D pipe in the same way they were removed The pipe should contact the inner race otherwise the bearing will...

Страница 154: ...he end play is incorrect use different shims to obtain the correct end play Shims available from the Service Parts Department 0 020 in 0 500 mm P N 99 4231 0 007 in 0 177 mm P N 99 2902 0 005 in 0 127...

Страница 155: ...ev 04 03 141 Fan Shaft Assembly 1 Oil Plug Screw with O ring 2 Housing 3 Breather Vent 4 Oil Seal 5 Shaft 6 Sleeve 7 Pin 8 Screw with Flatwasher and Lockwasher 9 Cap and Shims 10 O ring 11 Roller Bear...

Страница 156: ...142...

Страница 157: ...ace relay Corroded battery connections Clean and tighten Starter clutch defective Replace Starter defective Repair or replace Starter switch defective Replace Engine cranks but FAILS to start Misadjus...

Страница 158: ...mp not operating Check pump for running and 8 to 10 psig 55 to 69 kPa Repair or replace fuel pump Dry air cleaner optional plugged Change filter element Fuel solenoid not energized Check run circuit H...

Страница 159: ...el system Bleed fuel system Air is drawn into fuel pump Check all fuel lines and fittings Loose governor assembly Check and repair governor assembly Restricted exhaust system Clean or replace restrict...

Страница 160: ...eavily scaled Clean cooling system Water pump leaks Repair or replace water pump Worn or loose belt Replace belt or adjust Cylinder head gasket leaks bubbles appear in radiator if cylinder gasket is l...

Страница 161: ...eather Blue Smoke oil consumption Excessive oil consumption Refer to High Oil Consumption Repair as necessary White Smoke fuel is not burning Cold engine Allow engine to warm up Low compression Check...

Страница 162: ...148...

Страница 163: ...rce 2 Power plug 3 Motor contactor hot side 4 Motor contactor load side contactor closed 5 Overload relay 6 Motor terminals Defective motor contactor Repair or replace motor contactor Defective low oi...

Страница 164: ...ting Foreign matter prevents contacts from closing Clean contacts Rapid cycling Check for cause of short cycling such as thermostat Short circuit Correct fault Electric heaters do not heat optional in...

Страница 165: ...ing SYMPTOM POSSIBLE CAUSES Overcharge of refrigerant Shortage of refrigerant No refrigerant Air through condenser too hot ambient Air flow through condenser restricted Air through condenser too cold...

Страница 166: ...lot solenoid Loose or broken electrical connections Thermostat or thermometer out of calibration Suction pressure gauge out of calibration Leaky receiver tank outlet valve Leaky bypass check valve Lea...

Страница 167: ...Coil 4 Pilot Solenoid 5 Heat Solenoid 6 High Pressure Relief Valve 7 Receiver Tank 8 Sight Glass 9 Receiver Outlet Valve 10 Dehydrator 11 Receiver Outlet Check Valve 12 Accumulator Tank 13 Suction Pre...

Страница 168: ...ndenser Coil 4 Pilot Solenoid 5 Heat Solenoid 6 High Pressure Relief Valve 7 Receiver Tank 8 Sight Glass 9 Receiver Outlet Valve 10 Dehydrator 11 Receiver Outlet Check Valve 12 Accumulator Tank 13 Suc...

Страница 169: ...enser Coil 4 Pilot Solenoid 5 Heat Solenoid 6 High Pressure Relief Valve 7 Receiver Tank 8 Sight Glass 9 Receiver Outlet Valve 10 Dehydrator 11 Receiver Outlet Check Valve 12 Accumulator Tank 13 Sucti...

Страница 170: ...156...

Страница 171: ...wg No Drawing Title Page 5D45075 KD II 30 Schematic Diagram 159 160 5D45077 KD II 30 Wiring Diagram 161 162 5D45076 KD II 50 Schematic Diagram 163 164 5D45960 KD II 50 Wiring Diagram 165 166 5D48889 K...

Страница 172: ...158...

Страница 173: ...159 KD II 30 Schematic Diagram Page 1 of 2...

Страница 174: ...160 KD II 30 Schematic Diagram Page 2 of 2...

Страница 175: ...161 KD II 30 Wiring Diagram Page 1 of 2...

Страница 176: ...162 KD II 30 Wiring Diagram Page 2 of 2...

Страница 177: ...163 KD II 50 Schematic Diagram Page 1 of 2...

Страница 178: ...164 KD II 50 Schematic Diagram Page 2 of 2...

Страница 179: ...165 KD II 50 Wiring Diagram Page 1 of 2...

Страница 180: ...166 KD II 50 Wiring Diagram Page 2 of 2...

Страница 181: ...167 KD II 50 SR 230 1 60 Wiring Diagram Page 1 of 2...

Страница 182: ...168 KD II 50 SR 230 1 60 Wiring Diagram Page 2 of 2...

Отзывы: