CSR-20 & CSR-40, September 1999
Structural/Accessory Maintenance
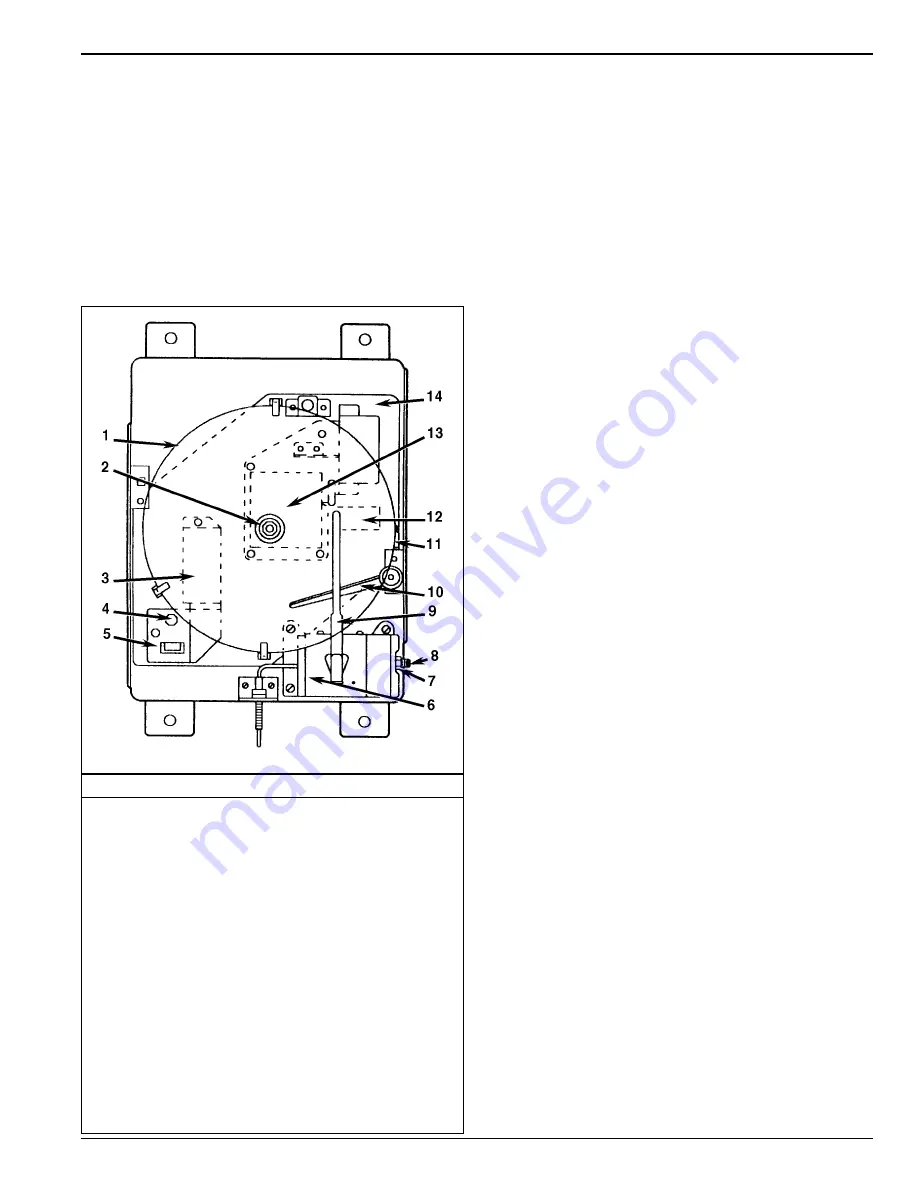
Saginomiya (Model SKM) Recording Thermometer
7-5
7.
Check to see that the quartz motor is running. Look
through the inspection window and make sure the internal
flywheel on the quartz motor is revolving.
8.
Replace the recording platen on the recorder base and
rotate clockwise to view setscrews. Tighten four set-
screws that hold the platen in the recorder
9.
Replace the recording chart and chart nut on the chart
drive shaft and tighten the chart nut finger tight.
10. Lower the pen by rotating the lifting arm counterclock-
wise and push the pen against the chart.
Recording Chart Replacement
1.
To change the charts, raise the stylus away from the chart
by rotating the pen lifting arm clockwise 30 degrees and
releasing the lifting arm. The pen will remain in the
raised position. Remove the knurled chart nut from the
drive shaft and remove the chart.
2.
Install the new chart in the slot on the platen and on the
chart drive shaft. Position the chart edge under three
hold-down flanges.
3.
Replace the chant nut loosely and rotate the chart so that
the correct date and time are indicated by the arrow on the
time scale plate. Finally hold the recording chart in posi-
tion and tighten the chart nut finger tight.
4.
Lower the pen by rotating the lifting arm counterclock-
wise and pushing the pen against the chart.
Marking System Calibration
1.
Visually inspect the recording thermometer sensing bulb
located in the evaporator near the return air grille. Make
sure it is securely fastened and clear of debris.
2.
Start the unit and adjust the temperature setpoint to 0 C
(32 F). Operate the unit until the return air temperature
reaches 0 C (32 F). Enter the View menu on the con-
troller display and scroll to the return air temperature
(“RET”) screen. Press the ENTER key to lock the “RET”
screen on the display.
5.
Wait at least 5 minutes to allow the recording thermome-
ter sensing bulb temperature to stabilize. Then compare
the “RET” temperature in the controller display with the
recording stylus of the recorder. Write down both read-
ings.
6.
If the average difference is 0.6 C (1.0 F) or less, DO NOT
attempt to recalibrate.
7.
If the recorder needs recalibration:
a.
Place the pen in the recording position (lowered
against chart)
b.
Loosen the lock screw using a small Phillips screw-
driver.
c.
Adjust the setting screw with a small slotted screw-
driver or a 7 mm (9/32 in.) open end wrench. Rotate
the setting screw clockwise until the recording pen
temperature reading is 2 to 4 C (4 to 6 F) higher than
the temperature reading of the test instrument.
NOTE: Turning the setting screw one complete
revolution (360 degrees) changes the temperature
reading of the pen by approximately 5 C (9 F).
Saginomiya (SKM) Recording Thermometer
1. Recording Chart
2. Chart Nut
3. Battery
4. Test Button
5. Battery Voltage Indicator
6. Power Element Assembly
7. Setting Screw (Calibration)
8. Lock Screw (Calibration)
9. Recording Pen
10. Lifting Arm
11. Time Scale Plate
12. Terminal Board
13. Quartz Motor and Reducing Gear Assembly
14. Recording Platen


