background image


14

2.7 Event 

log 

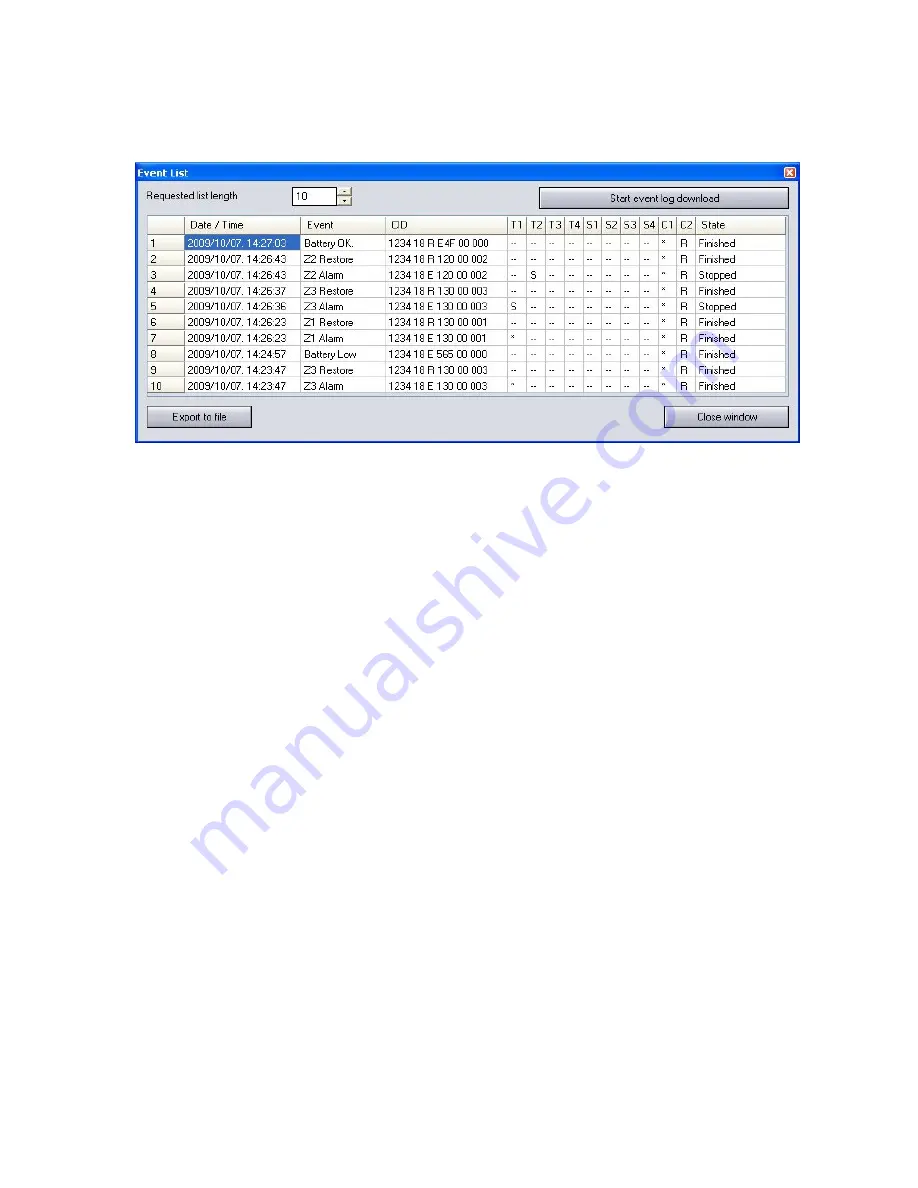
After the connection to the module is established successfully, the event list can be 
downloaded after pressing the 

“Event List >>>” 

button: 


Requested list length

: length of event list, this number of latest events will be 

displayed 


Start event log download

: initiates the downloading process 


Columns of the event list

:


o


Date / Time

: date and time of the event


o


Event

:


event specification 

o


CID

: Contact-ID code of the event 

o


T1-T4

: reports to user phone numbers


o


S1-S4

: SMS messages to user phone numbers


o


C1-C2

: reports to monitoring station


o


State

:


event status (Processing, Delayed, Stopped, Finished, Timeout)


Marks displayed in T1-T4, S1-S4 and C1-C2 columns: 

o


-


report processing in progress 

o


-


reporting successful 

o


-


reporting already performed in other way, therefore reporting is not needed 

o


-


reporting failed 

o


-


alarm has been cancelled, therefore reporting is not necessary 

o


-


reporting


timeout 

 
By keeping the mouse pointer above any cell of the table, details of the specific event 
will be displayed. If you wish to copy this content, hold down CTRL button on 
keyboard and the details will remain displayed therefore the content can be selected 
and copied as usual. 


Export to file: 

by pressing this button


event log can be saved in the following three 

formats:


o


Excel

: Microsoft Excel format


o


CSV

: text file, columns separated by comma


o


TXT

: text file, columns separated by tabulator


Close window:

 press to close event list window


Содержание GSM Pager3 Z6

Страница 1: ...GSM Pager3 Z6 INSTALLATION AND USER MANUAL for module version v3 20 and up Document version 1 3 05 12 2013...

Страница 2: ...umber settings 10 2 5 4 1 Setting phone numbers through SMS 11 2 5 5 Alarm settings 12 2 6 Changing the module s password 13 2 7 Event log 14 2 8 Reading the module s version 15 2 9 Remote control and...

Страница 3: ...ion page The update procedure requires internet connection Here it can be also configured if the program should search for updates automatically upon each opening or this is performed manually by clic...

Страница 4: ...next to the USB icon in the upper right corner of the main window then the module version is displayed The program does not request the module password if the default password is set in the module 11...

Страница 5: ...the alarming time By keeping the mouse pointer above any cell of the table details of the specific event will be displayed If you wish to copy this content hold down CTRL button on keyboard and the de...

Страница 6: ...pens a window showing detailed information about the procedures running in the module only for troubleshooting Message flow can be started and stopped by pressing Start Stop button Messages can be sav...

Страница 7: ...active state of the zones can be set here Normally Open the input should be connected to V terminal to generate an event Normally Close the input should be connected by default to V terminal and then...

Страница 8: ...g 0 9 A B C D E F characters for reporting to monitoring station e g 130 alarm however this code is also used for restoration since the module will indicate automatically in the appropriate part of th...

Страница 9: ...means if it has been activated it will not deactivate itself can only be deactivated through phone call if enabled or will deactivate on disarm if Turn off Relay 1 on Disarm is set this function does...

Страница 10: ...e phone o 4 Arm arming the module with free call from version v3 10 o 5 Disarm disarming the module with free call from version v3 10 o 6 Arm Disarm first free call arms next free call disarms the mod...

Страница 11: ...are not configured in the module but in this case the module password is requested to be entered in the command after the parameters in the following way e g UX phone number PWD 1111 The procedure is...

Страница 12: ...ious one but operates the system inversely closed contact disarms open contact arms the module o 3 One kind of impulse arms the system with a closed contact impulse on input Z6 to V and performs disar...

Страница 13: ...n This limitation option is only available in Always armed mode Test report frequency the frequency of test report messages can be set in hours 0 255 This means the module will send test reports in th...

Страница 14: ...ks displayed in T1 T4 S1 S4 and C1 C2 columns o report processing in progress o reporting successful o R reporting already performed in other way therefore reporting is not needed o reporting failed o...

Страница 15: ...sword denied 4 low tone beeps 0 Disarm 3 beeps 1 Arm 6 beeps 2 Armed status query Disarmed 3 beeps Armed 6 beeps 4 GSM signal strength query Number of beeps according to the actual GSM signal strength...

Страница 16: ...ON PWD yyyy CRQ Activation of Relay1 bistable mode If needed substitute yyyy with the module password see specifications below R1 OFF PWD yyyy CRQ Deactivation of Relay1 If needed substitute yyyy with...

Страница 17: ...ed Permanent Relay1 activated permanently bistable mode Relay1 deactivated Relay1 deactivated Unauthorized User Wrong or missing password Module reset executed Module settings are restored to factory...

Страница 18: ...ulty Red blinks fast Green blinks slower Event transmission in progress Green blinks impulsely and slowly Red is not lit GSM network is available system is disarmed Green and red blink impulsely and a...

Страница 19: ...antenna or find a more suitable place for the module The antenna should be placed outside the box in case of installing the unit into a metal box where the measured GSM signal is the highest possible...

Страница 20: ...uency GSM 900 1800 MHz 850 1900 MHz Max relay output load 5A 24VAC DC GSM phone type Simcom SIM900 Dimensions 84 x 72 x 32mm Weight 200g packed 300g 5 2 Contents of the package GSM Pager3 Z6 terminal...

Отзывы: