TEFAL Chefclub ClipsoMinut' Duo Скачать руководство пользователя страница 23

40

41

from being in contact with the food.  Also, they could distort and come off during 

cooking which could block the safety outlets. 


Accurate timing is essential when pressure cooking to prevent overcooking, 

especially with vegetables, fruit and fish.


Never make milk-based recipes (such as rice pudding, semolina pudding..) when 

pressure cooking using animal milk such as cows, goats, sheep milk, etc..

AUSTRALIAN – NZ GUARANTEE

COOKWARE, BAKEWARE AND PRESSURE COOKERS 

Limited Replacement Guarantee

Our goods come with guarantees that cannot be excluded under the Australian 

Consumer Law. You are entitled to a replacement or refund for a major failure and 

compensation for any other reasonably foreseeable loss or damage. You are also 

entitled to have the goods repaired or replaced if the goods fail to be of acceptable 

quality and the failure does not amount to a major failure. In addition to these 

statutory rights and any other rights and remedies you may have under the law, 

Groupe SEB Australia Pty Ltd (we or us) guarantees this Jamie Oliver by Tefal/T-fal/

All-Clad/Moulinex product will be free of defects in material and craftsmanship 

including handles, body, knobs, lids and fixings for 12 months from the date of 

purchase.We also guarantee the non-stick coating of this Jamie Oliver by Tefal/T-

fal/All-Clad/Moulinex product will be free of blistering or peeling for the life of the 

Jamie Oliver by Tefal/T-fal/All-Clad/Moulinex product. Should your Jamie Oliver 

by Tefal/T-fal/All-Clad/Moulinex product develop a defect during the guarantee 

period or the non-stick coating peel during the life of your Jamie Oliver by Tefal/T-

fal/All-Clad/Moulinex product, you should return it, at your cost, to the retailer from 

which you purchased it from, together with your receipt as proof of purchase.  The 

retailer will then forward your claim directly to us for processing.  Alternatively, if 

the retailer is unable to help you, you may contact us directly at:

Groupe SEB Australia Pty Ltd,Customer Service Department,Unit 1, No 10 Hill Rd, 

Homebush NSW 2127 T: +61 2 9748 7944

If on receipt your Jamie Oliver by Tefal/T-fal/All-Clad/Moulinex product is found 

to be defective or the non-stick coating has peeled, we will, at our cost, replace 

or repair the product in our discretion.  Only the defective part or accessory will 

be repaired or replaced.  Packaging, instructions etc. will not be replaced unless 

faulty.This guarantee excludes defects caused by the Jamie Oliver by Tefal/T-

fal/All-Clad/Moulinex product not being used in accordance with instructions , 

accidental damage (including overheating), misuse  or being tampered with by 

unauthorised persons.  It also does not apply if the Jamie Oliver by Tefal/T-fal/

All-Clad/Moulinex product is used commercially and excludes consumable items 

(including accessories such as pressure regulators and safety devices), dishwasher 

effects and damages, stains, dents, discolouration, scratches or scuffs due to 

normal wear and tear, and your costs of claiming under the guarantee.

GOLDEN RULES WHEN PRESSURE COOKING

(FOR UK CONSUMERS) 

   The minimum quantity of liquid required for normal cooking is 250 ml (½ pint) 

for the first ¼ hour cooking. For each additional ¼ hour, or part of ¼ hour, add 

a further 150 ml (¼ pint) of liquid. For example, 45 minutes cooking requires 

600 ml (1 pint) of liquid. Note: This is only a general guide. Certain foods, such as 

rice, pulses, steamed puddings and Christmas puddings may require extra water 

(see details below).

   When steaming foods in the basket use a minimum of 750 ml (1¼ pint)water 

in the cooker.

  Always use a liquid that gives off steam when boiled e.g. water stock, wine, beer, 

cider. Never use oil or fat. All pressure cooking requires some liquid.

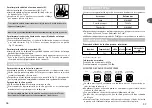
  The maximum filling level when all the ingredients and liquid have been added are:

  -  Solid foods e.g. vegetables, meat joints: no more than two-thirds full (MAX 2 

mark).

  - Liquid and cereals e.g. soups, stews, cereal and pasta: not more than half full.

  -  Pulses e.g dried beans and dried peas, rice stewed fruit, compotes, pumpkin, 

courgette and potatoes: no more than one-third full (MAX 1 mark)

   When cooking pulses they swell up and tend to froth up. Use 1.2 litres (2 pints) 

water for every 450 g (1 lb) pre-soaked weight of pulses. Remember all dried 

peas and dried beans, must be soaked in boiling water for 1 hour before cooking. 

Drain, rinse thoroughly and cook in fresh water. Never eat uncooked beans or 

peas. Soaking is not necessary for red lentils. The high temperatures achieved in 

the pressure cooker ensure that any natural toxins in the pulses are destroyed. 

Canned beans and pulses can simply be drained and rinsed before adding to the 

pressure cooker.

  For steamed suet puddings, sponge puddings or Christmas puddings, a short 

pre-steaming time is best to enable the raising agent to activate and prevent a 

heavy, close texture. Extra liquid is required so use a minimum of 1½ pint/900 ml 

of boiling water for a combined steaming and cooking time of up to 1 hour. For 

each additional ¼ hour of cooking, or part of ¼ hour, add a further ¼ pint/150 

ml of boiling water. Pre-steaming is done with the operating valve in the steam 

release position on a low heat for the required time. Then turn the operating 

valve to 

, and increase the heat to bring to full pressure. Lower the heat and 

pressure cook for the required time.


Pressure cooking 

 operates at 65 kPa (9psi/9lbs).


Never cook dumplings with the lid tightly closed, as they could rise up and block 

the safety devices.   Cook the stew and at the end of cooking, release the steam 

and cook gently for about 10 - 15 minutes without the lid on.


Pressure cooking times vary according to the size of individual pieces or thickness 

of the food, not the weight.


Cooking containers must withstand temperatures of 130°C (250°F).  Any covering 

on containers, e.g. foil, greaseproof paper, must be securely tied otherwise they 

could block the safety devices.  Do not use plastic lids as they prevent steam 

EN

Содержание Chefclub ClipsoMinut' Duo

Страница 1: ...i istruzioni Gebruiksaanwijzing Produktbeschreibung Exploded view diagram Esquema descriptivo Sch ma descriptif Illustrazione dei componenti Beschrijving van de onderdelen TEFAL CONSEIL SERVICE CONSOM...

Страница 2: ...beweglich ist Abb 16 die Deckeldichtung korrekt in die Rillen des Deckels eingesetzt ist Abb 13 die Griffe des Topfs korrekt befestigt sind Die Topfgriffe sind Sicherheitsbestandteile Entfernen oder...

Страница 3: ...gel vor dem Garen mit einem Messer oder einer Gabel einzustechen W hrend des Garens kann sich unter der Haut kochende Fl ssigkeit ansammeln und herausspritzen Bereiten Sie keine Rezepte auf Basis von...

Страница 4: ...Druck steht Ber hren Sie nicht die hei en Oberfl chen Verwenden Sie gegebenenfalls Handschuhe Benutzen Sie die 2 Griffe am Beh lter Bei Suppen sollten Sie eine schnelle Druckminderung in kaltem Wasse...

Страница 5: ...r halten und ohne Abtrocknen wieder in den Deckel einsetzen Abb 17 Dabei darauf achten dass er richtig unter den Aussparungen des Deckels verl uft Abb 13 ERSTMALIGER GEBRAUCH Reinigen Sie den Schnellk...

Страница 6: ...s RichtenSiedasPiktogramm desGarreglers A aufdiePositionsmarkierung des Ventils C aus Wenn der Sicherungsstift D nach unten geht steht Ihr Schnellkochtopf nicht mehr unter Druck ffnen Sie den Schnellk...

Страница 7: ...TOPF Zum Ablassen von Dampf Nach Abschalten der W rmequelle haben Sie zwei M glichkeiten Langsame Druckminderung Drehen Sie den Garregler A langsam bis Sie die Piktogramm Markierung erreichen Abb 10 S...

Страница 8: ...iblen Atmungssystem wie beispielsweise V gel k nnen die beim Garen entstehenden D mpfe gef hrlich sein Besitzer von V geln m ssen die Tiere von der K che fernhalten SICHERHEIT Ihr Schnellkochtopf ist...

Страница 9: ...gessen den Deckelgriff herunterzuklappen kann am Druckanzeiger D Dampf austreten und Ihr Schnellkochtopf kann keinen Druck aufbauen Sicherheitsvorrichtung beim ffnen Wenn der Schnellkochtopf unter Dru...

Страница 10: ...Dichtungsring wieder richtig einlegen wird in Abb 13 gezeigt Achten Sie darauf dass der Dichtungsring unter jeder der Aussparungen des Deckels verl uft Reinigen des Garreglers A Entfernen Sie den Gar...

Страница 11: ...atzer die durch den Kontakt zwischen Deckel und Topf entstehen Besch digungen die auf die Nichteinhaltung von wichtigen Vorsichtsma nahmen oder auf unsachgem en Gebrauch zur ckzuf hren sind insbesonde...

Страница 12: ...nomen anh lt lassen Sie kaltes Wasser in Ihr Sp lbecken laufen und stellen Sie Ihren Schnellkochtopf hinein bis die Druckanzeige D f llt Reinigen Sie den Garregler A Abb 1A und die Dampfentl ftung Abb...

Страница 13: ...that the valve is always whispering during cooking If not enough steam is escaping equalise the pressure and check that there is enough liquid and that the steam release valve is unobstructed Followin...

Страница 14: ...ppliance in cold water Move your pressure cooker with maximum care Do not touch hot surfaces Use oven gloves if necessary Use both the handles when moving the pressure cooker For soups we recommend th...

Страница 15: ...to place it under the notches in the lid Fig13 USING FOR THE FIRST TIME Thoroughly clean the pressure cooker and its components before using them for the first time Wash and lightly oil with cooking o...

Страница 16: ...n the pictogram on the operating valve A with the valve position index C When the pressure indicator D goes down your pressure cooker is no longer under pressure Open your pressure cooker Fig3 Clean i...

Страница 17: ...e heat has been turned off you have two options Gradual pressure release gradually turn the operating valve A so that it faces the symbol on the pictogram Fig10 If when releasing the steam you observe...

Страница 18: ...as birds We recommend that bird owners keep their birds away from the cooking area SAFETY Your pressure cooker is equipped with several safety features Safe closing If the lid is incorrectly positione...

Страница 19: ...lid handle G must not be opened or closed Never try to force open your pressure cooker Never tamper with the pressure indicator D Ensure that the internal pressure has dropped by checking that the pre...

Страница 20: ...ure cooker is clean and dry before placing it on the plate 35 After removing the operating valve A and the seal I you can put the lid in the dishwasher Never put the operating valve A seal l or pot in...

Страница 21: ...nce of important precautions or negligent use in particular Impacts drops oven cooking etc Only Tefal approved service centres are authorised to provide you with this guarantee For full details of the...

Страница 22: ...your sink and immerse the bottom of your pressure cooker in it until the pressure indicator D goes down Clean the operating valve A Fig 1 A and the steam release vent Fig15 and check that the safety...

Страница 23: ...ects and damages stains dents discolouration scratches or scuffs due to normal wear and tear and your costs of claiming under the guarantee GOLDEN RULES WHEN PRESSURE COOKING FOR UK CONSUMERS The mini...

Страница 24: ...lla a presi n se encuentra correctamente cerrada antes de ponerla en funcionamiento Consulte el apartado Cierre Aseg rese durante la cocci n de que la v lvula siempre emite un leve sonido Si no sale s...

Страница 25: ...est sometida a presi n mu vala con la m xima precauci n No toque las superficies calientes Si es necesario utilice guantes Utilice las 2 asas para sujetar la olla Para las sopas le aconsejamos que re...

Страница 26: ...y engrase ligeramente con aceite de cocina toda la superficie del revestimiento interior Acople el tr pode K en el cestillo de vapor J y a continuaci n coloque el conjunto en el fondo de la olla Llen...

Страница 27: ...on la marca de posici n de la v lvula C Cuando la varilla de seguridad D vuelva a bajar significar que la olla ya no se encuentra a presi n Abra la olla a presi n Fig 3 L vela con un l quido lavavajil...

Страница 28: ...ente de calor FIN DE LA COCCI N EN MODO OLLA A PRESI N Para liberar el vapor Una vez apagada la fuente de calor tiene dos posibilidades Descompresi n progresiva gire progresivamente la v lvula de func...

Страница 29: ...SEGURIDAD La olla a presi n est equipada con varios dispositivos de seguridad Seguridad de cierre Si la tapa est mal colocada o si ha olvidado plegar el asa de la tapa hay fuga de vapor al nivel de la...

Страница 30: ...n elevada y no se debe mover el asa de la tapa de apertura cierre G Nunca intente abrir la olla a presi n forz ndola Sobre todo no manipule la varilla de seguridad D Aseg rese de que la presi n inter...

Страница 31: ...Limpie la v lvula de funcionamiento A bajo el chorro de agua del grifo Fig 14 Aseg rese de que se puede mover consulte el dibujo que aparece junto a este texto Tras retirar la v lvula de funcionamient...

Страница 32: ...posici n piezas y mano de obra del producto para su diagnostico y reparaci n sin cargo 3 Si su aparato llegase a necesitar de nuestro servicio de garant a le rogamos llamar a nuestros tel fonos de ate...

Страница 33: ...esi n en l hasta que baje la varilla de seguridad D Limpie la v lvula de funcionamiento A Fig 14 y el conducto de liberaci n de vapor Fig 15 y aseg rese de que el pist n de la v lvula de seguridad se...

Страница 34: ...dans un autre but que celui auquel il est destin Ne mettez pas votre autocuiseur dans un four chaud Ne jamais mettre de feuille de papier d aluminium non maintenue sur un moule dans votre autocuiseur...

Страница 35: ...ec un maximum de pr cautions Ne touchez pas les surfaces chaudes Utilisez des gants si n cessaire Servez vous des 2 poign es de la cuve Dans le cadre des soupes nous vous conseillons d effectuer une d...

Страница 36: ...ION Nettoyer enti rement la cocotte minute et ses composants avant la premi re utilisation Lavez et huilez l g rement avec de l huile de cuisson toute la surface de rev tement int rieur Clipsez le tr...

Страница 37: ...nnement A avec l index de positionnement de la soupape C Lorsque la tige de s curit D redescend votre cocotte minute n est plus sous pression Ouvrez votre cocotte minute Fig3 Nettoyez le avec du produ...

Страница 38: ...ur teinte vous avez deux possibilit s D compression progressive tournez progressivement la soupape de fonctionnement A pour terminer face au rep re du pictogramme Fig10 Si lors de la lib ration de la...

Страница 39: ...res d oiseaux doivent les loigner de la cuisine S CURIT S Votre cocotte minute est quip e de plusieurs dispositifs de s curit S curit la fermeture Si le couvercle est mal positionn ou si vous oubliez...

Страница 40: ...poign e de couvercle d ouverture fermeture G ne doit pas tre actionn e N essayez jamais d ouvrir votre cocotte minute en force N agissez surtout pas sur la tige de s curit D Assurez vous que la press...

Страница 41: ...laque 77 Apr s avoir retir la soupape de fonctionnement A et le joint I vous pouvez passer le couvercle au lave vaisselle Ne passez jamais ni la soupape de fonctionnement A ni le joint I ni la cuve au...

Страница 42: ...e caisse ou facture de cette date d achat Ces garanties excluent Les rayures et la d coloration dues au vieillissement Les rayures li es au contact du couvercle sur la cuve Les d gradations cons cutiv...

Страница 43: ...votre vier et plongez y le fond de votre cocotte minute jusqu ce que la tige de s curit D descende Nettoyez la soupape de fonctionnement A Fig14 et le conduit d vacuation de vapeur Fig15 et v rifiez...

Страница 44: ...versi da quelli per cui progettata Non inserire la pentola a pressione in un forno caldo Noninserirenellapentolaapressioneunostampocopertoconunfoglio di alluminio a meno che non sia fissato con uno sp...

Страница 45: ...are le superfici calde Indossare dei guanti se necessario e usare le 2 impugnature della pentola Per le zuppe si consiglia di effettuare una decompressione rapida in acqua fredda consultare il paragra...

Страница 46: ...TILIZZO Pulire la pentola a pressione e i suoi componenti prima di usarla per la prima volta Lavare tutta la superficie del rivestimento interno e ungerla leggermente con dell olio da cucina Fissare i...

Страница 47: ...re il simbolo sulla valvola di funzionamento A in corrispondenza dell indicatore di posizionamento della valvola C Quando l indicatore di sicurezza D si abbassa la pentola non pi in pressione Aprire l...

Страница 48: ...to Decompressione graduale ruotare gradualmente la valvola di funzionamento A fino a portarla in corrispondenza del simbolo fig10 Se durante la fuoriuscita del vapore gli alimenti producono schizzi ri...

Страница 49: ...ISPOSITIVI DI SICUREZZA La pentola a pressione dotata di diversi dispositivi di sicurezza descritti di seguito Sicurezza durante la chiusura Se il coperchio non posizionato correttamente o l impugnatu...

Страница 50: ...el coperchio G non consentir l apertura della pentola Non tentare di forzare l apertura della pentola a pressione Non intervenire direttamente sull indicatore di sicurezza D Assicurarsi che la pressio...

Страница 51: ...ola di funzionamento A fig11 Lavare la valvola di funzionamento A sotto l acqua corrente fig14 Verificare che si muova liberamente come illustrato di fianco Dopo aver rimosso la valvola di funzionamen...

Страница 52: ...rioramenti dovuti al mancato rispetto delle precauzioni o a utilizzi impropri in particolare urti cadute cottura in forno ecc Solo i centri assistenza autorizzati Tefal possono applicare la garanzia M...

Страница 53: ...finch l indicatore di sicurezza D non si abbassa Pulire la valvola di funzionamento A fig 14 e il condotto di fuoriuscita del vapore fig15 e verificare che il pistone della valvola di sicurezza si ab...

Страница 54: ...deze is bestemd Plaats uw snelkookpan niet in een warme oven Doe nooit aluminiumfolie die niet goed vastzit in uw snelkookpan Doe nooit huishoudfolie in uw snelkookpan Alcoholdampen zijn ontvlambaar...

Страница 55: ...ovenhandschoenen Gebruik de 2 handgrepen van de pan Bij het bereiden van soepen raden wij aan een snelle drukverlaging onder koud water uit te voeren zie Einde van het koken in de modus Snelkookpan Le...

Страница 56: ...r het te drogen fig 17 en let hierbij op dat de afdichtingsring goed onder de uitsparingen van het deksel komen te zitten fig 13 EERSTE GEBRUIK Reinig de snelkookpan en de onderdelen helemaal voordat...

Страница 57: ...op de aanwijzing van de ventielstand C Wanneer de veiligheidsindicator D daalt dan is uw snelkookpan niet langer onder druk Open uw snelkookpan fig 3 Reinig hem met afwasmiddel MINIMUM EN MAXIMUM VULL...

Страница 58: ...KEN IN MODUS SNELKOOKPAN Om de stoom te laten ontsnappen Zodra de warmtebron is uitgezet heeft u twee opties Snelle drukverlaging draai geleidelijk het drukventiel A tot tegenover de markering van het...

Страница 59: ...EILIGINGEN Uw snelkookpan is uitgerust met verschillende beveiligingen Beveiliging bij het sluiten Wanneer het deksel verkeerd is geplaatst of als u vergeet de handgreep van het deksel omlaag te klapp...

Страница 60: ...and en mag de handgreep van de deksel voor het openen sluiten G niet worden gebruikt Oefen nooit enige druk op uw snelkookpan uit om het deksel te openen Manipuleer in het bijzonder nooit de veilighei...

Страница 61: ...het drukventiel A onder de kraan fig 14 Controleer of het vrij beweegt zie de afbeelding hiernaast Nadat het drukventiel A en de afdichtingsring I zijn verwijderd kunt u het deksel in de vaatwasser p...

Страница 62: ...gevolg van het niet naleven van de belangrijke voorzorgsmaatregelen of onzorgvuldig gebruik waaronder Schokken vallen gebruik in de oven Alleen de erkende servicecentra van Tefal zijn gemachtigd u dez...

Страница 63: ...inuten Indien het fenomeen aanhoudt laat koud water in uw gootsteen stromen en dompel de bodem van uw snelkookpan in het water tot de veiligheidsindicator D daalt Reinig het drukventiel A fig 1A en de...

Страница 64: ...122 selon mod le RU 123 2 12 16 13 250 4 2 3 MAX 2 5 MAX 2 7 1 3 MAX 1 6...

Страница 65: ...RU 125 1 2 4 A 10 A D 2 D D Tefal Tefal A I 10 Tefal...

Страница 66: ...RU 3 17 13 1 2 17 13 K J Q 2 3 MAX 2 5 A C 9 127 126 A B C D E G H I J K N P max 1 max 2 Q...

Страница 67: ...RU 128 750 Q K J MAX 2 A A C A 11 A 8 C A A 129 20 20 A C D 3 250 2 4 2 3 MAX 2 5 1 3 MAX 1 THERMO SPOT THERMO SPOT 1 3 MAX1 MAX2 2 3...

Страница 68: ...RU A 9 2 A A 10 A 131 A 11 B 12 E 16 2 17 13 A 8 130...

Страница 69: ...RU A 2 17 13 D 133 D D D A 1 2 1 3 17 13 D 132...

Страница 70: ...RU 135 D D G D D G D E 18 18 A B E I 14 15 16 Tefal 134...

Страница 71: ...RU TEFAL X1010007 792654 K X1030007 Tefal Tefal 5 L 5 8 24 cm 19 7 cm P47051 65 120 137 I 13 A A 11 A 14 A I A I B A 11 12 15 E 16 Tefal 13 10 Tefal 136...

Страница 72: ...RU 139 138 Tefal PS PF i...

Страница 73: ...RU 141 TEFAL 17 13 1 17 13 Tefal A D A 1 A 15 16 D D A A A Tefal...

Отзывы: