


EN
USE
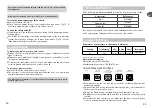
Cooking in
Cooking in
Steam release
Pressure Cooker mode
Stewpot mode*
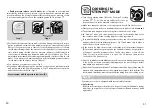
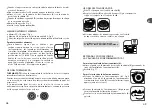
OPENING
Move the lid handle from a horizontal position to a vertical position
- Fig 3
.
The lid should now turn.
Raise the lid.
If you have difficulty opening the pressure cooker: run the seal under water
and put it back in the lid without drying it -
Fig 17
and make sure to place it
under the notches in the lid
- Fig 13
.
CLOSING
Make sure the lid handle is in the upright position.
Place the lid on the pot as shown in
- Fig 1
, by aligning the plastic part with
the pot’s handles.
Fold the lid handle from the vertical position to the horizontal position
- Fig 2
.
It is normal the lid turns on the pot when the pressure cooker is closed, but
not in operation. This effect disappears when it is pressurised.
If you cannot close the lid:
Check that the seal and the lid have been positioned correctly.
If you have difficulty closing the pressure cooker: run the seal under water
and put it back in the lid without wiping it - Fig 17 and make sure to place it
under the notches in the lid
- Fig 13
.
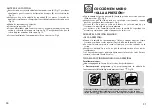
USING FOR THE FIRST TIME
Thoroughly clean the pressure cooker and its components
before using them for the first time.
Wash and lightly oil, with cooking oil, the entire inner coated
surface.
Clip the stand (K) to the basket (J), then place the assembly
at the bottom of the pot.
Fill the pot (Q) with water to the 2/3 mark (MAX 2)
- Fig 5
.
Close your pressure cooker.
Align the pictogram
on the operating valve (A) with the
valve position mark (C)
- Fig 9.
Place your pressure cooker on a suitable heat source, then set
it to its maximum power.
25
24
DESCRIPTION OF DIAGRAM
(see the exploded-view diagram)
A. Operating valve
B. Steam release vent
C. Valve positioning mark
D. Pressure indicator
(see the “Safety” paragraph)
E. Safety valve
G. Lid handle
H. Lid
I. Seal
J. Steam basket
K. Stand
N. Pot handle
P. Maximum fill marks
(max 1 and max 2)
Q. Pot
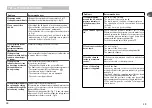
COMPULSORY CHECKS BEFORE EACH USE
Checking the operating valve
Check that the operating valve’s drainage hole is not blocked (see the
“Removing and installing the operating valve” paragraph).
Checking the safety valve
Check that the safety valve’s locking indicator is movable (push down on the
locking indicator several times with your finger).
Содержание Chefclub ClipsoMinut' Duo
Страница 64: ...122 selon mod le RU 123 2 12 16 13 250 4 2 3 MAX 2 5 MAX 2 7 1 3 MAX 1 6...
Страница 65: ...RU 125 1 2 4 A 10 A D 2 D D Tefal Tefal A I 10 Tefal...
Страница 66: ...RU 3 17 13 1 2 17 13 K J Q 2 3 MAX 2 5 A C 9 127 126 A B C D E G H I J K N P max 1 max 2 Q...
Страница 68: ...RU A 9 2 A A 10 A 131 A 11 B 12 E 16 2 17 13 A 8 130...
Страница 69: ...RU A 2 17 13 D 133 D D D A 1 2 1 3 17 13 D 132...
Страница 70: ...RU 135 D D G D D G D E 18 18 A B E I 14 15 16 Tefal 134...
Страница 72: ...RU 139 138 Tefal PS PF i...
Страница 73: ...RU 141 TEFAL 17 13 1 17 13 Tefal A D A 1 A 15 16 D D A A A Tefal...