


EN
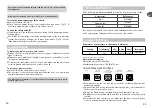
COOKING IN “PRESSURE
COOKER” MODE
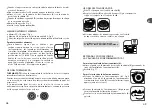
Turn the operating valve (A) to the “pressure cooker” cooking position
- Fig 9
. The pressure cooker operates at 65kPa/9 lbs (psi).
Make sure that your pressure cooker is closed properly before use
- Fig 2
.
Place your pressure cooker on a suitable heat source, then set it to maximum
power.
The clicking sounds and jets of steam emitted by the pressure indicator are
normal, as they allow air to escape before cooking.
WHEN COOKING IN “PRESSURE COOKER” MODE
When the operating valve (A) continuously releases steam that emits a
steady sound (PSCHHHT), reduce the heat.
Then start counting down the cooking time indicated in the recipe.
Make sure that the valve ‘whispers’ regularly during the cooking process.
If not enough steam is released, increase the heat slightly. If there is too much
steam, reduce it.
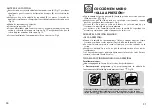
END OF COOKING IN “PRESSURE COOKER” MODE
To release the steam:
Once the heat has been turned off, you have two options:
•
Gradual pressure release: gradually turn the operating valve (A) so that it
faces the symbol on the pictogram
- Fig 10
.
If, when releasing the steam, you observe any food or liquid start to spray out,
return the operating valve (A) to the “pressure cooker” cooking position
,
then perform a rapid pressure release in cold water.
If the pressure indicator (D) does not go down, run cold water in your sink and
immerse the bottom of your pressure cooker in it until the pressure indicator
(D) goes down.
29
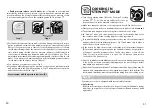
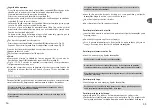
BEFORE COOKING
Before each use, remove the operating valve (A)
- Fig 11
and visually check
that the steam outlet vent (B) is not blocked
- Fig 12
.
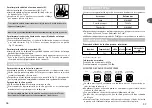
Check that the safety valve (E) is movable (refer to the “Cleaning” and
“Mandatory checks before each use” paragraphs) -
Fig 16
.
Add your ingredients and the liquid.
Close your pressure cooker
- Fig 2
.
If you have difficulty closing the pressure cooker: run the seal under water
and put it back in the lid without drying it
- Fig 17
and make sure to place it
under the notches in the lid
- Fig 13
.
Position the operating valve (A)
- Fig 8
.
28
Содержание Chefclub ClipsoMinut' Duo
Страница 64: ...122 selon mod le RU 123 2 12 16 13 250 4 2 3 MAX 2 5 MAX 2 7 1 3 MAX 1 6...
Страница 65: ...RU 125 1 2 4 A 10 A D 2 D D Tefal Tefal A I 10 Tefal...
Страница 66: ...RU 3 17 13 1 2 17 13 K J Q 2 3 MAX 2 5 A C 9 127 126 A B C D E G H I J K N P max 1 max 2 Q...
Страница 68: ...RU A 9 2 A A 10 A 131 A 11 B 12 E 16 2 17 13 A 8 130...
Страница 69: ...RU A 2 17 13 D 133 D D D A 1 2 1 3 17 13 D 132...
Страница 70: ...RU 135 D D G D D G D E 18 18 A B E I 14 15 16 Tefal 134...
Страница 72: ...RU 139 138 Tefal PS PF i...
Страница 73: ...RU 141 TEFAL 17 13 1 17 13 Tefal A D A 1 A 15 16 D D A A A Tefal...