83-517-000 Rev.
A
50
5.15
PARALLEL OPERATION
Up to four units of the same
VOLTAGE
and
CURRENT
rating can be connected in parallel to provide up to four
times the output current capability. One of the units operates as a Master and the remaining units operate as
Slaves. The Slave units are analog programmed by the Master unit. In remote digital operation (RS-232/RS-485,
etc.), only the Master unit can be programmed by the controller while the Slave units may be connected to the
controller for voltage, current and status readback only.
There are two parallel operating methods,
Basic
and
Advanced
, to configure multiple power supplies for
parallel operation. With both parallel operating methods, power supplies should be connected in a Daisy-Chain
configuration. Refer to Sections 5.15.1, to Section 5.15.2, and to Section 5.16 for additional details.
Basic Parallel Operation
5.15.1
In this method, setting the units as
Master
and
Slaves
is made by the rear panel J1 connections and the setup
DIP-switch SW1. Each unit displays its own Output current and Output voltage. To program the load current, the
Master
unit should be programmed to the total load current divided by the number of units in the system. Refer
to the following procedure to configure multiple supplies for
Basic
parallel operation.
5.15.1.1 Setting up the Master Unit
Set the
Master
unit Output voltage to the desired voltage. Program the Output current limit to the desired load
current limit divided by the number of parallel units. During operation, the
Master
unit operates in CV mode,
regulating the load voltage to the programmed Output voltage. Connect the sensing circuit to local or remote
sensing as shown in Figure 5-4 or Figure 5-5.
5.15.1.2 Setting up the Slave Units
1. The Output voltage of all the
Slave
units should be programmed 2% - 5% higher than the Output voltage of
the
Master
unit to prevent interference with the
Master
unit’s control. The Output current limit of each unit
should be programmed to the desired load current limit divided by the number of paralleled units.
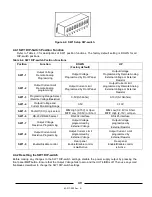
2. Set the rear panel setup DIP-switch SW1-2 to the
UP
position.
3. Set the rear panel setup DIP-switch SW1-3 to the same position as
SW1-4 of the
Master
unit.
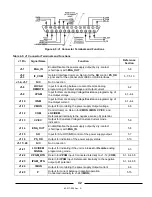
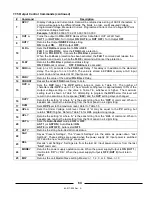
4. Connect a wire jumper between J1-8 and J1-12 (refer to Table 4-4).
5. Connect J1-10 (IPGM) of the
Slave
unit to J1-25 (P) of the
Master
unit.
6. Connect J1-23 (IPGM_RTN) of the
Slave
unit to J1-12 (COM) of the
Master
unit.
During operation, the
Slave
units operate as a controlled current source that follows the
Master
unit Output
current. It is recommended that the power system be designed so that each unit supplies up to 95% of its Output
current rating because of the imbalance which may be caused by cabling and connection voltage drop.
5.15.1.3 Setting Over-Voltage Protection
The
Master
unit
OVP
setting should be programmed to the desired
OVP
level. The
OVP
setting of the
Slave
units should be programmed to a higher value than that of the
Master
unit OVP setting. When the
Master
unit
shuts down, it programs the
Slave
unit to zero Output voltage. If a
Slave
unit shuts down (when its
OVP
is set
lower than the
Master
unit Output voltage), only that
Slave
unit would shut down, and the remaining
Master/Slave
units would supply all the load current.
5.15.1.4 Setting Foldback Protection
FOLD
back protection, if desired, may only be used with the
Master
unit. When the
Master
unit shuts down, it
programs the
Slave
units to zero output voltage.
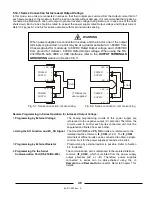
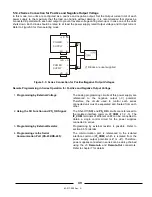
5.15.1.5 Connection to the Load
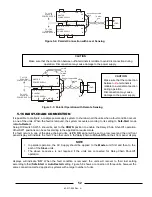
In parallel operation, power supplies can be connected with local or remote sensing. Refer to Figure 5-4 and 5-5
for typical connections of parallel power supplies. The figures show the connection of two (2) units, however the
same connection method applies for up to four (4) units.
Advanced Parallel Operation
5.15.2
In this method, multiple power supplies can be configured to parallel operation as a single power supply. The
total calculated load current and Output voltage are displayed by the
Master
unit and can be read back from the
Master
unit. The
Slave
units display only their operating status (ON, OFF or Fault condition). Refer to the
following procedure to configure multiple power supplies for
Advanced
parallel operation.
5.15.2.1 Basic Configuration
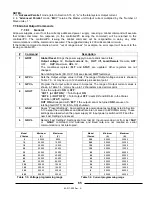
Repeat Steps 1 to 5 in Section 5.15.1 (
Basic
parallel operation).
Содержание GENESYS GEN 2400W Series
Страница 2: ...83 517 000 Rev A THIS PAGE INTENTIONALLY LEFT BLANK ...
Страница 3: ......
Страница 4: ......
Страница 6: ...83 517 000 Rev A THIS PAGE INTENTIONALLY LEFT BLANK ...
Страница 31: ...83 517 000 Rev A 21 2 15 GENESYSTM 2400W POWER SUPPLY OUTLINE DRAWING ...

