


Maintenance, Service, and Repair
Batteries
Page 7
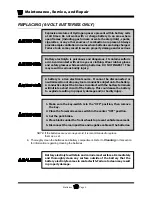
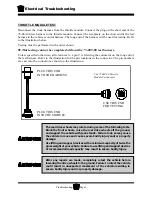
Do not leave cables on batteries that have been removed from the
vehicle. Cables left on batteries could cause a short circuit resulting
in battery explosion, severe bodily injury and/or property damage.
When torquing battery hardware, use a backup wrench on the battery
bolt and tighten the nut. Failure to use a backup wrench may damage
the battery post.
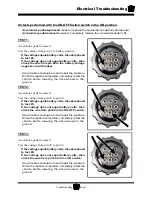
7. Remove the battery hold downs.
8. Inspect the battery hold downs for corrosion. If any signs of corrosion are seen then the
battery hold downs should be replaced.
9. Remove all battery jumpers from both posts of the battery or batteries being replaced.
NOTE: It is recommended to replace the battery jumpers when replacing
the batteries.
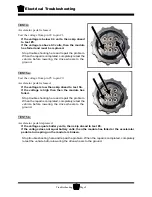
10. Remove the batteries from the vehicle.
11. Inspect the battery compartment for signs of corrosion.
12. If minimal signs of corrosion are seen, then the damaged paint should be stripped off and the
entire battery compartment prepped and repainted.
13. If there are excessive signs of corrosion, then it may be necessary to replace some of the
frame members or completely rebuild the battery compartment.
14. Inspect the main positive and negative cables and terminals, charger cables and terminals
and 12-volt tap wiring. If any of the terminals or wires show signs of corrosion, then they must
be repaired or replaced.
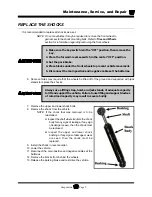
15. Install the batteries in reverse order. Refer to the
Illustrated Parts List
for battery cable
routing.
16. It is recommended to replace the battery terminal hardware when replacing the batteries.
17. Torque the terminal hardware to 7-8 ft.-lbs.
18. Tighten the hold downs so that the batteries are secure but not so tight as to deform the
batteries.
19. Remove the blocks from the wheels and test drive.
Содержание B0-T48-48 Taylor Truck T48
Страница 2: ......
Страница 14: ...TAYLOR DUNN...
Страница 30: ...TAYLOR DUNN...
Страница 31: ...TABLE OF CONTENTS General Maintenance Maintenance Guidelines 2 Troubleshooting Guide 3 Lubrication Chart 4...
Страница 68: ...Maintenance Service and Repair Steering Page 22 Exploded View of Steering Gear...
Страница 86: ...TAYLOR DUNN...
Страница 106: ...Maintenance Service and Repair Transmission Page 20 NOTE Values shown are for reference only C D...
Страница 112: ...TAYLOR DUNN...
Страница 118: ...TAYLOR DUNN...
Страница 130: ...TAYLOR DUNN...
Страница 140: ...TAYLOR DUNN...
Страница 152: ...Illustrated Parts Parts Page 2 Front Axle...
Страница 154: ...Illustrated Parts Parts Page 4 Steering Knuckle...
Страница 156: ...Illustrated Parts Parts Page 6 Steering Linkage...
Страница 162: ...Illustrated Parts Parts Page 12 Rear Suspension View from rear...
Страница 164: ...Illustrated Parts Parts Page 14 Transmission Gear Case...
Страница 168: ...Illustrated Parts Parts Page 18 Rear Brakes Front Brakes...
Страница 170: ...Illustrated Parts Parts Page 20 Brake Lines and Master Cylinder...
Страница 172: ...Illustrated Parts Parts Page 22 Motor...
Страница 174: ...Illustrated Parts Parts Page 24 Motor Mount Apply 94 421 34 grease to inside of motor coupler...
Страница 180: ...Illustrated Parts Parts Page 30 Speed Control Panel Illustration not available at time of printing...
Страница 186: ...Illustrated Parts Parts Page 36 Batteries FRONT OF VEHICLE...
Страница 188: ...TAYLOR DUNN...


