TASCAM Portacapture X6
29
6 - Recording apps
6 - 5 Recording with the MUSIC app
This recording app is good for easily capturing instrumental and vocal performances.
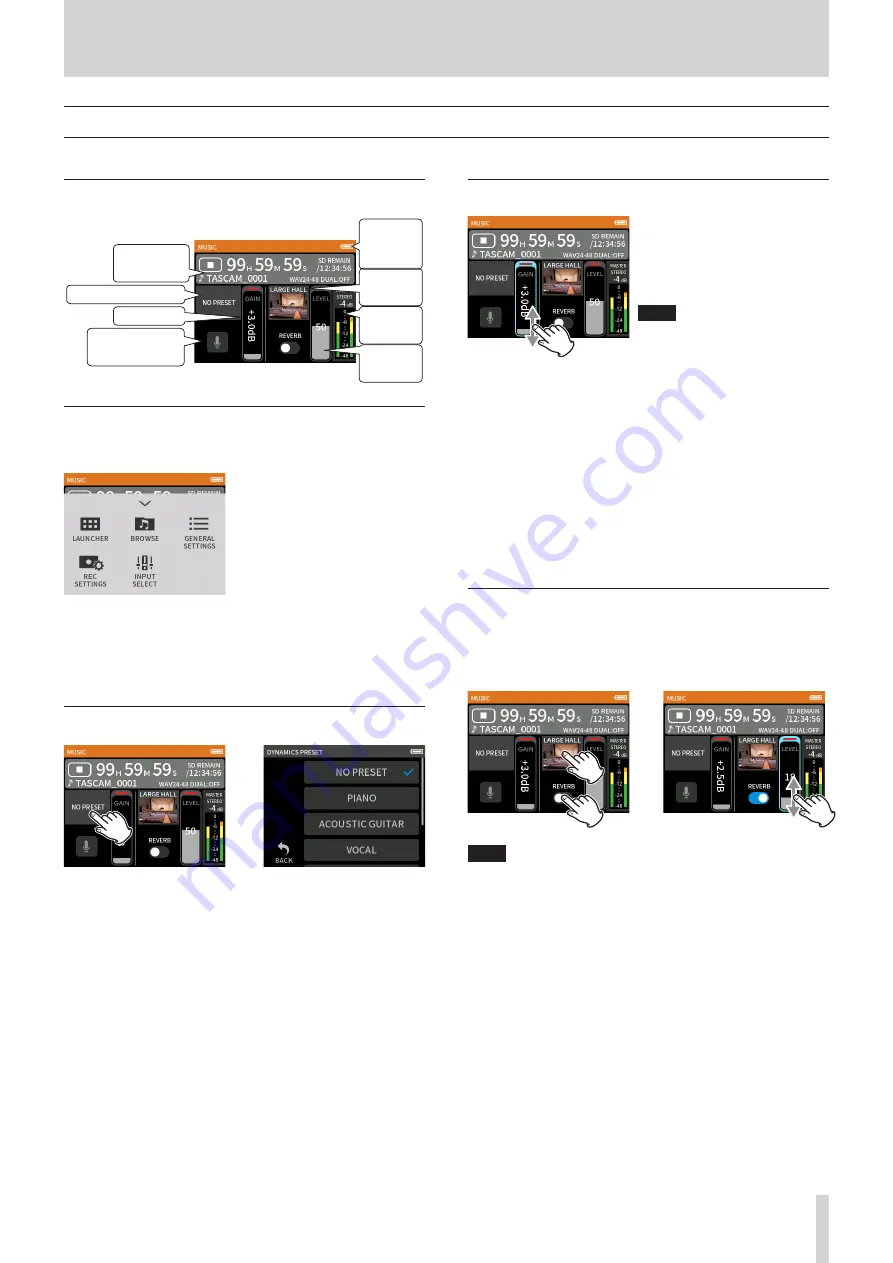
Screen overview
MASTER
level
Project status
bar
Instrument selection
Gain level
Open INPUT
SETTINGS screen
Remaining
battery
charge
Reverb
type
Reverb
level
Shortcut Menu
Press the MENU button on the bottom left of the unit to show the fol-
lowing menu.
LAUNCHER
App switching and unit settings
(page 9)
BROWSE
File operations (page 41)
GENERAL SETTINGS
REC SETTINGS
Recording settings and operations
(page 34)
INPUT SELECT
Track number and input jack
assignments (page 20)
Selecting the type of instrument to record
e
Tap the instrument selection.
Tap the desired instrument.
NO PRESET
This unaffected setting does not apply any dynamics preset to the
sound.
PIANO
Designed for piano
ACOUSTIC GUITAR
Designed for acoustic guitar
VOCAL
Designed for singing
WIND INST.
Designed for wind instruments
STRINGED INST.
Designed for string instruments
BAND
Designed for band performances
o
If none of the options match the desired instrument, select NO PRE-
SET.
Setting the input level
While watching the level meter, adjust
the GAIN so that the level averages
around −12 dB and the PEAK indica-
tor does not light.
NOTE
o
If the input level exceeds –2 dB,
the PEAK indicator on the unit will
light.
o
The recording sound might distort when the PEAK indicator lights.
o
If the entire level meter becomes red, the analog circuit is overload-
ing.
o
Tap INPUT SETTINGS to adjust settings other than the input level. See
“Making input settings for each input” on page 20 for details about
settings.
o
After tapping the GAIN, the wheel can be turned to adjust it precise-
ly.
See “Making input settings for each input” on page 20 for details
about input settings.
Adding reverb to the input (REVERB)
1.
Tap the REVERB setting to turn it on.
2.
Tap the REVERB TYPE to change the selection.
3.
Slide the REVERB LEVEL fader to adjust its level.
e
NOTE
After tapping the REVERB, the wheel can be turned to adjust it pre-
cisely.
For details, see “Adding reverb to inputs (REVERB)” on page 22.


