background image

18

  TASCAM  Portacapture X6

4 -  Connections

4 - 3  Connecting external mics and other 

equipment

Connecting external mics

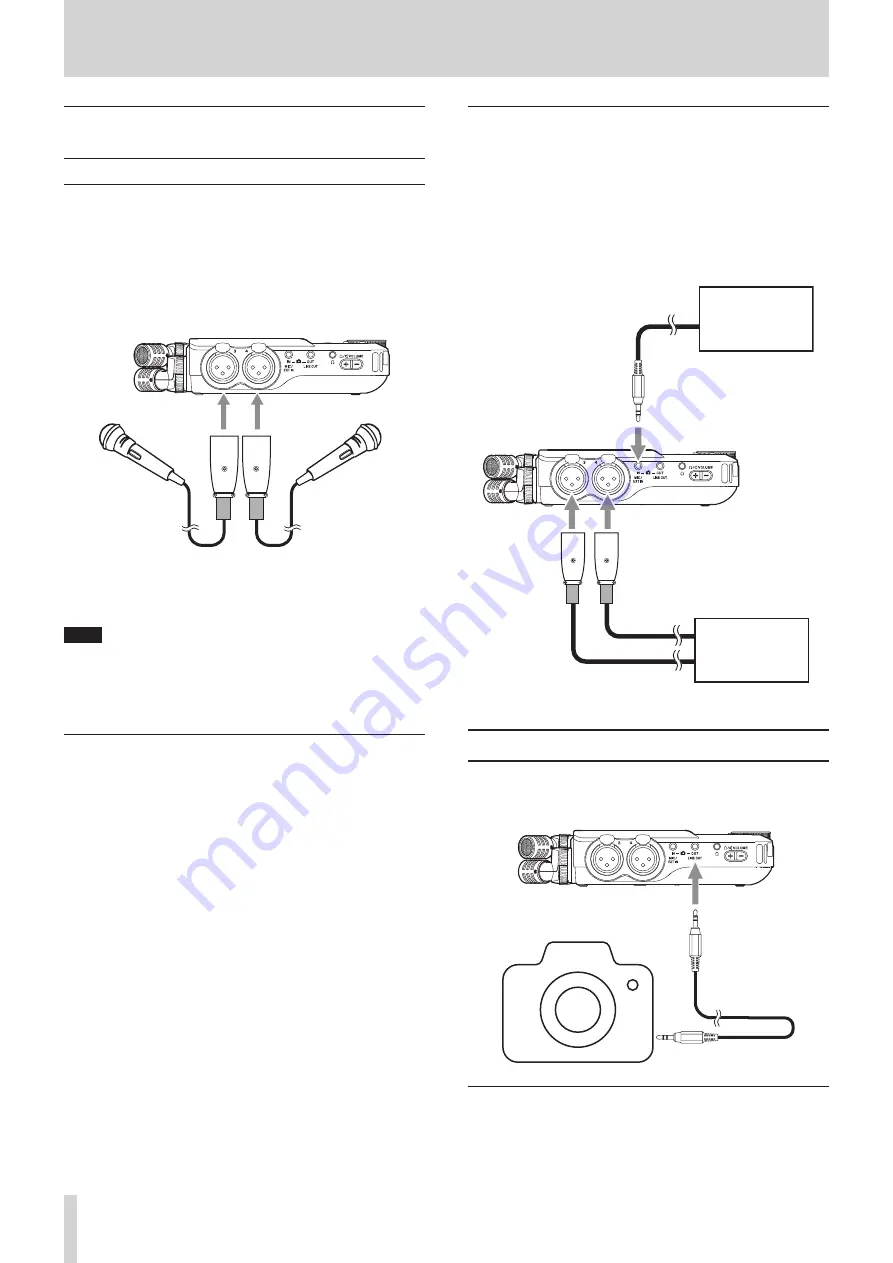
Connect mics to the Input 3/4 XLR connectors.
Point the mics at the sound source and place the unit in a stable location 
where there is little vibration.
When connecting to the XLR jacks, insert the plug until a clicking sound 
is made. When disconnecting, pull the plug out while pressing the lock-
ing mechanism.

Example connecting to input jacks 3–4

Mics

After connecting and making INPUT SELECT settings, use the INPUT set-
tings to select MIC or LINE level. (“Making input settings for each input” 
on page 20)

NOTE


o

Make phantom power settings when using a mic that requires phan-
tom power. (page 22)


o

When connecting a device with unbalanced output, use the MIC/EXT 
IN jack.

Connecting mid-side mics

Mid-side mics can be connected to input jacks 3 and 4.
Connect the mid-side mic mid to input jack 3 and the side to input jack 4.
After connecting them, select the tracks assigned to the jacks they are 
connected to using the GENERAL SETTINGS screen > I/O SETTINGS > MS 
DECODE> SOURCE item.
See “Using the mid-side decoding function” on page 49 for details 
about recording with mid-side mics.

Connecting other equipment


o

Use the MIC/EXT IN jack to connect stereo mini cables.
After connecting and making input selection settings (page 20), 
change the input setting to MIC/EXT IN. (“Making input settings for 
each input” on page 20)


o

To connect XLR plugs, use input jacks 3/4.
After connecting and making the INPUT SELECT setting (page 20), 
change the input setting to LINE. (“Making input settings for each 
input” on page 20)

XLR plugs

Audio device 

or other equip-

ment

Audio device 

or other equip-

ment

MIC/EXT IN jacks

Input jacks 3/4

XLR-3-31 equivalent(1: GND, 2: HOT, 3: COLD)

4 - 4  Connecting cameras

When recording video with a camera, the same sound can be recorded 
simultaneously by the camera and this unit. In order to input sound to 
the camera, connect it with this device as shown below.

Digital SLR camera

External mic input jack

LINE OUT jack

Setting the output for camera use

The line output level can be attenuated up to 30 dB for camera use.
See “Setting the output for camera use” on page 46.

Содержание Portacapture X6

Страница 1: ...D01405020A Linear PCM Recorder Reference Manual...

Страница 2: ...m voltage 20 Adjusting the input level automatically AUTO GAIN 20 Setting the low cut filter LOW CUT 21 Setting the noise gate NOISE GATE 21 Setting the limiter LIMITER COMP 21 Setting the equalizer E...

Страница 3: ...at every mark 45 10 6 Opening mark lists 45 11 Camera functions 46 11 1 Setting the output for camera use 46 11 2 Using the auto tone function AUTO TONE 46 Setting the AUTO TONE function 46 Adjusting...

Страница 4: ...built in These support output from a camera of the sound it is recording wireless mic receivers and plug in power mics for example o o The CAMERA LINE output jack has an attenuation function and allo...

Страница 5: ...ucts in this manual only for the purpose of example and does not indicate any guarantees against infringements of third party intellectual property rights and other rights related to them TEAC Corpora...

Страница 6: ...t A genuine Apple Lightning to USB Camera Adapter and a com mercially available Type A to Type C cable are necessary Connecting to a computer or smartphone with a USB Type C port A commercially availa...

Страница 7: ...ERAL SETTINGS screen I O SETTINGS page SPEAKER item set to OFF o o When not playing back o o When headphones are connected o o When punching in out 8 Touchscreen This shows a variety of information Ta...

Страница 8: ...standby Set it to the HOLD position to activate the hold function Neither the touchscreen nor any buttons can be used when HOLD is active Even when HOLD is active operation is possible using the remot...

Страница 9: ...y to switch to it 2 8 App overview LAUNCHER screen This can be used to launch recording apps and to open the GENERAL SETTINGS screen To GENERAL SETTINGS screen Recording apps Recording apps The follow...

Страница 10: ...apps o o The built in mics and the MIC EXT IN jack cannot be used at the same time MANUAL app Input setting Input selection Mixer Master Tracks 1 2 Tracks 3 4 MASTER Inputs Built in mics MIC EXT IN j...

Страница 11: ...s Master files ASMR app MUSIC app VOICE app FIELD app 2 channel recording apps MASTER Mixer Master Tracks 1 2 stereo mono Master files ASMR MUSIC FIELD Stereo files VOICE Mono files PODCAST app Mixer...

Страница 12: ...e According to recording settings Record p Recording time recordable time According to recording settings Recording paused p9 Recording time recordable time According to recording settings Playing fil...

Страница 13: ...ollowing example shows the character input screen opened from the GENERAL SETTINGS screen SYSTEM page FILE NAME WORD EDIT item Shift Delete one char acter Switch input char acter type Press the charac...

Страница 14: ...2 Preparing the power supply Notes about power supplies This unit can be powered by 4 AA batteries a TASCAM PS P520U AC adapter sold separately or a commercially available USB cable USB bus power Alk...

Страница 15: ...between the AC adapter and the unit NOTE o o If the supplied current of the external power supply cannot automat ically be determined a power supply current confirmation pop up will appear If the powe...

Страница 16: ...ard is replaced while the power is on Setting the language date and time Selecting the language The first time the unit is turned on after purchase the LANGUAGE screen will open 1 Swipe the screen ver...

Страница 17: ...or example 4 2 Setting the built in mics Using the built in stereo mic This unit s built in mics are adjustable enabling the mic format to be changed by setting their angles True X Y method This enabl...

Страница 18: ...he jacks they are connected to using the GENERAL SETTINGS screen I O SETTINGS MS DECODE SOURCE item See Using the mid side decoding function on page 49 for details about recording with mid side mics C...

Страница 19: ...AUTION To listen to the playback sound through the built in speaker set the GENERAL SETTINGS I O SETTINGS SPEAKER item to ON This is off when shipped new from the factory NOTE Sound will not be output...

Страница 20: ...11 o oEven though tracks are selected to make settings they are saved as settings for the input jacks assigned to those tracks For this reason when the INPUT SELECT function is used to change the tra...

Страница 21: ...tting is good for recording sound in interviews meetings pod casts and similar conversational situations GUITAR This setting is good for recording acoustic guitars LOUD The setting is good for emphasi...

Страница 22: ...to the mixer output LEVEL This sets the reverb level 5 4 Setting the phantom power voltage Set the phantom power voltage with the GENERAL SETTINGS screen I O SETTINGS page PHANTOM voltage item e Tap t...

Страница 23: ...fault ON STEREO ON MONO When connecting a microphone that requires plug in power set this to ON When connecting a mono mic set this to ON MONO to record the same signal to both left and right channels...

Страница 24: ...tion can be set with the GENERAL SETTINGS screen REC SETTINGS page REC PAUSE item NOTE When the recording pause function is activated monitoring of input signals is disabled when recording is stopped...

Страница 25: ...apps other than the MANUAL app the recording guide function will be dis abled regardless of its on off setting 6 2 Button operations during recording Recording pause function on 0 Recording 8 Stopped...

Страница 26: ...NGS Additional settings page 54 INPUT SELECT Track number and input jack assignments page 20 INPUT SETTINGS Input settings page 20 REC SETTINGS Recording settings and operations page 34 Setting input...

Страница 27: ...be shown NOTE o oBy default recording guide activated recording cannot be started before proceeding through the guided steps to the MIXER screen o oIf the recording guide is not needed open the MANUA...

Страница 28: ...level exceeds 2 dB the PEAK indicator on the unit will light o o The recording sound might distort when the PEAK indicator lights o o If the entire level meter becomes red the analog circuit is overlo...

Страница 29: ...nstruments STRINGED INST Designed for string instruments BAND Designed for band performances o o If none of the options match the desired instrument select NO PRE SET Setting the input level While wat...

Страница 30: ...nments page 20 INPUT SETTINGS Input settings page 20 REC SETTINGS Recording settings and operations page 34 Setting the inputs For details see Making input settings for each input on page 20 Setting t...

Страница 31: ...unds VEHICLE Trains motorsports etc BIRD Wild bird calls and similar sounds o o If none of the options match the desired subject select NO PRESET Setting the input level While pointing the mic at the...

Страница 32: ...on 3 While inputting the voice and watching the level meters adjust the GAIN so that they average around 12 dB and the PEAK indicators do not light NOTE o o If the input level exceeds 2 dB the PEAK in...

Страница 33: ...sired setting LATCH default Press the pad to start playback from the beginning Press that pad again to stop playback Press that pad once again to restart playback from the beginning PAUSE Press the pa...

Страница 34: ...The levels of quiet sounds can be raised without changing their original sound qualities o o Sounds that seem clipped can be restored to unclipped sounds by lowering their volumes CAUTION Analog clip...

Страница 35: ...e increases and decreases are not a problem 7 9 Recording file naming See File name overview on page 38 7 10 Designating the folder use for record ings See File operations on page 38 7 11 Changing fil...

Страница 36: ...tap the shortcut menu but ton at the bottom left of the unit and select REDO A message confirming execution of the REDO operation will pop up 2 Select YES The unit will be restored to the state after...

Страница 37: ...8 button to stop playback Changing the playback position Slide the playback slider to the desired playback position Selecting files for playback Use the and buttons to select a file for playback Pres...

Страница 38: ...alue is TASCAM The usable characters are as follows Uppercase and lowercase alphabet letters numerals 0 9 and the following symbols _ space File numbers This shows the order recorded The default value...

Страница 39: ...cks 3 4 stereo linked TASCAM_0001_1 WAV Track file TASCAM_0001_2 WAV Track file TASCAM_0001_3 4 WAV Track file TASCAM_0001_MIX WAV master files are always created Master file Dual files handled as sep...

Страница 40: ...w folder or deleting all the files in a folder Exec This will reset the file number the next time a file is created e Tap Exec Tap YES 9 2 File and project structure overview Folders Formatting microS...

Страница 41: ...reen e Press the Shortcut Menu button at the bottom left of the unit and tap the BROWSE icon 9 6 Folder operations Screen overview Icon Return to the LAUNCHER screen Open higher folder Create folder F...

Страница 42: ...the y 9 button to play track files in the current project NOTE If a file not created by this unit is selected it will be played using the MANUAL app Current project The name of the file shown in the...

Страница 43: ...the BROWSE screen 2 Tap FILE INFORMATION Information about the selected file will be shown Project information Track information e Tap TRACK FILE This shows the project name recording format recording...

Страница 44: ...o Tap TIME MARK to divide the file at every mark added by the auto matic mark function TIME option o o Only files in projects that have been recorded by this unit can be divided o o MP3 files cannot...

Страница 45: ...d automatically when the input signal exceeds the set level TIME Marks will be added automatically when the set time elapses during recording Adding marks when peak levels occur PEAK MARK Set this wit...

Страница 46: ...et this with the GENERAL SETTINGS screen CAMERA SETTINGS AUTO TONE item The auto tone function can be used to automatically insert a tone signal whenever recording starts and stops By connecting the L...

Страница 47: ...website https tascam jp int for details NOTE With a Mac the standard OS driver will be used so there is no need to install any software 12 USB connection 12 5 Using as an audio interface This unit can...

Страница 48: ...will automatically be used as the computer inputs Signals from other input jacks will not be input to the computer Using the computer output as sound input to this unit 1 Use a USB cable to connect th...

Страница 49: ...coding function In the MANUAL app mid side mics can be used for recording and their recordings played back See Connecting mid side mics on page 18 for details about connect ing mid side mics to this u...

Страница 50: ...or tablet to launch Portacapture Control Bluetooth device screen 4 If the unit is not turned on turn it on 5 On the unit turn the GENERAL SETTINGS screen OTHER SETTINGS page BLUETOOTH item on The AK B...

Страница 51: ...ted on the following screens the screen on the device that was not being used will show the progress and will not respond to touch operations 1 INPUT SETTINGS 2 INPUT SELECT 3 PAD SETTINGS NOTE Even i...

Страница 52: ...ked on the FILE INFORMATION screen page 43 NOTE XRI data cannot be saved when recording MP3 files 15 3 Showing various information Select the GENERAL SETTINGS screen SYSTEM page INFORMATION item CARD...

Страница 53: ...e batteries LITHIUM Lithium batteries 15 11 Power saving energy conservation mode This can be set using the GENERAL SETTINGS screen POWER DISPLAY page POWER SAVE MODE item POWER SAVE MODE When this is...

Страница 54: ...CREMENT OFF default 5 min 10 min 15 min 30 min 60 min page 35 I O SETTINGS PHANTOM voltage 24V 48V default page 22 PLUG IN POWER OFF default ON STEREO ON MONO MIC TRIM page 52 MIC L 3dB 2dB 1dB 0dB de...

Страница 55: ...E OFF default ON page 53 BACKLIGHT OFF 5sec 10sec 15sec 30sec ALWAYS default BRIGHTNESS LOW MID default HIGH INDICATORS ALL ON default PEAK LED OFF REC LED OFF ALL OFF CONTRAST 0 10 default 20 page 53...

Страница 56: ...nd the app used for recording appears on the Home Screen page 42 PLAY EXECUTE page 42 FILE INFORMATION This shows file and track information page 43 FILE DELETE EXECUTE page 43 TRACK DELETE Track 1 2...

Страница 57: ...tion Can t divide Short interval Mark division will not work when the inter val between marks is two seconds or less Can t divide No file There is no audio file Message Details and response Cannot div...

Страница 58: ...appear on the computer o o Confirm that the unit is properly connected to the computer through its USB port The unit might not operate properly if connected through a USB hub o o To show the unit s fi...

Страница 59: ...Reduce the contrast Power saving energy conservation mode on page 53 o o Turn the recording pause function on Recording app overview on page 24 o o Lower the headphone speaker volume o o Disconnect in...

Страница 60: ...5mW 45mW THD N 0 1 or less into 32 load Built in speaker 0 4 W mono USB Port USB Type C Transfer mode USB 2 0 Hi Speed Device classes mass storage USB audio 2 0 USB class compliant USB audio Sampling...

Страница 61: ...EVOLTA Use conditions Operation time Input through inputs 1 2 built in mics Phantom power not used 44 1kHz stereo WAV BWF 24 bit recording About 13 5 hours Input through inputs 1 2 buit in mics and in...

Страница 62: ...62 TASCAM Portacapture X6 18 Specifications 18 2 Dimensional drawings 75mm 77 3mm 37 2mm 38 3mm 174 3mm...

Страница 63: ...EAK Meter BROWSE PLAY Solo Any Solo STEREO MONO STEREO IN 3 4 MIC LINE INPUT GAIN H L LOW CUT LIMITER COMP 4Band EQ NOISE GATE PHASE IN 1 EXT L IN 2 EXT R IN 3 IN 4 USB L USB R INPUT SELECT Tr 1 4 INP...

Страница 64: ...s www tascam eu en Phone 44 1923 797205 Luminous House 300 South Row Milton Keynes Buckinghamshire MK9 2FR United Kingdom TEAC EUROPE GmbH https www tascam eu de Phone 49 611 71580 Bahnstrasse 12 6520...

Отзывы: