Installation
19
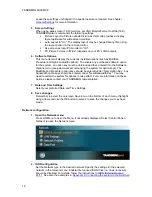
56 network
and in
Appendix 10: Connecting the system to ISDN using NT1 network
adapters
.
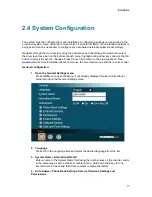
3.
LAN configuration
Select LAN Settings in the Network menu and specify the necessary LAN settings
according to the instructions from your LAN administrator. For details, follow the
instructions in
LAN Settings
. If there is an H.323 Gatekeeper present on your LAN,
refer to
H.323 Settings
as well.
4.
Network Profiles
Please refer to
Network Profiles
for details
5.
Data Port
Please refer to
Data Port
for details
6.
Save changes
Remember to save any changes made in the menu by selecting the Save button on
the Menu line and pressing OK.
* The International Name field is only visible if the system name contains Asian and non-Latin character text input.
Содержание 6000 MXP Profile
Страница 14: ......
Страница 30: ...TANDBERG 6000 MXP 16 2 3 Monitor Configuration The monitor is pre configured and only needs to be switched on ...
Страница 145: ...General Use 131 PC Presentation shown in Wide stretched mode ...
Страница 205: ...General Use 191 Voice Switched mode ...
Страница 207: ...General Use 193 5 7 Security Security contains the settings Encryption Encryption Mode Passwords Camera Standby mode ...
Страница 255: ...Peripheral Equipment 241 All signals are electrically according to RS232 Cable length max 5 meter X21 ...
Страница 268: ...TANDBERG 6000 MXP 254 ...
Страница 293: ...Appendices 279 ...
Страница 297: ...Appendices 283 Top view ...
Страница 300: ...TANDBERG 6000 MXP 286 Dimensions Front view Side view Rear view Underside view ...
Страница 314: ...TANDBERG 6000 MXP 300 Appendix 17 Dimensions Dimensions with the Precision HD Camera ...
Страница 315: ...Appendices 301 ...
Страница 316: ...TANDBERG 6000 MXP 302 Dimensions with the WAVE II Camera Front view 50 monitor Top view with base ...
Страница 317: ...Appendices 303 Top view 50 monitor ...
Страница 318: ...TANDBERG 6000 MXP 304 Codec ...
Страница 320: ...TANDBERG 6000 MXP 306 ...

