


28
Hardware Installation
Sentinel Pro Installation Procedure and Reference Manual
- for Coral IPx / FlexiCom
Po
wering the Sentinel
Pro
4
................................................................................................................
Powering the Sentinel Pro
The Sentinel Pro is connected to the AC power from its rear panel (
).
To power the Sentinel Pro:
1
Verify that the Sentinel Pro power switch is turned OFF.
2
Plug the male connector of the AC power cable into the AC power input
connector in the rear panel of the Sentinel Pro.
3
Plug the female connector of the AC power cable into the wall outlet.
4
Turn the power switch ON.
5
Verify that on the Sentinel Pro front panel, the
Power
LED indicator lights.
................................................................................................................
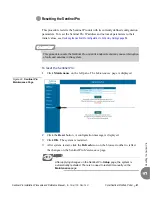
Connecting the Sentinel Pro to the LAN
Plug the RJ-45 jack connectors into the LAN connector in the Sentinel Pro rear panel
(
) and into the LAN socket.
The LAN connection can function properly only after the IP parameters of the
Sentinel Pro have been defined.
The Sentinel Pro is designed to operate over Ethernet LAN with a
connection of less than 100 meters to the local switch.
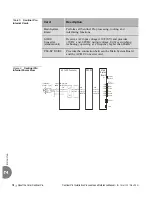
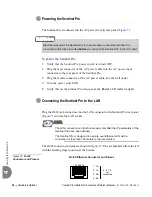
The RJ-45 connector and pins are shown in
. Pins are numbered from the left
with the latching finger position at the bottom.
Figure 15 RJ-45
Connector and Pinouts
Electrical Hazard. If the Sentinel Pro is rack-mounted, connect the Sentinel Pro
grounding to the rack grounding before you connect the Sentinel Pro to the AC outlet.
4, 5, 7, 8
not
connected
1 2 3 45 6 7 8
1 - Tx+
2 - Tx-
3 - Rx+
6 - Rx-
RJ-45 Ethernet Connector and Pinout
Содержание Coral Sentinel Pro
Страница 1: ...Coral Sentinel Pro Installation Procedure and Reference Manual Version 6 78 Document Edition 3 2...
Страница 56: ...NOTES...
Страница 62: ...NOTES...
Страница 70: ...NOTES...
Страница 71: ......
Страница 72: ......