6-6
A+ SERVER 4042G-6RF/TRF User's Manual
6-5 Drive Bay Installation
SAS/SATA Drives
A total of five SAS/SATA drives may be housed in the SC748 chassis. The drive
IDs are preconfigured as 0 through 4 (channel A) in order from bottom to top (or
from left to right if rackmounted).
Installing/Removing Hot-swap Drives
The SAS/SATA drive carriers are all easily accessible at the front of the chassis.
These drives are hot-swappable, meaning they can be removed and installed
without powering down the system. To remove a carrier, first open the front bezel
then push the release button located beside the drive LEDs. Swing the handle fully
out and then use it to pull it straight out as shown in Figure 6-4.
Note:
Your operating system must have RAID support to enable the hot-swap
capability of the SAS/SATA drives.
SAS/SATA Drive Installation
The SAS/SATA drives are mounted in drive carriers to simplify their installation
and removal from the chassis. These carriers also help promote proper airflow for
the drives. For this reason, even empty carriers without SAS/SATA drives installed
must remain in the chassis.
Mounting a SAS/SATA Drive in a Drive Carrier
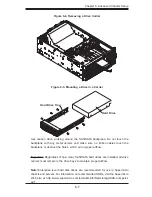
1. Install a drive into the carrier with the printed circuit board side facing down
so that the mounting holes align with those in the carrier.
2. Secure the drive to the carrier with six screws, as shown in Figure 6-5.
The SAS/SATA drive carriers are located in the front of the chassis, making them
easily accessible for installation and removal. These drives are hot-swappable,
meaning that they can be installed and removed while the system is running.
Installing/removing SAS/SATA drives
1.
To remove a SAS/SATA drive, first push the release button located beside the
drive's LEDs
2. Swing the handle fully out and use it to pull the SAS/SATA drive carrier
straight out (see Figure 6-4).
Содержание A+ SERVER 4042G-6RF
Страница 1: ... SUPER A SERVER 4042G 6RF TRF USER S MANUAL Revision 1 0d ...
Страница 5: ...v Preface Notes ...
Страница 10: ...Notes x A SERVER 4042G 6RF TRF User s Manual ...
Страница 25: ...Chapter 2 Server Installation 2 9 Figure 2 5 Accessing the Inside of the System ...
Страница 30: ...3 4 4042G 6RF TRF User s Manual Notes ...
Страница 50: ...4 20 A SERVER 8027R TRF 7RFT User s Manual Notes ...
Страница 92: ...6 10 A SERVER 4042G 6RF TRF User s Manual Figure 6 7 Removing a Power Supply Module ...
Страница 110: ...A 2 A SERVER 4042G 6RF TRF User s Manual Notes ...

