background image

57

AVSI-12 Interview Room System Setup and User Guide

APPENDIX B: ADVANCED RECORDER FEATURES

APPENDIX B 


Advanced Recorder Features

Your ALI-QVR4108H recorder is a state-of-the-art high performance digital video recorder. The extensive features of your ALIBI 
recorder are detailed in the 

Embedded Video Recorder Firmware V4.20.00 (or later) User Manual

 downloadable from 

AlibiSecurity.com

 or your ALIBI security products vendor. The most commonly used features are included below. 

B.1  User Management

User accounts are created to control access to the system both at the recorder and when logging into the recorder from a remote 
computer. Each account has a User Name, Password, and a selection of permissions granted to the user. The recorder supports up to 
32 user accounts. To add, edit, and delete user accounts, you must log into the recorder with 

admin

 user credentials. .

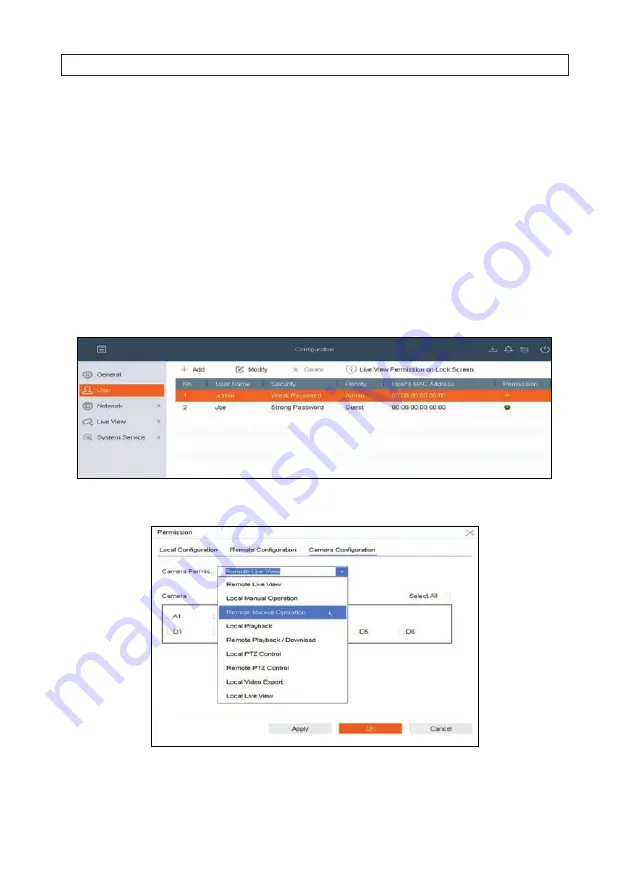
User Management - user configuration

User Camera Configuration settings

Содержание AVSI-12

Страница 1: ... Interview Room System Setup and User Guide PLEASE READ THIS MANUAL BEFORE USING YOUR SYSTEM and always follow the instructions for safety and proper use Save this manual for future reference AVSI 12_SM 200302 ...

Страница 2: ...nd or consent We encourage you to check and comply with all applicable local state and federal laws and regulations before engaging in any form of surveillance or any transmission of radio frequencies Microsoft Windows and Internet Explorer are either registered trademarks or trademarks of Microsoft Corporation in the United States and or other countries Android is a trademark of Google Inc Use of...

Страница 3: ...ation 14 3 8 Using the setupWizard 18 3 9 Opening the Menu system 23 3 9 1 Camera OSD setup 23 3 9 2 Camera Image Settings 25 3 9 3 CameraVideo Parameters 26 3 10 Setup alarm triggered recording 28 3 10 1 Configuring Record schedule 28 3 10 2 Configure Alarm IN 1 and recording trigger 32 SECTION 4 Test Use the Interview Room System 35 4 1 Test System 35 4 2 Playback recorded video 36 4 3 Export re...

Страница 4: ...iv www Observint com TABLE OF CONTENTS A 2 Normal Playback 55 APPENDIX B Advanced Recorder Features 57 B 1 User Management 57 B 2 Remote Access 58 B 3 System Maintenance 58 ...

Страница 5: ...ese instructions will configure the system to record video and audio on Channel 1 when the AVSI switch is ON While recording the video stream from Channel 01 will expand to full screen Also included here are instructions for playing back video and downloading it After configuring and testing the system ALIBI Support highly recommended that the system configuration file be saved to an external devi...

Страница 6: ...SI system control switch 1 CAB ASK 100 ft 3 conductor 1 DC12 2000R 12 Vdc 2A power adapter 1 EXT100 100 ft Video Audio Power extension cable 1 PA6IL High Fidelity Low Noise microphone with DC IN OUT This list subject to change 24LGLED Monitor This Alibi 24 Inch widescreen security grade LED Monitor offers high resolution viewing and is engineered for 24 7 surveillance environments The slim 16 7 mi...

Страница 7: ...capacity of 16TB ALI TS1012R Camera The ALI TS1012R HD TVI 2MP indoor dome camera include a new generation sensor with high sensitivity and advanced circuit design technology It feature low image distortion and low noise which makes them suitable for surveillance and image processing systems AUDIOADAPTER Converts 3 5 mm plug go RCA male AVSI SPEAKER Speakers The AVSI SPEAKER is a high quality comp...

Страница 8: ... The switch provides normally open contacts N O to two independent pair of leads colored blue and yellow The procedure in this document uses the blue leads to activate recording CAB ASK The CAB ASK is a 3 conductor spool of bulk cable for use between the Alarm In connectors on the recorder backpanel and the AVSI switch DC12 2000R 12 Vdc power adapter The DC12 1000R is a regulated 12 Vdc 2 amp 2000...

Страница 9: ...mini audio monitoring device captures crisp clear sound with high fidelity and low noise The monitoring scope reaches up to 164 sq ft and you can easily connect this device to video recorders and IP cameras 1 2 Optional equipment UPS 1000 Uninterruptible power supply UPS The highly recommended UPS 1000 features 890 1080 Joules of surge protection and provides battery backup during power outages It...

Страница 10: ...08H1TB ALI QVR4100 series 8 channel HD TVI Hybrid security DVR ALI TS1012R HD TVI 2MP indoor dome camera AUDIOADAPTER Mono audio 3 5mm female to RCA male adapter AVSI SPEAKER Powered stereo speaker set AVSI STEREO Adapter cable AVSI SWITCH AVSI system control switch CAB ASK 100 ft 3 conductor bulk cable spool DC12 2000R 12 Vdc 2A power adapter EXT100 100 ft Video Audio Power extension cable PA6IL ...

Страница 11: ...hrougha1000VAuninterruptiblepowersupply UPS isstronglyrecommended AUPSis notprovided 1 Place the ALI QVR4108H unit in a secure location that is within cable distance to the interview room s you are monitoring and in a location that has restricted access Using the cables provide Cable EXT100 between the recorder and the camera and microphone is 100 feet Longer cables are available The ALI TS1012R c...

Страница 12: ...tch is used to start and stop recording on channel Find the best location to locate the switch NOTE A 100 ft CAB ASK cable provided is used to connect the switch to the recorder 1 Route the CAB ASK cable between the recorder and the location where the AVSI switch will be mounted Switch leads two pair White Green N C and Yellow Green N O Lead functions 2 Find a convenient location for the switch an...

Страница 13: ...he switch Leave a few inches of extra cable between the anchor and the switch for maintenance when needed 9 Mount the switch plate securely to a wall or electrical box as determined earlier 3 3 Connect the CAB ASK cable to the recorder Alarm In termi nals At the back panel of the recorder do the following 1 Remove about 2 of insulating sheath from the end of the CAB ASK cable 2 Strip 1 4 of insula...

Страница 14: ...nge button Tug on the wire to ensure that is securely attached 3 4 Connect the speakers to the recorder The speakers provided with the system connect to the recorder AUDIO OUT connector through the AUDIOADAPTER The AUDIO OUT connector is located on the back of the recorder between the VGA connector and the LAN connector 1 Plug the audio cable from the speakers into the AUDIOADAPTER provided and th...

Страница 15: ...n a After mounting the camera leave the dome cover off The camera direction and tilt will be adjusted after the recorder is powered on 2 Install the PA6IL microphone to achieve optimal recording of the subject being interviewed and all other room occupants be away extraneous noise such as from HVAC vents fans and sounds outside the room and in a location where it cannot be easily tampered with Do ...

Страница 16: ...IN 1 BNC connector See below DC12 2000R 2 amp power adapter EXT100 cable recorder end To camera and microphone RCA female to BNC adapter VIDEO IN 1 BNC AUDIO IN 1 RCA b Connect the EXT100 cable with the RCA connector audio white connector to the AUDIO IN 1 connector c Connect the EXT100 power cable red connector to the DC12 2000R power adapter NOTE Do not plug the power adapter into a power outlet...

Страница 17: ...r configuration and verify system functionality When performing this procedure refer to the following documents provided with the system hardware for more information ALI QVR4100HSeries8 16 ChannelAHD HD TVI AnalogandIPCameraRecorderQuickSetupGuide EmbeddedVideoRecorderFirmwareV4 20 00 orlater UserManual provided online by your equipment vendor ALI TS1012RHD TVI2MPIndoorDomeCameraQuickInstallation...

Страница 18: ...ts security options a configuration Wizard will open The Wizard helps you to easily configure the recorder for its basic settings including date and time network configuration network cameras HDD initialization etc NOTE AftercompletingsystemsetupwiththeWizard therecorderwillrecordonChannel1whentheAVSIswitchisON andrecordonotherallotherchannelswithcameraswhenmotionisdetectedonthatchannel 3 7 System...

Страница 19: ... feature enables you to create a GUID file and save it to a flash drive for logging back into the recorder if you loose your admin password Enable Unlock Pattern This option allows you to login by dragging the mouse across a 3 x 3 matrix to quickly login to your admin account Security Question Configuration If you loose your password this option enables you to login by responding correctly to secu...

Страница 20: ...the instructions in this step to use this feature a Plug a flash drive into an unused USB port on the recorder and then click the Refresh icon see below Refresh icon b In the GUID Import Export window open the Device Name drop down list and then select the device where you want to save the GUID file If a list of directories appear click on the directory you prefer in the window shown above the fir...

Страница 21: ...e Question 1 field and then select the question you want to use b Enter your answer to Question 1 in the Answer 1 field c Repeat the same setup for Question 2 and Question 3 d Remember or write down the exact answers you entered and then save it in a secure location e Click OK to save your configuration and then click OK again to close the Note window 8 If you selected the Enable Unlock Pattern op...

Страница 22: ...own menus b Click the System Date field and then click on the current date c Click the System Time field and then use the graphical interface for setting the current time You can also check the Enable NTP box and then enter the appropriate parameters in the fields below it to configure the recorder retrieve the precise time and date information from a timeserver on the Internet d Click Next to sav...

Страница 23: ...enable fixed network settings un check the Enable DHCP box Then you can either use the IPV4 parameters assigned by the DHCP server or enter your preferred IPV4 parameters IPv4 Address IPv4 Subnet Mask IPv4 Default Gateway NOTE If you enter IPV4 parameters in the fields above ensure that they do not conflict with other devices in the network c Click Next to save your settings and continue 3 In the ...

Страница 24: ...ve a limit of how many network cameras can be added to the system You can also use the recorder to Activate cameras on the network A camera must be activated before it can be added To activate a IP network camera with the recorder a Click the Search button to discover the cameras attached to your local network network to which the recorder is attached b Scroll through the list of cameras found on ...

Страница 25: ...lable from your vendor for more information Enable DDNS enables DDNS Dynamic Domain Name System access to the recorder This feature simplifies access to the recorder especially when the IP address of the recorder may change For more information on setting up a DDNS service for the recorder refer to firmware user manual for the recorder You can download the firmware user manual for your recorder fr...

Страница 26: ...rAlibiSupportorganizationformoreinformation a To change the password check the New Admin Password box and then follow the on screen instructions b To change the port numbers enter the new port numbers in the field provided c To save your settings and exit the configuration Wizard click Finish Click Previous to return to an another Wizard menu After clicking Finish the Live View window will open Me...

Страница 27: ... click the Menu icon in the upper left corner to open the Menu screen 2 IntheMenu screen clicktheCameraicon seeabove 3 9 1 Camera OSD setup You can configure the OSD Settings On Screen Display settings for the camera including date time day of week camera name etc OSD options you select will be permanently embedded in the recorded video for your camera NOTE Ifyoudisplaythedateandtime ensurethedate...

Страница 28: ... 01 is selected 4 You can enter a new name for the camera bu clicking the Camera Name field In this example the camera is renamed Interview Room 1 5 In the OSD menu check the select boxes for the information you want to appear on the screen such as camera name date and or week Information you selected will appear in the text boxes shown in the video window a If you selected Display Name enter the ...

Страница 29: ...want to configure In the example above A1 Camera 01 is selected 3 Click the expand icon for Image Settings 4 Open the Mode drop down list and then select the option that best applies to the where the camera is installed If you are configuring an IP camera the only option is Custom 5 Adjust the sliders for the Brightness Contrast Saturation Hue Sharpness and Denoising to produce the best image If y...

Страница 30: ...ure that both the Main Stream Continuous and Main Stream Event parameters are configured to stream Video Audio Other video parameters are normally set to provide adquate camera performance you can adjust camera parameters for both main stream Continuous recording and main stream Event recording Refer to the Specifications for your camera s to see what options for main stream performance are availa...

Страница 31: ...ters as needed for the camera performance you require 4 Click Apply to save your settings for this camera Sub Streams In the Sub Stream menu ensure that the Stream Type option is configured to stream Video and Audio The sub stream is normally used for cloud storage and remote access to the recorder ...

Страница 32: ...ble video audio recording at preset times Initially cameras are configured to record either continuously or using motion detection Managing the record schedule for each camera can save space on the HDD and help the recorder operate more efficiently You can setup a record schedule in either of two ways graphically see below where you apply recording modes to sections of the week array Monday throug...

Страница 33: ...eduleforHolidaysandconfigureupto8differentrecordingschedulesforholidays 1 Open the Record Schedule menu Go to Menu Storage Schedule Record By default the schedule shown below is setup to record continuously only throughout the week 2 To configure the Record schedule a Open the Camera No drop down list to select the camera you want to configure In this example the camera installed in the interview ...

Страница 34: ...Click OK to save your settings Setting the Recording Schedule graphically To graphically configure the recording schedule simply click the recording mode you want to apply and then drag a rectangle across the areas of the array you want to change Each segment of the array represents 30 minutes To graphically change the recording schedule for Alarm recording type of event created when the AVSI swit...

Страница 35: ...cted Schedule enable 4 Use the mouse to drag a rectangle across the area of the schedule array you want to change see above A red rectangle will show the area you selected In this example the entire week was selected When you release the mouse button the recording mode in that area will change to the mode you selected See below 5 Click Apply to save your settings ...

Страница 36: ...o trigger video and audio recording on A1 Channel 01 when the AVSI switch is ON 1 Open the Alarm IN menu Go to Menu Camera Event Normal Event 2 For Alarm Input No Local 1 click the checkbox in the Edit column See above 3 In the Edit popup window enter an Alarm Name for the alarm you are configuring In the example below Interview room 1 was entered ...

Страница 37: ...rmally Open if not already selected 5 Click the Input radial button An Arming Schedule will appear By default this schedule enables the Local 1 alarm continuously You can modify this schedule as done with the Record schedule see above if needed Input radial button 6 Click Apply to save your settings 7 Click the Linkage Action tab ...

Страница 38: ...select box to record video and audio from A1 Channel 01 to check it b Optional In this screen I also checked the select box in the Normal Linkage column for Full Screen Monitoring so that when the AVSI switch is ON video from A1 Channel 01 in the Live View display expands to full screen c Click Apply to save your settings d Click the X in the upper right corner to close the Edit window ...

Страница 39: ...n Section 3 the Live View display for channel 1 is expanded to full screen 4 1 Test System The ALI QVR4108H recorder features several ways to manage and search for video files including clipping tagging intelligent search etc Refer to the EmbeddedVideoRecorderFirmwareV4 20 00 orlater UserManualfor ALI QVR4100 series recorders for more information about using the extensive tools and features of the...

Страница 40: ...h the speakers 8 Set the AVSI switch to OFF The Live View screen should return to Multi screen mode and the Recording in progress icon in the upper right corner of Camera 01 video should disappear 4 2 Playback recorded video The ALI QVR4108H recorder features several ways search for playback and manage video files including clipping tagging intelligent search etc Refer to the EmbeddedVideoRecorder...

Страница 41: ...ST USE THE INTERVIEW ROOM SYSTEM 2 In the Menu window click the Playback icon NOTE FormoreinformationaboutuseofthePlaybackscreen see APPENDIXAPlaybackScreenControls onpage54 3 In the camera list on the right check the select box for the interview room camera Camera 01 ...

Страница 42: ...ttom of the screen will show times when recordings for the camera were made and color code the mark to indicate if it was a Normal blue or Event red recording Recordings initiated by the AVSI switch Alarm IN will always be Event recordings You can click the icon to the right of the timeline to expand or contract the timeline 5 After expanding the timeline and click the Play u in playback controls ...

Страница 43: ...of the video verify that you can hear sound from the recording and the video started and stopped at the time when the AVSI switch turned ON and OFF 4 3 Export recorded video In this example the video recorded from testing the system will be exported to a USB flash drive 1 Insert a USB flash drive into an USB port on the recorder 2 In the playback window ...

Страница 44: ...r the camera you that the recording was made from b Click the Custom Search button at the bottom of the left frame The Search Condition screen will open 3 Open the Event Type drop down list and then select Alarm Input to search for an alarm generated on Camera 01 triggered by the AVSI switch ...

Страница 45: ...t a search for recordings triggered by an Alarm Input Start of search icon End of search icon 5 Click the End of search icon and then select the date and time when you want to end a search for recordings triggered by an Alarm Input 6 Click the Search button at the bottom of the screen The results of the search will be listed in the window In the window below only one recording was found ...

Страница 46: ...bservint com SECTION 4 TEST USE THE INTERVIEW ROOM SYSTEM 7 You can click the icon in the View column to play the video 8 In the Playback screen click Custom Search again to return to the Search results screen ...

Страница 47: ...tton in the upper right corner of the screen c Click the Export button d In the Export popup window select Video and log normal or Player Player is used for playing an optional proprietary video file format exported by the recorder In this example I selected Video and log e Click OK Refresh button f In the Path Settings window click the Refresh button see above and then double click on the directo...

Страница 48: ...us icon in the screen header Note that it shows the file is 100 exported 10 Unplug the USB flash drive from the recorder 4 4 Tagging and locking recorded video clips You can tag or name to video clips during playback and then easily find play and export them later Video clips can also be locked on the HDD to prevent them from being overwritten with newer data 4 4 1 Tagging video files To tag a vid...

Страница 49: ...VIEW ROOM SYSTEM 1 While the video is being played back hover the mouse pointer over the video frame A group of pop up icons will appear at the bottom of the window Add Tag icon 2 Click the Add Tag icon See above 3 In the window that opens enter a Tag Name using the virtual keyboard ...

Страница 50: ...of pop up icons will appear at the bottom of the video frame Lock icon 2 Click the Lock icon See above 4 4 3 Search for and Playback aTagged file To find and playback video that was tagged do the following 1 Stop video playback in the Playback screen 2 In the left frame of the Playback screen check the select box of the camera used to streamed the video that was tagged 3 Click the Custom Search bu...

Страница 51: ...field and then use the virtual keyboard to enter the tag name Here we just entered part of the tag name J Davis to find the tag See below Start of search icon End of search icon 5 Click the Calendar icons for the Start of search and End of search to set the time range to search 6 Click the Search button at the bottom of the screen In this example one result was found for the camera selected ...

Страница 52: ...the Play icon in the View column White mark on timeline indicates video segment is tagged 4 4 4 Search for and play locked files 1 Open the playback menu and check the select boxes for cameras used to record the locked video files you want to find In the example below Camera 01 A1 was selected ...

Страница 53: ...ns to set a date range that includes when the locked files you want were recorded Start of search icon End of search icon 4 Open the File Status drop down list and then select Locked 5 Click the Search button at the bottom of the screen A list of video files that match your search criteria will be displayed The icon in the Lock column below shows the file is locked Click the Play icon in the View ...

Страница 54: ...n click the Start Stop Manual Recording icon again See above You can playback and search for this recording as with any other recording 4 6 Export system configuration You can export the recorder configuration file then import the file later to restore the earlier configuration if needed Use this procedure to backup your system settings whenever the configuration is changed The configuration backu...

Страница 55: ...u want to save the configuration file and double click on it to open it You can hover the mouse over the directory entry in the list to see the directory name see above 5 Double click on the directory in the flash drive where you want to save the configuration file see below Export button Import button 6 Click the Export button see callout above In the popup Export Encryption window enter your adm...

Страница 56: ...at configuration See 4 6 Export system configuration on page 50 for more information The procedure below uses the configuration file created above to restore the system You must be logged into the recorder as the system administrator to perform this procedure 1 If the configuration file you saved is on a flash drive insert the flash drive into an unused USB port on your recorder 2 Open the Import ...

Страница 57: ...EM Click to Import 4 Click the Import button see above In the popup Import Encryption window enter your administrator password and then click OK to perform the export 5 After the configuration file is imported a system reboot is required Follow the on screen instructions to complete the procedure ...

Страница 58: ...om or your ALIBI security products vendor A 1 Playback screen basic controls Video playback window Channel panel Search field Time panel calendar Toolbar Play head timestamp Switch to sub stream Full Screen split Get external file Show sub periods Clip Smart play strategy Video clip Play controls Legend Playback mode select Tag Digital zoom Mute listen Lock file Smart search options Motion Detect ...

Страница 59: ...e 4 frames Smart playback strategy opens a popup window for setting the playback speed of normal video separate from the playback speed of Smart search video You can skip normal video during playback Timeline Marks on the timeline indicate video clips Color of the marks is defined in the Legend You can drag the timeline left or right to reposition it at the play head and use the Timeline Width GUI...

Страница 60: ...3 In the Time frame the current day is identified The recorder will search for available video in the selected month and mark each day that has recorded video available In the screen below the mark on the date shows video was recorded Mark shows video recorded on this day Timeline Legend Play head timestamp Playback mode Normal Play controls ...

Страница 61: ... AlibiSecurity com or your ALIBI security products vendor The most commonly used features are included below B 1 User Management User accounts are created to control access to the system both at the recorder and when logging into the recorder from a remote computer Each account has a User Name Password and a selection of permissions granted to the user The recorder supports up to 32 user accounts ...

Страница 62: ... User Name and Password User permissions can disallow remote access to the recorder and or restrict access to features of the recorder Refer to the EmbeddedVideoRecorderFirmwareV4 20 00 orlater UserManual for your ALI QVR4100 series recorder for more information RemoteAccessLiveViewscreen typical B 3 System Maintenance The Maintenance menus provide several displays that report system device inform...

Страница 63: ...59 AVSI 12 Interview Room System Setup and User Guide APPENDIX B ADVANCED RECORDER FEATURES SystemMaintenancemenu ...

Отзывы: