


Service Manual
SummaSign
To re-install, proceed as follows:
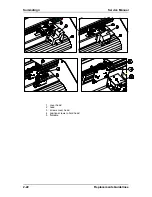
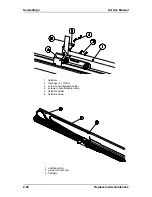
97.Put the flat cable into the connector of the head and close the connector. To ensure good contact,
the flat cable must be positioned as deeply as possible and in the middle of the connector.
98.
68.
Note:
69.
If the flat cable is connected to a drag head it is advisable to allow for ±7
centimeters of slack. This slack is necessary to be able to upgrade to a tangential
head,the connector of whichis located in a lower position.
99.
100.Put the flat cable across the top of the head and fold it correctly .
101.
102.Remount the top cover of the head. Press the cover down while firmly tightening the screws. Check
that the up/down part of the head can move freely.
103.Remount the flat cable clamp. Check that the flat cable runs parallel to the inner side of the shaft's
upright edge and that the up/down part of the head can move freely.
104.Slide the flat cable in between the upright edge of the shaft and the top of the head.
105.Bring the head all the way to the left. Make a loop to allow the head to move unhampered along the
length of the unit.
70.
Caution:
71.
Make sure the loop is neither too long nor too short. A very long loop may get
caught behind other parts and break. A very short loop may break as the head
moves along the length of the unit.
106.Glue the flat cable to the inner side of the shaft's upright edge, starting from the middle.
107.Slide the flat cable through the slot on the right-hand side of the shaft.
108.Put the flat cable into the connector and close the connector. The flat cable must be positioned as
deeply as possible in the middle of the connector to have good contact.
109.Fold the cable into the correct position and press it onto the flat cable for the keyboard.
110.Proceed in the reverse order of removal. Make sure to firmly tighten all screws.
111.
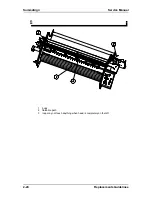
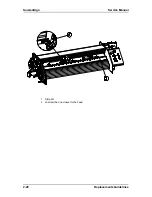
Additional strip in larger units:
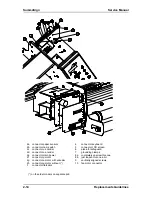
As mentioned at the beginning of this chapter, larger units have an additional strip that runs alongside
the flat cable to prevent the flat cable from creasing. If you need to replace this strip make sure you
insert the new strip as follows:
112.
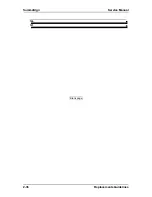
113.Glue ± 2 cm of this end of the strip to the shaft's upright edge.
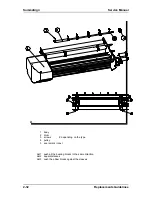
114.Glue the other end of the strip to the other upright edge of the shaft starting at the protrusion shown
in the figure on page 2-26.
Replacement Guidelines
2-27
Содержание SummaSign D1010
Страница 1: ...Service Manual SummaSign Series Summa NV Rochesterlaan 6 8470 Gistel Belgium...
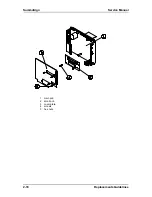
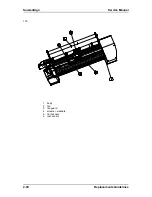
Страница 62: ...SummaSign Service Manual 2 18 Replacements Guidelines 1 main pcb 2 small pcb 3 cover plate 4 screws 5 hex nuts...
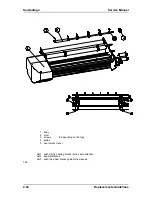
Страница 72: ...SummaSign Service Manual 2 28 Replacements Guidelines 1 Strip Pur 2 unscrew the one closest to the head...
Страница 80: ...SummaSign Service Manual 106 107 2 36 Replacements Guidelines Blank page...
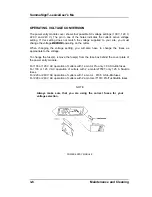
Страница 85: ...Service Manual SummaSignT se 3 2 OPERATING VOLTAGE CONVERSION Maintenance and Cleaning 3 5...
Страница 87: ...Service Manual SummaSignT se Maintenance and Cleaning 3 7 blank page...
Страница 92: ...Service Manual SummaSign Calibration 4 5...
Страница 93: ...SummaSign Service Manual HEAD CALIBRATION 4 6 Calibration...
Страница 131: ...Service Manual SummaSign Spare Parts List 7 13...
Страница 134: ...Summasign Service Manual 7 16 Spare Parts List...


