


(April, 2013)
DRH Series GEN1 Ultrasonic Humidifi er Installation, Operation & Maintenance Manual
1.0 INTRODUCTION
1.1 General
Recognized as a world leader, Stulz Air Technology
Systems, Inc. (STULZ)
Ultrasonic Humidifi ers are
designed and manufactured with the highest quality
craftsmanship using the fi nest materials available in
the industry. Your ultrasonic humidifi cation system will
provide years of trouble free service if installed and
maintained in accordance with this manual. Damage
to the unit from improper installation, operation or
maintenance is not covered by the warranty.
This manual contains information for installation,
operation, maintenance, troubleshooting and repair.
STUDY the instructions contained in this manual.
They must be followed to avoid diffi culties. Spare
parts are available from STULZ to ensure continu-
ous operation. Using substitute parts or bypassing
electrical components in order to continue operation
is not recommended and will VOID THE WARRANTY.
Due to technological advancements, components are
subject to change without notice.
STULZ
DRH Series
Ultrasonic Humidifi ers are de-
signed as stand alone direct room humidifi ers. Any
use beyond this is deemed to be not intended. STULZ
is not liable for any damage resulting from improper
use. The system is designed to be installed indoors
unless otherwise noted on the equipment nameplate.
1.2 Safety
1.2.1 General
Stulz Air Technology Systems, Inc. uses
NOTES
along with
CAUTION
and
WARNING
symbols
throughout this manual to draw your attention to
important operational and safety information.
A bold text
NOTE
marks a short message in the
information to alert you to an important detail.
A bold text
CAUTION
safety alert appears with infor-
mation that is important for protecting your equip-
ment and performance. Be especially careful to read
and follow all cautions that apply to your application.
A bold text
WARNING
safety alert appears with
information that is important for protecting you from
harm and the equipment from damage. Pay very
close attention to all warnings that apply to your ap-
plication.
1-1
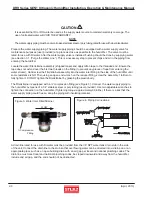
A safety alert symbol
accompanies a general
WARNING
or
CAUTION
safety statement.
A safety alert symbol
accompanies an electrical
shock hazard
WARNING
or
CAUTION
safety state-
ment.
1.2.2 Safety Summary
The following statements are general guidelines fol-
lowed by warnings and cautions applicable through-
out the manual.
Prior to performing any installation, operation,
maintenance or troubleshooting procedure read and
understand all instructions, recommendations and
guidelines contained within this manual.
WARNING
High voltage is used in the operation of this
equipment. Death on contact may result if
personnel fail to observe safety precau-
tions.
CAUTION
This unit must be installed according to local
and national electric codes.
CAUTION
All maintenance and/or repairs must be per-
formed by a qualifi ed technician. All person-
nel working on or near equipment should be
familiar with hazards associated with electrical
maintenance.
CAUTION
Always turn off the main power and unplug the
unit before beginning work on the equipment.
NOTE
Wiring terminations may become loose during
transit of the equipment therefore; verify all wir-
ing terminations are secure prior to operation.
NOTE
Do not attempt to make repairs without the
proper tools.