


(April, 2013)
DRH Series GEN1 Ultrasonic Humidifi er Installation, Operation & Maintenance Manual
Note
Ensure the elbow is facing the correct direction.
7) Install the new solenoid valve to the fl oat panel and re-install
the pipe fi tting.
Note
Ensure the o-ring is not damaged. If it is damaged, replace
it with a new one.
4.4.6.2
Float Switch
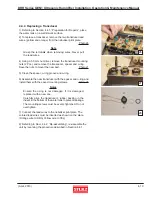
8) To replace a fl oat switch, remove the lock nut on the fl oat
switch and replace the switch with a new one (ref. Photo 10).
4.4.6.3
Level Control Board
9) To replace the level control board, remove the lead wire
terminal connectors (3 Pcs.) from the board (see Photos 6 & 7).
Note
Grasp the connectors when removing. Never pull the lead
wires.
10) Slide the level control board out along the guides. Remove it
and install a new one.
Photo 34
4.4.6.4
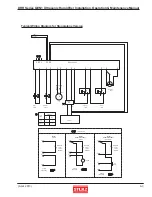
Drain Solenoid Valve
11) To replace the drain solenoid valve remove the humidifi er fan
casing as described in Section 4.2.5 and lay it on it’s side. Photo 35
12) Using a 5.5 mm nut driver, remove the nuts holding the two
valve outlet adapters. Unscrew the adapters from the solenoid
valve and screw them into the replacement part.
Photo 36
13) Referring to Section 4.4.2, “Re-assembling”, assemble the
unit by reversing the procedure described in Section 4.4.1.
34
35
36
4-12