


(April, 2013)
DRH Series GEN1 Ultrasonic Humidifi er Installation, Operation & Maintenance Manual
4-3
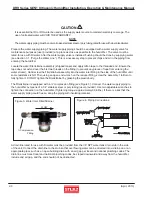
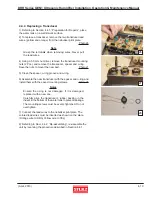
4.2.1 Air Filter
1) Stop the humidifi er.
2) Loosen and remove the fi lter case mounting screws (2 Pcs.)
at the lower front of the humidifi er.
Photo 1
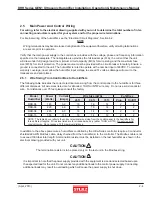
3) Pull out the fi lter case.
Photo 2
4) Wash the fi lter media with clean water.
5) Lightly shake off excess water and dry it well in the shade.
6) When the fi lter is dried, put it back in the fi lter case, install the
stopper and install the fi lter case in the humidifi er.
7) If the fi lter is seriously clogged and cannot be cleaned by
washing with water, or if it is seriously deteriorated, it should be
replaced with a new one.
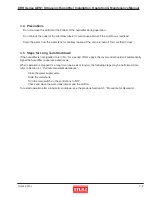
4.2.2 Water Supply Filter/Strainer
1) Stop the humidifi er, set the control box disconnect switch to
“Off” and close the water supply valve.
2) Loosen the bowl on the fi lter/strainer assembly and remove it.
Photo 3
3) Remove the element and rinse the fi lter and the inside of the
bowl with DI water.
4) Inspect the fi lter element. If dirty, replace the element with a
new one.
5) Re-install the fi lter element and bowl on the fi lter/strainer.
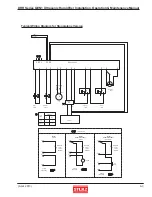
4.2.3 Electrical Parts
1) Stop the humidifi er, set the control box disconnect switch to
“Off” and close the water supply valve.
2) Drain the water tank.
Note
Be careful not to splash water onto the electrical parts.
3) Remove the mist guide cover from the top of the humidifi er.
4) Remove the screws (4 Pcs.) holding the electrical box access
cover.
Photo
4
5) Remove the electrical box access cover.
Photo 5
Inspect the interior and check the following:
No water leakage from the solenoid valve joint.
No damage to electrical wires or cables.
No abnormality of parts.
2
1
4
5
3