GB
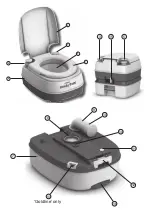
1. Removable seat - 2. Removable lid - 3. Freshwa-
ter tank cap - 4. Toilet cover - 5. Pump - 6. Freshwa-
ter tank - 7. Waste tank - 8. Sealed valve - 9. Swivel-
ling spout - 10. Swivelling spout cap - 11. Ventilation
button - 12. Valve - 13. Level indicator - 14. Venting
- 15. Locking lever - 16. Transporting wheel
Operating Instructions
Set Up Instructions
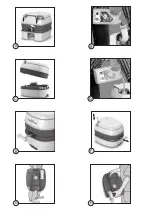
A) Slide the locking lever to the left to disconnect the
freshwater tank (6) from the waste tank (7).
B) Turn the spout (9) upwards and add the required
amount of Camp-Blue® to the waste tank according
to the product’s instructions. Fill with two litres of
fresh water.
C) Twist the cap on to the spout, then turn the spout
until it is in the folded up position. Reconnect both
sections by pressing the top section firmly back on
to the bottom section.
D) Fill the fresh water tank with clean water (max 16
litres). Add the required amount of Camp-Flush®
according to the product’s instructions.
Instructions for Use
E) Open and close the sliding valve (12) once, with
the toilet lid (2) closed. This will avoid too much high
pressure.
F) Flush the toilet with fresh water using the pump
(5). Open the sliding valve to deposit the contents
of the toilet in the waste tank. Then close the sliding
valve once more. The indicator level shows when
the waste tank needs to be emptied, green = empty,
red = full.
G) Disconnect the toilets and empty the waste tank
in the appropriate containers or in a regular toilet.
H) Empty the waste tank using the spout. During this
process hold the ventilation button in to avoid any
spillage (only hold this button in when the spout is
facing downwards).
Do not use any regular toilet paper, only Camp-
Soft® dissolving toilet paper, to avoid any blo-
ckages.
For Winter Use:
Only use in heated environments
and protect from frost.
Emptying and cleaning:
Keep the toilet clean and dry.
Guarantee:
There is a two year manufacturer’s guar-
antee on product faults. Please contact your suplier
along with your invoice. When warranty is granted
the defective part will be repaired or replaced. The
entire toilet will not be exchanged.
1. Lunettes amovibles - 2. Couvercle amovible - 3.
Bouchon du réservoir d‘eau de rinçage - 4. Enve-
loppe de toilette - 5. Pompe - 6. Réservoir d‘eau de
rinçage - 7. Réservoir des eaux usées - 8. Clapet -
9.Bec verseur pivotant - 10. Bouchon du bec verseur
pivotant - 11. Bouton de ventilation - 12. Vanne - 13.
Indicateur de niveau - 14. Système d‘évacuation -
15. Dispositif de verrouillage - 16. Roue de transport
Manuel d’utilisation
Préparation à l‘utilisation
A) Faites glisser le dispositif de verrouillage vers la
gauche pour séparer le réservoir d‘eau de rinçage
(6) du réservoir d‘eaux usées (7).
B) Tournez le bec verseur (9) en haut et remplissez
le réservoir des eaux usées avec Camp-Blue®,
maintenez le dosage indiqué sur la bouteille. Rem-
plissez avec deux litres d‘eau de rinçage.
C) Tournez le bouchon situé sur le bec verseur,
remettez ensuite le bec dans la position rabattable.
Assemblez de nouveau les deux parties de toilettes,
en pressant la partie supérieure sur la partie inféri-
eure.
D) Remplissez le réservoir d‘eau de rinçage (6)
avec de l‘eau propre (max 16 litres). Ajoutez Camp-
Flush® et maintenez le dosage indiqué sur la
bouteille.
Utilisation
E) Ouvrez et fermez une fois la soupape (12),
laissez le couvercle de toilette (2) fermé. Cela per-
mettra d‘éviter la pression excessive.
F) Rincez à l’aide de la pompe (5) les toilettes avec
l‘eau de rinçage. Ouvrez la soupape pour déverser
le contenu des toilettes dans le réservoir des eaux
usées. Fermez de nouveau la soupape. L‘indicateur
de niveau permet de savoir si le réservoir des eaux
usées doit être vidé, vert = vide/rouge = plein.
G) Détachez les toilettes et videz le réservoir des
eaux usées dans les bacs d‘évacuation appropriés
ou dans des toilettes normales.
H) Videz le réservoir des eaux usées à travers le
bec verseur. Lors de la vidange, appuyez sur le
bouton de ventilation pour éviter de faire des saletés
(appuyez uniquement quand le bec verseur est
orienté en bas).
Pour éviter l’engorgement des toilettes, n’utilisez pas
de papier hygiénique normal, mais plutôt le papier
toilette Camp-Soft ® auto- dissolvant.
Utilisation en hiver :
Uniquement dans un environ-
nement chauffé et à l’abri du gel.
Vidange et nettoyage:
Gardez les toilettes propres
et sèches.
Garantie:
Une garantie d’usine de deux ans couvre
les défauts du produit.
FR
Содержание Handy Potti Silver Line
Страница 1: ...WWW STIMEX COM...
Страница 2: ...3 2 1 4 5 6 15 3 5 10 9 8 7 11 12 16 14 13 Goldline only...
Страница 3: ...A E C G F H B D...


