background image

35

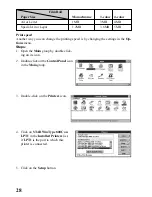
Changing the film roll setting
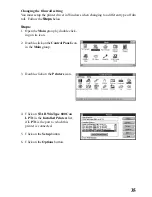
You must setup the printer driver in Windows when changing to a different type of film
roll.  Follow the 

Steps

 below.

Steps:

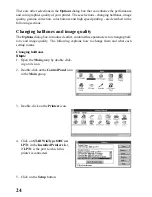
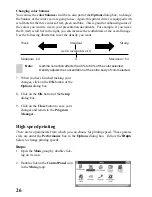
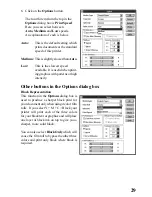
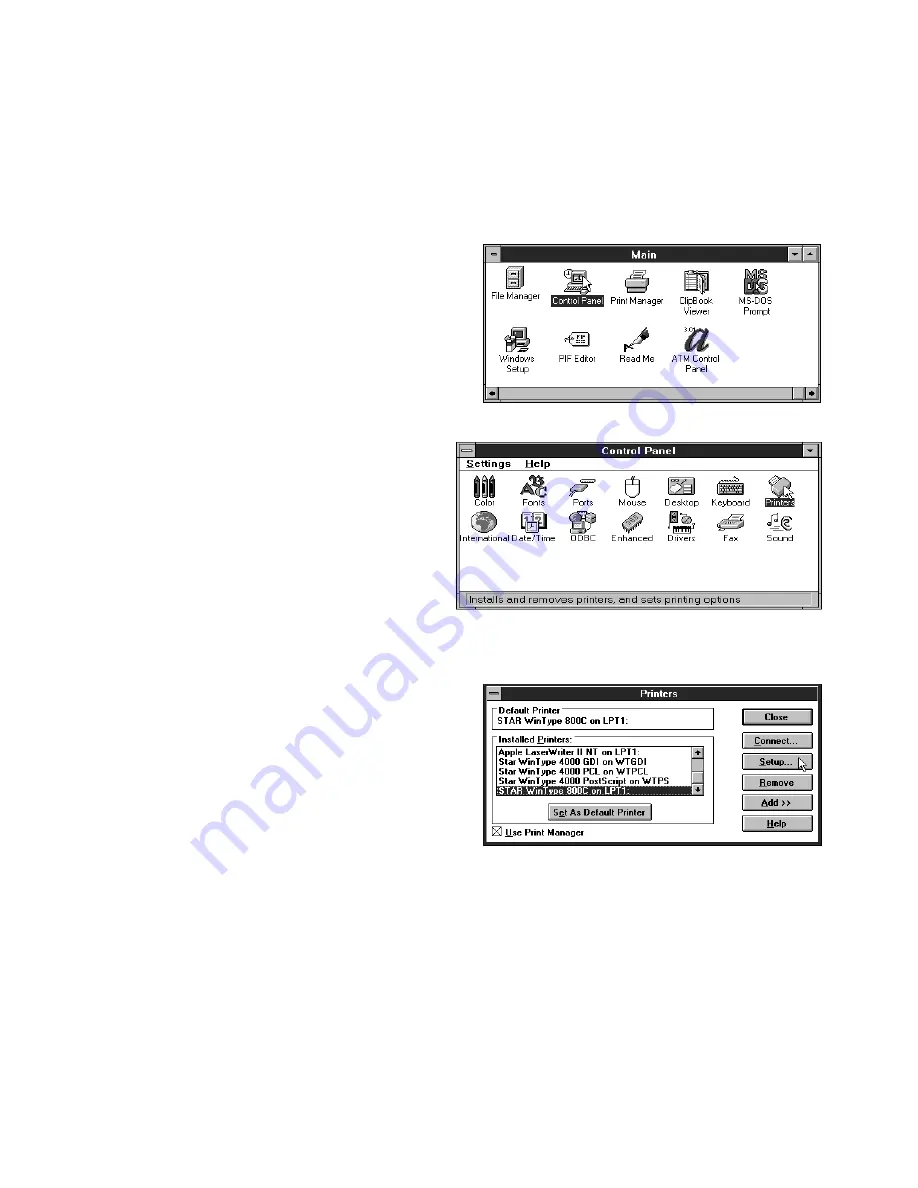
1. Open the Main group by double click-

ing on its icon.

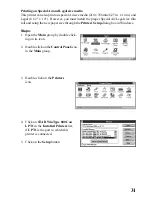
2. Double-click on the Control Panel icon

in the Main group.

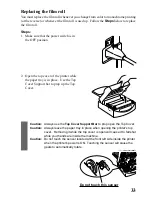
3. Double-click on the Printers icon.

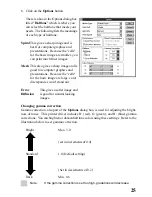
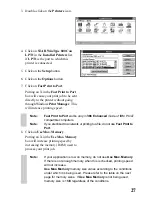
4. Click on STAR WinType 800C on

LPT1 in the Installed Printers list,
if LPT1 is the port to which this
printer is connected.

5. Click on the Setup button.

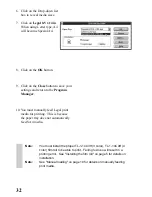
6. Click on the Options button.

Содержание WinType 800C

Страница 1: ...The Windows Color Presentation Printer WinType 800C Users Manual 80825100 ...

Страница 2: ...te radio frequency energy and if not installed and used in accordance with the instructions may cause harmful interference to radio communica tions However there is no guarantee that interference will not occur in a particular installation If this equip ment does cause harmful interference to radio or television reception which can be determined by turning the equipment off and on the user is enco...

Страница 3: ...wer cord 8 Performing a test print 8 Connecting the printer to your computer 9 Chapter 2 Installing the printer driver and TrueType fonts 11 System requirements 11 Installing the printer driver and TrueType fonts 11 TrueType font samples 14 Chapter 3 Printing with WinType 800C 15 The control panel 15 The Paper lamp 15 The Film Roll lamp 15 The Ready lamp 15 The Ready button 15 Features of the prin...

Страница 4: ...ing the film roll 33 Changing the film roll setting 35 Printing with iron on transfer 37 Steps for printing on the transfer sheets 37 Steps for transferring the image on the cloth 38 Steps for the finishing process 39 Chapter 4 Maintenance troubleshooting 41 Maintaining your printer 41 Cleaning the outside of the printer 41 Cleaning the inside of the printer 41 Clearing paper jams 46 Transporting ...

Страница 5: ...er you need an IBM compatible PC with at least a 386SX 16 MHz CPU and at least 8 megabytes MB of PC memory RAM The PC must be running DOS 3 3 or later and Windows 3 1 in Enhanced Mode A Microsoft compatible mouse is highly recommended You must also have a 3 5 floppy disk drive A standard PC parallel printer port is required to connect the printer using a standard high quality shielded Centronics p...

Страница 6: ...the printer This printer is capable of laser quality color page printing on Letter A4 Legal and Spe cial A4 size coated presentation quality smooth paper OHP overhead projection film and iron on transfer sheets The main features of the printer include Full color and monochrome laser quality printing Up to 2 pages per minute using monochrome film rolls and 1 page per minute using 4 color film rolls...

Страница 7: ...Press this to open the printer s top cover Control panel The control panel includes the Ready button and the Ready Paper and Film Roll lamps Paper tray The paper tray cover and the paper tray base when put together are called the paper tray Paper tray cover This covers the paper tray ...

Страница 8: ...r This connects the printer to the computer Power switch AC cord socket DIP switches Top cover Air vents Top cover support Thermal head Bobbin sockets These are used to mount the film roll to the inside of the printer Platen roller ...

Страница 9: ...t of Communications Radio Interference Regulations This digital device does not exceed the Class B limits for radio noise emissions from digital apparatus set out in the Radio Interference Regulations of the Canadian Department of Communications Le présent appareil numérique n emen pas de bruits radioélectriques dépassant les limits applicable aux appa reils numériques de la classe B prescrites da...

Страница 10: ...his Users Manual 4 Paper tray base 5 Paper tray cover 6 Starter 3 color film roll 7 Film roll bobbins 8 Starter paper 30 sheets 9 Printer driver and font software 2 disks 10 Power cable We strongly recommend that you save the sales receipt boxes and packing materials for this printer They will protect the printer should you ever need to transport it to a new location or require service Caution Alw...

Страница 11: ... pages Note All film rolls are sold with 2 rolls per package Description Model Number Size Sheets Pack Coated paper A PWC Letter 100 sheets A4 PWC A4 100 sheets SA PWC Legal 100 sheets SA4 PWC Special A4 100 sheets Presentation A PW Letter 100 sheets grade paper A4 PW A4 100 sheets SA PW Legal 100 sheets SA4 PW Special A4 100 sheets OHP film A TFC Letter 100 sheets A4 TFC A4 100 sheets SA TFC Lega...

Страница 12: ...m recommended length of the parallel interface cable not supplied is 2 meters or 6 feet The printer should be placed so that there is a minimum of 5 cm 2 in clear ance on the front left and right sides to prevent blockage of its ventilation fan outlets and at least 30 cm on the back of the printer to allow opening of the printer s top cover Preparing to print After placing for your printer in a su...

Страница 13: ...o the paper tray base with the printing side facing the paper tray base Note Recommended coated paper will have the words PRINT OPPOSITE SIDE printed in light blue letters on the back side 4 After one sheet has been inserted all the way into the printer add the remainder of the stack of paper Note The paper tray can hold up to 50 sheets of coated presentation grade paper at one time Be certain to ...

Страница 14: ...inter Failing to do so will allow the top cover to drop down when opened This can cause unexpected and painful injury Steps 1 Insert the film roll bobbins into holes on both sides of the rolls Be certain to insert the bobbins with wedges into the holes that are shaped in the same way Those portions of the bobbins are colored green 2 Unwrap the film roll and gently pull the two halves apart They ar...

Страница 15: ...nds are inside the machine 4 Lift up the Top Cover Support located on the left on the inside of the printer and slip the end of the support bar into the latch located on the inside of the Top Cover Gently lower the Top Cover until it stops 5 Remove the two protective transporta tion inserts and the socket protective transportation sheet from inside the printer Protective transportation inserts Soc...

Страница 16: ...the take up roll smaller half into the slots in the front portion of the machine by following the procedures described above 7 Gently rotate toward the front of the printer the gear of the film roll to take up any slack in the sheet 8 Lay the Top Cover Support Bar down to its original position while holding the top cover with one hand 9 Gently but firmly close the printer s top cover by pushing do...

Страница 17: ...e using the anything other than the included paper and film roll you must first change the dip switch settings Refer to Chapter 4 Troubleshooting for details Note You should use recommended paper for this test to get the best results 1 While pressing the Ready button on the control panel which is located on the front of the printer turn the power switch to the ON position 2 Release the Ready butto...

Страница 18: ...allel cable into one of the interface ports on the com puter 3 Plug the other end of the interface cable into the printer s interface port which is located on the back of the printer 4 Securely fit the prongs on either side of the printer s port into the clips on both sides of the printer cable Note To ensure proper operation you must use a high quality Centronics compatible shielded parallel inte...

Страница 19: ...10 ...

Страница 20: ...requires at least 5 megabytes of disk space on your system s hard drive An addi tional 1 85 megabytes is needed to install all of the 35 TrueType fonts A Microsoft compatible mouse is also highly recommended This manual assumes that you are using a mouse If you are not using a mouse please refer to your Windows 3 1 Users Guide for information on using the keyboard in place of a mouse A standard PC...

Страница 21: ...ll see the STAR WinType 800C installer screen prompting you to select the printer type You can select either WinType 800C A4 or WinType 800C Letter Select one and click on OK 6 After selecting one and clicking OK theInstall Fontsdialog box will appear You can install the 35 TrueType fonts at this time by clicking on the InstallFonts checkbox You can select either Automatic Install which will autom...

Страница 22: ...re using is LPT1 If your computer has only 1 parallel port LPT1 is the name of the port 4 Click Close to continue 5 When the installation is done you will see a message telling you that the installation of the printer driver was completed successfully Click on Re start to restart Windows or Quit Custom Install 1 If you selected Custom Install the in stall program will prompt you to insert Floppy d...

Страница 23: ...c Install Steps 3 5 described on the previous page Note To make the typefaces appear in your application reselect your printer in Printer Setup in the application File menu Note You must restart Windows in order to begin using this printer for the first time TrueType font samples American text Broadway Brush 445 Caslon Openface Cloister Blk Commercial Script Cooper Black Davida BD DomCasual Engrav...

Страница 24: ...am this lamp will flash and the printer will enter the Not Ready mode The Not Ready mode is indicated by the flashing green Ready lamp The Film Roll lamp This lamp is also colored orange and it too is ordinarily not lit If an error is detected such as no film roll or wrong film roll this lamp will flash and the printer will en ter the Not Ready mode which is also indi cated by the flashing green R...

Страница 25: ... paper tray or manually loaded media The following list describes media to use with this printer to maintain its exceptional color quality Media Type Dimensions Recommended Type Coated paper Letter 8 1 2 x 11 A PWC 216mm x 279mm A4 8 27 x 11 69 A4 PWC 210mm x 297mm SA4 8 27 x 14 SA4 PWC 210 x 356 mm Manual insertion only Legal 8 1 2 x 14 SA PWC 216mm x 356mm Manual insertion only Presentation Lett...

Страница 26: ...n Never turn OFF the power when you are printing because this will cause paper to jam inside of the machine See Chapter 4 Maintenance and troubleshooting for an explanation on clearing paper jams Loading print media You can load print media either via the paper tray or manually Caution There are print media types which the paper tray cannot use They are Iron on transfer sheets all sizes Legal Spec...

Страница 27: ...an hold up to 50 sheets of coated presentation grade paper at one time Be certain to insert the print media with the print side facing down when inserting into the printer Note Recommended coated paper will have the words PRINT OPPOSITE SIDE printed in light blue letters on the back side The side from where you can read the silver colored letters on the Recommended OHP film is the print side 4 Rep...

Страница 28: ...own into the opening in the paper tray cover Make sure that it is inserted com pletely into the printer feeder Caution Do not manually load more than one sheet of media at a time Wait until the first sheet has been completely printed and removed before loading more media Printable area Refer to the following information to determine the actual printable area for your print media An illustration of...

Страница 29: ...355 6 C 8 1 8 1 200 5 200 5 8 1 8 1 200 5 200 5 Dots 2432 2432 2368 2368 2432 2432 2368 2368 D 9 5 10 1 258 273 6 12 5 13 1 316 6 332 1 Lines 2850 3034 3048 3232 3750 3934 3739 3293 E 0 2 0 2 4 75 4 75 0 2 0 2 4 75 4 75 F 0 55 0 55 14 14 0 55 0 55 14 14 G 0 2 0 2 4 75 4 75 0 2 0 2 4 75 4 75 H 0 95 0 35 25 9 4 0 95 0 35 25 9 5 A B C 0 06 0 06 1 1 0 06 0 06 1 1 D E F 0 12 0 12 3 3 0 14 0 14 3 6 3 6 ...

Страница 30: ...ters icon in the Control Panel window 4 Double click on STAR WinType 800C on LPT1 in the Installed Printers win dow if LPT1 is the port to which this printer is connected This will set it as the default printer 5 Click on the Setup button 6 Select the size of the media you will be using If you selected A4 type at step 5 on page 10 you can select either A4 210 x 297 mm 8 27 x 11 69 or Special A4 21...

Страница 31: ...he recommended paper such as PPC paper or the equivalent However be aware that print quality will greatly decrease with other print media When using PPC paper or the equivalent select Plain Paper in the Media Type checkbox 10 Select the type of film roll you have installed on the printer from the drop down list box Selections include 3 Color for 3 color film rolls 4 Color for 4 color film rolls Mo...

Страница 32: ...itches are located on the back side of the printer and can be changed using the tip of a ball point pen or other similar object Altogether there are 7 levels from which you can select To change the darkness setting of your printer you use DIP switches 7 8 and 9 Use the following illustration to make your selections Note Printer driver settings have a higher priority than DIP switch settings DIP sw...

Страница 33: ...ality The Options dialog box introduced earlier contains three parameters for changing half tone and image quality The following explains how to change them and what each setting means Changing halftones Steps 1 Open the Main group by double click ing on its icon 2 Double click on the Control Panel icon in the Main group 3 Double click on the Printers icon 4 Click on STAR WinType 800C on LPT1 in t...

Страница 34: ...ons Because the cells for the basic image are large color discrepancies won t stand out Error This gives a softer image and Diffusion is good for natural looking images Changing gamma correction Gamma correction also part of the Options dialog box is used for adjusting the bright ness of tones This printer driver includes R red G green and B blue gamma corrections You can brighten or darken halfto...

Страница 35: ...ng set in increments of 1 Minimum 64 0 Maximum 64 Note Gamma correction affects the 40 to 60 of the color selected Density adjusts the concentration of the entire body of color selected 7 When you have finished making your changes click on the OK button of the Options dialog box 8 Click on the OK button of the Setup dialog box 9 Click on the Close button to save your changes and return to the Prog...

Страница 36: ...nhanced mode of IBM PC AT compatible computers Note If you are linked to a network or printing to a file do not use Fast Print to Port 8 Click on Use Max Memory Putting an X in the Use Max Memory box will increase printing speed by increasing the memory RAM used to process your print job Note If your application is low on memory do not use Use Max Memory If there is not enough memory when this is ...

Страница 37: ...ng speed is by changing the settings in the Op tions menu Steps 1 Open the Main group by double click ing on its icon 2 Double click on the Control Panel icon in the Main group 3 Double click on the Printers icon 4 Click on STAR WinType 800C on LPT1 in the Installed Printers list if LPT1 is the port to which this printer is connected 5 Click on the Setup button ...

Страница 38: ...hen print ing graphics with patterns or high intensity Other buttons in the Options dialog box Black Representation This function in the Options dialog box is used to produce a sharper black print for your document only when using 4 color film rolls If you select Y M C Black your printer will print each of the three colors for your black text or graphics and will place one layer of black ink on to...

Страница 39: ...phs more true color printing Color Balance will be set to R 0 G 5 and B 0 If you click on this when using 4 color film ribbons Black Representation will be set to Y M C Black Text When you click on theText button Gamma Correction will automatically be set to the values of R G B 1 0 and Color Bal ance will be set to R G B 0 If you click on this when using 4 color film ribbons Black Representation w...

Страница 40: ...al size film roll and setup the new paper size through the Printers Setup dialog box in Windows Steps 1 Open the Main group by double click ing on its icon 2 Double click on the Control Panel icon in the Main group 3 Double click on the Printers icon 4 Click on STAR WinType 800C on LPT1 in the Installed Printers list if LPT1 is the port to which this printer is connected 5 Click on the Setup butto...

Страница 41: ...gram Manager 10 You must manually feed Legal print media for printing This is because the paper tray does not automatically feed SA4 media Note You must install the proper TL 1 14C3H 3 color TL 1 14C4H 4 color film roll to be able to print Failing to do so will result in a printing error See Installing the film roll on page 5 for details on installation Note See Manual loading on page 19 for detai...

Страница 42: ...y is in place Use the Top Cover Support bar to prop up the Top Cover Caution Always use the Top Cover Support Bar to prop open the Top Cover Caution Always leave the paper tray in place when opening the printer s top cover Removing it while the top cover is open will cause it to fall shut while your hands are inside the machine Caution Do not touch the sensor located at the front left side inside ...

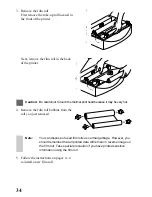
Страница 43: ...ead because it may be very hot 4 Remove the film roll bobbins from the roll you just removed Note You can dispose of used film rolls as normal garbage However you should remember that all printed data will remain in reverse image on the film roll Take special precaution if you have printed sensitive information using the film roll 5 Follow the instructions on pages 4 6 to install a new film roll ...

Страница 44: ...s below Steps 1 Open the Main group by double click ing on its icon 2 Double click on the Control Panel icon in the Main group 3 Double click on the Printers icon 4 Click on STAR WinType 800C on LPT1 in the Installed Printers list if LPT1 is the port to which this printer is connected 5 Click on the Setup button 6 Click on the Options button ...

Страница 45: ...st of genuine Star printer supplies for a description of the types of film rolls you can use with this printer 8 When finished making your selection click on the OK button 9 A message to confirm your changes will appear Click on OK 10 Click on the OK button of the Setup dialog box 11 Click on the Close button to save your changes and return to the Program Manager ...

Страница 46: ...inting iron on transfer sheets always select OHP Film in the Media Type setting of the printer driver Steps for printing on the transfer sheets 1 Create an image with your software program 2 Place the finishing sheet with its silicon side facing upwards into the paper tray base The silicon side is the side facing you when the cut corner is in the upper right hand side Note The finishing sheet is n...

Страница 47: ...ely printed before loading more sheets 6 Print your image on the transfer sheet Steps for transferring the image on the cloth 1 Cut out the image on the transfer sheet leaving approximately 1 2 margin around the image Round off the corners because this will reduce the chance of the image peeling off 2 Carefully position the transfer sheet on the cloth with the image side down 3 Uniformly iron the ...

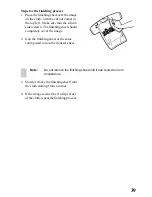
Страница 48: ... The finishing sheet should completely cover the image 2 Iron the finishing sheet at the same setting used to iron the transfer sheet Note Do not remove the finishing sheet until it has cooled to room temperature 3 Slowly remove the finishing sheet from the cloth starting from a corner 4 If the image seems like it will peel off of the cloth repeat the finishing process ...

Страница 49: ...40 ...
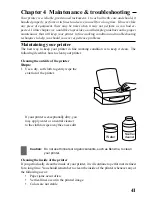
Страница 50: ...ep your printer in fine working condition is to keep it clean The following describes how to clean your printer Cleaning the outside of the printer Steps 1 Use a dry soft cloth to gently wipe the exterior of the printer If your printer is exceptionally dirty you may apply water or a neutral cleaner to the cloth to wipe away the excess dirt Caution Do not use thinners or organic solvents such as Be...

Страница 51: ...e this could cause damage Steps 1 Dampen a soft cloth with ethanol 2 Make sure that the printer is not print ing and turn off the power to the printer 3 Remove the paper tray cover and the paper tray 4 Press the top cover release and open the top cover while the paper tray is in place Use the Top Cover Support Bar to prop up the top cover Caution Always use the Top Cover Support Bar to prop open t...

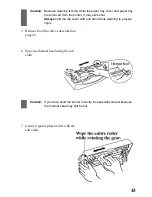
Страница 52: ...lways hold the top cover with one hand while cleaning to prevent injury 5 Remove the film rolls as described on page 28 6 Wipe the thermal head using the soft cloth Caution If you have used the printer recently be especially careful because the thermal head may still be hot 7 Gently wipe the platen roller with the soft cloth ...

Страница 53: ...th 10 While holding up the paper guide wipe the area of the paper pinch rollers you can see with the soft cloth 11 Rotate the gear shown in the illustra tion to expose the opposite side of the pinch rollers Wipe the entire roller while rotating the gear Wipe the entire roller while rotating the gear ...

Страница 54: ...ne hand and gently close the top cover You should hear a click ing sound as it closes tightly 14 Place the paper tray and paper tray cover back into their normal operating posi tions and turn ON the power to the printer Caution Do not print for 5 to 10 minutes or until the alcohol has dried after cleaning the inside of the printer Make sure that the Ready lamp is lit ...

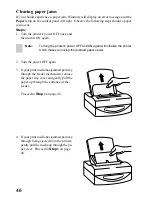
Страница 55: ...he printer s power OFF and ON again will initialize the printer which makes removing the jammed paper easier 2 Turn the power OFF again 3 If your print media has jammed partway through the feeder mechanism remove the paper tray cover and gently pull the paper up through the entrance of the feeder Proceed to Step 8 on page 48 4 If your print media has jammed partway through being ejected from the p...

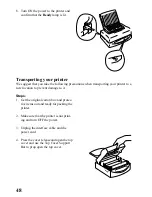
Страница 56: ... theTop Cover Support Bar to prop up the Top Cover 6 Your print media will appear if you gen tly rotate the gear as shown in the illus tration at the right Note Do not leave any paper scraps inside of the printer if your paper should rip 7 After removing the jammed paper close the top cover You should hear a click ing sound as it closes tightly ...

Страница 57: ...ur printer to a new location to prevent damage to it Steps 1 Get the original carton box and protec tive items out and ready for packing the printer 2 Make sure that the printer is not print ing and turn OFF the power 3 Unplug the interface cable and the power cord 4 Press the cover release and open the top cover and use the Top Cover Support Bar to prop open the top cover ...

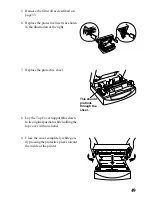
Страница 58: ...ustration at the right 7 Replace the protective sheet 8 Lay the Top Cover Support Bar down to its original position while holding the top cover with one hand 9 Close the cover completely while gen tly pressing the protective pieces toward the inside of the printer This should protrude through the sheet ...

Страница 59: ...50 9 Remove the paper tray cover and the paper tray base 10 Wrap the printer in its original protec tive sheet and place it in its original box ...

Страница 60: ...ting operations other than those described here may result in electric shock damage to the printer or both The following table is provided to give you an idea of where to find solutions to prob lems you may encounter Region of problem Description Power supply Power is not being supplied to the printer Page 52 Printing The printer doesn t print or it stops printing Page 52 The printed image has ver...

Страница 61: ...hat the Ready lamp is lit If it is flashing mode press it to enter the Ready mode Is paper jammed Make sure that there is no paper or other media jammed inside of the printer See page 46 for an explanation on clearing paper jams Is the software you are Check the installation settings in your software and re using properly installed install it if necessary for your printer Is the proper media being...

Страница 62: ...sible remedy Is the media type set Check the media type settings in the Printers Setup correctly dialog box in Windows Is the print intensity set too Change the Printer Setup dialog box in Windows to a high higher setting See Chapter 3 Changing intensity for an explanation Patterns appear where print density is high Check Possible remedy Is the print intensity set too Change the Printer Setup dial...

Страница 63: ...e inside of the printer See page 41 for an rollers dirty explanation of the proper way to clean the inside of your printer Is the paper too thick or Use only the recommended paper types too thin Is the top cover completely Close it tightly if it is open closed Is the film roll properly Properly select the film roll which is currently selected installed on the printer Are you using the wrong Check ...

Страница 64: ...Change of print media size 3 types 2 types Overall print intensity 7 levels from 3 to 3 Note 1 Windows settings take priority over DIP switch settings Note 2 This sets Low print speed which is useful for areas with high intensity or patterns Paper Types Plain Paper Coated Paper Presentation grade paper OHP Film Iron on Transfer Sheets Film Roll Types Paper Sizes Print Intensity TL1 11C4H 4 Color A...

Страница 65: ...ment of the interface connector Pin Signal Pin Signal 1 DATA STROBE 19 GND 2 DATA 1 20 GND 3 DATA 2 21 GND 4 DATA 3 22 GND 5 DATA 4 23 GND 6 DATA 5 24 GND 7 DATA 6 25 GND 8 DATA 7 26 GND 9 DATA 8 27 GND 10 ACKNLG 28 GND 11 BUSY 29 GND 12 EOP 30 GND 13 ON LINE 31 INPUT PRIME 14 GND 32 FAULT 15 33 GND 16 GND 34 EOI 17 CHASSIS GND 35 18 5V Max 160mA 36 1 18 19 36 ...

Страница 66: ...ze paper Monochrome 37 seconds page 3 color YMC 87 seconds page 4 color YMCB 107 seconds page Special A4 size paper Monochrome 37 seconds page 3 color YMC 87 seconds page 4 color YMCB 107 seconds page Paper feed Speed Paper 4 6 8 or 10 ms line depending on data transfer speed OHP film 6 8 or 10 ms line depending on data transfer speed Paper handling Paper tray Capacity 50 sheets of coated presenta...

Страница 67: ...life 25 000 pages or 5 years Printer head life 5 000 pages A4 size 3 color 20 duty Noise level ISO 7779 53 0 dB Environment Temperature Operating 10 to 35 C 50 to 95 F Non operating 20 to 55 C 4 to 131 F Humidity Operating 30 to 70 RH no condensation Non operating 30 to 90 RH no condensation Printer supply accessories Film roll TL1 11C3H 30 Color type 3 color YMC film roll Size Page length is less...

Страница 68: ...lm roll Size Page length is less than 14 Letter A4 Legal SA4 Life 200 pages per roll at Letter or A4 Coated paper A PWC A4 PWC Size Letter Size A4 Packaging 100 sheets Packaging 100 sheets SA PWC SA4 PWC Size Legal Size Special A4 Packaging 100 sheets Packaging 100 sheets Presentation grade paper A PW A4 PW Size Letter Size A4 Packaging 100 sheets Packaging 100 sheets SA PW SA4 PW Size Legal Size ...

Страница 69: ...he screen See also font and pixel Bitmapped font A font in a single point size made up of bit mapped characters Some fonts stored in the computer system are bitmapped fonts Buffer A holding area in the memory where infor mation can be stored by one program or device and then read by another For example some printers have built in memory to store text that comes from the computer faster than it can...

Страница 70: ...nd hold the left mouse button moving the mouse and releasing the button E EEPROM Electronically Erasable Programmable Read Only Memory It has an internal switch to per mit the user to erase the contents and write new contents into it by means of electrical signals Engine This is the mechanical printer developer and laser portion of the printer Emulation One printer s imitation of the functions of ...

Страница 71: ...ndscape pictures are usually wider than they are tall M Megabyte 1024 kilobytes or 1 048 576 bytes Also repre sented as MB Memory Part of the computer system that can store in formation and retrieve it later Menu A list of items either in the group windows or in your applications from which you can select These are selected by clicking on them with your mouse button Mesh This is a type of ditherin...

Страница 72: ...mmunications interface that sends or re ceives 1 bit of information at a time at a speci fied baud rate Spiral This is a type of dithering method where the dithering cells are somewhat smaller than Mesh It produces finer images for graphics and pre sentations System fonts These are fonts that are installed and used by Windows during a normal installation T Title bar The bar at the top of your wind...

Страница 73: ... voltage 51 Index Symbols 3 color 22 28 386 Enhanced 27 4 color 22 28 A A4 28 Accessories carton 1 Auto 29 B Backup copy 11 Benzine 41 Black Only 29 Black Representation 29 Brightness of tones 25 Browse 12 C Centronics parallel interface cable 9 Changing density 26 Changing gamma correction 25 Changing halftones 24 Changing halftones and image quality 24 Changing the film roll setting 35 Character...

Страница 74: ... 28 N Not Ready mode 15 O Operating the printer 17 Options button 22 Options menu 22 Organic solvents 41 Overhead projection OHP film 2 21 P Package contents 1 Paper extract rollers 44 Paper feed 57 Paper feeders 44 Paper feeding 51 54 Paper jams 54 Paper lamp 15 46 Paper pinch rollers 44 Paper tray 4 17 33 Paper tray base 1 4 Paper tray cover 1 Parallel interface cable 3 Performance 26 Photo 30 P...

Страница 75: ...4 Sensor 33 Setting up your printer 1 Setup button 21 Silicon 37 Socket protective sheet 6 Software fonts 57 Special A4 28 Specifications 57 Spiral 25 Starter 3 color film roll 1 System requirements iv 11 T Take up roll 7 Test print 8 Text 30 Thermal print head 34 Thinners 41 Top cover 7 33 Top Cover Support Bar 33 Transporting your printer 48 Troubleshooting 51 TrueType font samples 14 TrueType f...

Страница 76: ...ervice Requires a computer modem North America 1 908 572 5010 United Kingdom 44 494 461395 France 33 1 305807 Germany 49 69 780929 Netherlands 31 73 424485 Australia and New Zealand 61 2 748 2960 Customer response Star Micronics Co Ltd invites your suggestions and comments on your printer and this Users Manual Please address your correspondence to Attn Product Manager Worldwide Headquarters 536 Na...

Отзывы: