CP390i and CPF390i
Page 81
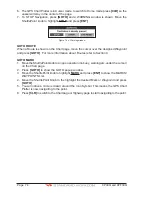
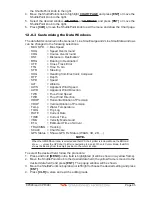
4. The SELECT ROUTE popup window will be shown.
WAAS 3D
WAAS 3D
Figure 9.6.0 - GOTO ROUTE procedure (1)
5. Move the ShuttlePoint knob to the highlight the desired Route and press
[ENT]
.
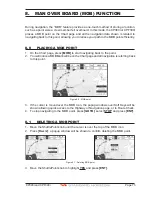
6. On the Chart page a circle with a flag is shown on the first leg of the Route and a navigation
line is shown, indicating the GPS Chart Plotter is navigating to the first Waypoint in the
Route.
WAAS 3D
Figure 9.6.0a - GOTO ROUTE procedure (2)
9.6.1 Using the ShuttlePoint knob
1. On the Chart page move the ShuttlePoint knob until the cursor reaches the starting point
of the Route.
2. Press
[GOTO]
to start following the Route.
3. Press
[CLR]
twice to revert to Home mode.
9.7
DELETING A ROUTE
To delete a Route follow the procedure below:
1. Press
[MENU]
, move the ShuttlePoint knob to highlight
USER POINTS
and press
[ENT]
.
2. Move the ShuttlePoint knob to highlight
ROUTE
and press
[ENT]
.
3. Move the ShuttlePoint knob to highlight
DELETE
and press
[ENT]
or move the
ShuttlePoint knob to the right.
4. A Warning message appears to confirm. Move the ShuttlePoint knob to highlight
YES
and press
[ENT]
. The Route has been deleted.
WARNING
An active Route (one that you are navigating to) cannot be deleted until you stop navigating to the
Route.
Содержание CP390i
Страница 1: ......
Страница 5: ...Page 6 CP390i and CPF390i ...
Страница 15: ...Page 16 CP390i and CPF390i ...
Страница 29: ...Page 30 CP390i and CPF390i ...
Страница 43: ...Page 44 CP390i and CPF390i ...
Страница 53: ...Page 54 CP390i and CPF390i ...
Страница 67: ...Page 68 CP390i and CPF390i ...
Страница 75: ...Page 76 CP390i and CPF390i ...
Страница 83: ...Page 84 CP390i and CPF390i ...
Страница 87: ...Page 88 CP390i and CPF390i ...
Страница 109: ...Page 110 CP390i and CPF390i ...
Страница 145: ...Page 146 CP390i and CPF390i Figure 17 16 C Card Restore settings ...
Страница 147: ...Page 148 CP390i and CPF390i ...
Страница 153: ...Page 154 CP390i and CPF390i ...
Страница 157: ...Page 158 CP390i and CPF390i ...
Страница 168: ......

