background image


24 

Southwestern Industries, Inc. 

TRAK

 EMX Knee Mill, Bed Mill & ProtoTRAK

 EMX CNC Retrofit Safety, Programming, Operating & Care Manual


4.2.11  Fine Feed Direction Shaft 


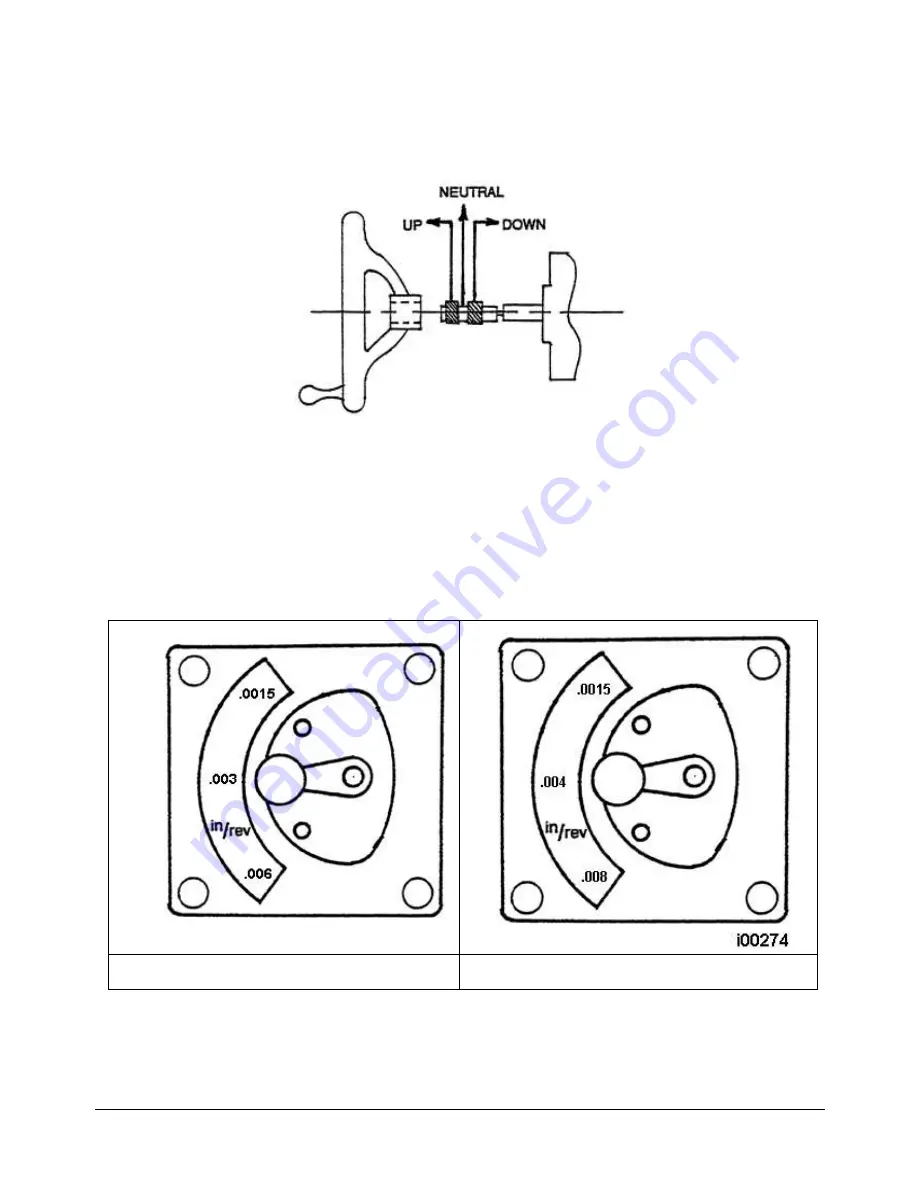
Figure 4.2.10.2 


The direction of the fine feed is set by the position of the fine feed direction shaft.  IN sets 

the direction down, OUT sets the direction up, and NEUTRAL in the middle. 
 

4.2.12 

Quill Feed Selector


Figure 4.2.10.3  Quill Feed Selector for the K2, K3 & 

DPMEX2 

Figure 4.2.10.4  Quill Feed Selector for the K4 


This selector is used to set the quill feed speed.   


i00166 

Содержание ProtoTRAK EMX

Страница 1: ...EMX TRAK DPMEX2 Non Current Models TRAK K2 EMX TRAK KEMX TRAK K4 EMX Document P N 26056 Version 021120 Southwestern Industries Inc 2615 Homestead Place Rancho Dominguez CA 90220 5610 USA T 800 421 6875 F 310 764 2668 Service Department 800 367 3165 e mail sales southwesternindustries com service southwesternindustries com web southwesternindustries com ...

Страница 2: ...en made to include all the information required for the purposes of this guide Southwestern Industries Inc assumes no responsibility for inaccuracies or omission and accepts no liability for damages resulting from the use of the information contained in this guide All brand names and products are trademarks or registered trademarks of their respective holders Southwestern Industries Inc 2615 Homes...

Страница 3: ...eed Direction Shaft 4 2 12 Quill Feed Selector 4 2 13 Feed Trip Lever 4 2 14 Fine Hand Quill Feed 4 2 15 Fine Automatic Quill Feed 5 0 Definitions Terms Concepts 5 1 ProtoTRAK EMX Axis Conventions 26 5 2 Absolute Incremental Reference 5 3 Referenced Non Referenced Data 5 4 Tool Diameter Compensation 5 5 Connective Events 5 6 Conrad 5 7 Memory Storage 6 0 Using the EMX as a DRO 6 1 Enter DRO Mode 3...

Страница 4: ... 54 11 2 Math Help Types 12 0 Program Memory and Storage 12 1 Cautions About Opening Deleting Progs 57 12 2 Program Formats and Labeling 12 3 Saving Opening Programs from Internal Storage 12 4 File Transfer and Backup 12 5 CAM G Code Files 12 5 1 G Codes Recognized by the ProtoTRAK EMX 12 5 2 M Codes Supported by the ProtoTRAK EMX 12 5 3 Valid Characters for Word Address Sequences 13 0 Service Cod...

Страница 5: ...w volume production This manual will describe the operation of all basic and optional features in the appropriate context Where optional features are discussed a note will explain in which option the particular feature is found 1 1 Models The ProtoTRAK EMX CNC is featured in the following products Model Description Retrofits PTEMX Two axis CNC retrofit to your knee mill Knee Mill TRAK KEMX Two axi...

Страница 6: ...udy the following publications for assistance in enhancing the safe use of this machine Safety Requirements For The Construction Care And Use of Drilling Milling and Boring Machines ANSI B11 8 2001 Available from The American National Standards Institute 1430 Broadway New York New York 10018 Concepts And Techniques Of Machine Safeguarding OSHA Publication Number 3067 Available from The Publication...

Страница 7: ... Operating Care Manual Safety Information Labels Used On The TRAK Knee or Bed Mills It is forbidden by OSHA regulations and by law to deface destroy or remove any of these labels Retrofit customers please see the manual that came with your machine for information about safety and information labels ...

Страница 8: ...e Bed Mill ProtoTRAK EMX CNC Retrofit Safety Programming Operating Care Manual 220 440 VOLTS Safety Information Labels Used On The ProtoTRAK EMX CNC It is forbidden by OSHA regulations and by law to deface destroy or remove any of these labels ...

Страница 9: ...asily caught in moving parts 8 Remove all tools wrenches check keys etc from the machine before you start Loose items can become dangerous flying projectiles 9 Never operate a milling machine after consuming alcoholic beverages or taking strong medication or while using non prescription drugs 10 Protect your hands Stop the machine spindle and ensure that the CNC control is in the stop mode Before ...

Страница 10: ...t the machine including the rotation of the spindle if the tool is in contact with the part 21 Check the direction or of movement of the table when using the jog or power feed 22 Don t use dull or damaged cutting tools They break easily and become airborne Inspect the sharpness of the edges and the integrity of cutting tools and their holders Use proper length for the tool 23 Large overhang on cut...

Страница 11: ...on makes arcs and any size hole easy to do with standard tools Linear Interpolation to machine lines at any angle Conrad provides automatic corner radius programming with one data input Incremental and Absolute programming can even be mixed within an event Error Messages to identify programming mistakes Fault Messages for system self diagnostics Parts Graphics display Look a single button press to...

Страница 12: ...graphics in Program mode INC ABS switches all or one axis between incremental and absolute INC SET loads incremental dimensions and general data ABS SET loads absolute dimensions and general data X Y Z selects axis for subsequent commands 0 9 inputs numeric data with floating point format Data is automatically unless key is pressed All input data is automatically rounded to the system s resolution...

Страница 13: ...switch kills all power to the ProtoTRAK s servomotors and the spindle motor when pressed on a TRAK machine The computer and pendant remain powered The Liquid Crystal Display LCD The display of the ProtoTRAK EMX is a 7 active matrix color LCD The information displayed on the LCD screen is nearly always divided into 4 sections or areas The top line or status line shows the system s current status Th...

Страница 14: ...with retrofits The USB Ports There are two USB ports use only one at a time for an optional thumb drive for program storage transferring programs between ProtoTRAKs and computers and for program backup Software updates will be through the USB port The ports are USB1 1 compliant The thumb drives listed below proved to be compatible with the ProtoTRAK EMX CNC at the time of this writing We can t gua...

Страница 15: ...tors Amplifiers The ProtoTRAK EMX servomotor and amplifier have been combined into a single integrated package on each axis The motors are rated 280 in oz maximum continuous torque that is sufficient for the heaviest cuts 3 2 4 The Z Scale In order to have the Z axis digital readout it is necessary to have the optional Z axis scale The Z readout may be activated or deactivated with Special Code 15...

Страница 16: ... Bed Mill Specifications This section describes the TRAK Knee and Bed Milling machines it does not apply to ProtoTRAK EMX retrofits Item Part Number Description 1 20819 Spindle Motor 2 26015 1 EMX Pendant 3 15616 Y Axis Handwheel Saddle 4 15616 X Axis Handwheel Table 5 20296 X or Y Motor FIGURE 3 3 1 The TRAK Knee Mill Machine Overview ...

Страница 17: ...13 Southwestern Industries Inc TRAK EMX Knee Bed Mill ProtoTRAK EMX CNC Retrofit Safety Programming Operating Care Manual FIGURE 3 3 2 The TRAK Knee Mill back view ...

Страница 18: ...rofit Safety Programming Operating Care Manual Figure 4 1 DPMEX2 Component Identification Item Part Number Description 1 20819 1 Spindle Motor 2 26015 7 EMX Pendant 2 axis 3 15616 Y Axis Handwheel Saddle 4 15616 X Axis Handwheel Table 5 21157 1 Lube Pump 6 20296 X Y or Z Motor ...

Страница 19: ...and right Quill Feeds per Rev 0 0015 0 003 0 006 0 0015 0 003 0 006 0 0015 0 003 0 006 0 0015 0 003 0 006 0 0015 0 003 0 006 Spindle Motor Power Vari speed 3HP 3HP 3HP 5HP 3HP Power Requirement Control 110 1P 10A 110V 1P 10A 110V 1P 10A 110V 1P 10A 110 1P 10A Power requirements machine 220 440V 3P 8 5 4 25A 220 440V 3P 8 5 4 25A 220 440V 3P 8 5 4 25A 220 440V 3P 14 7A 220 440V 3P 8 5 4 25A Maximum...

Страница 20: ...er of the speed changer housing This oil lubricates the speed changer shaft 3 Extend the quill fully and apply a coating of SAE 30 or 30W oil to the outside diameter of the quill Every Four Months Apply a good grade of general purpose grease through the grease fittings on the back of the head and on the left side of the head The grease lubricates the low range gear set and the feed change gears re...

Страница 21: ...ump at the beginning of each day or allowing the Auto Lube to run dry may cause severe damage to the TRAK DPMEX2 way surfaces and ballscrews 3 3 3 Electrical Cabinet TRAK Knee Bed Mills Only TRAK Knee and Bed Mills use two electrical inputs Spindle 220 or 440V power is wired into the cabinet A cord is supplied from the cabinet to a 110V power source for running the ProtoTRAK EMX CNC 3 4 Optional E...

Страница 22: ...ary Functions 3 4 6 Chip Pan TRAK Knee Mills Only The Chip Pan option is available for TRAK Knee Mills only not available for retrofits 3 4 7 Table Guard TRAK Knee Bed Mills Only The Table guard option provides an enclosed workspace mounted on the table The sliding door is switched to prevent operation of the CNC Run with the door open While it will aid in the control of chips and coolant it is no...

Страница 23: ...display The key you press will be ignored except to turn the screen on 4 1 3 Modes The functions of the ProtoTRAK EMX are divided into Modes Modes are groups of activities that belong together Organizing the ProtoTRAK EMX this way makes it easy to use because you don t have to memorize how to do things Simply select the Mode and then choose from the options The Modes of the ProtoTRAK EMX are DRO C...

Страница 24: ...ration of the TRAK Mills If you purchased your ProtoTRAK EMX CNC as a retrofit please refer to the user manual that came with your machine 4 2 1 Spindle On Off Forward Reverse The spindle switch is located on the left side of the milling head Turn the Spindle switch to left to 1 for forward clockwise spindle rotation if the Hi Lo Neutral lever is in the low position Turn the Spindle switch right t...

Страница 25: ...thwestern Industries Inc TRAK EMX Knee Mill Bed Mill ProtoTRAK EMX CNC Retrofit Safety Programming Operating Care Manual Figure 4 2 0 TRAK K3 Mill head front view Shown without the standard quill glass scale ...

Страница 26: ...ocated on the left front of the knee Clockwise rotation moves the knee up while counterclockwise rotation moves the knee down Be sure the knee is unclamped before raising or lowering 4 2 4 Spindle Brake The mechanical spindle break is activated pulling it down or pushing it up When the lever arm is in the horizontal position the brake is off CAUTION Be certain that the spindle brake is released be...

Страница 27: ... stationary 4 2 8 Operating the Quill The quill may be moved up and down through its range with the quill feed handle The quill may be locked into position by rotating the quill lock clockwise Pull the handle out slightly to rotate it freely to a new position 4 2 9 Adjusting the Quill Stop The quill stop may be adjusted by rotating the micrometer dial nut It is locked in place with the knurled nut...

Страница 28: ...re 4 2 10 2 The direction of the fine feed is set by the position of the fine feed direction shaft IN sets the direction down OUT sets the direction up and NEUTRAL in the middle 4 2 12 Quill Feed Selector Figure 4 2 10 3 Quill Feed Selector for the K2 K3 DPMEX2 Figure 4 2 10 4 Quill Feed Selector for the K4 This selector is used to set the quill feed speed i00166 ...

Страница 29: ...rip Lever stops the quill feed motion when the quill stop knob reaches the quill micrometer dial Move the lever to the left to engage or to the right to disengage 4 2 14 Fine Hand Quill Feed 1 Disengage the Power Feed Engagement Lever 2 Set the fine feed direction shaft to the neutral position 3 Rotate the Fine Feed handwheel 4 2 15 Fine Automatic Quill Feed 1 Be certain the quill lock is off 2 Se...

Страница 30: ...erence The ProtoTRAK EMX may be programmed and operated in either or in a combination of absolute or incremental dimensions An absolute reference from which all absolute dimensions are measured in DRO and program operation can be set at any point on or even off the workpiece To help understand the difference between absolute and incremental position consider the following example 5 2 1 Some Rules ...

Страница 31: ...eferenced and Non Referenced Data Data is always loaded into the ProtoTRAK EMX by using the INC SET or ABS SET key X Y Z positions are referenced data In entering any X Y or Z position data you must note whether it is an incremental or absolute dimension and enter it accordingly All other information non referenced data such as tool diameter feedrate etc is not a position and may therefore be load...

Страница 32: ...plex calculations For this figure you simply program a Mill event from X1 Y1 to X2 Y2 with tool right offset and another Mill event from X2 Y2 to X3 Y3 also with tool right offset During the programming of the first Mill event the system will prompt for Conrad at which time you input the numerical value of the tangentially connecting radius r k The system will calculate the tangent points T1 and T...

Страница 33: ...and 341 Virus Protection As a device ProtoTRAK CNCs are not generally susceptible to viral infections The part programs they run are non executable text files You can further assure protection by avoiding e mail programs and web browser programs loaded onto the ProtoTRAK and by using a router with a firewall An anti virus program is not necessary since the virus risk is low and is not recommended ...

Страница 34: ... EMX as a DRO The ProtoTRAK EMX operates in DRO Mode as a sophisticated digital readout with jog and power feed capability 6 1 Enter DRO Mode Press MODE select DRO soft key The screen will look as follows on the 2 axis model Note the RETURN soft key is lit when in Jog Press MODE select DRO soft key The screen will look as follows on the 2 axis model ...

Страница 35: ...e feedrate box will read 100 indicating the table will move in the X or Y positive direction at 100 inches per minute A message will flash to warn you that JOG is activated 3 Press to reverse direction The feedrate box will change to 100 Press again to go back to JOG the is not shown 4 Press the down arrow key to the right of the LCD screen to reduce the jog speed in 10 percent increments The feed...

Страница 36: ...a detailed explanation of Service Codes 6 7 Teach Teach gives you the ability to enter X and Y dimensions into a program It can be a useful way of entering a few manual moves for operations like clearing out excess material or remembering a few hole locations The process of using Teach is in two parts The first part takes place in the DRO Mode This is where you start the Teach program establish th...

Страница 37: ...w MILL event MILL CONT the last point of the current Mill event but the beginning of the next Mill event You may enter successive Mill events by pressing the MILL CONT key Pressing either of the above softkeys will cause the event counter to increase by one At any time you may exit the Teach screen and return to the DRO screen The events you have defined with their X and Y dimensions are finished ...

Страница 38: ...ssume the program name is 0 The ProtoTRAK EMX automatically holds all of the completed events as you program in current memory Choices at the beginning of Program Mode GO TO BEGIN puts Event 0 on the left side of the screen and the first event on the right side GO TO END puts the last programmed event on the left side of the screen and the next event to be programmed on the right side GO TO enter ...

Страница 39: ...e programmed events INSERT EVENT use this to insert a new event into the program This new event will take the place of the one that was on the right side of the screen when you pressed the INSERT EVENT key That previous event and all the events that follow increase their event number by one For example if you started with a program of four events if you were to press the INSERT EVENT key while Eve...

Страница 40: ...d you program and end at the ending position See the discussion on Continue below for the variation in tool motion if the event is connective 7 3 3 Arc Event This is any part of a circle Like the Mill Event the prompts you answer will allow the ProtoTRAK EMX to calculate the complete tool path When the program is run at an Arc Event the ProtoTRAK EMX will rapid to the beginning position prompt you...

Страница 41: ...s can be useful for drilling a series of evenly spaced holes duplicating some machined shapes or even repeating an entire program with an offset for a second fixture Repeat events may be nested That is you can repeat a repeat event of a repeat event of some programmed event s One new tool number may be assigned for each Repeat Event Repeat events may be nested up to five deep ROTATE is used for po...

Страница 42: ... axis mode 2 axis mode on this machine is the same as what is listed in section 7 3 7 4 1 Posn Drill When you press the POSN DRILL key you choose between the following Posn a single position Drill a single drill event Bolt Hole a series of positions spaced evenly around a circle Pause this event allows you to pause the program at a certain event When program the Z will move up to Z retract The use...

Страница 43: ...e last event enter 0 by pressing the INC SET or ABS SET key without a number value 2 The corner radius in a rectangular pocket or PROFILE The radius is tangential Continue to tell the ProtoTRAK EMX if the event is continuous to the next event s to be programmed This saves inputs needed to define a profile If the event is programmed with a Yes for continue then X begin Y begin Tool Offset Feedrate ...

Страница 44: ...eck will remove more material than the next peck and so on Z Feedrate this is the feedrate the Z axis will move down at Z Rapid Offset this is the Z rapid offset you want to apply to your repeat event If you program 0 INC the Z rapid will be the same as your previous event Z Offset this is the Z offset you wish to apply from your previous Z end or Z depth If you program 0 INC the control will cut ...

Страница 45: ...data when the event is programmed 7 8 Incremental Reference Position When X and Y data for the beginning position of any event are input as incremental data this increment must be measured from some known point in the previous event Following are the positions for each event type from which the incremental moves are made in the subsequent event POSITION DRILL X and Y programmed BOLT HOLE X CENTER ...

Страница 46: ...prompt appears in the conversation line simply press the LOOK hard key The programmed events are automatically sized so that everything fits on the screen To return to the programming press the RETURN softkey The part graphics are useful for checking what you have programmed so far Certain kinds of programming mistakes are not caught by the graphics These will surface when running the program 7 11...

Страница 47: ... as incremental moves from the previous hole We could have also programmed using X 1 75 ABS SET and Y 2 0 ABS SET The INC SET entry for Y was taken as a 0 incremental move you do not have to press 0 The INC SET for the Tool and Tool Diameter were taken as use the data from the previous event 7 Repeat the holes to drill to size Prompt You push these keys SELECT EVENT REPEAT First Event 1 INC or ABS...

Страница 48: ...t to use a drill to open up a hole at the beginning of the slot for your milling tool To do that you can either program a position event for the drill or when the ProtoTRAK EMX positions at the beginning of the slot center drill and drill first then put in your mill If you have a lot of parts to do it is worth your while to add the drill into the program but probably not if you only have one or tw...

Страница 49: ...e and press SET 5 Program the first hole Prompt You push these keys SELECT EVENT POSN DRILL SELECT DRILL DRILL or BORE 1 SET X 75 ABS SET Y 2 ABS SET Z Rapid 1 ABS SET Z End 1 ABS SET of Pecks 3 SET Z Feedrate 10 SET Tool 1 INC or ABS SET Tool Dia 1 INC or ABS SET Notes For the non referenced data either SET key will do This first tool is a center drill For the Drill Event the program will run wit...

Страница 50: ...t you have programmed Press the LOOK key You will see two marks on opposite sides of the screen to show where the holes have been programmed Press RETURN to get back to the programming 12 Program the slot Prompt You push these keys SELECT EVENT MILL X Begin 4 25 ABS SET or 2 5 INC SET Y Begin 8 ABS SET Z Rapid 1 ABS SET Z End 55 ABS SET X End INC SET Y End 1 3 INC SET Conrad INC SET Tool Offset 0 ...

Страница 51: ...up key to the right of the LCD screen and the program will move back one event From that point you will have the following softkey options INSERT EVENT allows you to insert a new event between the two shown on the left and right side of the screen When you press INSERT EVENT the screen will revert to the Select Event screen and you may program the new added event as you would any other Subsequent ...

Страница 52: ...rograms in current memory may be changed and run with the changes but unless they are saved again the changes made will be lost when the program is cleared from current memory If you intend to keep the changes made to your program it is a good practice to store the program occasionally in case a power loss causes the program to be ejected from current memory 8 7 Erasing an Entire Program To erase ...

Страница 53: ...e have combined SETUP and RUN modes together The following is a screen shot of this mode See section 10 2 for an explanation of START and START at EVENT 9 1 TOOL TABLE The tool table is where you set your Z retract set the lengths of your tools and also where you can set Z modifiers for each tool The following example has 4 tools in the program The tool table looks as follows ...

Страница 54: ...ther tools off of the same surface The first tool will not show a number when you touch it off but the rest of the tools will show how much longer or shorter they are relative to the first tool The following figure shows 3 different tools that were touched off The 1 1950 offset means this tool is this much longer than your base tool The 0 2367 offsets means this tool is shorter by this amount It s...

Страница 55: ...the user is using the STEP feature to move through the program STEP allows the user to move step by step through the program XY provides a XY view of the part 3D provides a 3D view of the part 9 3 STEP UP STEP DOWN DPMEX2 only The STEP UP STEP DOWN feature is used only on the DPMEX2 machine when running in 2 axis mode This feature allows the user to move the head up and down 1 with each press This...

Страница 56: ... tool in the spindle is the tool that the control thinks is in the spindle The tool the control thinks is in the spindle can be found in the status line 10 2 Starting After setting up in the DRO Mode go into the Run Mode You will see this screen The part number appears in the status line To start the program select between START and START EVENT START starts running the program from the beginning S...

Страница 57: ...ion as the first part you do not need to relocate the absolute 0 and restart Instead press the NEXT PART softkey when the conversation line states Run Over and the system will proceed directly to Event 1 10 5 Stop At any time pressing the STOP key will halt the program This freezes the program at that point To continue press the GO key 10 6 Feedrate Override The run feedrate may be changed at any ...

Страница 58: ...ulate points of intersection centers of arcs trig functions square roots etc 11 1 Procedure To enter the Math Help Mode press MODE and select the MATH HELP soft key The screen will show If you already know the math help type you want see Section 11 2 press the TYPE softkey and enter the number and SET If you do not know the type select from A through E using the softkeys If for example you wish to...

Страница 59: ...gram an event When all of the data is entered the solution or solutions if there are more than one will be shown on the left side of the information area There are often multiple solutions for geometry problems For example in the Type 13 example above a line will often intersect an arc or circle in two places In these cases all possible solutions will be calculated and displayed In most cases a ca...

Страница 60: ...not cross arc centers center of each arc radius of each arc 17 Intersection of a line tangent to an arc one point on the line center of the arc radius of the arc 18 Intersection of a line tangent to two arcs line crosses arc centers center of each arc radius of each arc 19 Center and points of intersection of an arc tangent to two arcs 2 of the arc centers all 3 radii 20 Center of an arc 2 points ...

Страница 61: ...program memory When this happens your existing current program is erased Therefore if your current program is one you want to keep be certain to store it before you retrieve another program Second to store a program it must have a part number so that the ProtoTRAK EMX can find it when you want to open it However no two programs can have the same part number how would the system decide which to ret...

Страница 62: ...EN will write a program from the internal storage to current memory First input the part number and then press the OPEN key Then you will have the option of either opening as an MX2 MX3 or CAM file type For more on CAM files and G Code see section 12 5 SAVE will write the program in current memory to the internal storage You will see the program added to the list in the information area after it i...

Страница 63: ...owing 1 Plug the Thumb Drive into the ProtoTRAK EMX USB port 2 Go to the DRO Mode 3 Press Serv Codes 4 Under group A Software Service Codes select code 340 Copy Files from Control to USB Drive 5 The ProtoTRAK EMX will place a folder on the thumb drive named Programs if one doesn t exist already and write the programs saved in the internal storage of the ProtoTRAK EMX to the USB Thumb Drive The pro...

Страница 64: ...20 input in inch G21 input in mm G40 cutter compensation cancel for SWI it means center G41 cutter compensation left G42 cutter compensation right G80 cancel canned cycle G81 drill canned cycle G82 drill cycle counter bore G83 drill cycle peck drill G85 drill cycle bore G90 absolute G91 incremental G98 drill cycle return to init point G99 drill cycle return to r plane 12 5 2 M Codes Supported by t...

Страница 65: ...t the factory 15 Activate or Deactivate Z readout The Z axis readout should be activated if you installed the optional Z axis scale This may be added to your system at any time and the Z readout activated by this code 22 Turn on simulation For demo purposes the ProtoTRAK EMX may be run in simulation mode where the control operates normally but does not send commands to the motors If you use this c...

Страница 66: ...ation and Service Manual 125 Display calibration factors See SWI Publication No 26109 ProtoTRAK EMX Installation and Service Manual 127 Single encoder backlash calibration Used to calculate a backlash value for entering in Code 128 See SWI Publication No 26109 ProtoTRAK EMX Installation and Service Manual 128 Enter backlash value Used to enter the backlash value calculated using Code 127 See SWI P...

Страница 67: ...ours and you ll be making more parts with less effort in no time We assume you know how to run a knee mill know how to read a blueprint and have at least a little experience inputting information into a box like a digital readout or a computer We told you this would be easy 14 1 Working with Definitions Terms and Conventions This first section contains some paper and pencil exercises to help get y...

Страница 68: ...ensions can be plotted with the Cartesian Coordinate System Tip if you have any problem with this part take this manual out to your machine and put the drawing under the spindle so that the 0 0 point is lined up with the center of the spindle Zero out the DRO on your display and crank the table different directions Watch the DRO measurement count up and down turning from positive to negative as yo...

Страница 69: ...ference point is the 0 0 we call that an Absolute Reference That means that the number you put in is measured from 0 0 There is another way to define a point and that is with Incremental dimensions Incremental dimensions are simply dimensions measured from the previous point Consider the print below If we say the bottom left corner is absolute zero ABS 0 then the dimensions are absolute or increme...

Страница 70: ...ne of the tool Let s say you programmed the square shape below shown as the solid line The ProtoTRAK has no way of knowing whether you want to cut a pocket out of the material so you want your tool to follow Path A or if you are squaring up a block so you want your tool to follow Path B This is what tool cutter compensation or cutter comp is about Once again it is easier to think about these conce...

Страница 71: ...xamples of tool left are Tool center means no compensation either right or left That is the centerline of the tool will be moved directly over the points or line that is programmed Quiz 4 For the part tool and direction shown indicate whether the compensation is Right Left or Center Check your answers at the back of this manual ...

Страница 72: ...se you can program the above part by programming a straight line from A to C tell the control when it asks that you have a CONRAD equal to R and then program another straight line from C to E The ProtoTRAK will automatically blend the connecting radius CONRAD R between the two straight lines with no additional input For Rectangular Pockets or Profiles CONRAD stands for corner radius You may input ...

Страница 73: ...inc 0 inc From E to F 1 50 0 From D to F 3 00 0 From L to B 0 4 00 From G to M 2 00 0 From H to M 2 00 1 50 From M to H 2 00 1 50 From K to K 0 0 Quiz 4 A Right B Left C Left D Right E Left F Left G Right H Right I Left X Y A 0 abs 0 abs B 0 2 00 C 6 00 2 00 D 2 50 1 00 E 4 00 1 00 F 5 50 1 00 G 3 00 1 50 H 3 00 0 J 2 00 0 K 6 00 2 00 L 0 2 00 M 5 00 1 50 ...

Страница 74: ...on what you re doing In DRO operation it shows the axis readout in Programming it shows the program when you press LOOK in programming it shows a picture of your part etc The CONVERSATION line is below the information area This is where you input all the data and this is where the ProtoTRAK will prompt you for the information or activity that it wants Keyboard Organization The keyboard is made up ...

Страница 75: ...toTRAK EMX CNC Retrofit Safety Programming Operating Care Manual 71 Modes Press the MODE function key The screen will show This is how you change from one mode of operation to another If you ever get confused just press MODE to get back to this beginning screen ...

Страница 76: ... Manually crank the X handwheel so that the table moves left Move the table so that the readout is X 1 0000 INC 4 Manually crank the Y handwheel so that the saddle moves away from you Move the saddle so that the readout is Y 1 0000 INC 5 Press X INC SET and Y INC SET to reset the X and Y incremental readout to zero 6 Move X another inch to 1 0000 INC and Y another inch to 1 0000 INC 7 Press the IN...

Страница 77: ... The table now moves right Release 7 Press and hold Y The saddle now moves away Release 8 Press the key Notice the JOG 100 ipm changes to JOG 90 ipm Press the key several more times 9 Press and hold X Notice the table moves slower Release 10 Press the key several times until you are back to JOG 100 ipm 11 Press number key 9 Notice that the conversation line now says FEED RATE 9 12 Press either X o...

Страница 78: ...If you want to make this part you will need the following 1 A vise if the vise does not have step jaws you will also need parallels 2 A 1 4 drill 3 A 3 8 2 flute bottom cutting end mill 4 An edge finder or wiggler 5 A piece of 6 x 4 x 250 aluminum Program Strategy Before programming a part take a moment to figure out what you want to do and what order you want to do it The strategy for programming...

Страница 79: ...Number The conversation display says Program Name You input 123 SET INC SET or ABS SET Event 1 The First Hole Conversation says Select Event You press POSN DRILL soft key Now press ONE to select the single hole The right side of the information area shows that Event 1 is a Position Drill and it lists what data is required But keep your eye on the conversation line Conversation says X You press 2 7...

Страница 80: ...rom 3 00 o clock to the first hole you want to drill We could have input 0 and then we would drill the right most hole first Tool You press SET We re still using tool number 1 but notice we didn t press the 1 If you don t input a number the ProtoTRAK assumes the last tool is used again Tool Dia You press SET Event 4 The Upper Left Diagonal Select Event You press MILL soft key for Event 4 X Begin Y...

Страница 81: ...ter You input 5 ABS SET or we could have input 0 INC SET since the X Center is the same as the X End Y Center You input 5 ABS SET CONRAD You input 0 SET Direction You input 2 SET because we are milling in a counterclockwise direction Tool Offset You input 1 SET because looking from beginning towards end the direction of the tool cut the tool is to the right of the work piece Think about this to be...

Страница 82: ...or Event 7 Select You press RECT PROFILE soft key for the rectangular profile X1 You press 3 75 ABS SET which is the distance to corner number 1 which we will say is the lower left corner of the profile Y1 You press 1 75 ABS SET X 3 You press 1 5 INC SET because corner number 3 is the diagonal corner and it is 1 5 inches in the plus X direction from X1 Y3 You press 1 25 INC SET CONRAD You press 3 ...

Страница 83: ... lost To prevent this we will save it in the system s internal storage where it will stay even without power until you intentionally erase it Do the following 1 Press MODE and select the PROG IN OUT soft key 2 The conversation line says Part Number 123 If you wanted to change the part number you could just put in a new one at this time You press SAVE soft key and wait a few seconds until it s comp...

Страница 84: ...ess GO The tool will move actually the table moves to the first hole in the row Set Z You move the quill and drill the hole After every drilling operation always make sure the tool is up to clear the work piece Press GO and drill the remaining holes and holes in the bolt hole pattern each time the conversation line says Set Z Mill the Upper Left Diagonal When the last hole is drilled the conversat...

Страница 85: ...ocket is hogged out a little undersized the cutter will automatically make the program 020 finish cut Check Z You should raise the tool Mill the Through Rectangle Press GO The tool will rapid to the beginning point to machine the rectangular profile thru Set Z Move the quill down so that the tool is slightly below the bottom of the plate Lock the quill Press GO The tool will move at 5 ipm if you l...

Страница 86: ...ram absolute zero The event numbers are shown in the circles Programming Aspects Shown on This Part Bolt hole using 2 different tools Profile milling Math Help to calculate arc and line intersection points Program Notes Event 1 spot drills the bolt hole pattern and Event 2 drills the hole using Tool 2 Event 1 Bolt Hole Holes X Center Y Center Radius Angle Tool 6 0 abs 0 abs 0 875 0 1 Tool 1 is a s...

Страница 87: ...end mill Tool Dia 25 Continue Yes Event 4 Mill X End Y End Conrad Continue 1 1456 abs 0 inc 0 187 Yes Use Math Help Type 13 to find the intersection of the 2 parallel lines and the arc Event 5 Arc X End Y End X Center Y Center Conrad Direction Continue 0 inc 0 5 abs 0 abs 0 abs 0 187 CCW Yes Event 6 Mill X End Y End Conrad Continue 3 0 abs 0 inc 0 125 Yes Event 7 Mill X End Y End Conrad Continue 0...

Страница 88: ...4 5 6 7 3 00 15 R 1 375 B C Program 2 2 Axis Program I00375 This sample part was programmed using the center of the circular pocket Point A as the program absolute zero The event numbers are shown in the circles Programming Aspects Shown on This Part Bolt hole using 2 different tools Circular Pocket Profile milling Math Help to calculate arc and line tangency points ...

Страница 89: ...ll Event 2 Repeat First Event Last Event X Offset Y Offset No Of Repeats Tool 1 1 0 inc 0 inc 1 2 Tool 2 is a 1 4 drill Event 3 mills the circular pocket Event 3 Circle Pocket X Center Y Center Radius Direction Fin Cut Feed Rate Fin Feed Rate Tool Tool Dia 0 abs 0 abs 1 CW 0 005 10 5 3 25 Tool 3 is a 1 2 end mill Events 4 through 7 mill the profile of the part Event 4 Mill X Begin Y Begin X End Y ...

Страница 90: ... abs 0 5990 abs 0 Yes Use Math Help Type 17 to find the tangency point of the line to the arc See math help section Event 6 Arc X End Y End X Center Y Center Conrad Direction Continue 1 6445 abs 0 inc 0 abs 0 abs 0 CCW Yes X End is the same value but positive because of the part s symmetry about the center point Event 7 Mill X End Y End Conrad Continue 0 77 abs 3 0 abs 0 No ...

Страница 91: ...he program absolute zero The event numbers are shown in the circles Programming Aspects Shown on This Part Profile milling Math Help to calculate arc and line tangency points Program Notes Events 1 through 6 mill the profile of the part Event 1 Mill X Begin Y Begin X End Y End Conrad Tool Offset Feed Rate Tool Tool Dia Continue 1 25 abs 0 5 abs 0 inc 0 abs 0 Right 10 1 5 Yes The first mill event w...

Страница 92: ...W Yes Use Math Help Type 16 to solve for intersection points See Math Help section Event 3 Mill X End Y End Conrad Continue 3 3702 abs 0 6133 abs 0 Yes Event 4 Arc X End Y End X Center Y Center Conrad Direction Continue 0 inc 0 6133 abs 3 25 abs 0 abs 0 CCW Yes Event 5 Mill X End Y End Conrad Continue 0 2404 abs 1 2267 abs 0 Yes Event 6 Arc X End Y End X Center Y Center Conrad Direction Continue 1...

Страница 93: ...20 R 2 59 1 15 98 2 61 R 38 2 59 R 25 TYP 38 85 2 0 R 6237 1 12 2 3 4 5 6 7 8 9 10 11 B A Program 4 2 Axis Program I00374 This sample part was programmed using the center arc Point A as the program absolute zero The event numbers are shown in the circles Programming Aspects Shown on This Part Profile milling Math Help to calculate arc and line intersection points ...

Страница 94: ...nc 0 125 Right 10 Yes 1 5 Tool 1 is a end mill The first event starts at point B Event 2 Mill X End Y End Conrad Continue 0 inc 0 abs 0 Yes Event 3 Arc X End Y End X Center Y Center Conrad Direction Continue 0 875 abs 0 inc 0 abs 0 abs 0 CW Yes Event 4 Mill X End Y End Conrad Continue 0 inc 0 56 abs 0 125 Yes Event 5 Mill X End Y End Conrad Continue 2 59 abs 0 inc 0 38 Yes Event 6 Mill X End Y End...

Страница 95: ...g right triangle math help or math help type 25 Event 9 Arc X End Y End X Center Y Center Conrad Direction Continue 2 0701 abs 1 5566 abs 0 abs 0 abs 0 25 CCW Yes Use Math Help Type 15 to find the intersection of arc s 9 and 10 Event 10 Arc X End Y End X Center Y Center Conrad Direction Continue 2 59 abs 0 49 abs 2 59 abs 1 15 abs 0 25 CW Yes Use Math Help Type 13 to find the intersection of Event...

Страница 96: ...n on This Part Profile milling Math Help to calculate arc and line intersection points Program Notes Events 1 through 3 mill the profile of the part Event 1 Mill X Begin Y Begin X End Y End Conrad Tool Offset Feed Rate Tool Tool Dia Continue 0 abs 0 abs 3 25 abs 0 inc 0 Right 10 1 5 Yes Tool 1 is a end mill Event 2 Mill X End Y End Conrad Continue 2 0313 abs 0 9758 abs 0 Yes Use Math Help Type 17 ...

Страница 97: ...is sample part was programmed using the center of the rectangular pocket Point A as the program absolute zero Before running the program enter Setup Run mode input the necessary tool data set the base for each tool set a Z retract position and visually check the program using tool path In DRO mode set the absolute zero locations Programming Aspects Shown On This Part Drill using 2 different tools ...

Страница 98: ... Tool 1 is a spot drill Event 2 Bolt Hole Drill 1 Bore 2 Holes X Center Y Center Z Rapid Z End Radius Angle Pecks Z Feed Rate Tool Tool Dia 1 8 0 abs 0 abs 0 02 abs 0 52 abs 1 25 0 4 10 1 0 25 Tool 2 is a 1 4 drill Event 3 mills out the counterbore Event 3 Circle Pocket X Center Y Center Z Rapid Z End Radius Direction of Passes Entry Mode Fin Cut Z Feed Rate XYZ Feed Rate Finish Feed Rate Tool Too...

Страница 99: ...nrad Direction of Passes Entry Mode Fin Cut Z Feed Rate XYZ Feed Rate Finish Feed Rate Tool Tool Dia 0 625 abs 0 375 abs 0 625 abs 0 375 abs 0 02 abs 0 51 abs 0 062 CW 2 2 0 005 10 10 8 3 0 25 Event 6 Rectangular Pocket X1 Y1 X3 Y3 Z Rapid Z End Conrad Direction of Passes Entry Mode Fin Cut Z Feed Rate XYZ Feed Rate Finish Feed Rate Tool Tool Dia 0 125 abs 0 25 abs 0 125 abs 0 625 abs 0 02 abs 0 2...

Страница 100: ...ad Direction of Passes Tool Offset Fin Cut Z Feed Rate XYZ Feed Rate Finish Feed Rate Tool Tool Dia 0 abs 3 25 abs 3 25 abs 05 abs 51 abs 0 CW 2 Left 0 005 10 10 8 5 0 5 Program 7 2 Axis Program insert I00340 This sample part was programmed using the center pocket Point A as the program absolute zero Before running the program enter Setup mode input the necessary tool data set the base for each to...

Страница 101: ...s 0 05 abs 0 55 abs 3 3 1 0 5 Tool 1 is a 1 2 drill Use Subroutine Repeat if you want to spot drill or pilot drill before drilling out to the final diameter Event 2 Bolt Hole Drill 1 Bore 2 Holes X Center Y Center Z Rapid Z End Radius Angle Pecks Z Feed Rate Tool Tool Dia 1 4 0 abs 0 abs 0 05 abs 0 55 abs 1 625 0 3 3 2 0 25 Tool 2 is a 1 4 drill Events 3 and 4 mill out the counterbore Event 3 Circ...

Страница 102: ... Center Y Center Z Rapid Z End Radius Direction of Passes Entry Mode Fin Cut Z Feed Rate XYZ Feed Rate Finish Feed Rate Tool Tool Dia 0 abs 0 abs 0 05 0 55 abs 1 3 CCW 2 2 0 010 3 10 10 4 0 5 Tool 4 is a 1 2 end mill Events 6 through 15 mill the profile Event 6 Mill X Begin Y Begin Z Rapid Z Depth X End Y End Conrad Tool Offset Z Feed Rate XYZ Feed Rate Tool Tool Dia 2 0 abs 1 0 abs 0 05 abs 0 55 ...

Страница 103: ...Continue 1 4203 abs 2 2891 abs 0 1 Event 9 Arc X End Y End Z End X Center Y Center Conrad Direction Continue 1 06 abs 2 56 abs 0 inc 1 06 abs 2 185 abs 0 2 1 Use Math Help Type 16 to find the intersection points of Events 9 and 10 Event 10 Mill X End Y End Conrad Continue 1 06 abs 2 56 abs 0 1 Event 11 Arc X End Y End Z End X Center Y Center Conrad Direction Continue 1 3520 abs 2 4203 abs 0 inc 1 ...

Страница 104: ...d X Center Y Center Conrad Direction Continue 2 8438 abs 0 5222 abs 0 inc 2 5 abs 0 abs 0 2 1 Use Math Help Type 16 to find the intersection points of Events 13 and 14 Event 14 Mill X End Y End Conrad Continue 1 1 abs 1 6703 abs 0 1 Event 15 Arc X End Y End Z End X Center Y Center Conrad Direction Continue 2 0 abs 0 abs 0 inc 0 abs 0 abs 0 2 2 ...

Страница 105: ...lar purpose and of any other obligations or liability on the part of SWI or any producing entity if different Warranty repairs exchanges do not cover incidental costs such as installation labor freight etc SWI is not responsible for consequential damages from use or misuse of any of its products TRAK products are precision mechanical electromechanical electronic systems and must be given the reaso...

Отзывы: