background image

Procedimientos iniciales

5

-ES

ES

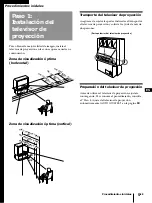
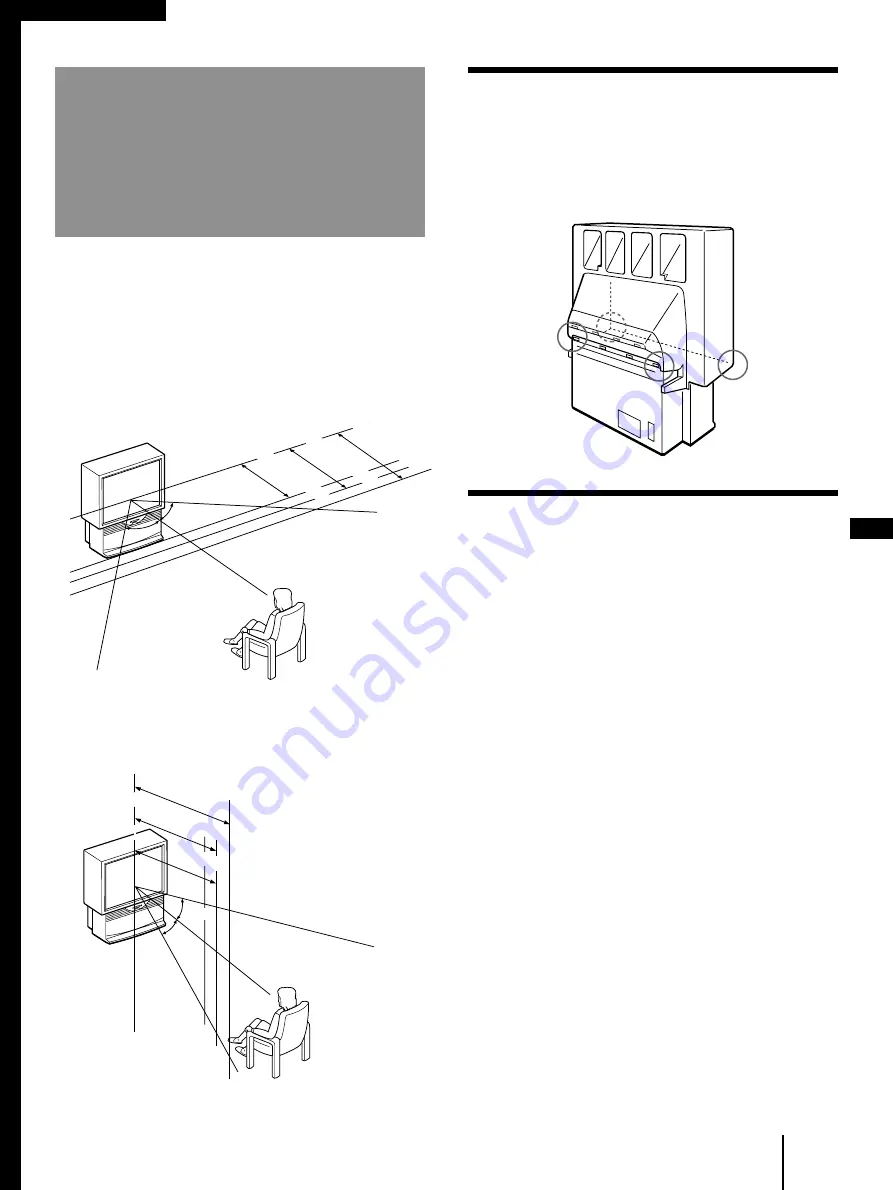
Para obtener la mejor calidad de imagen, instale el
televisor de proyección en las zonas que se muestran a
continuación:

Zona de visualización óptima
(horizontal)

Zona de visualización óptima (vertical)

27,5°

mín. 2,1m

 (aprox. 7 pies)

53"

mín. 1,8m

 (aprox. 6 pies)

46"

27,5°

mín. 1,5m (aprox. 5 pies)

41"

mín. 1,5m

 (aprox. 5 pies)

41"

75°

75°

75°

m

ín. 2,1m (aprox. 7 pies)

53"

m

ín. 1,8m (aprox. 6 pies)

46"

m

ín. 1,5m (aprox. 5 pies)

41"

Transporte del televisor de proyección

Asegúrese de sujetar las partes indicadas al transportar
el televisor de proyección y solicite la ayuda de más de
dos personas.

Preparación del televisor de proyección

Antes de utilizar el televisor de proyección, ajuste la
convergencia. Para conocer el procedimiento, consulte
el “Paso 4: Ajuste del televisor de proyección
automáticamente (AUTO AJUSTES)” en la página 

18

.

Procedimientos iniciales

Paso 1:
Instalación del
televisor de
proyección

(Parte posterior del televisor de proyección)

Содержание KP-41T25 - 41" Color Rear Video Projector

Страница 1: ...Operating Instructions Manual de instrucciones 1996 by Sony Corporation 3 856 233 11 1 EN Color Rear Video Projector ES KP 41T25 KP 46S17 KP 53S17 ...

Страница 2: ... the user is encouraged to try to correct the interference by one or more of the following measures Reorient or relocate the receiving antennas Increase the separation between the equipment and receiver Connect the equipment into an outlet on a circuit different from that to which the receiver is connected Consult the dealer or an experienced radio TV technician for help You are cautioned that any...

Страница 3: ... Adjusting sound AUDIO 30 Listening to surround sound SURROUND 30 Selecting stereo or bilingual programs MTS 31 Setting the speaker switch SPEAKER 31 Setting audio out AUDIO OUT 32 Setting daylight saving time DAYLIGHT SAVING 33 Setting the clock CURRENT TIME SET 34 Setting the timer to turn the projection TV on and off ON OFF TIMER 35 Blocking out a channel CHANNEL BLOCK 36 Customizing the channe...

Страница 4: ...ly one way If you are unable to insert the plug fully into the outlet contact your dealer Should any liquid or solid object fall into the cabinet unplug the projection TV and have it checked by qualified personnel before operating it further Unplug the projection TV from the wall outlet if you are not going to use it for several days or more To disconnect the cord pull it out by the plug Never pul...

Страница 5: ... when carrying the projection TV and to use more than two people Preparing for your projection TV Before you use your projection TV adjust convergence For the procedure see Step 4 Setting up the projection TV automatically AUTO SET UP on page 18 Getting Started Step 1 Installing the projection TV For the best picture quality install the projection TV within the areas shown below Optimum viewing ar...

Страница 6: ...iate connector If you use the U V mixer snow and noise may appear in the picture when viewing cable TV channels over 37 W 1 C VHF and UHF 300 ohm twin lead cable Although you can use either an indoor antenna or outdoor antenna with your projection TV we recommend connecting to an outdoor antenna or a cable TV system for improved picture quality To an antenna Connect your antenna cable to the VHF U...

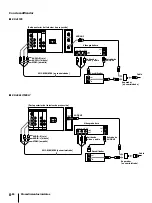
Страница 7: ...ther program Watch two TV programs at one time using a window picture Picture in Picture Do not connect the cable to the S VIDEO connector on the projection TV VHF UHF CONTROL S IN OUT VIDEO AUDIO L R MONO VIDEO 1 VIDEO 3 S VIDEO IN OUT MONITOR AUDIO VAR FIX VIDEO 1 VIDEO 3 MONITOR AUDIO VAR FIX IN OUT AUDIO VIDEO LINE OUT OUT IN VHF UHF VIDEO yellow AUDIO L white AUDIO R red VMC 810S 820S not sup...

Страница 8: ... outputs VHF UHF input VCR Cable box Cable Splitter not supplied Rear of projection TV AUDIO R red AUDIO L white VIDEO yellow AUX VHF UHF TO CONVERTER CONTROL S IN OUT VIDEO AUDIO L R MONO VIDEO 1 VIDEO 3 S VIDEO IN OUT MONITOR AUDIO VAR FIX VIDEO 1 VIDEO 3 MONITOR AUDIO VAR FIX IN OUT AUDIO VIDEO LINE OUT OUT IN OUT IN VMC 810S 820S not supplied Video and audio outputs VHF UHF input VCR Cable box...

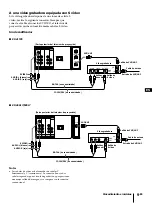
Страница 9: ...ite AUDIO R red RK 74A not supplied YC 15V 30V not supplied VCR VHF UHF input VHF UHF output Rear of projection TV Note Video signals are composed of Y luminance and C chroma signals The S connection sends the two signals separately preventing degradation and gives better picture quality compared to conventional connection Antenna cable AUX VHF UHF TO CONVERTER CONTROL S IN OUT VIDEO AUDIO L R MON...

Страница 10: ...outputs RK 74A not supplied Cable box VCR Splitter not supplied Cable AUDIO R red AUDIO L white S VIDEO Rear of projection TV AUX VHF UHF TO CONVERTER OUT IN CONTROL S IN OUT VIDEO AUDIO L R MONO VIDEO 1 VIDEO 3 S VIDEO IN OUT MONITOR AUDIO VAR FIX VIDEO 1 VIDEO 3 MONITOR AUDIO VAR FIX IN OUT S VIDEO LINE OUT AUDIO VIDEO OUT IN Rear of projection TV VHF UHF AUDIO R red AUDIO L white S VIDEO YC 15V...

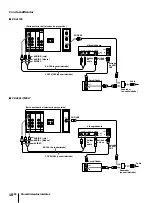
Страница 11: ...IO VAR FIX IN OUT VHF UHF S VIDEO OUT AUDIO VIDEO LINE OUT IN Rear of projection TV Antenna Cable or cable box Video output Audio outputs DBS receiver VHF UHF SATELLITE ANTENNA IN VMC 810S 820S not supplied VIDEO yellow AUDIO L white AUDIO R red VHF UHF CONTROL S IN OUT VIDEO AUDIO L R MONO VIDEO 1 VIDEO 3 S VIDEO IN OUT MONITOR AUDIO VAR FIX VIDEO 1 VIDEO 3 MONITOR AUDIO VAR FIX IN OUT VHF UHF S ...

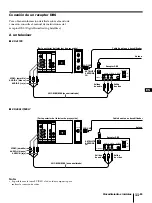
Страница 12: ...OUT VHF UHF S VIDEO OUT AUDIO VIDEO LINE IN LINE OUT IN To a TV and VCR p KP 41T25 p KP 46S17 53S17 Audio inputs Rear of projection TV AUDIO R red AUDIO L white VIDEO yellow VMC 810S 820S not supplied SATELLITE ANTENNA IN Antenna DBS receiver Audio outputs Video output Video input VHF UHF IN VHF UHF OUT Audio outputs Video output F type cable not supplied VCR to video input Rear of projection TV V...

Страница 13: ...rder connect the audio output of the camcorder to AUDIO L MONO of VIDEO 2 INPUT on the projection TV Connecting a camcorder SET UP TV VIDEO VOLUME CHANNEL POWER TIMER STAND BY STEREO PIP VIDEO 2 INPUT VIDEO L MONO AUDIO R VMC 810S 820S not supplied AUDIO R red AUDIO L white Front of projection TV to audio and video outputs VIDEO ...

Страница 14: ...R for recording CONTROL S IN OUT VIDEO AUDIO L R MONO VIDEO 1 VIDEO 3 S VIDEO IN OUT MONITOR AUDIO VAR FIX VIDEO 1 VIDEO 3 MONITOR AUDIO VAR FIX IN OUT AUDIO VIDEO LINE OUT OUT IN AUDIO VIDEO LINE IN OUT IN AUX VHF UHF TO CONVERTER to audio video inputs VMC 810S 820S not supplied to video input to audio inputs to audio outputs to video output VMC 810S 820S not supplied VCR for playback to audio vi...

Страница 15: ...DEO 3 S VIDEO IN OUT MONITOR AUDIO VAR FIX VIDEO 1 VIDEO 3 MONITOR AUDIO VAR FIX IN OUT RK 74A not supplied AUDIO OUT L white AUDIO OUT R red Set the amplifier s function to line input Line input Stereo amplifier Rear of projection TV AUX VHF UHF TO CONVERTER CONTROL S IN OUT VIDEO AUDIO L R MONO VIDEO 1 VIDEO 3 S VIDEO IN OUT MONITOR AUDIO VAR FIX VIDEO 1 VIDEO 3 MONITOR AUDIO VAR FIX IN OUT RK 7...

Страница 16: ...ojection TV with the remote commander of other Sony equipment connect the output of the equipment to CONTROL S IN jack on the projection TV p KP 41T25 p KP 46S17 53S17 CONTROL S IN OUT VIDEO AUDIO L R MONO VIDEO 1 VIDEO 3 S VIDEO IN OUT MONITOR AUDIO VAR FIX VIDEO 1 VIDEO 3 MONITOR AUDIO VAR FIX IN OUT CONTROL S IN OUT AUX VHF UHF TO CONVERTER Rear of projection TV VHF UHF CONTROL S IN OUT VIDEO A...

Страница 17: ...ace the remote commander in direct sunlight near a heater or where the humidity is high Using the remote commander The upper half of the remote commander has three selectable operation modes Each button in this area has three different functions You can select the mode by sliding a selector on the left side For normal TV viewing For operating video equipment For using the Picture in Picture featur...

Страница 18: ...panish or VOLUME for French All of the menus will be set to the factory preset condition in the selected language 4 Press CHANNEL to preset channels AUTO PROGRAM appears on the screen and the TV starts scanning and presetting channels automatically When all the receivable channels are stored AUTO PROGRAM disappears and the following menu appears If the projection TV receives cable TV channels CATV...

Страница 19: ...een as a white cross Notes If more than 90 seconds elapse after you press a button the menu disappears automatically In case of using the AUX connector press the TV button on the remote commander first and make sure that AUX is displayed beside the channel number on the screen Then follow steps 2 to 5 above to perform AUTO SET UP KP 41T25 only To preview the main functions DEMO Press VOLUME in ste...

Страница 20: ...vice versa If more than 90 seconds elapse after you press a button the menu disappears automatically Erasing and adding channels are also available for the AUX input KP 41T25 only Adjusting convergence CONVERGENCE The projection tube image appears on the screen in three layers red green and blue If they do not converge the color is poor and the picture blurs To correct this adjust convergence You ...

Страница 21: ... do not have to do this procedure if you execute AUTO SET UP page 18 Do this procedure only when you want to set it manually 1 Press MENU 2 Press or to move the cursor z to SET UP and press RETURN 3 Press or to move the cursor z to CABLE and press RETURN 4 Press or to select ON or OFF and press RETURN 5 Press MENU to return to the original screen Note If CABLE appears in black the projection TV is...

Страница 22: ... PROGRAM and press RETURN AUTO PROGRAM appears on the screen and the projection TV starts scanning and presetting channels automatically When all the receivable channels are stored AUTO PROGRAM disappears and the lowest numbered channel is displayed 4 Press MENU to return to the original screen Notes If AUTO PROGRAM appears in black in the SET UP menu the projection TV is set to a video input and ...

Страница 23: ...are broadcast with XDS Extended Data Service which shows a network name program name program type program length call letters and time of the show When you select XDS with the DISPLAY button this information will be displayed on the screen if the broadcaster offers this service Check that the CABLE BOX TV selector is set to TV 1 Press POWER TV to turn on the projection TV The TIMER STAND BY indica...

Страница 24: ...s as follows TV n VIDEO 1 n VIDEO 2 n VIDEO 3 To return to TV picture press TV Changing the VHF UHF input to the AUX input KP 41T25 only Press TV AUX appears beside the channel number Pressing TV again switches back to the previous input Watching two programs at one time PIP The Picture in Picture PIP feature allows you to watch both the main picture and a window picture simultaneously For KP 46S1...

Страница 25: ...sound of the window picture Press AUDIO appears for a few seconds indicating that the window picture sound is being received To restore the main picture sound press AUDIO again Changing the position of the window picture Press POSITION Each time you press POSITION the window picture will move as illustrated Freezing the window picture This feature is useful when you want to write down a recipe fro...

Страница 26: ...ch you want to adjust and press RETURN 5 Adjust the picture according to the steps 3 to 5 in Adjusting the picture on page 27 To restore the factory setting Press RESET while the VIDEO menu is displayed MENU RETURN RESET MODE Low position Sound effect Standard Theatrical audio effect Sound with a sports stadium effect Picture effect Standard Finlely detailed picture Vivid bright picture Us e RETUR...

Страница 27: ...repeat steps 3 and 4 Description of adjustable items Us e RETURN Ex MENU i t S MENU HUE TANDARD COLOR V I DEO MODE P I CTURE BR I GHTNESS SHA NESS RP TR I N I TONE H I GH NR OFF RETURN V I DEO BR I GHTNESS STANDARD Item PICTURE HUE COLOR BRIGHTNESS SHARPNESS Press to Decrease picture contrast for soft color Make overall picture purplish Decrease color intensity Darken the picture Soften the pictur...

Страница 28: ... select ON and press RETURN Note This feature is useful when watching a weak broadcast signal MENU RETURN MODE Low position To Make the white color reddish Make the white color whitish Make the white color bluish MENU RETURN MODE Low position Us e RETURN Ex MENU i t S HUE TANDARD COLOR V I DEO MODE P I CTURE BR I GHTNESS SHA NESS RP MENU TR I N I TONE H I GH NR OFF Us e RETURN Ex MENU i t S HUE TA...

Страница 29: ... on each item see Description of adjustable items below 5 To adjust other items repeat steps 3 and 4 above Description of adjustable items To restore the factory settings Press RESET on the remote commander AUD I O BASS Item TREBLE BASS BALANCE Press to Increase the treble response Increase the bass response Emphasize the right speaker s volume Press to Decrease the treble response Decrease the ba...

Страница 30: ... select MAIN SAP or MONO and press RETURN To Listen to stereo sound The STEREO indicator on the projection TV lights up while a stereo broadcast is received Listen to bilingual programs The sound of non SAP programs will be muted when SAP is selected Reduce noise during stereo broadcasts Note Stereo and SAP sounds are subject to program sources MODE Low position MENU RETURN Us e RETURN Ex MENU i t...

Страница 31: ...a stereo system 1 Press MENU 2 Press or to select AUDIO and press RETURN 3 Press or to select SPEAKER and press RETURN 4 Press or to select OFF and press RETURN Setting the speaker switch SPEAKER Setting audio out AUDIO OUT Us e RETURN Ex MENU i t MENU BA SURROUND T B MTS S AUD I O REB E L ASS L NCE A EAKER P AUD I O OUT VAR I ABL E OFF MA I N ON Us e RETURN Ex MENU i t MENU BA SURROUND T B MTS S ...

Страница 32: ...g end Choose YES NO If your area uses daylight saving time change DAYLIGHT SAVING setting depending on the season before setting the current time Daylight saving start After the first Sunday in April set DAYLIGHT SAVING to YES Current time setting page 33 automatically moves one hour ahead Daylight saving end After the last Sunday in October set DAYLIGHT SAVING to NO Current time setting automatic...

Страница 33: ...TURN set hour and minute in the same way as in step 2 When you press RETURN after setting the minute the clock starts If you make a mistake while setting the time Press RESET while the CURRENT TIME SET menu is displayed then repeat step 4 To display the current time Press DISPLAY Note If you unplug the projection TV or a power interruption occurs the clock will be erased Reset the current time MOD...

Страница 34: ... to select the channel and press RETURN The TIMER STAND BY indicator on the projection TV lights 5 To set the other program press RETURN and repeat step 4 One minute before the projection TV switches to turn off a message TV will turn off is displayed on the screen To cancel the timer Press RESET on the remote commander Note If you unplug the projection TV or a power interruption occurs ON OFF TIM...

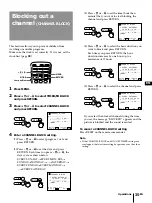
Страница 35: ...tly If it is not set the clock first page 33 1 Press MENU 2 Press or to select TIMER CH BLOCK and press RETURN 3 Press or to select CHANNEL BLOCK and press RETURN 4 Enter a CHANNEL BLOCK setting 1 Press or to select program 1 or 2 and press RETURN 2 Press or to set the days and press RETURN Each time you press or the days cycle as shown below EVERY SUN SATnEVERY MON FRIn SUNDAYnMONDAYn nSATURDAYn ...

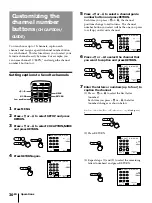
Страница 36: ...RETURN 7 Enter the letters or numbers up to four to caption the channel 1 Press or to select the first letter number Each time you press or the letter number changes as shown below 0n1n n9nAnBn nZn n n n_ blank space 2 Press RETURN 3 Repeat steps 1 and 2 to select the remaining letters numbers and press RETURN MODE Low position MENU RETURN Us e RETURN Ex MENU i t MENU 1 CH CAPT I ON GU I DE 2 3 4 ...

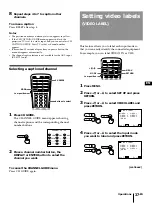
Страница 37: ...channel number buttons 2 Press a channel number button the DISPLAY or ENTER button to select the channel you want To cancel the CHANNEL GUIDE menu Press CH GUIDE again This feature allows you to label each input mode so that you can easily identify the connected equipment For example you can label VIDEO 1 IN as VHS 1 Press MENU 2 Press or to select SET UP and press RETURN 3 Press or to select VIDE...

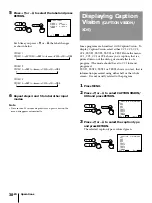
Страница 38: ...d using either half or the whole screen It is not usually related to the program 1 Press MENU 2 Press or to select CAPTION VISION XDS and press RETURN 3 Press or to select the caption type and press RETURN The selected caption type is colored green Displaying Caption Vision CAPTION VISION XDS 5 Press or to select the label and press RETURN Each time you press or the label changes as shown below VI...

Страница 39: ...e remote commander Each time you press DISPLAY the display changes as follows on screen informationnXDS nCaption Vision or Text DISPLAY OFF goes off after three seconds Some programs are broadcast with XDS service which shows a network name program name program length call letters and time of the show When you select XDS with the DISPLAY button this information will be displayed on the screen if t...

Страница 40: ... use a code that is not provided with this remote commander In this case please use the equipment s own remote control unit The code numbers for Sony equipment are assigned at the factory as follows Beta ED Beta VCRs 01 8 mm VCR 02 VHS VCR 03 preset code for this remote commander Caution When you remove a battery from the remote commander the code may revert to 03 Reset the codes each time you rep...

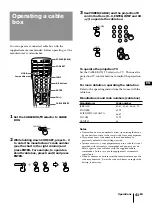
Страница 41: ... operating instructions that come with the cable box Manufacturers and code numbers cable box MODE Low position POWER CABLE CODE SET JUMP 0 9 buttons ENTER CH CABLE BOX TV CABLE POWER JUMP CH Code number 60 61 62 63 64 65 73 69 70 66 67 71 72 68 Manufacturer JERROLD PIONEER SCIENTIFIC ATLANTA TOCOM ZENITH Notes If more than one code number is listed try entering them one by one until you come to t...

Страница 42: ...tion TV away from noise sources such as cars neon signs and hair dryers Double images or ghosts Use a highly directional outdoor antenna or a cable when the problem is caused by reflections from nearby mountains or tall buildings Cannot operate menu If the item you want to choose appears in black you cannot select it Press TV VIDEO correctly Check the CABLE setting in the SET UP menu page 21 Canno...

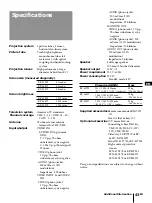
Страница 43: ...n mini DIN Y 1 Vp p 75 ohms unbalanced sync negative C 0 286 Vp p Burst signal 75 ohms VIDEO phono jack 1 Vp p 75 ohms unbalanced sync negative AUDIO phono jacks 500 mVrms 100 modulation Impedance 47 kilohms VIDEO INPUT 2 and VIDEO IN 3 VIDEO phono jacks 1 Vp p 75 ohms unbalanced sync negative Screen size measured diagonally KP 41T25 41 inches KP 46S17 46 inches KP 53S17 53 inches Screen brightnes...

Страница 44: ...O indicator 30 Surround 30 TIMER STAND BY indicator 23 34 Video label 37 Watching TV 23 video tapes 24 XDS 39 Names of controls buttons 19 AUDIO button 25 AUDIO L MONO R IN jacks 7 12 AUDIO L R OUT jacks 14 AUDIO VAR FIX OUT jacks 15 CABLE BOX TV selector 23 41 CABLE POWER button 41 CH channel buttons 20 23 CH channel GUIDE button 37 CODE SET button 39 CONTROL S jacks 16 DISPLAY button 23 ENTER bu...

Страница 45: ...Additional Information 45 EN EN ...

Страница 46: ...elevisor de proyección no se olvide de ajustar la convergencia Para conocer el procedimiento consulte la página 18 Observación sobre la limpieza Limpie la unidad del televisor de proyección con un paño seco y suave Para quitar el polvo de la pantalla pásele suavemente un paño de arriba a abajo solamente Las manchas resistentes pueden limpiarse con un paño ligeramente humedecido en agua Nunca emple...

Страница 47: ...Escucha de sonido periférico SURROUND 30 Selección de programas en estéreo o bilingües MTS 31 Selección de las bocinas BOCINAS 31 Ajuste de la salida de audio AUDIO OUT 32 Ajuste del cambio de hora oficial DAYLIGHT SAVING 33 Ajuste del reloj FIJAR HORA ACTUAL 34 Ajuste del temporizador para activar y desactivar el TV de proyección RELOJ 35 Bloqueo de un canal BLOQUEAR CANAL 36 Personalización de l...

Страница 48: ...un voltaje extremadamente alto Para evitar incendios o descargas eléctricas siga cuidadosamente las indicaciones que se indican a continuación Seguridad Asegúrese de que la unidad funciona sólo a 120 V CA Una clavija del enchufe es más ancha que la otra por razones de seguridad y sólo podrá enchufarse en una posición Si no consigue insertar completamente el enchufe en la salida póngase en contacto...

Страница 49: ... 53 mín 1 8m aprox 6 pies 46 mín 1 5m aprox 5 pies 41 Transporte del televisor de proyección Asegúrese de sujetar las partes indicadas al transportar el televisor de proyección y solicite la ayuda de más de dos personas Preparación del televisor de proyección Antes de utilizar el televisor de proyección ajuste la convergencia Para conocer el procedimiento consulte el Paso 4 Ajuste del televisor de...

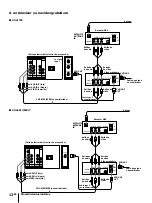
Страница 50: ...ntena directamente al terminal siga las instrucciones que se indican a continuación en función del tipo de cable de que disponga A C VHF y UHF Cable coaxial de 75 ohmios Sólo VHF o VHF UHF o cable B Sólo VHF o Sólo UHF o VHF UHF Conector de antena OUT Cable Decodificador Cable coaxial de 75 ohmios Parte posterior del televisor de proyección VHF UHF Parte posterior del televisor de proyección VHF U...

Страница 51: ... audio de la videograbadora a AUDIO L MONO de VIDEO 1 3 IN en el televisor de proyección Una vez realizadas las conexiones podrá hacer lo siguiente Ver la reproducción de cintas de vídeo Grabar un programa de televisión mientras visualiza otro programa Ver dos programas de televisión al mismo tiempo en una ventana imagen en imagen VHF UHF No conecte el cable al conector S VIDEO del televisor de pr...

Страница 52: ...UT MONITOR AUDIO VAR FIX VIDEO 1 VIDEO 3 MONITOR AUDIO VAR FIX IN OUT AUDIO VIDEO LINE OUT OUT IN OUT IN Videograbadora Salidas de vídeo y audio Entrada de VHF UHF VHF UHF VMC 810S 820S no suministrado AUDIO R rojo AUDIO L blanco VIDEO amarillo Decodificador Parte posterior del televisor de proyección Cable Separador no suministrado Parte posterior del televisor de proyección Videograbadora Entrad...

Страница 53: ...AUDIO L R MONO VIDEO 1 VIDEO 3 S VIDEO IN OUT MONITOR AUDIO VAR FIX VIDEO 1 VIDEO 3 MONITOR AUDIO VAR FIX IN OUT S VIDEO LINE OUT AUDIO VIDEO OUT IN VHF UHF VHF UHF CONTROL S IN OUT VIDEO AUDIO L R MONO VIDEO 1 VIDEO 3 S VIDEO IN OUT MONITOR AUDIO VAR FIX VIDEO 1 VIDEO 3 MONITOR AUDIO VAR FIX IN OUT S VIDEO LINE OUT AUDIO VIDEO OUT IN VHF UHF Videograbadora Parte posterior del televisor de proyecc...

Страница 54: ... AUDIO VAR FIX VIDEO 1 VIDEO 3 MONITOR AUDIO VAR FIX IN OUT S VIDEO LINE OUT AUDIO VIDEO OUT IN Parte posterior del televisor de proyección RK 74A no suministrado YC 15V 30V no suministrado VHF UHF Separador no suministrado Cable AUDIO R rojo AUDIO L blanco S VIDEO Salida de S vídeo Videograbadora Entrada de VHF UHF Salidas de audio Decodificador Parte posterior del televisor de proyección AUDIO R...

Страница 55: ...odo de conexión consulte el manual de instrucciones del receptor DBS Digital Broadcasting Satellites A un televisor p KP 41T25 p KP 46S17 53S17 Nota Es posible usar la toma S VIDEO o la de video compuesto para realizar la conexión de video VHF UHF SATELLITE ANTENNA IN VHF UHF Antena Receptor DBS Salida de vídeo SATELLITE ANTENNA IN VIDEO amarillo AUDIO L blanco AUDIO R rojo VMC 810S 820S no sumini...

Страница 56: ...ELLITE ANTENNA IN AUX VHF UHF TO CONVERTER IN VHF UHF S VIDEO OUT AUDIO VIDEO LINE OUT CONTROL S IN OUT VIDEO AUDIO L R MONO VIDEO 1 VIDEO 3 S VIDEO IN OUT MONITOR AUDIO VAR FIX VIDEO 1 VIDEO 3 MONITOR AUDIO VAR FIX IN OUT VHF UHF S VIDEO OUT AUDIO VIDEO LINE IN LINE OUT IN to video input SATELLITE ANTENNA IN VHF UHF IN VHF UHF OUT VHF UHF Parte posterior del televisor de proyección VMC 810S 820S ...

Страница 57: ...ara de vídeo monofónica conecte la salida de audio de la cámara de vídeo a AUDIO L MONO de VIDEO 2 INPUT del televisor de proyección SET UP TV VIDEO VOLUME CHANNEL POWER TIMER STAND BY STEREO PIP VIDEO 2 INPUT VIDEO L MONO AUDIO R a salidas de audio y vídeo Parte delantera del televisor de proyección AUDIO R rojo AUDIO L blanco VIDEO VMC 810S 820S no suministrado ...

Страница 58: ...AUDIO VIDEO LINE OUT OUT IN AUDIO VIDEO LINE IN OUT IN AUX VHF UHF TO CONVERTER CONTROL S IN OUT VIDEO AUDIO L R MONO VIDEO 1 VIDEO 3 S VIDEO IN OUT MONITOR AUDIO VAR FIX VIDEO 1 VIDEO 3 MONITOR AUDIO VAR FIX IN OUT AUDIO VIDEO LINE OUT OUT IN AUDIO VIDEO LINE IN OUT IN VHF UHF Videograbadora para grabación a entradas de audio vídeo a salida de vídeo a entradas de audio VMC 810S 820S no suministra...

Страница 59: ...VIDEO IN OUT MONITOR AUDIO VAR FIX VIDEO 1 VIDEO 3 MONITOR AUDIO VAR FIX IN OUT Amplificador estéreo Defina la función del amplificador a la entrada de línea Entrada de línea AUDIO OUT L blanco RK 74A no suministrado AUDIO OUT R rojo Parte posterior del televisor de proyección VHF UHF CONTROL S IN OUT VIDEO AUDIO L R MONO VIDEO 1 VIDEO 3 S VIDEO IN OUT MONITOR AUDIO VAR FIX VIDEO 1 VIDEO 3 MONITOR...

Страница 60: ...e proyección con el control remoto de otro equipo Sony conecte la salida del equipo a la toma CONTROL S IN del televisor de proyección p KP 41T25 p KP 46S17 53S17 CONTROL S IN OUT VIDEO AUDIO L R MONO VIDEO 1 VIDEO 3 S VIDEO IN OUT MONITOR AUDIO VAR FIX VIDEO 1 VIDEO 3 MONITOR AUDIO VAR FIX IN OUT CONTROL S IN OUT AUX VHF UHF TO CONVERTER Parte posterior del televisor de proyección VHF UHF CONTROL...

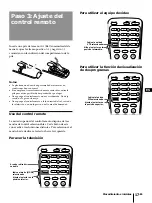
Страница 61: ...n lugar con un alto nivel de humedad Uso del control remoto La mitad superior del control remoto dispone de tres modos de control seleccionables Cada botón de esta zona realiza tres funciones distintas Para seleccionar el modo basta deslizar el selector hacia la izquierda Para ver la televisión Para utilizar el equipo de vídeo Para utilizar la función de visualización de dos programas 1 2 3 MUTING...

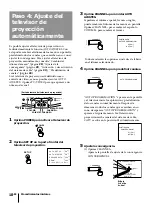
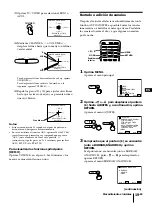
Страница 62: ...ntalla Oprima CHANNEL para cambiar al español o VOLUME para cambiar al francés Todos mostrarán las opciones ajustadas de fábrica en el idioma seleccionado 4 Oprima CHANNEL para predefinir canales AUTO PROGRAMACION aparece en la pantalla y el televisor inicia la exploración y predefinición de los canales automáticamente Después de almacenar todos los canales que se reciben en su zona desaparece AUT...

Страница 63: ... el televisor automáticamente con la función AUTO AJUSTES es posible borrar los canales innecesarios o añadir los canales que desee Predefina los canales durante el día ya que algunos no emiten por la noche 1 Oprima MENU Aparece el menú principal 2 Oprima o para desplazar el puntero z hasta AJUSTES y a continuación oprima RETURN Aparece el menú AJUSTES 3 Compruebe que el puntero z se encuentre jun...

Страница 64: ...o también se borra o añade y viceversa Si transcurren más de 90 segundos después de pulsar un botón el menú desaparece automáticamente También es posible borrar y añadir canales recibidos mediante la entrada AUX sólo KP 41T25 Cambio del idioma de menú Es posible cambiar al idioma español francés o inglés si lo prefiere No es preciso realizar este procedimiento si ejecuta AUTO AJUSTES página 18 Rea...

Страница 65: ...O AJUSTES página 18 Realice este procedimiento sólo si desea ajustarlo manualmente 1 Oprima MENU 2 Oprima o para desplazar el puntero z hasta AJUSTES y a continuación oprima RETURN 3 Oprima o para desplazar el puntero z hasta CONVERGENCIA y a continuación oprima RETURN El ajuste CONVERGENCIA aparece en la pantalla 4 Oprima o para desplazar el puntero z hasta el símbolo que muestra la línea que des...

Страница 66: ...bién está disponible para la entrada AUX sólo KP 41T25 Activación y desactivación del sistema de cable Si ha conectado el televisor de proyección a un sistema de cable ajuste CABLE en la posición SI que es el ajuste de fábrica En caso contrario ajuste CABLE en la posición NO No es preciso realizar este procedimiento si ejecuta AUTO AJUSTES página 18 Realice este procedimiento sólo si desea ajustar...

Страница 67: ... restaurar el sonido vuelva a oprimir MUTING o oprima VOL Visualización de indicaciones en pantalla Oprima DISPLAY varias veces hasta que aparezca la indicación que desee Cada vez que oprima DISPLAY la indicación cambia de la siguiente forma Indicación de estado nXDS nCaption Vision Aparecen en pantalla el número de canal la hora actual sólo para los modelos disponibles el nombre o logotipo del ca...

Страница 68: ...hasta que aparezca la hora en minutos que desee Cada vez que oprime SLEEP la hora cambia según se indica 30n60n 90n OFF SLEEP aparece aproximadamente un minuto antes de que el televisor de proyección se desactive Para cancelar la función de desactivación automática oprima SLEEP varias veces hasta que aparezca SLEEP OFF o desactive el televisor de proyección El cronodesconectador también puede canc...

Страница 69: ...e aparecer en blanco y negro El sonido de la imagen de ventana también sale de las tomas AUDIO VAR FIX OUT Cambio del modo de entrada de la imagen de ventana Oprima TV VIDEO en el área de control PIP del control remoto para seleccionar el modo de entrada Cada vez que oprime TV VIDEO aparecen en secuencia TV VIDEO 1 VIDEO 2 y VIDEO 3 Nota Si conecta la videograbadora sin decodificador la fuente de ...

Страница 70: ...de tres opciones en la columna derecha MODE Posición inferior RESET MENU RETURN RETURN RETURN Efecto de sonido Estándar Efecto de sonido de sala de cine Sonido con efecto de estadio de deportes Opción ESTANDAR PELICULAS DEPORTES Efecto de tres opciones Usar RETURN MENU VIDEO MODO PELICULAS CONTRASTE TINTE COLOR BRILLO NITIDEZ TRINITONE ALTO NR NO MENU Salir VIDEO MODO ESTANDAR CONTRASTE TINTE COLO...

Страница 71: ... ajustar otras opciones repita los pasos 3 y 4 Descripción de las opciones ajustables VIDEO MODO ESTANDAR CONTRASTE TINTE COLOR BRILLO NITIDEZ TRINITONE ALTO NR NO MENU Usar RETURN MENU Salir VIDEO ESTANDAR BRILLO Oprima para Aumentar el contraste de la imagen e intensificar el color Que toda la imagen adquiera un color verdoso Aumentar la intensidad del color Dar más brillo a la imagen Conseguir ...

Страница 72: ...E MENU RETURN Posición inferior Posición inferior VIDEO MODO ESTANDAR CONTRASTE TINTE COLOR BRILLO NITIDEZ TRINITONE ALTO NR NO MENU Usar RETURN MENU Salir Usar RETURN MENU VIDEO MODO ESTANDAR CONTRASTE TINTE COLOR BRILLO NITIDEZ TRINITONE NTSC STD NR NO MENU Salir RETURN RETURN Usar RETURN MENU VIDEO MODO ESTANDAR CONTRASTE TINTE COLOR BRILLO NITIDEZ TRINITONE ALTO NR SI MENU Salir VIDEO MODO EST...

Страница 73: ...ma RETURN 4 Ajuste la opción seleccionada 1 Oprima o para ajustar la opción 2 Oprima RETURN El nuevo ajuste aparece en el menú AUDIO Para obtener información detallada acerca de cada opción consulte Descripción de las opciones ajustables más adelante 5 Para ajustar otras opciones repita los pasos 3 y 4 anteriores Descripción de las opciones ajustables Para restaurar los ajustes de fábrica Oprima R...

Страница 74: ...continuación oprima RETURN La función MTS Multichannel TV Sound permite elegir entre sonido estéreo o SAP Second Audio Programs cuando esté disponible El ajuste inicial es el sonido estéreo MAIN 1 Oprima MENU 2 Oprima o para seleccionar AUDIO y a continuación oprima RETURN 3 Oprima o para seleccionar MTS y a continuación oprima RETURN 4 Oprima o para seleccionar MAIN SAP o MONO y a continuación op...

Страница 75: ...levisor de proyección por ejemplo al escuchar el sonido mediante un sistema estéreo 1 Oprima MENU 2 Oprima o para seleccionar AUDIO y a continuación oprima RETURN 3 Oprima o para seleccionar BOCINAS y a continuación oprima RETURN 4 Oprima o para seleccionar NO y a continuación oprima RETURN Selección de las bocinas BOCINAS Ajuste de la salida de audio AUDIO OUT MODE MENU RETURN Posición inferior A...

Страница 76: ... 2 Oprima o para desplazar el puntero z hasta HORA y a continuación oprima RETURN 3 Oprima o para seleccionar DAYLIGHT SAVING y a continuación oprima RETURN 4 Oprima o para seleccionar SI o NO y a continuación oprima RETURN Ajuste del cambio de hora oficial DAYLIGHT SAVING HORA FIJAR HORA ACTUAL RELOJ BLOQUEAR CANAL DAYLIGHT SAVING NO MENU MIE 12 00 AM Usar RETURN MENU Salir RETURN Elija Para SI e...

Страница 77: ...00 AM MENU Ajuste el día Usar RETURN MENU Salir MODE MENU RETURN Posición inferior RETURN HORA FIJAR HORA ACTUAL DAYLIGHT SAVING NO MENU Usar RETURN MENU Salir AM RETURN FIJAR HORA ACTUAL Usar RETURN MENU Salir AM RETURN 2 Oprima o para seleccionar el día de la semana y a continuación oprima RETURN 3 Mediante o y RETURN seleccione la hora y minutos de la misma forma que en el paso 2 Si pulsa RETUR...

Страница 78: ...ue desee activar el TV de proyección y oprima RETURN 4 Oprima o para seleccionar la duración y a continuación oprima RETURN Es posible ajustar una duración de una a seis horas como máximo 5 Oprima o para seleccionar el canal y a continuación oprima RETURN El indicador TIMER STAND BY del televisor de proyección se ilumina 5 Para definir otros programas oprima RETURN y repita el paso 4 Un minuto ant...

Страница 79: ...rectamente En caso contrario ajuste primero el reloj página 33 1 Oprima MENU 2 Oprima o para seleccionar HORA y a continuación oprima RETURN 3 Oprima o para seleccionar BLOQUEAR CANAL y a continuación oprima RETURN 4 Introduzca un ajuste de BLOQUEAR CANAL 1 Oprima o para seleccionar el programa 1 o el 2 y oprima RETURN 2 Oprima o para ajustar los días y oprima RETURN Cada vez que oprime o los días...

Страница 80: ... botón de número de canal Esta función permite seleccionar los canales favoritos mediante un nombre Por ejemplo es posible asignar el nombre ESPN al canal 20 y asignarle el botón de número de canal 4 Asignación de nombre a sus canales favoritos 1 Oprima MENU 2 Oprima o para seleccionar AJUSTES y a continuación oprima RETURN 3 Oprima o para seleccionar ETIQUETA GUIA y a continuación oprima RETURN 4...

Страница 81: ...número de canal 2 Oprima un botón de número de canal el botón DISPLAY o ENTER para seleccionar el canal que desee Para cancelar el menú CANAL GUIA Vuelva a oprimir CH GUIDE Esta función permite crear una etiqueta para cada modo de entrada de forma que pueda identificarse fácilmente el equipo conectado Por ejemplo es posible asignar la etiqueta VHS a VIDEO 1 IN 1 Oprima MENU 2 Oprima o para selecci...

Страница 82: ... oprima RETURN El tipo de subtítulo seleccionado aparece en color verde Visualización de subtítulos CAPTION VISION XDS 5 Oprima o para seleccionar la etiqueta y a continuación oprima RETURN Cada vez que oprime o la etiqueta cambia según se indica abajo VIDEO 1 VIDEO 1nS VIDEOnBETAn8mmnVHSnLDnDBS VIDEO 2 VIDEO 2nBETAn8mmnVHSnLDnDBS VIDEO 3 VIDEO 3nBETAn8mmnVHSnLDnDBS 6 Repita los pasos 4 y 5 para a...

Страница 83: ...n un recuadro blanco o algún otro error en lugar de una determinada palabra La baja calidad de recepción de los programas de televisión también puede causar errores en los subtítulos DISPLAY OFF MODE CODE SET Botones de 0 a 9 ENTER Posición inferior Utilización del equipo de vídeo Es posible emplear un equipo de vídeo que disponga de un sensor remoto infrarrojo con el control remoto suministrado A...

Страница 84: ...ontinuación Videograbadoras Beta ED Beta 01 Videograbadora de 8 mm 02 Videograbadora VHS 03 preselección de código para este control remoto Precaución Al retirar una pila del control remoto el código puede volver a 03 Restaure los códigos siempre que sustituya la pila si es necesario Utilización del equipo de vídeo Utilice los botones de control de vídeo del control remoto para utilizar el equipo ...

Страница 85: ... A continuación utilice los botones de control del televisor de proyección para utilizar el televisor de proyección Para obtener información detallada acerca del uso del decodificador Consulte el manual de instrucciones que se suministra con el decodificador Fabricantes y números de código decodificador CODESET 6 8 ENTER CABLE POWER CH JUMP Notas Si hay más de un número de código intente introduci...

Страница 86: ...tena Aleje el televisor de proyección de fuentes de ruido como coches señales de neón y secadores de pelo Imágenes dobles o fantasmas Utilice una antena exterior altamente direccionable o un cable cuando el problema se deba a reflejos de montañas o edificios altos cercanos No puede utilizarse el menú Si la opción que desea seleccionar aparece en negro no es posible hacerlo Oprima TV VIDEO correcta...

Страница 87: ... INPUT 2 y VIDEO IN 3 VIDEO tomas de fono 1 Vp p 75 ohmios desbalanceado sincronización negativa AUDIO tomas de fono 500 mVrms modulación100 Impedancia 47 kiloohmios MONITOR OUT VIDEO tomas de fono 1 Vp p 75 ohmios desbalanceado sincronización negativa AUDIO tomas de fono 500 mVrms modulación100 Impedancia 10 kiloohmios AUDIO OUT tomas de fono 900 mVrms modulación 100 Impedancia 5 kiloohmios Bocin...

Страница 88: ... SAP Second Audio Program 30 SELECCION A V 26 Sistema de cable 31 Subtítulos 38 S vídeo 9 Ver cintas de vídeo 24 televisión 23 XDS 39 Nombres de controles Botón AUDIO 25 Botón CABLE POWER 41 Botón CH canal GUIDE 37 Botón CODE SET 39 Botón DISPLAY 23 Botón ENTER 23 39 Botón FREEZE 25 Botón JUMP 23 Botón MENU 19 Botón MUTING 23 Botón PIP 24 Botón POSITION 25 Botón POWER 23 Botón RESET 26 Botón RETUR...

Отзывы: