

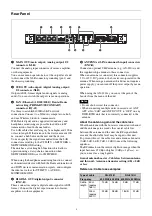


17
If the scanning DWR-R03D unit and tuners on the
assignment side are not operated for a certain time, the
channel assignment receive standby state is released.
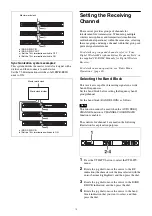
Switching to a Safe Frequency
Automatically
The host DWR-R03D unit scans for a frequency and
maintains a list of safe frequencies. When the reception
conditions on another client DWR-R03D unit
deteriorates, the units automatically change to a
frequency in the safe frequency list with better RF
conditions.
• The host is tuner 1 on the DWR-R03D unit that scans
the frequencies. Tuner 2 is the client, and becomes the
target for automatic frequency switching.
• To use this function, select a group to be used for multi-
channel operation beforehand as described in
groups where simultaneous multi-channel operation is
not taken into account” (page 14)
• This function cannot be used when the OUTPUT
SWAP function or CHANNEL COORDINATE
function is enabled.
• DWR-R03D units that satisfy all the following
conditions are the target for automatic frequency
switching.
– Connected via a network with the host DWR-R03D
unit for communication between DWX devices
– Same group settings as the host DWR-R03D unit
– OUTPUT SWAP function is set to OFF
– AUTO FREQ CHANGE is set to CLIENT
– Communication is enabled using Cross Remote when
paired with a transmitter
• Depending on the RF conditions, the frequency may not
switch correctly.
• When switching the frequency, audio cutouts may
occur depending on the communication status.
• When a client automatically attempts to switch
frequency and there is no assignable frequency
available, preventing the frequency switching, the
“CLIENT” icon flashes.
• If no RF signal is transmitted from a transmitter paired
with a client (for example, it is turned off or in sleep
mode), the host may assign the frequency used by that
transmitter to another client.
• When using this function, a total of up to three network
connected computers (with Wireless Studio installed)
and mixers is supported.
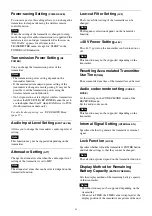
Client operation
1
Press the UTILITY button to select the UTILITY
menu.
2
Rotate the jog dial to move the cursor to the
REDUNDANCY indication, and then press the dial.
3
Rotate the jog dial to move the cursor to the AUTO
FREQ CHANGE indication, and then press the dial.
4
Rotate the jog dial to move the cursor to the CLIENT
indication, and then press the dial.
The “CLIENT” icon starts flashing.
When the host is detected, the “CLIENT” icon turns
on solid when ready to assign an empty channel.
When there is no empty channel on the host or the
host cannot be found, the “CLIENT” icon flashes.
Host operation
When automatic frequency switching is enabled on the
host, frequency scanning begins immediately.
Accordingly, configure the host after enabling automatic
frequency switching on the target clients.
1
Press the UTILITY button to select the UTILITY
menu.
2
Rotate the jog dial to move the cursor to the
REDUNDANCY indication, and then press the dial.
3
Rotate the jog dial to move the cursor to the AUTO
FREQ CHANGE indication, and then press the dial.
4
Rotate the jog dial to move the cursor to the HOST
indication, and then press the dial.
A message “START SCAN?” appears.
5
Rotate the jog dial to select YES, and then press the
dial.
Automatic frequency switching is enabled.
Note
Notes


