background image

32

Selecting Keyboard Type

Select whether the keyboard is Japanese or English
using the menu operations.
1 Press the MENU/NO button and turn the AMS

control. Display “Pc Keyboard”, and then press the
AMS control or the YES button.

2 Turn the AMS control to select one of the following.

JP Type: Use a Japanese keyboard.
US type: Use an English keyboard.

3 Press the AMS control or YES button.

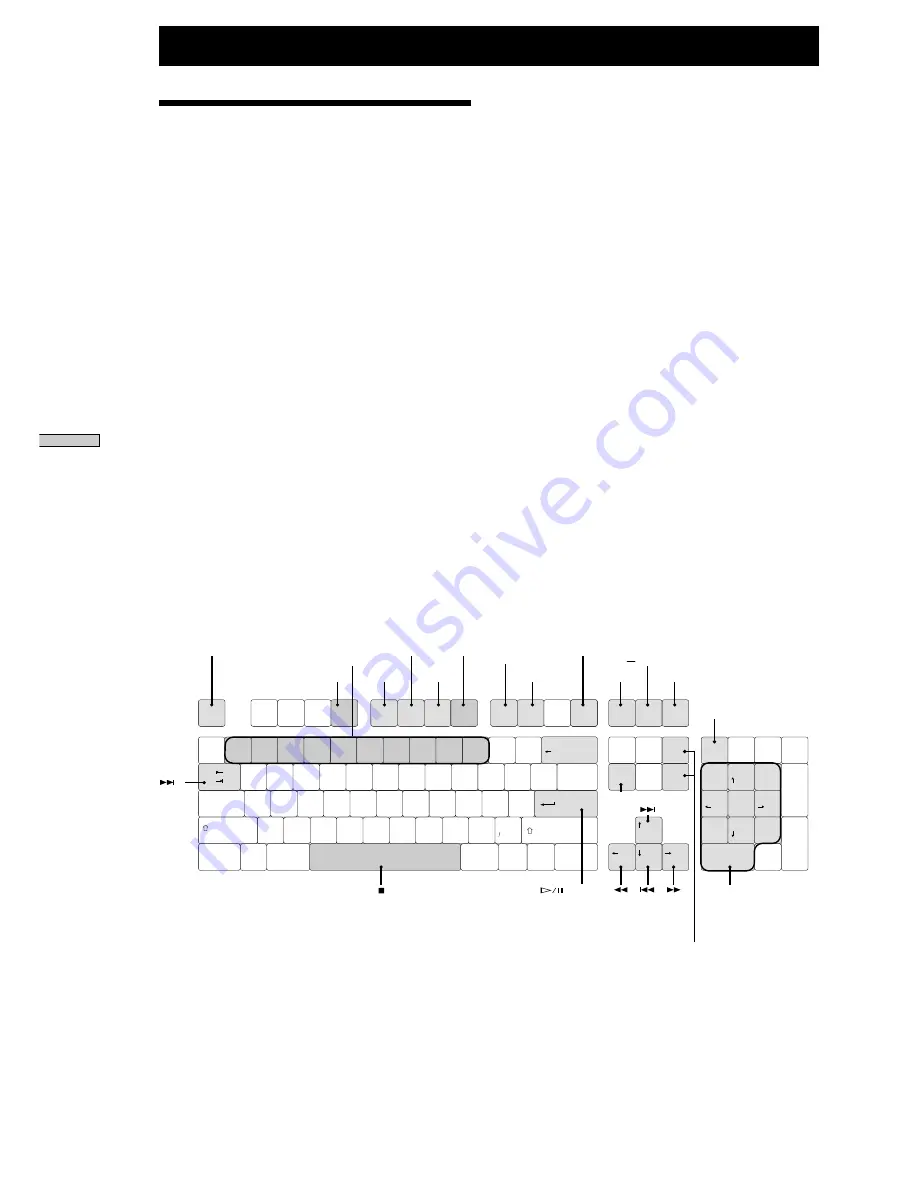
Operating the CD recorder using the keyboard

The functions of all the buttons on the CD recorder and
the remote are allocated to the keyboard, so you can
perform various operations using the keyboard instead
of the CD recorder and the remote. The key allocations
are shown in the following diagram.

Entering Track Names and Disc Name Using the
Keyboard

You can enter track names and disc name using the
keyboard. The keyboard is useful for directly entering
alphabet and numbers. For the operating procedure,
refer to page 19, “Adding Track Name and Disc Name
(NAME)”.

Keyboard Terminal

Installing a Keyboard

You can use any keyboard that is IBM 

*

 PC/AT or

compatible with a PS/2 interface. You can use either a
Japanese or English keyboard.
Use a keyboard with a current consumption of 120 mA
or less.

*

IBM is a registered trademark of International
Business Machines Corporation.

Connecting a Keyboard

Connect the keyboard connector to the keyboard
terminal on the front panel of the CD recorder. The
keyboard will be enabled approximately 4 seconds
after connection.

** 

.

: Shift + Tab

REC 

z

: Shift + Enter

MUSIC SYNC: Ctrl + Enter

Adding Names

Use the Caps Lock key to switch between uppercase
and lowercase characters.

Esc

F1

F2

F3

F4

F5

F6

F7

F8

F9

F10

F11

F12

Backspace

A

S

D

F

G

H

J

K

L

:

"

!

1

2

3

4

5

6

7

8

9

0

-

^

,

@

#

$

%

&

'

(

)

=

+

|

Q

W

E

R

T

Y

'U

I

O

P

{

}

]

'

;

[

Tab

Caps Lock

Z

X

C

V

B

N

M

<

>

.

?

Shift

Ctrl

Ctrl

Alt

Alt

Shift

Insert

Ins

Del

PgDn

PgUp

Enter

Home

/

*

+

Home

Page
Up

Num
Lock

7

8

9

4

5

6

1

0

2

3

Delete

End

End

Page
Down

Enter

Print
Screen

Scroll
Lock

Pause

~

`

|

\

MENU/NO

PLAY MODE

Enter track numbers

 higher than 10

NAME

(Use the 0 key to play track 10)

or YES

**

FINALIZE

DISPLAY

FADER

REPEAT

CLEAR

LEVEL UP

LEVEL DOWN

MUSIC SCAN

A      B REPEAT

SCROLL

REC MUTE

OPEN/CLOSE

Press the key corresponding to

the number to play that track

Press the key corresponding to

the number to play that track

Contr

ol T

e

rminal Functions and Settings

Control Terminal Functions and Settings

Содержание CDR-W66

Страница 1: ...ons and Settings Setup Menu Operations Miscellaneous 2 5 6 9 10 18 23 27 30 33 34 2 347 449 11 1 2001 Sony Corporation CDR W66 Operating Instructions Compact Disc Recorder TABLE OF CONTENTS Thank you very much for purchasing this Sony product Before operating please read this manual carefully Be sure keep it properly for reference Recordable Recordable ...

Страница 2: ...ance with the instructions may cause harmful interference to radio communications However there is no guarantee that interference will not occur in a particular installation If this equipment does cause harmful interference to radio or television reception which can be determined by turning the equipment off and on the user is encouraged to try to correct the interference by one or more of the fol...

Страница 3: ...can be used both wireless and wired You can use IBM compatible keyboard with a PS 2 interface instead of using the supplied remote control For the customers in Europe This product with the CE marking complies with both the EMC Directive 89 336 EEC and the Low Voltage Directive 73 23 EEC issued by the Commission of the European Community Compliance with these directives implies conformity to the fo...

Страница 4: ...cording 17 Digital Recording Without Sampling Rate Converter 17 Operations on the Disc s TOC Area Finalizing FINALIZE 18 Unfinalizing 18 Adding Track Name and Disc Name NAME 19 Setting Skip Unskip Tracks 21 Erasing Tracks TRACK ERASE 22 Erasing All Tracks DISC ERASE 22 Playback Playing a Disc 23 Switching Display During Playback 23 Playing a Specific Track 24 Pausing After Each Track Auto Pause 24...

Страница 5: ... with new batteries When using the remote control do not expose the remote sensor to direct sunlight or a lighting apparatus Doing so may cause a malfunction Installation Precautions Use of the product at a high temperature may shorten the life of the product or cause a trouble in correct recording or playback on a disc For efficient radiation keep a sufficient space around the product and avoid p...

Страница 6: ...me information Location and Function of Parts Location and Function of Parts 0 1 2 3 4 6 7 9 8 10 5 REC 1 2 3 4 5 6 7 8 9 10 11 12 13 14 15 1 2 3 4 5 6 7 ª º ª º 8 9 º qh Z OPEN CLOSE button Press to open and close the disc tray qj M Fast forward button Press to fast forward to the section you want to play qk m Fast backward button Press to rewind to the section you want to play ql N Play button P...

Страница 7: ...e connected with a pin type connector cable to the CD recorder as analog input 6 ANALOG UNBALANCE output terminal Output the content of the CD recorder to a device connected with a pin type connector cable as analog output 7 DIGITAL OPTICAL input terminal Connect to the OPTICAL digital output terminal of a digital device 8 DIGITAL OPTICAL output terminal Connect to the OPTICAL digital input termin...

Страница 8: ...nputs using the NUM and CHAR buttons CD SYNC STOP START STANDBY By connecting a Sony CD player you can make recording easily The remote operates both the CD player and the CD recorder so install the CD player and CD recorder close together 9 STOP button Press to stop CD Synchro recording 0 START button Press to start CD Synchro recording STANDBY button Press to enter standby for CD Synchro recordi...

Страница 9: ...additional recordings but after a disc is finalized further recording is disabled Consequently perform finalizing after completing recordings to the disc CD R Discs Until a CD R disc is finalized it cannot be played on a CD player By finalizing a CD R disc can be played on a CD player as well as on this CD recorder Unfinalized CD R discs can be played on the CD recorder regardless CD RW Discs By f...

Страница 10: ...BAL COAXIAL OPTICAL AES EBU ANALOG DIGITAL 1 Select the input signal using the INPUT switch on the front panel Input singal to be selected Display ANALOG UNBAL input UNBAL ANALOG BAL input BAL DIGITAL COAXIAL input COAXIAL DIGITAL OPTICAL input OPTICAL AES EBU input AES EBU 2 Insert a CD R disc or CD RW disc 3 z Press the REC button Pressing the REC button enters recording standby mode u REC will ...

Страница 11: ...ile PMA Writing is displayed Writing to the PMA takes approximately 5 seconds after recording has finished Maximum Number of Tracks that can Be Recorded on a Disc Depending on the CD specifications you can record a maximum of 99 tracks on the CD R RW disc Even if there is still space to record more on the disc you cannot exceed 99 tracks When the 99th track is being recorded you cannot pause recor...

Страница 12: ...ANALOG UNBALANCE Input You can adjust the recording level using the REC LEVEL control on the front panel ANALOG BALANCE Input You can adjust the recording level using both LEVEL adjustment CH 1 CH 2 on the back panel and the REC LEVEL control on the front panel Normally the LEVEL control on the front panel is set to the position of 5 and an analog reference signal is input to perform LEVEL adjustm...

Страница 13: ...put When recording a CD MD or DAT track numbers are added according to changes in the track number sound source If recording a digital sound source other than CD MD or DAT track numbers are added depending on level sync in the same way as analog signals z The timing for adding track numbers with CD MD and DAT sound sources is shown below Adjust the track start ID of the sound source for desired tr...

Страница 14: ...rter This converter interlaces lower 8 bits the subsidiary part of the 24 bits signals with the 16 bits format of the CDR SBM Filter is moreover featured with ON OFF select function when OFF is s selected the prescribed 8 bits are definitely cut out Now that SBM is a technology to qualify the very recording signals any other CD players can realize the high quality of the sound when playback is per...

Страница 15: ...ns Parameters and Variable Ranges Bass frequency 50 Hz to 1 kHz Bass level _ 6 0 dB to 6 0 dB Mid frequency 100 Hz to 10 kHz Mid level _ 6 0 dB to 6 0 dB Mid width Wide Mid Narrow Treble frequency 1 kHz to 12 5 kHz Treble level _ 6 0 dB to 6 0 dB z Setting the band level parameter to high on the side may cause the signal level to rise to the clip level internally resulting in the sound warping If ...

Страница 16: ...0 Using Digital Limiter Effectively 1 Convert the signal to high level When setting the analog input recording level basically set the REC LEVEL control so that hard clipping does not occur in the greatest part of the level during A D conversion Even so this may result conversely in the entire level being too low If this is the case when using the digital limiter raise the low recording level usin...

Страница 17: ...ss the CD SYNC STANDBY button on the remote To restart recording press the CD SYNC START button The track number will change at the point where the recording was paused You can also use the CD player remote during CD synchro recording Press the STOP button to stop the CD player and pause the CD recorder Press the PAUSE button to pause the CD player and pause the CD recorder Press the PLAY button t...

Страница 18: ...upply is turned OFF in the same state as after it was entered Consequently you can edit the information or add other tracks names Operations on the Disc s TOC Area Finalizing FINALIZE CD R CD RW CD R discs can be played on ordinary CD players when they have been finalized but you cannot change the disc status such as adding additional tracks doing the finalizing CD RW discs can be played on CD RW ...

Страница 19: ...ered press the YES button The CD recorder will return to disc or track number selection status 5 Repeat steps 2 to 4 to enter the desired track and disc name 6 Finally press the MENU NO button to quit the name input setup menu screen Operations on the Disc s TOC Area Adding Track Name and Disc Name NAME CD R CD RW You can add disc names and track names into discs in CD TEXT format The disc names a...

Страница 20: ...uit the name input setup menu screen Operations on the Disc s TOC Area Adding Names Using a Personal Computer Keyboard Sold Separately For the basic keyboard settings refer to page 32 Keyboard Terminal 1 Press the Num Lock NAME key to enter the name input setup menu screen 2 Select whether you want to enter the disc name or track number Press the Tab key and Shift Tab key to make the selection and...

Страница 21: ...l remain even if the disc is removed from the CD recorder and so remains valid even if another disc is inserted If not writing to the PMA area press the MENU NO button The setting information will not be written to the disc In this case the setting information will be stored until the disc is removed or the power is turned OFF z You can play discs without the skip that has been set Turn OFF Skip P...

Страница 22: ...z The names of the erased tracks will also be erased at the same time If you have selected to erase all tracks the disc name will also be erased Erasing All Tracks DISC ERASE CD RW You can delete all the tracks currently written to a CD RW disc and reuse the disc This operation is possible regardless of whether or not the disc has been finalized You cannot stop a disc erase operation once it has s...

Страница 23: ...tray will open so you can remove the disc z You may become disable disc removal during play In the Setup menu select Z mode For operation details refer to page 33 Setup Menu Operations Switching Display During Playback Pressing the DISPLAY button during recording changes the display window as follows If the track title is stored on the disc in CD TEXT compatible format the title will be displayed ...

Страница 24: ...n ON and OFF the function by pressing the A PAUSE button When Auto Pause is ON play automatically pauses at the start of a track and Auto Pause is displayed When Auto Pause is OFF play does not pause at the start of a track and continues to play the next track normally Playing Tracks Repeatedly Repeat Play Cycle between the following by pressing the REPEAT button Normal play n Repeat all tracks n ...

Страница 25: ...me Lower line display Track numbers in program order 3 Press the AMS control to confirm The display returns to next program track selection 4 Repeat steps 2 and 3 to set the desired program 5 Press the YES button or wait 20 seconds for the display to automatically quit setting mode Press the CLEAR button in program mode to delete the last track from the program Use the number buttons on the remote...

Страница 26: ...sic Scan You can set the music scan time from 6 to 14 seconds using M ScanTime in the Setup menu screen For operation details refer to page 33 Setup Menu Operations Playing Tracks in Random Order Shuffle Play You can play all tracks on the disc in random order 1 Press the SHUFFLE button The CD recorder will enter shuffle play mode and SHUF will be displayed in the display window 2 Press the H butt...

Страница 27: ...BU input signal is electrically buffered and output The signals input to the CD recorder can be distributed to other devices through series connections After this setting the AES EBU input signal is always output without adjustment regardless of the operation mode stop playback and recording of a disc Cautions Digital COAXIAL and OPTICAL output is not synchronized externally A disc is always playe...

Страница 28: ... for one generation by an SCMS device Permit Permission Digital copy for any number of generations is possible for the track or disc recorded in this setting This setting conforms to the copy bit specification with no copyright protection free For operation details refer to page 33 Setup Menu Operations Functions of CHECK Key You can press the CHECK key to display AES EBU input Word Sync input AES...

Страница 29: ... use an unrecorded disc as a disc to be recorded 3 Select Duplicate Start from the Setup menu of the CD recorder for playback and press the AMS or YES button If CD recorder for playback is not prepared properly Duplicate Start is not displayed If a disc is not inserted into the CD recorder for recording or an inserted disc is not a blank disc Duplicate Not Ready will be displayed If two CD recorde...

Страница 30: ...Setup No output standard setting menu during user setting 1 Input Play P Input 1 2 Input Pause P Input 2 3 Input Stop P Input 3 4 Input AMS P Input 4 5 Input AMS P Input 5 6 GND 7 Output Play P Output 1 8 Output Pause P Output 2 9 Output No Disc P Output 3 For user setting you can assign the functions below in P Input1 to P Input5 and P Output1 to P Output3 in the Setup menu Input output of each p...

Страница 31: ...ethod Open collector of NPN Residual voltage at ON 0 5 V or less Maximum inflow current at ON 100 mA Withstand voltage 20 V Fader Play The CD player performs playing which synchronizes with the operation of the fader by connecting the fader terminal of the mixer to the terminal set in FaderPlay of the parallel input terminal of the CD recorder Fader play can be used in the mixer equipped with the ...

Страница 32: ... a PS 2 interface You can use either a Japanese or English keyboard Use a keyboard with a current consumption of 120 mA or less IBM is a registered trademark of International Business Machines Corporation Connecting a Keyboard Connect the keyboard connector to the keyboard terminal on the front panel of the CD recorder The keyboard will be enabled approximately 4 seconds after connection Shift Tab...

Страница 33: ...e equalizer level Set middle equalizer bandwidth Set treble equalizer frequency Set treble equalizer level Set limiter ratio effective ratio Set output mode of AES EBU Set copy bits copyright bits Set recording not to use sampling rate encoder SRC during 44 1 kHz digital input recording Set tracks to be skipped Set valid invalid of skip setting Set whether to leave level meter peak maximum value d...

Страница 34: ...uring powder or solvent such as alcohol or benzine If you have any questions or problems concerning your recorder please consult your nearest Sony dealer Disc Handling Precautions Handling Discs Do not touch the signal surface the side without characters or printing with your fingers and hands Dust scratches and dirt may prevent normal play and recording If a disc is damaged or dirtied before reco...

Страница 35: ...BAL BAL SBM MIN MAX OFF LIMITER EQ SBM LIMITER EQ COAXIAL OPTICAL AES EBU ANALOG DIGITAL LP 2 4 SYNC REC OPT 12 COAX ANALOG TOC EDIT REMOTE SLEEP 1 2 3 4 5 6 7 8 9 10 11 12 13 14 15 DISC TRACK dB 40 30 18 12 8 4 2 0 OVER R L CH 2 R INPUT OUTPUT DIGITAL I O ANALOG UNBAL REMOTE ANALOG BAL CH 1 L CH 1 L CH 2 R CH 1 L CH 2 R OPTICAL COAXIAL CH 1 L PARALLEL RS 232C WORD SYNC ON OFF 75Ω IN OUT OUT OUT A...

Страница 36: ...generation during shipment from the factory ANALOG balance output Terminal type XLR 3 32 or its equivalent Load impedance 600 Z or more Maximum level 24 dBu full scale signal generation during shipment from the factory DIGITAL AES EBU output Terminal type XLR 3 32 or its equivalent Format AES EBU DIGITAL COAXIAL output Terminal type Phono jack Load impedance 75 Z Reference signal level 0 5 Vp p at...

Страница 37: ... stay on the disc If the power supply is turned OFF during recording or while PMA Writing is displayed writing to the PMA area will be incorrect and the recording disabled Refer to page 11 Rcording Precautions Cannot add track numbers even pressing the z REC button during recording Check if auto track marking is ON L SYNC is lit Refer to page 12 Making Track Numbers While Recording Track Marking C...

Страница 38: ...h all tracks have been set to skip Power supply is turned OFF to the recording source or is not correctly connected Auto pause function is ON and CD recorder is in standby mode Timer play function has turned ON when the power supply was turned ON and CD recorder is in play mode Z mode is set to N X Disable and the Z button has been pressed during play or pause The selected track has been set to sk...

Страница 39: ......

Страница 40: ...Printed in Japan ...

Отзывы: