10
Recording
5
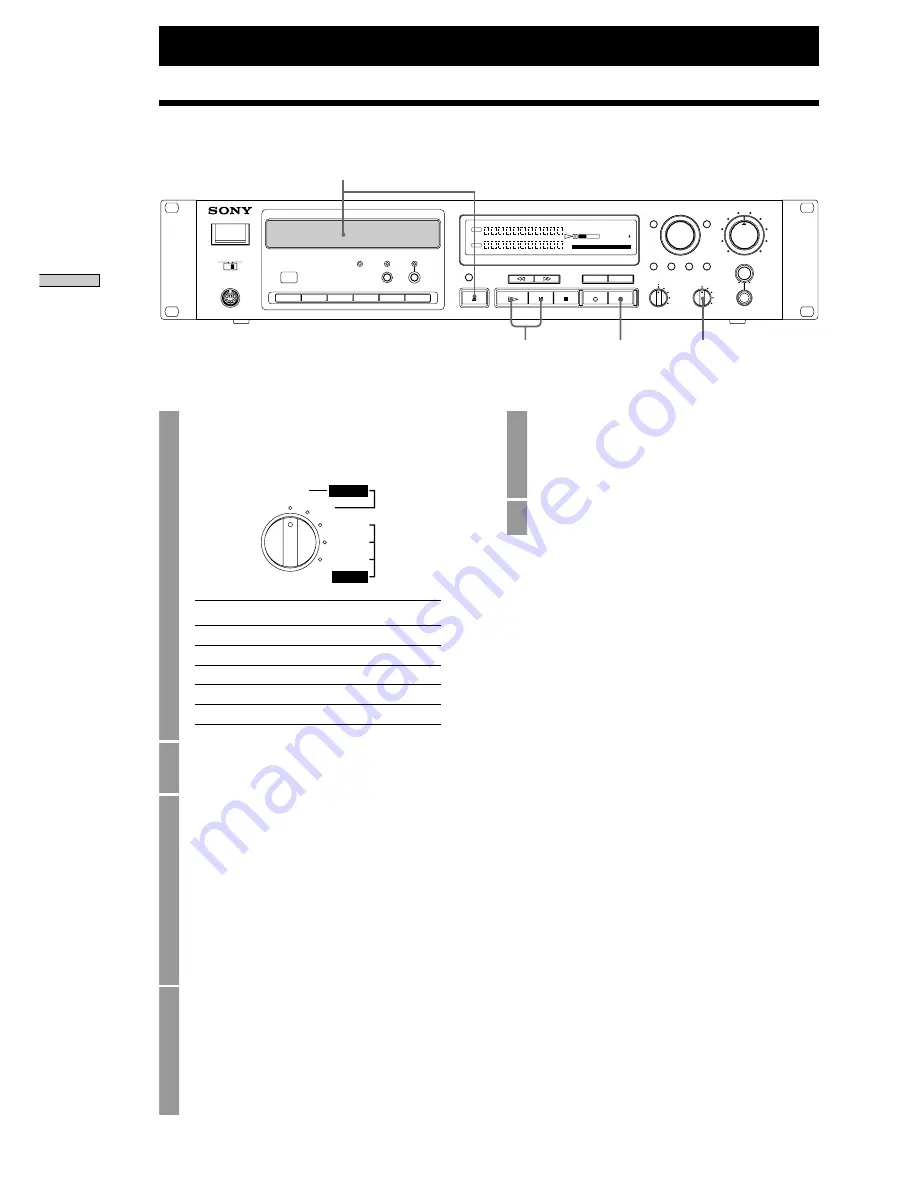
Press the
H
or
X
button.
Recording will start, and the recording time will
be displayed. (
N
[REC]
will be displayed.)
6
Start play on the input device.
To stop recording,
press the
x
button.
To pause recording,
press the
X
button.
The CD recorder will enter recording standby mode.
To restart recording,
Press the
H
button or the
X
button.
A new track number will start from the location at
which recording is restarted.
z
Silent pause function
If the digital input remains mute for 30 seconds, the CD
recorder will automatically pause recording. If making a
digital recording from a CD or MD, mute recording will
not continue after the source play has stopped.
0
1
2
3
4
6
7
9
8
10
5
REC
1 2 3 4 5
6 7 8 9 10
11 12 13 14 15
1
3
5
2
INPUT
UNBAL
BAL
COAXIAL
OPTICAL
AES/EBU
ANALOG
DIGITAL
1
Select the input signal using the INPUT switch
on the front panel.
Input singal to be selected
Display
ANALOG (UNBAL) input
UNBAL
ANALOG (BAL) input
BAL
DIGITAL COAXIAL input
COAXIAL
DIGITAL OPTICAL input
OPTICAL
AES/EBU input
AES/EBU
2
Insert a CD-R disc or CD-RW disc.
3
z
Press the REC button.
Pressing the REC button enters recording
standby mode. (
u
[REC]
will be displayed.)
The number of the next track to be recorded will
be displayed. The track number will flash while
the recorder is setting up, and when setup is
complete, the track number will remain lit and
the track time will be displayed. The input
signal is monitored from the output terminal.
4
Adjusting the recording level
During recording and when in recording
standby mode, the input signal level is
displayed in the level meter, so you can adjust
the recording level. Refer to page 12, “Adjusting
the Recording Level.”
Recording on a Disc
Recor
ding
Содержание CDR-W66
Страница 39: ......
Страница 40: ...Printed in Japan ...


