


NOTE: All buttons are touch sensitive sensor buttons. They do not have to
be pressed, touching them is suffcient.
s
OPERATION
STARTING AND ADJUSTING THE APPLIANCE
1. If you have completed all steps under “BEFORE FIRST USE”, connect the power
cord to a suitable wall outlet. The appliance beeps and the red
symbol in the
ON / OFF button starts flashing.
2. Touch the ON / OFF button for one second to switch the appliance on. When
the appliance is switched on, you hear a signal sound, the red
symbol in the
ON / OFF button lights up constantly and the display states the current water
temperature.
NOTE:
Should the water level exceed the MIN marking with the error code
“E001” being displayed nonetheless, stir a little bit of table salt into the water.
3.
Now set the desired cooking temperature:
–
Touch and release the Temperature button
. Now the display flashes and
the temperature can be set.
–
Using the + and − buttons, you can set the desired temperature. Touching the
+ or − button for more than just a moment will quickly increase or decrease
the temperature shown in the display. You can set a target temperature
between 25 °C and 85 °C (77 °F and 185 °F). The default temperature setting
is 60 °C.
–
Stop touching the button once the desired temperature is shown on the
display. After 5 seconds, the display will return to showing the current water
temperature in the water basin.
4.
Now set the desired cooking time:
–
Touch the Timer button
. Now the display flashes and the countdown timer
for the cooking time can be set. The default time setting is 2 hours.
–
Using the + and − buttons, you can set the desired cooking time. Touch-
ing the + or − button for more than just a moment will quickly increase or
decrease the time shown in the display. You can set a temperature between
00:00 (unlimited cooking time) and 99:00 (99 hours). Stop touching the but-
ton once the desired cooking time is shown in the display. After 5 seconds,
the display will return to showing the current water temperature in the water
basin.
NOTE:
It is not urgently required that the cooking time is set. When you set the
timer to 00:00, the Sous-Vide Cooker Pro will work until you manually switch it
off again.
.
s
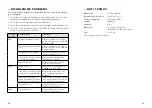
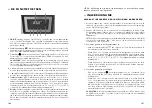
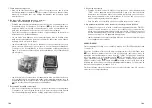
THE FUNCTION BUTTONS
1
1
3
6
7
2
4
5
ON / OFF button
:
Touch the ON / OFF button for 1 second to switch the
appliance on or off. The display will light up once the appliance is switched on.
Also, the red
symbol on the ON / OFF button will light up constantly once the
appliance is switched on.
2 Start / Pause button
:
With this button, you can start or pause the cooking
process. The Pause function will only work if a cooking time has been set and if
the set temperature has been reached.
3 Timer button :
With this button, you can set the operation time of the Sous-
Vide Cooker Pro. Settings between 00:00 and 99:00 are possible, the default
time setting is 2 hours.
REMARK:
If you do not wish the appliance to switch off automatically after a
certain time, you may set the countdown timer to 00:00. Like this, the Sous-Vide
Cooker Pro will work until it will be switched off manually.
4 + button:
With this button, you can increase the temperature resp. the time.
Constantly touching the button will quickly change the setting.
5 – button:
With this button, you can decrease the temperature resp. the time.
Constantly touching the button will quickly change the setting.
6 Temperature button
:
With this button, you can choose units (°C or °F)
and set the water temperature. Touch the button once and the display starts
flashing. Repeatedly touching the button will switch between °C and °F. While
the display is flashing, you can set the desired water temperature with the
buttons − and +. Temperatures between 25 °C and 85 °C (77 °F and 185 °F) are
possible. The default temperature setting is 60 °C.
7 Display:
Once the appliance is switched on, the current water temperature
will show up on the display. While adjusting the temperature, the currently set
temperature is shown. While adjusting operation time, the currently set time is
shown. After that, the display will return to the current water temperature. The
temperature unit (Celsius or Fahrenheit) is shown to the right of the display.
82
83