Instruction manual
SolarMax TP series
4TP / 5TP2 / 6TP2 / 7TP2
Register here:
maxview.solarmax.com
Страница 1: ...Instruction manual SolarMax TP series 4TP 5TP2 6TP2 7TP2 Register here maxview solarmax com...
Страница 2: ...Sputnik Engineering AG L nggasse 85 CH 2504 Biel Bienne E Mail info solarmax com Sputnik Engineering AG 2014...
Страница 3: ......
Страница 4: ...pleteness 15 4 3 Selecting the installation location 16 4 4 Mounting the inverter 18 5 Electrical connection 19 5 1 Open the inverter 19 5 1 1 Removing the cover 19 5 1 2 Removing the right hand conta...
Страница 5: ...ion 48 6 4 Displaying the configuration 51 6 4 1 Procedure 51 6 4 2 Description of extended functions and parameters 52 6 5 Displaying the measured values 57 6 6 Registering for MaxView 58 6 7 Update...
Страница 6: ...ubleshooting 67 8 2 2 Warnings 68 8 2 3 Faults 68 8 2 4 Error 69 8 2 5 Blockings 69 9 Maintenance 70 10 Decommissioning 71 10 1 Instructions for inverter replacement 71 10 2 Inverter disassembly 71 10...
Страница 7: ...ics industrial electronics technicians The instructions in chapter 4 should only be carried out by specialist transport personnel 1 3 Where to keep this manual The plant operator must ensure that this...
Страница 8: ...ic grid Any other use in particular the conversion of direct current from batteries or other storage elements into alternating current is not permissible Inverters of the TP series may only be connect...
Страница 9: ...s switched off the contacts are open The DC disconnector is switched on the contacts are closed Risk of death through high voltages Only qualified electricians may perform work on the inverter Caution...
Страница 10: ...ed with an MPP tracker Each MPP tracker can be fitted with one string as standard The grid connection is a three phase connection Automatic operation Inverter operation is completely automatic and dep...
Страница 11: ...with an internal fan 3 3 Safety installations Surge protection The inverter is fitted with surge arresters varistors at its input and output Each DC input plus and minus connection is fitted with a su...
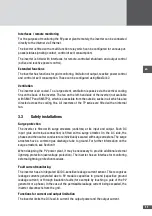
Страница 12: ...C the equipment temperature may reach more than 80 C In such cases the maximum in feed power is temporarily reduced When the equipment temperature rises above 85 C the inverter disconnects from the g...
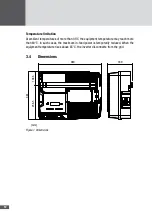
Страница 13: ...2 1 3 4 8 7 Figure 2 Views of the unit No Description 1 DC disconnector 2 Type plate 3 Graphics display 4 Cover 5 Mounting rail 6 Fan only SM6TP2 SM7TP2 7 Cooling fins 8 Connection area only 2 DC plug...
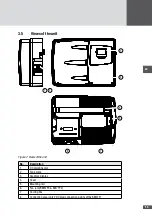
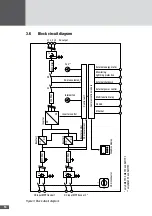
Страница 14: ...energy meter Inverter control Booster control Inverter LCL filter Booster 2 Booster 1 DC DC AC K2 K1 DC DC DC External power control Control unit Communication module Graphics display only SM5TP2 SM6T...
Страница 15: ...packaging when shipping the inverter 4 2 Checking the delivery for completeness Check the contents of the delivered package for completeness and possible damage In the case of an inadequate delivery...
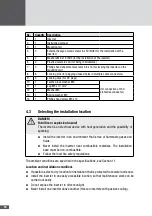
Страница 16: ...x 12 4 3 Selecting the installation location DANGER Fatal fire or explosion hazard The inverter is an electrical device with heat generation and the possibility of sparking Install the inverter in an...
Страница 17: ...ounting positions The optimal cooling of the inverter is only guaranteed when the cooling fins see section 3 5 are absolutely free of dust and dirt When installing the inverter on a mast a mounting pl...
Страница 18: ...izontal position 3 Mark 2 places for drilling 446 376 26 mm 26 6 5 6 5 Figure 7 Dimensions of wall mounting bracket For the other measurements see section 3 4 4 Drill two 8 x 50 mm holes 5 Fix the mou...
Страница 19: ...d sockets the S0 interface and the inter face for the lightning protection monitor are directly accessible Procedure 1 Disconnect the AC power supply to the inverter 2 Disconnect all control cables co...
Страница 20: ...act protection covers the AC connection terminals and the AC feed in lines Procedure 1 Operate the snap lock and pull the right hand contact protection from its holder Figure 10 Remove the right hand...
Страница 21: ...onduc tors which may be charged with dangerously high voltages external shutdown status signaling contact Procedure 1 Operate the snap lock and pull the left hand contact protection from its holder Fi...
Страница 22: ...2 DC connection MPP tracker 1 3 Middle cable gland communication and control connections 4 DC connection for MPP tracker 2 only with SM5TP2 SM6TP2 SM7TP2 5 Right hand cable pass through AC feed cable...
Страница 23: ...ductors with or without ferrule or rigid conductors max 16 mm2 flexible conductors with ferrules with plastic sleeves max 10 mm2 The AC input conductor must be fused Minimum conductor cross sections a...
Страница 24: ...d in Section 5 1 1 2 Remove the right hand contact protection as described in Section 5 1 2 3 Thread the AC feed cable through the right hand cable gland 4 Pull the ferrite included in the delivery ov...
Страница 25: ...ode In the dual tracking mode a separate MPP tracker is available for each DC input Connection conditions Connection of maximum 2 strings 1 string in the case of SM4TP DANGER Risk of death by fire Hig...
Страница 26: ...the PV generator Procedure 1 Make sure the DC disconnector and the external AC disconnector are off 2 Connect the pre fitted DC conductors DC DC DC DC 1 2 Figure 16 DC connection No MPP tracker 1 1 2...
Страница 27: ...oltage protection If you want to increase the overvoltage protection on the DC side using additional external surge arresters the following connection conditions must be met Use a surge arrester with...
Страница 28: ...2 S0 S0 BS BS 12 NC 14 11 K3 K4 K1 K2 NA N K5 K6 Figure 19 Connection terminals for communication Contact Description N External shutdown external power control NA External shutdown K1 External power...
Страница 29: ...ions The inverter can be connected to Ethernet and RS485 networks Note You will find further details about data communication in the technical infor mation MaxComm network You can download this docume...
Страница 30: ...needed While the external grid monitoring signal the phase voltage is active at the NA contact the inverter feeds into the grid When the signal stops the grid relays K1 and K2 of the inverter are ope...
Страница 31: ...land Figure 21 1 3 Connect the wires as follows Wire stripping length 7 mm 1 2 Figure 21 Connection of external shutdown Contact Description NA Control line N Neutral conductor 4 Close the unused aper...
Страница 32: ...on of the ripple control receiver to the interface 20 19 18 17 16 15 14 13 12 11 10 9 8 7 6 5 4 3 2 1 a b c a b c a b c a b c a b c a b c K6 K5 K4 K3 K2 K1 L 230 V I max 150 mA N I 25 mA N K5 K6 K4 K3...
Страница 33: ...the left hand cable gland Figure 23 1 3 Connect the wires as follows Wire stripping length 7 mm 1 2 Figure 23 Connection of external power control Contact Description K1 Control signal relay K1 K2 Co...
Страница 34: ...e cable diameters min 9 5 mm max 12 5 mm Connectable conductor cross sections min 0 25 mm2 max 2 5 mm2 Max switching voltage 250 VAC 30 VDC Max switching current 1 5 A no internal fuse present Max cab...
Страница 35: ...the contact protection 8 Fit the cover of the inverter You can switch the inverter on as described in Section 6 1 5 5 7 Lightning protection monitor This interface can be used for monitoring an exter...
Страница 36: ...the cable through the middle cable gland Figure 26 1 3 Connect the wires as follows Wire stripping length 7 mm Contact Description BS Remote signaling contact of the lightning protection module potent...
Страница 37: ...for feed in S0 pulses for both directions of energy flow are not permitted The pulse rate of the energy meter must be between 1000 and 10000 pulses per kWh Connectable cable diameters min 9 5 mm max 1...
Страница 38: ...f consumption The connection is made via the relevant communication interfaces Several different operating modes can be selected Operating mode Description Grid feed in limitation As the inverter cont...
Страница 39: ...imitation is configured using the free MaxTalk 2 Pro service software see Section 12 S0 S0 BS BS 12 NC 14 11 kWh R kWh N Inv PV C 0 20 40 60 80 100 120 Figure 28 Wiring in Grid feed in limitation oper...
Страница 40: ...electric meter operating mode can be configured on the inverter s graphics display or using MaxTalk 2 S0 S0 BS BS 12 NC 14 11 R K N Inv PV kWh kWh C 0 20 40 60 80 100 120 Figure 29 Wiring in Pac elect...
Страница 41: ...e Pac inverter operating mode can be configured on the inverter s graphics display or using MaxTalk 2 S0 S0 BS BS 12 NC 14 11 R K N Inv PV kWh kWh C 0 20 40 60 80 100 120 Figure 30 Wiring in Pac inver...
Страница 42: ...tion status message to be displayed This indicates that the inverter is in mains operation During initial start up of the inverter instead of the Overview menu an Initial setup menu appears see Sectio...
Страница 43: ...Switch on the inverter as described in Section 6 1 The Initial setup menu will be displayed Figure 32 Selecting the display language and updating the system time 2 Select the display language from the...
Страница 44: ...CPP Inactive The cos Pac function is deactivated no reactive power generated cos 1 On The cos Pac function for reactive power generation is activated 6 3 Settings Different communication parameters an...
Страница 45: ...ime The inverter s display language and system time can be changed in the Settings menu 1 Select the Settings menu Figure 36 Changing the display language and system time 2 Select a parameter Paramete...
Страница 46: ...e inverter is a DHCP client and is connected to a network with DHCP server factory setting Static The inverter is connected to a network with static IP addresses 3 If appropriate configure the followi...
Страница 47: ...C input voltage the status signaling contact closes The status signaling contact will not re open unless the inverter is switched off DC input voltage too low 4 Select Delay 5 Adjust the required dela...
Страница 48: ...relay on off Energy meter Pac W Start time End time Enable threshold Figure 37 Pac electric meter operating mode The time window of the control of self consumption is defined by the Start time and End...
Страница 49: ...enu Multi function relay select the PacEm setting 6 Configure the parameters 6 3 6 2 Configuring the Pac inverter operating mode The Pac inverter operating mode for the control of self consumption can...
Страница 50: ...he Self consumption setting 3 In Mode select the Pac inverter operating mode 4 Configure the parameters Parameter Description Value range Unit Enable threshold Activation value 100 10000 W Disable thr...
Страница 51: ...ntry setting selected at the time of initial start up Plant system rating Plant system rating selected at initial start up only available with the Germany country setting SSF Menu of standard specific...
Страница 52: ...ENA EISD function status Disabled enabled EPC Output control by ripple control receiver or similar external control unit EPC ENA EPC function status Disabled enabled Inverter start up Functions and p...
Страница 53: ...2 function status Disabled enabled GVMMIN2 THR Limit value V GVMMIN2 DLY Trip time s GVMMAX2 Checking the maximum permissible mains voltage limit 2 GVMMAX2 ENA GVMMAX2 function status Disabled enabled...
Страница 54: ...ing the leakage current step value RSCM ENA RSCM function status Disabled enabled DCCIM Monitoring the DC component in the AC current DCCIM ENA DCCIM function status Disabled enabled DCCIM THR Maximum...
Страница 55: ...wer limit value of the active power W QMCPP Reactive power mode cos Pac QMCPP PSP1 PSP10 Characteristic values 1 to 10 of Pac active power of Pac nom QMCPP CPSP1 CPSP10 Characteristic values 1 to 10 o...
Страница 56: ...alue UEX of Pac nom QMQU2 UPVLI Mains voltage switch on value for QMQU2 UPQ V QMQU2 UPVLO Mains voltage switch off value for QMQU2 UPQ V QMQU2 LOVLI Mains voltage switch on value for QMQU2 LOQ V QMQU2...
Страница 57: ...l output current A IacL1 IacL2 IacL3 Phase current L1 L2 L3 A s Apparent output power VA Pac Output power W Q Reactive power overexcited underexcited var cos Power factor OEX overexcited UEX underexci...
Страница 58: ...ons about MaxView and the replies to these can be found on our website at https maxview solarmax com faq xhtml Procedure 1 Connect the inverter to the internet via the Ethernet interface see Sections...
Страница 59: ...5 3 Figure 41 Graphics display with the standard Overview display No Description 1 Graphics display with backlighting 2 Status LED operating status display see Section 7 7 3 Function keys membrane key...
Страница 60: ...twork IP IP Mode Netmask Gateway TCP Port DNS1 DNS2 MF Relay Status relay Selfconsumption Off SSF Settings Grid operation External input Inverter start up Limitation Reactive power Reference parameter...
Страница 61: ...menu Figure 43 Overview menu Display Description 19 06 2013 11 44 35 Date and system time examples Pac Current output power W Today Daily yield kWh Total Total yield since commissioning kWh State Oper...
Страница 62: ...s values for the last 31 days 1 In the Statistics menu select the Day sub menu Figure 45 Daily statistics 2 Press or to select the day Statistics value Description Yield Daily yield kWh Maximum Fed in...
Страница 63: ...last 25 years 1 In the Statistics menu select the Year sub menu Figure 47 Annual statistics 2 Press or to select the year Statistics value Description Yield Annual yield kWh Maximum Fed in maximum pow...
Страница 64: ...ted 1 In the Statistics menu select the Reset sub menu Figure 49 Resetting the inverter s data logger Note The deletion process cannot be undone 2 Press to cancel the deletion process 3 Press to delet...
Страница 65: ...tus messages the inverter also displays warnings Warnings result from device errors or external failures The inverter continues to feed power into the grid but it is possible that yield is reduced War...
Страница 66: ...dc limitation The inverter limits the PV generator current to the maximum permissible value This may occur if the PV generator is designed such that the current at Maximum Power Point MPP exceeds the...
Страница 67: ...2504 Biel Bienne 8 2 Diagnosis measures The following tables describe possible actions for remedying faults If the actions sug gested do not correct the fault please contact the SolarMax Service Cent...
Страница 68: ...r Flash error An error has occurred in the flash memory Contact the SolarMax Service Center SPD failure A signal is active at the lightning protection monitoring interface inputs BS and BS Check the e...
Страница 69: ...rage value of the mains voltage GVM10AMAX THR is too high DC insulation fault The insulation resistance of the PV generator to ground is too low Check the PV generator Phase and neutral conductor are...
Страница 70: ...ularly check the operating status of the inverter on the graphics display see Sec tion 7 7 Clean the graphics display with a damp cloth Do not use harsh or abrasive cleansing agents Check the inverter...
Страница 71: ...this chapter WARNING Risk of injury from electric arc Dangerous electric arcs could occur when removing live DC conductors Switch off the DC disconnector before pulling out the DC plugs ATTENTION Ele...
Страница 72: ...the inverter CAUTION Risk of burns due to hot casing components Wait until the back of the casing has cooled down 7 Fit the contact protection 8 Fit the cover of the inverter 9 Remove the 2 lateral P...
Страница 73: ...rent output power 2 4000 VA 5000 VA 6000 VA 7000 VA Maximum AC current2 3 x 6 5 A 3 x 7 5 A 3 x 9 5 A 3 x 10 2 A Nominal mains voltage range 3 x 400 V Mains nominal frequency range 50 45 55 Hz Power f...
Страница 74: ...Ethernet Plug Play Status signalling contact integrated Ripple control signal receiver integrated External lightning protection monitor integrated External grid monitoring integrated Energy counter S0...
Страница 75: ...downloaded from our website www solarmax com Downloads Software MaxTalk MaxTalk 2 Pro Professional version of MaxTalk 2 for the configuration of inverters This software can be downloaded from our web...
Страница 76: ...replaced by SPUTNIK service personnel within a reasonable time in either case free of charge unless this is impossible or disproportionate SPUTNIK may decide at its own discretion whether a device wil...
Страница 77: ...mentioned in the paragraph above 4 Warranty Period in Case of Repair Replacement In case of repair or replacement of devices under this warranty the repaired respectively replaced device will inherit...
Страница 78: ...device by SPUTNIK Central Inverters The extension of the basic warranty can be ordered within 3 months after pur chase but the latest within 12 months after dispatch by SPUTNIK b Extent Full warranty...
Страница 79: ...en 79 Notes...
Страница 80: ...SolarMax Service Center Please refer to our website for contact details www solarmax com service 2014 05 en...