


24
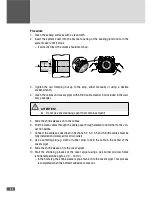
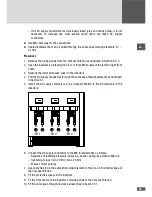
Procedure
1. Clean the sealing surfaces with a clean cloth.
2. Insert the system cover into the bayonet opening of the sealing gland and turn the
system cover until it stops.
– If correctly fitted, the marks should match up.
3. Tighten the red clamping nut up to the stop, either manually or using a flexible
socket-wrench.
4. Clean the cables and cover spigot with KR 60 cable cleaner (not included in the deli-
very package).
ATTENTION!
■
■
Do not use any cleansing agent that contains solvent!
5. Slide the shrink sleeves on to the cables.
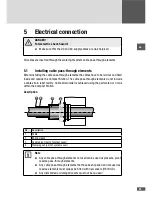
6. Pull the clean cables through the cable pass-through element and further to the con-
nection points.
7. Connect the cables as described in Sections 5.2, 5.3, 5.5 and 5.6 (the cables must be
fully installed and clamped for strain relief).
8. Use a centering aid (e.g. cloth or rubber strip) to hold the cable in the center of the
cover spigot.
9. Slide the shrink sleeve on to the cover spigot.
10. Start the shrinking process at the cover spigot using a gas burner and low flame
(shrink temperature approx. 20 ... 140°C).
– In the first step, the shrink sleeve is pre-shrunk on to the cover spigot. This process
is completed when the hotmelt adhesive comes out.
Содержание 330TS-SV Compact Station
Страница 3: ...en 3 en 3...
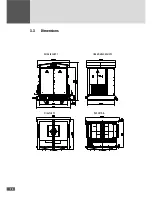
Страница 12: ...12 3 3 Dimensions Vorderansicht linke Seitenansicht Draufsicht Schnitt A A...
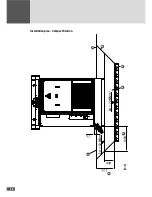
Страница 22: ...22 Installation plan Compact Station 1000 mm Ev 2 50 MN m2 Ev 2 20 MN m2 725 400 75 1 4 3 2 5 7 6...
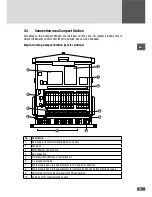
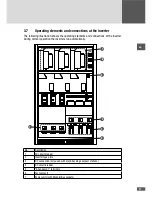
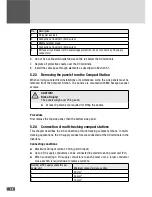
Страница 27: ...en 27 25 mm M12 3 2 4 6 1 5 No Description 1 NH fuse circuit breaker...
Страница 83: ...en 83 Notes...


