


Managing Your Security
System
67
RB6741-Z Touchscreen Security System User Manual
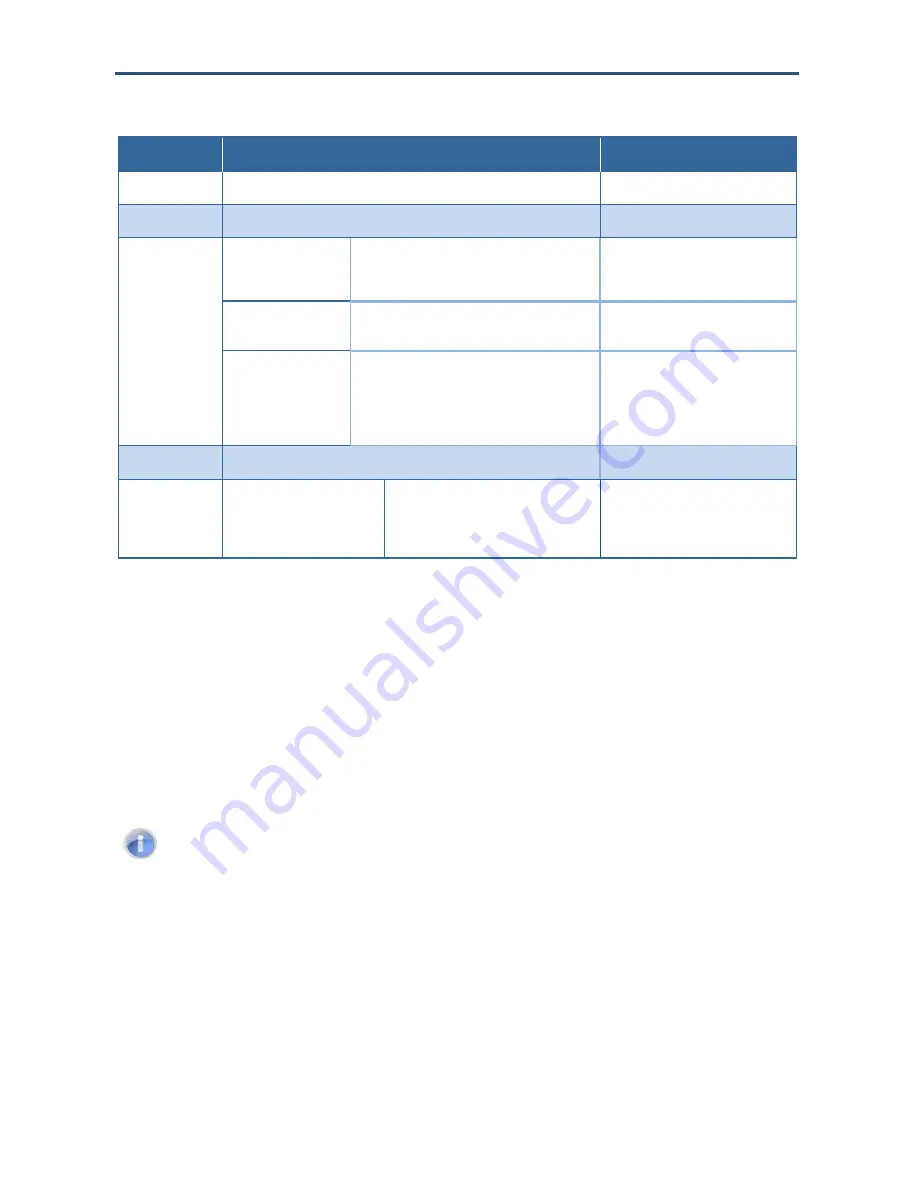
Table 3-4. Edit Camera Options
Item
Description
Modifiable?
Model
Make and model ID for the camera
No
Camera Name
Name assigned to camera device
Yes
Associated Zone
Default Camera
If any door sensor not assigned to a camera trips
an alarm, this camera will take a series of
pictures.
Yes
Unassigned to Zone
This camera is not associated with another
sensor and it is not the Default camera.
Yes
<Security zone name> This camera is associated with the selected
zone. It will take a series of pictures
automatically when the zone trips an alarm,
whether or not the alarm is ultimately sent to the
central-monitoring station.
Yes
Video Quality
Level of video detail captured by the camera
Yes
Enable LED
On/Off
If set to ON, the camera LED light is ON
or blinks to show whether the camera is
communicating with the router. If set to
OFF, the camera LED does not light.
Yes, for some brands of cameras.
This field is not displayed if this value
cannot be modified.
4. Tap the
Camera Name
fields to display a keyboard screen and rename the Camera
zone. Tap
Done
to accept your changes.
5. Tap the
Enable LED
field to turn the camera LED on or off.
6. Tap the
Associated Zone
field to display menu of options for assigning the camera to a
security zone (see
“Assigning a Camera to a Security Zone” on page 68
).
7. Tap the
Video Quality
field to test the upload network speed and determine the best
video quality level for the current camera (see
“Modifying Video Quality” on page 69
).
Note:
When you modify the video quality, the system lets you choose to display live
video in three levels based on the camera’s connection speed to the system
servers.


