Siemens Energy & Automation, Inc.
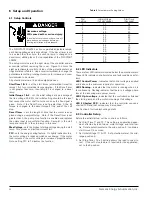
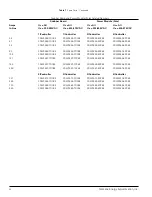
Table 6
Troubleshooting
Trouble
Cause
Check/Remedy
Motor does not start
No main power
Check input side of terminals L1, L2 and L3 for open disconnect
and LED 1 is not on.
switch, breaker trip, or insecure terminal connections. Verify that
proper three-phase incoming power is present per paragraph
6.5, steps 3, 4 and 6.
No control power
Check input side of control terminals X1 and X2 for blown fuse,
any open circuit condition or insecure terminal connections.
Verify that proper control voltage is present (10%,-15%
of nominal controller rating). If the control circuit includes a con
trol power transformer (CPT), verify that the CPT primary voltage
is present and proper for the CPT primary tap.
Motor does not start and
Motor not connected
Check that any series disconnect switch or isolating contact is
LED 1 is on
closed.
Check for tripped overload relay. Determine and remedy cause
of trip per “Motor overload relay trips...” trouble below.
Verify that the motor is connected to the controller. With proper
incoming power and the motor connected but stopped, volt-
meter readings across terminals T1 and T2, T2 and T3, and T3 and
T1 should be zero. A reading of line voltage indicates that the
motor is not connected properly.
Motor does not start,
Discontinuity in the
Check that control power is present at terminals A1 and A2. If
LED1 is on and LED 2
control input circuit
power is not present, check for insecure wiring connections at
is not illuminated.
to the Run coil
terminals A1 and A2, at applicable control terminals (13, 14, etc.),
and at the control devices (e.g., start-stop device, isolation con-
tact) used in the input circuit to the Run coil.
Bad cable connection
Remove control power and check that Logic PCB-to-Snubber
or defective printed
PCB cable is secure. If secure, remove main power and
circuit board (PCB)
replace Logic PCB and/or snubber PCB.
component
Faulty motor
Troubleshoot motor according to the manufacturer’s instructions.
Motor starts but does
Controller not finished
Check that LED 3 is on, which indicates output voltage equals
not come up to speed
ramping to line voltage
line voltage. If motor is coming up to speed too slowly, decrease
Start Time T1 and/or increase Initial Voltage U; refer to
paragraph 6.6.
Motor growls or hums
Initial Voltage U is set
Raise setting of Initial Voltage U until motor just starts to rotate
at start but comes
too low
when power is first applied; refer to paragraph 6.6.
up to speed
Motor growls at start and does
Motor unable to start load.
Check load for mechanical blockage (rocks, logs, seized bear-
not come up to speed.
ings, etc.). Increase motor size; for proper controller selection,
refer to section 3.
Controller not finished
Check that LED 3 is on, which indicates output voltage equals
ramping to line voltage.
line voltage. If motor is coming up to speed too slowly, decrease
Start Time T1 and/or increase Initial Voltage U; refer to
paragraph 6.6.
Shorted SCR (LED 4
Check SCR’s as described in paragraph 9.3.
is on)
27


