background image

Modules


3-110

Service Manual


Entrance telephone

Examples of connection 

Depending on the functions desired, the connection should be made with an electric entrance 
telephone (TFE-S) with amplifier.

In the analog interface, the a wire should be connected to the negative and the b wire to 
the positive

.

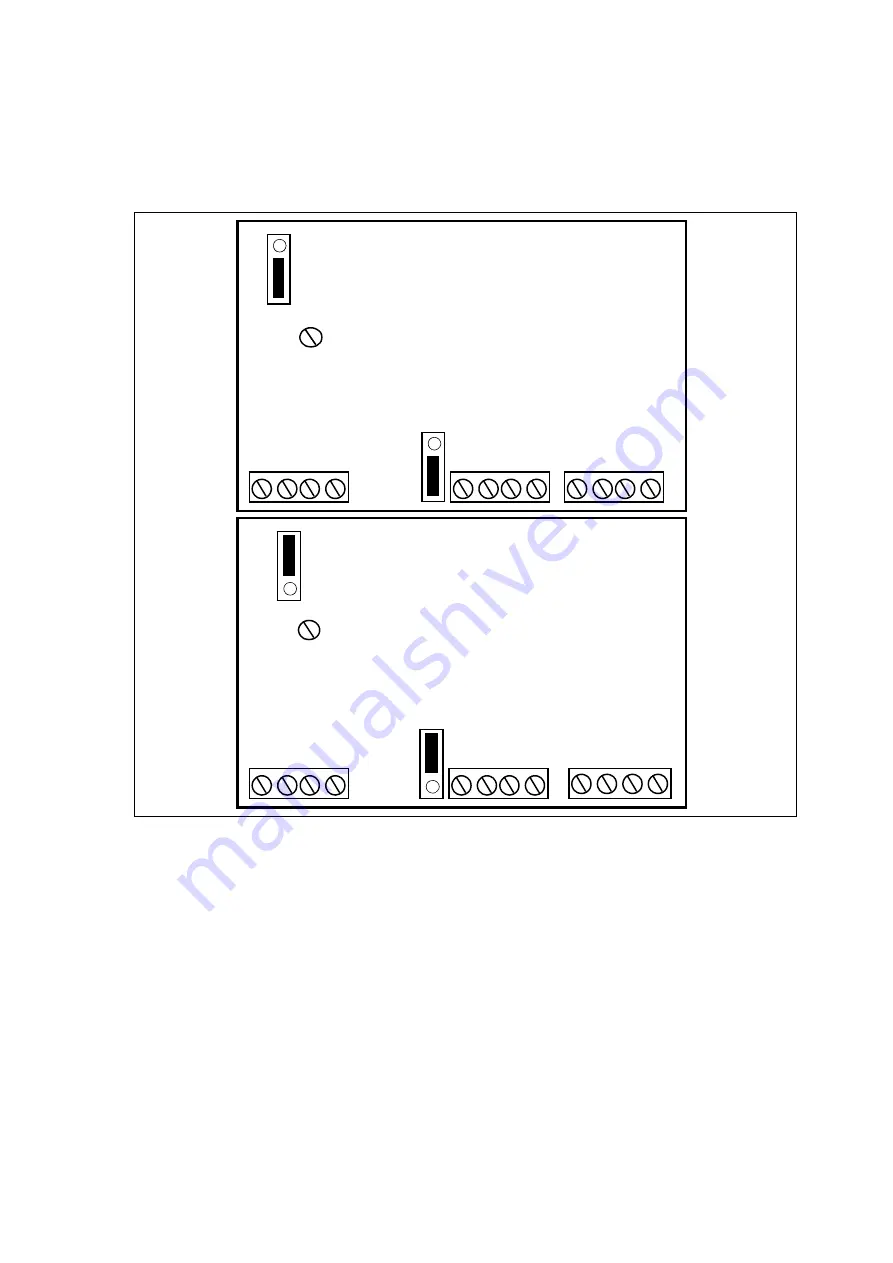
Figure 3-46

Assigning button pad contacts 

X2

X1

X2

X5

X4

X3

X5

X4

X3

X1

1

2 3 4

1

2 3 4

1

2 3 4

1

2 3 4

1

2 3 4

1

2 3 4

Connection in:

Button pad
Ritto 5760

Connection in:

Button pad
Siedle TLM 511-

01

(Siedle TLM 511-02 - 
not possible!)

Potentiometer 

Potentiometer 

-   +

-   +

Содержание HiPath 1100

Страница 1: ...HiPath 1100 HiPath 1120 HiPath 1150 HiPath 1190 Service Manual ...

Страница 2: ...ecifically for the client Feature access codes Abbreviations Index Selo CE The device conforms to the EU directive 1999 5 EG as attested by the CE mark Certificado Ambiental This device has been manufactured in ac cordance with our certified environmental management system ISO 14001 This process minimises energy consumption the use of primary raw materials and waste production ...

Страница 3: ...ath 1100 2 27 2 4 HiPath 1100 System Periphery 2 28 2 5 System expansion limitations 2 30 2 5 1 Considerations for digital lines 2 32 2 5 2 Considerations on system telephones 2 34 2 5 3 Notes on HiPath 1150 2 35 2 5 4 Notes on HiPath 1190 2 36 2 6 Technical Data 2 38 2 7 Technical standards and compliance 2 39 2 7 1 International Safety Standard 2 40 2 7 2 Environmental conditions 2 40 2 8 Docume...

Страница 4: ...5 3 8 Batteries 3 98 3 8 1 Examples of Configurations X Capacities x Times 3 100 3 9 Main Distribution Frame 3 100 3 10 Backplane 3 101 3 10 1 HiPath 1150 3 101 3 10 2 HiPath 1190 1190R 3 102 3 11 Entrance telephone 3 103 3 11 1 Internal entrance telephone with TFE interface 3 103 3 11 1 1 Examples of connection 3 104 3 11 1 2 TFE S interface 3 108 3 11 2 External entrance telephone 3 112 3 11 2 1...

Страница 5: ... Installing a TME1 module 4 148 4 7 5 ADSL Connection in the LAN interface modules 4 149 4 7 5 1 ADSL module 4 149 4 7 5 2 SLIMC SADSLIM LIMC and ADSLIM modules 4 149 4 7 6 Installing a Baby Board ADSL module 4 151 4 7 6 1 On the HiPath 1120 4 151 4 7 6 2 On the HiPath1150 1190 1190R 4 152 4 7 7 Installing an EVM module 4 153 4 7 7 1 On the HiPath 1120 4 153 4 7 7 2 On the HiPath 1150 4 154 4 7 7 ...

Страница 6: ...ling 4 186 4 17 Installing telephone terminals 4 186 4 18 optiPoint Master Slave telephone HiPath 1120 connections 4 188 4 19 Performing a visual inspection 4 189 5 Telephones 5 191 5 1 Overview 5 191 5 2 System Telephones 5 191 5 2 1 Keys 5 192 5 2 2 Profiset 3030 System Telephone 5 192 5 2 3 E822 ST System telephone 5 193 5 2 4 E821 ST System Telephone for Brazil only 5 195 5 2 5 optiPoint 500 S...

Страница 7: ...ll Detail Report Manager 6 262 6 3 10 Fax DID Feature 6 267 6 3 11 EVM module 6 269 6 3 12 Digital trunk settings 6 271 6 3 13 LAN interface modules 6 275 6 3 14 Relay and sensor on the HiPath 1120 6 275 7 Operation 7 278 7 1 Programming with a Telephone Set 7 279 7 2 System programming mode using a PC 7 280 7 2 1 Local Connection 7 281 7 2 1 1 V 24 Serial Interface 7 281 7 2 1 2 USB Interface 7 2...

Страница 8: ...2 7 4 4 9 Configuring the SpeedStream 4100 modem 7 354 7 4 5 LCR settings 7 355 7 4 5 1 GSM SIP BOX with LCR support 7 361 7 4 5 2 Importing the LCR from the Telefonsparbuch 7 361 7 4 6 E1 Trunk Manager 7 362 7 4 7 S2M Maintenance 7 363 7 4 8 Account Manager CDR 7 363 7 4 9 Status Monitor indicator 7 363 7 4 10 MOH Transfer Wizard 7 364 7 4 11 Software Update 7 364 7 4 12 CAPI Applications 7 364 7...

Страница 9: ...e 3 15 CAS access connection 3 71 Figure 3 16 S2 access connection with 75 ohm impedance 3 71 Figure 3 17 S2 access connection with 120 ohm impedance 3 72 Figure 3 18 Signal distribution on the TME1 module Connector 3 72 Figure 3 19 DIP Switch for the TME1 module 3 73 Figure 3 20 UP0 E module HiPath 1120 3 77 Figure 3 21 UP0 E module HiPath1150 1190 1190R 3 78 Figure 3 22 CTR UP0 E module HiPath 1...

Страница 10: ...he HiPath 1120 Main Distribution Frame 4 129 Figure 4 3 System installation overview HiPath 1120 4 129 Figure 4 4 Dimensions of the HiPath 1150 4 130 Figure 4 5 System installation overview HiPath 1150 4 130 Figure 4 6 Opening the HiPath 1150 Main Distribution Frame 4 131 Figure 4 7 Dimensions of the HiPath 1190 1190R 4 132 Figure 4 8 Opening the HiPath 1190 1190R 4 132 Figure 4 9 HiPath 1190 1190...

Страница 11: ...tion for the HiPath1150 1190 1190R Sys tems 4 183 Figure 4 45 Protection and grounding connection diagram 4 184 Figure 4 46 Connections for telephone jacks for Brazil 4 187 Figure 4 47 optiPoint Master Slave telephone HiPath 1120 connections 4 188 Figure 5 1 Profiset 3030 System telephone layout 5 193 Figure 5 2 E822 ST system telephone layout 5 194 Figure 5 3 E821 ST system telephone layout 5 195...

Страница 12: ...on 7 310 Figure 7 33 Windows XP Driver installation location 7 311 Figure 7 34 Windows XP ISDN 7 311 Figure 7 35 Windows XP MSN 7 312 Figure 7 36 Windows 98 SE USB drivers installation location 7 317 Figure 7 37 Windows 98 SE USB drivers installation location 7 317 Figure 7 38 Windows 98 SE selection for ISDN 7 318 Figure 7 39 Windows 98 SE MSN Number 7 319 Figure 7 40 Windows ME Specify installat...

Страница 13: ...irmware Upgrade 7 344 Figure 7 67 Configuring the Speed Stream Modem 7 345 Figure 7 68 Login to the Speed Stream Modem 7 345 Figure 7 69 Configuring the Speed Stream Modem 7 346 Figure 7 70 Returning to factory settings 7 347 Figure 7 71 Access to COMGATE 7 348 Figure 7 72 CommServer Configuration 7 349 Figure 7 73 Communication Server Configurations 7 350 Figure 7 74 LCR module 7 355 Figure 7 75 ...

Страница 14: ...Figures 14 Service Manual ...

Страница 15: ...le 3 5 Baby Board VCC module Connectors HiPath 1120 3 54 Table 3 6 HiPath 1150 Motherboard Connector assignments 3 56 Table 3 7 HiPath 1190 Motherboard Connector assignments 3 58 Table 3 8 EB 200 Connector assignments 3 59 Table 3 9 EB 204 Connector assignments 3 60 Table 3 10 Connector assignments for modules EB 210 EB 206 and EB 202 3 62 Table 3 11 EB 012 and EB 010 Connector assignments 3 64 Ta...

Страница 16: ...e signals 3 120 Table 3 45 TME1 coax cable signals 3 121 Table 3 46 Technical data of the balun 3 122 Table 3 47 Technical data of the battery interconnect cable 3 122 Table 4 1 HiPath 1100 Equipment installation procedures 4 126 Table 4 2 Slot type of module for the HiPath 1150 4 141 Table 4 3 Slot type of module on HiPath 1190 1190R systems 4 144 Table 4 4 Example of the location of extensions o...

Страница 17: ...es 165 6 226 Table 6 17 Analog CLIP Protocol 005 6 226 Table 6 18 Fax DID Feature 6 227 Table 6 19 EVM module 6 229 Table 6 20 Digital trunk settings0 6 231 Table 6 21 CAC Code 012 6 232 Table 6 22 LAN interface modules 6 232 Table 6 23 Relay and sensor on the HiPath 1120 6 233 Table 6 24 CD Interface Assignment 6 248 Table 6 25 CDR Header Layout 6 265 Table 9 1 Abbreviations 9 382 ...

Страница 18: ...discuss the situation with a supervisor before starting to work For example humidity or risk of an explosion due to the presence of gas should be talked about before proceeding Safety Symbols The following symbols are used to indicate potential hazards Warning Only service and installation personnel should open the PABX box and or connect and handle trunk and extension lines This symbol indicates ...

Страница 19: ...mediately covers labels safety cables Use Siemens approved cables and modules only The use of accessories that are not recommended for the system may cause it to malfunction Make sure power is turned off while equipment is being serviced When maintenance services require shutting down the system make sure to disconnect all power supplies Working on low voltage network circuits Only qualified techn...

Страница 20: ...lues are higher This results in higher risk specifically in the event of a short circuit Protective Clothing Equipment When working with the equipment do not wear loose fitting clothes Contain long or free flowing hair To avoid injury and the risk of short circuiting do not wear jewelry watches with metallic wristbands clothing with metallic accessories or rivets when working with the equipment Al...

Страница 21: ... problems to your supervisor ESD Protection for Components ESD To protect an electrostatically sensitive device Wear an anti static wristband before servicing or maintaining the system or any of its modules Always transport the system or its modules in appropriate protective packaging When working with boards always place them on a grounded conductive base Use grounded soldering irons with only La...

Страница 22: ...ironment to a location at room temperature take into consideration Environmental conditions on page 2 40 to prevent the occurrence of condensation Wait until the equipment is at room temperature and completely dry before turning it on Wall Mounting Some types of walls e g drywall have limited weight bearing capacity Before installing equipment in wall mount configuration make sure the wall can sup...

Страница 23: ... order to help victims who have suffered cardiac arrest or who have stopped breathing It is also essential to have basic knowledge of the kind of first aid administered to burn victims If the victim is not breathing perform mouth to mouth or mouth to nose resuscitation immediately If you have had proper training and the victim s heart is not beating promptly commence a heart massage Emergency Call...

Страница 24: ...ata confidentiality The following rules must be strictly followed in order to ensure compliance with job related statutory requirements be they company functions or outsourced maintenance and management This serves to safeguard our customers interests and provide additional personal protection Guidelines for Handling Information A conscientious responsible approach helps to protect and safeguard i...

Страница 25: ...is Manual Chapter 2 System Data provides a description of the HiPath 1100 system technical information and a list of relevant documentation Chapter 3 Modules describes all the modules that comprise the HiPath 1100 system as well as their characteristics Chapter 4 Installation provides information on how to setup and install the HiPath 1100 including recommendations and important notes Chapter 5 Te...

Страница 26: ...PEN conductor divided in two a ground or protective earth conductor PE and a neutral conductor N These HiPath 1100 systems are designed for residential private or commercial use Additional safety measures to prevent external interference may be required in industrial environments For additional information see Environmental Conditions item 2 7 2 Topic Page Introduction 2 26 Configurations 2 27 Sys...

Страница 27: ...dard configuration for 2 external lines 10 extensions and 8 system telephone interfaces KS The HiPath 1190 comes in two versions HiPath 1190 with external cabinet accommodating up to 21 modules expansion and optional comprising the MB 2 backplanes 3 power supplies UPS HiPath 1190R with rack mounting cabinet on a standard 19 rack can accommodate up to 21 modules expansion and optional in addition t...

Страница 28: ...e MO Internal entrance tele phone Extension External analog lines A B 2 x System Telephones MO V 24 MO USB EVM MO CTR UP0 E EB S0 S 0 EB Basic Access Public Network ISDN E1 A B Analog extensions 010 202 206 210 012 200 400 800 EB A B optiPoint telephones UP0 E EB TME1 EB Primary Access Public Network External analog lines Analog extensions 8 x MB 10 x Mini DIN 6 ADSL MO Ethernet LAN External analo...

Страница 29: ... Primary Access Public Network External analog lines Analog extensions 8 x MB Mini DIN 6 ADSL MO Ethernet LAN HUB 4 PC Ports C D CD 16 MO System telephones System telephones C D Entrance telephone interface Entrance tele phone Extension S0 S 0 EB Basic Access Public Network ISDN Mini DIN 4 Service PC Printer Service PC MO V 24 MO USB EVM MO CTR UP0 E EB Music External music source MOH ...

Страница 30: ...ines 2 0 Analog extensions 8 10 System telephone interface KS 4 8 Expansion modules EB 010 10 extensions 0 4 14 EB 012 12 extensions 0 3 11 EB 202 2 external lines and 2 extensions 0 4 16 EB 204 2 external lines and 4 extensions 2 0 EB 206 2 external lines and 6 extensions 0 4 16 EB 210 2 external lines and 10 extensions 0 4 11 EB 200 2 external lines 2 4 16 EB 400 4 external lines 0 3 10 EB 800 8...

Страница 31: ...ple 1 HiPath 1150 slot 0 MB 210 slot 1 EB 210 slot 3 TME1 30 digital lines EB 210 external lines will not work but extensions will Since the system allows for a maximum number of 32 lines we cannot have any additional analog line Example 2 HiPath 1150 slot 0 MB 210 slot 3 TME1 30 digital lines In this case there are 32 external lines at most available on the system This means there is no room for ...

Страница 32: ... lines allowed is 16 S0 digital lines external analog lines Table 2 2 Considerations on S0 digital lines on the HiPath 1120 HiPath 1150 Maximum number of external lines allowed is 16 S0 digital lines external analog lines Settings External analog line S0 module digital line Total MB 1 EB 200 4 0 4 MB 1 S0 2 2 4 6 MB 1 S0 2 1 EB 200 4 4 8 ...

Страница 33: ...onfigurations are available Configuration 1 40 analog lines 5 digital lines Configuration 2 8 analog lines 37 digital lines Configuration 3 0 analog lines 45 digital lines Settings External analog line S0 module digital line Total MB 1 EB 800 10 0 10 MB 1 EB 800 1 EB 400 1 EB 200 16 0 16 MB 1 S0 2 2 4 6 MB 1 S0 2 1 EB 800 1 EB 200 12 4 16 MB 1 S0 5 2 10 12 MB 1 S0 5 1 EB 400 6 10 16 Settings Exter...

Страница 34: ...0 10 30 40 2 TME1 1 EB 800 1 EB 200 10 35 45 1 TME1 1 EB 800 1 EB 400 12 30 42 2 TME1 1 EB 800 1 EB 400 12 33 45 1 TME1 2 EB 800 16 29 45 2 TME1 2 EB 800 16 29 45 1 TME1 2 EB 800 1 EB 200 18 27 45 2 TME1 2 EB 800 1 EB 200 18 27 45 1 TME1 2 EB 800 1 EB 400 20 25 45 2 TME1 2 EB 800 1 EB 400 20 25 45 1 TME1 3 EB 800 24 21 45 2 TME1 3 EB 800 24 21 45 1 TME1 3 EB 800 1 EB 200 26 19 45 2 TME1 3 EB 800 1...

Страница 35: ...les are possible for a maximum of 8 ports 2 5 3 Notes on HiPath 1150 If there are only 2 PCM highways in the HiPath 1150 and one module TME1 is used we would have 30 timeslots reserved and a further 2 timeslots reserved for the analog trunks which would mean fewer than 32 timeslots free for all the other extensions of the system To avoid this limitation the solution was to use an additional highwa...

Страница 36: ... 2 2 x EB 800 2 x EB 012 or 2 x EB 210 or 1 x TME1 in slot 1 in this case slot 2 must remain Free 3 4 and 14 The module configuration for extensions or external lines must not exceed 32 ports e g 3 x EB 010 or 2 x EB 012 or 2 x EB 210 5 6 and 7 The module configuration for extensions or external lines must not exceed 32 ports 8 9 and 10 The module configuration for extensions or external lines mus...

Страница 37: ...ions Table 2 9 shows the slots and their Highways Table 2 9 Distribution of modules on the HiPath 1190 backplanes Slot 11 12 13 14 15 16 17 18 19 20 Highways 2 X 5 X X X 6 X X X 7 X X X Slot 01 02 03 04 05 06 07 08 09 10 Highways 1 X X 2 X X 3 X X X 4 X X X ...

Страница 38: ...s Power Requirements Input 220V 127mA 127V 331mA 110V 381mA 110 230V Full range 1 5A Operating Frequency 50 60Hz 50 60Hz Rated Voltage Output U1 8 Vrms U2 23 Vrms 5 1 VDC 26 4 VDC Call Voltage U3 40 Vrms 60Hz 65 Vrms 25Hz SPA 42 Vrms 25Hz RSA 50 VAC 97 VDC 0 13A 25Hz 42 VAC 85 8 VDC 0 13A 25Hz RSA Dialing modes for calls to other public or private exchanges MF Transmission Level Lower Group 11 dBm...

Страница 39: ...ds and compliance Open loop isolation resistance between A B or a ground or b ground 10MΩ Closed loop line resistance continuous loop current Complies with national requirements standards Incoming Call Detection 9VRMS Values shown are approximate When making connections consider the specific level of tolerance that applies Compliance Standard Note Electrical Safety EN60950 IEC 60950 UL 60950 1 Env...

Страница 40: ...g Tthe avoid condensation when shipping the system in extremely low temperatures keep the equipment in its packaging until it reaches room temperature Proceed thereafter with the installation acceptable temperature range 7 5 C 45 5 F 30 min Do not expose the equipment to direct sunlight or place it near any heat sources to avoid a localized increase of temperature Make sure the installation area i...

Страница 41: ... Reference Guide DTMF telephones and Pulse telephones A31003 K1270 U105 19 Quick Reference Guide optiPoint 500 system telephone Entry A31003 K1270 U106 19 Quick Reference Guide optiPoint 500 system telephone Adv Std Basic and Econ A31003 K1270 U107 19 Quick Reference Guide Profiset 3030 and E822ST system telephones A31003 K1270 U108 19 Attendant Console optiPoint 500 system telephone Adv Std Basic...

Страница 42: ...ent on completeness Feature Documentation Order number Small Hotel Application Operating Instructions Extension number changing through Key phone Programming Manual A31003 K1270 U100 19 Group programming by menu Programming Manual A31003 K1270 U100 19 Executive secretary function Programming Manual User Manual optiPoint 500 A31003 K1270 U100 19 A31003 K1270 U101 19 ...

Страница 43: ...E1 module 3 69 UP0 E module and CTR UP0 E module 3 77 Optional modules LAN interface modules 3 80 EVM module 3 88 CD 16 module 3 90 Music module 3 91 General modules components Power Supply Unit PSU 3 93 Main Distribution Frame 3 100 Backplane 3 101 Internal entrance telephone with TFE interface 3 103 V 24 Adapter Cable 3 113 USB adapter cable 3 116 TME1 Serial Cable 3 117 Adapter cable for analog...

Страница 44: ...International Market RSA South Africa ARG Argentina SPA Spain IND India RUS Russia UK United Kingdom AUS Australia Module component Reference BOX HiPath 1120 S30817 U857 B401 IM 110V S30817 U857 A401 IM 220V S30817 U857 C401 ARG S30817 U857 A412 SPA S30817 U857 A464 IND S30817 U857 A497 RSA S30817 U857 A408 UK S30817 U857 A400 AUS Motherboard MB MB S30817 Q845 A401 IM S30817 Q845 A464 IND S30817 Q...

Страница 45: ...odule S30817 H842 A301 IM SLIMC module S30817 H866 A401 IM SADSLIM module S30817 H866 B401 IM Music module S30817 H860 A301 IM Internal entrance telephone with TFE interface See Note 1 General Components V 24 Adapter Cable S30122 X5468 X005 USB adapter cable S30817 K861 A301 Impedance adapter Balun TME1 S30122 X7357 X Power Supply Unit PSU 110 127V S30122 X8009 X100 IM 220V S30122 X7646 X IM S3012...

Страница 46: ...ace on page 3 103 TFE entrance telephone interface S30122 K7696 T313 with an amplifier TFE entrance telephone interface S30817 K930 A300 without an amplifier entrance telephone interface Brazil S30817 Q936 C282 Module component Reference BOX HiPath 1150 S30817 U853 A401 IM S30817 U853 A497 RSA S30817 U853 A464 IND S30817 U853 A400 AUS HiPath 1190 Full 2 shelves S30777 U770 A401 IM S30777 U770 A464...

Страница 47: ...B HiPath 1150 MB S30817 Q848 B401 IM S30817 Q848 B464 IND S30817 Q848 B497 RSA MB HiPath 1190 MB S30817 Q856 A401 IM S30817 Q856 A464 IND Expansion modules EB 010 S30817 H858 B301 IM S30817 H858 B397 RSA EB 012 HiPath 1150 only S30817 H858 A301 IM S30817 H858 A397 RSA EB 202 S30817 H847 C301 IM S30817 H847 C364 IND S30817 H847 C397 RSA EB 206 S30817 H847 B301 IM S30817 H847 B364 IND S30817 H847 B3...

Страница 48: ...L module S30817 H849 A282 LIMC module S30817 H867 A401 IM ADSLIM module S30817 H867 B401 IM EVM module S30817 Q6945 X CD 16 module S30817 H0855 A282 Internal entrance telephone with TFE interface See Note 2 General Components Coax Cable for TME1 module C39195 A9700 B531 TME1 Serial Cable C39195 A9700 B532 V 24 Adapter Cable S30122 X5468 X005 Impedance adapter Balun S30122 X7357 X USB adapter cable...

Страница 49: ...B401 IM S30817 U853 B464 IND HiPath 1190 S30122 K7642 X200 IM AUS and IND S30122 K7642 X300 RSA Full with BBU Battery Backup Unit S30777 U770 E400 AUS S30777 U770 E401 IM S30777 U770 E464 IND Medium with BBU Battery Backup Unit S30777 U770 F400 AUS S30777 U770 F401 IM S30777 U770 F464 IND HiPath 1190R S30122 K7642 X200 IM AUS and IND S30122 K7642 X300 RSA Full with BBU Battery Backup Unit S30777 U...

Страница 50: ...410 Medium S30777 H770 H420 Backplane HiPath 1150 S30817 Q853 A401 HiPath 1190 backplane 1 HiPath 1190 backplane 2 S30817 Q854 A401 S30817 Q854 B401 Note 1 HiPath 1100 For further details on the system s total capacity see Table 2 1 on page 2 31 Specific limitations to system expansion Note 2 See Internal entrance telephone with TFE interface on page 3 103 TFE entrance telephone interface S30122 K...

Страница 51: ... With backup power from a battery date and time settings are not lost in the event of a power outage Replace this battery with an identical type of battery or use a type recommended by Technical Support Caution FAILURE TO REPLACE BATTERY WITH SPECIFIED BATTERY TYPE CAN CAUSE RISK OF EXPLOSION DISPOSE OF USED BATTERIES ACCORDING TO YOUR COUNTRY S LAWS AND REGULATIONS ...

Страница 52: ...Modules 3 52 Service Manual Motherboard MB 3 4 1 HiPath 1120 MB Interfaces Figure 3 1 HiPath 1120 s MB If the UP0 E module is connected on the HiPath 1120 only 2 CD interfaces will be available Battery ...

Страница 53: ...2 extension 2 a6 extension 6 C interface 2 4 b2 trunk 2 b2 extension 2 b6 extension 6 D interface 2 5 a3 extension 3 a7 extension 7 C interface 3 6 b3 extension 3 b7 extension 7 D interface 3 7 a4 extension 4 a8 extension 8 C interface 4 8 b4 extension 4 b8 extension 8 D interface 4 X1 Connector X2 Connector X50 Connector X60 Connector X70 Connector Ribbon cable for modules Additional ribbon cable...

Страница 54: ...nput voltages are 23V AC and the ring voltage which depends on the country Output voltages are 3 3VDC 5 VDC 24VDC 32VDC and the ring voltage added to the offset voltage Figure 3 2 HiPath 1120 Baby Board VCC module Baby Board VCC module Connector assignments Table 3 5 Baby Board VCC module Connectors HiPath 1120 X1 and X2 Connectors Connects to MB through a pin Connector ...

Страница 55: ...Service Manual 3 55 Modules Motherboard MB 3 4 2 HiPath 1150 MB Interfaces Figure 3 3 Overview of the HiPath 1150 MB Battery ...

Страница 56: ...ension 8 Music B wire D interface 2 D interface 6 5 a1 extension 1 a5 extension 5 a9 extension 9 C interface 3 C interface 7 6 b1 extension 1 b5 extension 5 b9 extension 9 D interface 3 D interface 7 7 a2 extension 2 a6 extension 6 a10 extension 10 C interface 4 C interface 8 8 b2 extension 2 b6 extension 6 b10 extension 10 D interface 4 D interface 8 Connector X212 Connector port Connector port C...

Страница 57: ...Service Manual 3 57 Modules Motherboard MB 3 4 3 HiPath 1190 1190R MB Interfaces Figure 3 4 Overview of the HiPath 1190 MB Battery ...

Страница 58: ...es the available trunks to their respective slots on the extensions 3 5 1 HiPath 1120 Limitations 200 2 external analog lines 204 2 external analog lines and 4 analog extensions Contact X16 Connector X17 Connector X8 Connector Battery 1 C interface 1 C interface 5 Music A wire Supplies power for maintaining the system s date and time settings in the event of a power outage 2 D interface 1 D interf...

Страница 59: ...e distribution of extensions and external lines associated with the EB 200 module Connectors EB 200 Connector assignments Table 3 8 EB 200 Connector assignments Contact X6 Connector X5 Connector 1 Connects to the MB through an interconnect cable flat cable a1 external line 1 2 b1 external line 1 3 a2 external line 2 4 b2 external line 2 ...

Страница 60: ... 204 module Connectors EB 204 Connector assignments Table 3 9 EB 204 Connector assignments Contact X1 Connector X2 Connector X5 Connector 1 Connects to the MB through an interconnect cable flat cable a1 extension 1 a1 external line 1 2 b1 extension 1 b1 external line 1 3 a2 extension 1 a2 external line 2 4 b2 extension 2 b2 external line 2 5 a3 extension 3 6 b3 extension 3 7 a4 extension 4 8 b4 ex...

Страница 61: ...xternal analog lines and 6 analog extensions 202 2 external analog lines and 2 analog extensions 012 12 analog extensions 010 10 analog extensions EB 210 EB 206 and EB 202 expansion modules Interfaces Figure 3 7 EB 210 module overview Figure 3 7 shows the distribution of extensions and external lines associated with the EB 210 module Connectors The distribution associated with the EB 206 and 202 m...

Страница 62: ...line 1 a3 extension 3 a7 extension 7 2 b1 external line 1 b3 extension 3 b7 extension 7 3 a2 external line 2 a4 extension 4 a8 extension 8 4 b2 external line 2 b4 extension 4 b8 extension 8 5 a1 extension 1 a5 extension 5 a9 extension 9 6 b1 extension 1 b5 extension 5 b9 extension 9 7 a2 extension 2 a6 extension 6 a10 extension 10 8 b2 extension 2 b6 extension 6 b10 extension 10 Note 1 X2 Connecto...

Страница 63: ... EB 010 expansion modules Interfaces Figure 3 8 EB 012 module overview Figure 3 8 shows the distribution of extensions and external lines associated with the EB 012 module Connectors The distribution associated with the EB 010 module is limited by its capacity ...

Страница 64: ...nector a1 extension 1 a5 extension 5 a9 extension 9 2 b1 extension 1 b5 extension 5 b9 extension 9 3 a2 extension 2 a6 extension 6 a10 extension 10 4 b2 extension 2 b6 extension 6 b10 extension 10 5 a3 extension 3 a7 extension 7 a11 extension 11 6 b3 extension 3 b7 extension 7 b11 extension 11 7 a4 extension 4 a8 extension 8 a12 extension 12 8 b4 extension 4 b8 extension 8 b12 extension 12 Note 1 ...

Страница 65: ...EB 400 and EB 200 Connector assignments Contact X1 Connector X2 Connector X3 Connector 1 Connection to MB through backplane Connector a1 external line 1 a5 external line 5 2 b1 external line 1 b5 external line 5 3 a2 external line 2 a6 external line 6 4 b2 external line 2 b6 external line 6 5 a3 external line 3 a7 external line 7 6 b3 external line 3 b7 external line 7 7 a4 external line 4 a8 exte...

Страница 66: ...hem some features such as Caller ID Caller ID Blocking Direct dialing to extensions and so on may be provided 3 5 3 1 HiPath 1120 Interfaces Figure 3 10 HiPath 1120 S0 module HiPath 1120 S0 module jumpers X2 Port 1 X3 Port 2 Configuration Jumper Pos Configuration Jumper Pos Extern S0 Trunk Point to Point Point to Multipoint X4 1 2 X5 1 2 Extern S0 Trunk Point to Point Point to Multipoint X6 1 2 X7...

Страница 67: ...dule Connectors for HiPath1150 1190 1190R Jumpers Port 1 X10 and X11 Port 2 X50 and X51 Port 3 X90 and X91 Port 4 X130 and X131 Port 5 X170 and X171 Slot 1 and 2 without RT resistive termination factory default Slot 3 and 2 with RT resistive termination used when the port is configured as S0 BUS X1 Connector Port 1 X2 Connector Port 2 X3 Connector Port 3 X4 Connector Port 4 X5 Connector Port 5 X6 ...

Страница 68: ...e 3 13 S0 Connector signal distribution Setup and Installation of S0 module Connectors Table 3 15 Installing an S0 module System Position slot HiPath 1120 2 HiPath 1150 3 HiPath 1190 1190R 1 or 11 Cable 4 wire HiPath 1100 S0 NT Public network 3 SX 4 SR 5 SR 6 SX 1 8 SX Signal Transmit SR Signal Receive X RJ 45 2 NC 1 NC 8 NC 7 NC ...

Страница 69: ...lifying access for the user S2 access It provides connections to the ISDN network via primary access 30 Channels allowing services offered by the network to be used Functions It increases the capacity of the system s external up to 20 on the HiPath 1150 and 45 on the HiPath 1190 1190R The system only operates in Point to Point connections PP The ISDN line may be used for video conferencing externa...

Страница 70: ...ation Restriction CLIR to name but a few can be provided if enabled by the local carrier Note In ISDN some features depend on contracting and the local console TME1 interfaces Figure 3 14 TME1 module HiPath 1190 1190R In the event of a problem occurring with the TME1 link during an external call the S2M master see Display indications of TME1 module S2 ac cess on page 3 77 system will go into a mut...

Страница 71: ...access connection with 75 ohm impedance S1 Component S2 Component H801 Component DIP Switch 1 DIP Switch 2 Display X803 Connector X402 Connector X401 Connector Serial interface Module PC connection BNC RX Connector Connections between the module and the alternative line E1 BNC TX Connector Connections between the module and the alternative line E1 2x coax cable HiPath 1100 E1 CAS Modem Public Netw...

Страница 72: ...stribution on the TME1 module Connector Warning Do not touch the TME1 module s administrative serial interface Connector X803 without first disconnecting all analog extensions and trunk Connectors Failure to fol low this procedure may expose the user to dangerous voltages The administrative serial interface Connector X803 as well as all other Connectors and interconnect cables should only be servi...

Страница 73: ...tch 1 Switch Procedure Meaning Possible settings 1 FE Flash memory off ON Deletes Flash memory when the PABX is turned on OFF System will work as usual default 2 EST Extended Autotest E1 CAS access ON Activates autotest E1 CAS access OFF Skips autotest default E1 CAS access 2 EST Reserved for future applications S2M access 3 BR1 Baud rate configuration 3 OFF 4 OFF and 5 OFF 9600 bps 3 OFF 4 OFF an...

Страница 74: ...the PABX off Set Switch 1 FE to ON Turn the PABX on again Wait for F and E to show on the display Turn the PABX off Set switch 1 FE to OFF again Turn on the PABX It is recommended that you do not change the DIP Switch 2 default setting Switch Procedure Default 1 DSP BIO OFF 2 Reserved OFF 3 Reserved OFF 4 Battery connection OFF 5 MODCK2 ON 6 WDI ON 7 MODCK1 OFF 8 E1 interface impedance E1 CAS acce...

Страница 75: ...mory contents to DRAM memory Continuous Checking and validating contents of Flash memory P Continuous TME1 module is active but CAS link is out of service A Continuous TME1 module is active with CAS link I Continuous Unpacking E1 Trunk Manager 3 Continuous 7 Continuous Writing software to Flash memory F Continuous Checking transferred data o Continuous E1 and CAS links are down The reason is unkno...

Страница 76: ...uous with segment g blinking TME1 module active with both links established 2 or 3 Continuous Loading software from Flash 7 Continuous Writing software to Flash memory F Continuous Checking transferred data 3 Cycle Live Clearing Flash memory f e Alternating Flash memory cleared h Continuous No software in Flash memory Waiting for Tool to download software 8 Continuous Power up reset Continuous Cle...

Страница 77: ...th 1150 1190 via 8 4 or 2 UP0 E interfaces and to a HiPath 1120 system via 4 or 2 UP0 E interfaces see System expansion limitations on page 2 30 3 5 5 1 UP0 E module HiPath 1120 Interfaces Figure 3 20 UP0 E module HiPath 1120 Continuous Network link operational Continuous Link with mainboard operational CTR U module installation is required P0 E no in MB module see Installing a CTR UP0 E module on...

Страница 78: ...HiPath 1120 Note UP0 E modules for the HiPath 1120 may have 4 or 2 ports HiPath1150 1190 1190R Interfaces Figure 3 21 UP0 E module HiPath1150 1190 1190R X1 Connector X2 Connector X3 port X4 port Flat Cable for MB Additional flat cable for MB a1 port 1 a3 port 3 b1 port 1 b3 port 3 a2 port 2 a4 port 4 b2 port 2 b4 port 4 ...

Страница 79: ...es for HiPath 1150 1190 8 may have 8 4 or 2 ports 3 5 5 2 CTR UP0 E module IHiPath 1120 1150 1190 1190R Interfaces Figure 3 22 CTR UP0 E module HiPath 1120 1150 1190 1190R X1 Connector X2 port X3 port backplane a1 port 1 a5 port 5 b1 port 1 b5 port 5 a2 port 2 a6 port 6 b2 port 2 b6 port 6 a3 port 3 a7 port 7 b3 port 3 b7 port 7 a4 port 4 a8 port 8 b4 port 4 b8 port 8 ...

Страница 80: ...k with the applications used in your administration such as HiPath 1100 Manager SNMP services Interaction Center Smart Raters etc The modules have been developed for use on the HiPath 1100 based on ADSL Asymmetric Digital Subscriber Line technology It is therefore possible to receive high speed data and voice up to 8 Mbit s through a single pair on a standard telephone line POTS Figure 3 23 Functi...

Страница 81: ...e 1 5 Mbps downstream and 512 kbps upstream ITU G2 922 2 ANSI T1 413 1998 Standard capability 4 10 100 Base T standard HUB ports with four ports for building a small LAN Module with built in microfilter to separate voice and data signals Do not connect the V 24 interface to the PABX when using a network interface cable All data is delivered through the network ADSL modem access must be enabled by ...

Страница 82: ...nnect X2 Connector slots 3 and 4 to a HiPath 1120 external analog line input using the cable included with the module Contact X1 Connector X2 Connector J3 Connector J5 Connector J6 Connector J7 Connector 1 Connection to the MB is through a pin Connector Incoming external line with ADSL RJ45 Connector HUB RJ45 Connector HUB RJ45 Connector HUB RJ45 Connector HUB 2 3 External analog line output 4 ...

Страница 83: ...190 1190R ADSL module Connectors Note Connect X2 Connector slots 3 and 4 to a HiPath1150 1190 1190R external analog line input using the cable included with the module Contact X2 Connector J3 Connector J5 Connector J6 Connector J7 Connector 1 Incoming external line with ADSL RJ45 Connector HUB RJ45 Connector HUB RJ45 Connector HUB RJ45 Connector HUB 2 3 External analog line output 4 ...

Страница 84: ...tes These modules already have the CommServer application installed and do not need to be connected directly to a PC to administer the PABX only to the LAN To set the required parameters of the modules use the Configuring the SpeedStream 4100 modem on page 7 354 and the administration tool Siemens Admin Console on page 7 352 HiPath 1120 Interfaces SLIMC and SADSLIM module Figure 3 26 SLIMC and SDA...

Страница 85: ...e SLIMC and SDASLIM module HiPath 1120 Contact X2 Connector X3 Connector X4 Connector X5 Connector X11 Connector X17 Connector 1 RJ45 Connector HUB RJ45 Connector HUB RJ45 Connector HUB RJ45 Connector HUB Incoming externalline with ADSL Connection to the MB is through a pin Connector 2 3 External analog line output 4 X6 Connector X7 Connector X14 Connector Connection s of the Baby Board ADSL Ether...

Страница 86: ...ule Table 3 27 Connectors of the LIMC and ADSLIM module HiPath1150 1190 1190R Contact X2 Connector X3 Connector X4 Connector X5 Connector X11 Connector 1 RJ45 Connector HUB RJ45 Connector HUB RJ45 Connector HUB RJ45 Connector HUB Incoming external line with ADSL 2 3 External analog line output 4 X6 Connector X7 Connector X14 Connector Baby Board ADSL Ethernet Interface Baby Board ADSL power supply...

Страница 87: ...le included with the module 3 6 1 3 Baby Board ADSL Introduction Provides ADSL services through the SpeedStream 4100 modem to the SADSLIM and ADSLIM modules HiPath 1120 1150 1190 1190R Interfaces Figure 3 28 Baby Board ADSL HiPath 1120 1150 1190 1190R If you do not have the Baby Board ADSL you will not be able to access ADSL only the LAN network X7 X6 X14 ...

Страница 88: ...sage music playback before answering Up to two different greetings Manual or day night service greeting selection Context sensitive User s Guide Messages inform users of current menu options Two actions allow for call transfer and auto answering 2 ports Capability for up to 120 minutes of voice recording Maximum voice message recording time for each mailbox is 5 minutes configurable from 1 to 5 mi...

Страница 89: ...l modules MO HiPath 1120 1150 1190 1190R Interfaces Figure 3 29 HiPath 1120 1150 1190 1190R EVM module Connector assignments Table 3 29 EVM HiPath 1120 1150 1190 1190R module Connector X1 Connector Connects to MB through a pin Connector ...

Страница 90: ... HiPath 1190 1190R and for connecting more than 16 KS type system telephones The CD 16 module has a dedicated slot for burning CDs CD 16 Interfaces Figure 3 30 CD 16 module Note CD interfaces on a CD 16 module are installed subsequently to CD interfaces on the MB module 7 When a UP0 E module is connected to the HiPath 1190 1190R the CD 16 mod ule is disabled ...

Страница 91: ...upporting additional devices such as entrance telephones door openers alarms etc You can insert music for external calls placed on hold MOH using an internal or external music source Contact X1 Connector X2 Connector X3 Connector X4 Connector X5 Connector 1 Connection to MB through backplane Connector C port 1 C port 5 C port 9 C port 13 2 D port 1 D port 5 D port 9 D port 13 3 C port 2 C port 6 C...

Страница 92: ... Sensor external music input MOH Connection to the MB is through a pin Connector 3 and 4 Relay The activation logic based on the initial position of the sensor contacts and its result ing actions are programmable If a sensor is programmed the relay can be activated through that sensor It can be activated either manually or automatically after a specified time When the relay is activated the contac...

Страница 93: ...s receivers MD etc See Figure 4 45 Protection and grounding connection diagram on page 4 184 3 7 Power Supply Unit PSU Introduction The power supply unit PSU provides the required voltages for the correct operation of the entire system The power sources of the HiPath1150 1190 1190R systems can have connections available to a row of batteries which guarantee constant power supply should there be an...

Страница 94: ...ter 3 7 1 HiPath 1120 Description Two versions of power supply units are available for the HiPath 1120 BRA and IM supply voltage 110 127 Vac 50 60 Hz or 220 Vac 50 60 Hz RSA supply voltage 220 Vac 50 60 Hz ARG supply voltage 220 Vac 50 60 Hz SPA supply voltage 220 Vac 50 60 Hz PSU interface Figure 3 32 System PSU interface HiPath 1120 1 10 ...

Страница 95: ...connection socket Contacts Function RSA SPA IM 1 Free Free Free 2 3 8 Vrms 8 Vrms 8 Vrms 4 5 23 Vrms 23 Vrms 23 Vrms 6 7 42 Vrms 65 Vrms 40 Vrms 8 9 Free Free Free 10 Free Free Free Warning Turn the system power ON or OFF using the power supply cable or the input circuit breaker NB For the HiPath1150 1190 1190R with battery connection input BBU you need to install the ferrite C39022 Z7000 C7 in th...

Страница 96: ...ces HiPath 1150 Figure 3 33 System PSU interface HiPath 1150 PSU without battery input PSU with battery input Indication of the connection slot Indication of the connection slot on the backplane on the backplane AC input Interconnect cable AC input PSU Batteries ...

Страница 97: ...ion of slot slot position on the backplane AC input 1 Connector used to link the PSU s via the Interconnect cable between the PSU s and also used to connect the batteries via the PSU battery interconnect cables in the 1st PSU located in the base of the system see Battery interconnect cables BBU on page 3 122 2 Connector for connecting the Vshare cable to the PSU s Warning Cable polarity indication...

Страница 98: ...on cable see Battery interconnect cables BBU on page 3 122 Note The power supply used in the systems must have a battery connection socket BBU see Power Supply Unit PSU on page 3 93 Warning If the power supply is not supplying the output voltages shown in Table 3 34 open it and check the condition of the fuses Contact Function Contact Function 1 5 1 VDC 2 5 1 VDC 3 5 1 VDC 4 5 1 VDC 5 5 1 VDC 6 5 ...

Страница 99: ...technical information Caution FAILURE TO REPLACE BATTERY WITH SPECIFIED BATTERY TYPE CAN CAUSE RISK OF EXPLOSION DISPOSE OF USED BATTERIES ACCORDING TO YOUR COUNTRY S LAWS AND REGULATIONS Battery Type Valve Regulated Lead Acid VRLA Voltage 27 2V Supply voltage 24V 2X12V Capacity 9Ah to 12Ah at 20h discharge ...

Страница 100: ...1190 Increasing by one EB 210 module reduces the total time by 15 minutes If the working period is less than 1 5 hours this falls by 5 minutes 3 9 Main Distribution Frame Introduction The Main Distribution Frame MDF connects cabling to a public exchange and extensions using Connectors Follow the procedures described in Chapter 4 9 Connections to the system s MDF on page 4 170 to attach the cables ...

Страница 101: ...tems a set of Connectors mounted on a printed circuit board known as the backplane connects the modules to the motherboard 3 10 1 HiPath 1150 Interfaces Figure 3 37 Backplane HiPath 1150 Cables are attached with screws Cables are attached using pressure Dinkle Connector Cables are attached using Connectors 4 way 8 way 2 way for example RJ 45 ...

Страница 102: ...o insert a ferrite bead into the backplane If the module came with a ferrite bead install it as shown in Figures B and C 3 10 2 HiPath 1190 1190R Interfaces Figure 3 38 HiPath 1190 backplanes HiPath 1190 1190R backplane Connector assignments Table 3 38 HiPath 1190 1190R backplane Connectors Connectors 1 2 and 3 Slots DC input PSU see Table 4 3 ...

Страница 103: ...you can connect up to twenty entrance telephones in extension slots The connection is made using an interface between the entrance telephone and the PABXs a1 b1 Connection to the system a2 b2 Connection of the amplifier of the entrance telephone For further information on installation settings and requirements consult the Entrance Telephone installation manual Figure 3 39 Connections to the TFE in...

Страница 104: ...ce telephone if required newer amplifiers have a programmable automatic disconnection system In this case this connection will not be required 3 11 1 1 Examples of connection No amplifier Model S30817 K930 A300 TFE EGUCOM Ackermann Emmerich Figure 3 40 EGUCOM entrance telephone by Ackermann Emmerich TO1 UB1 UB2 TS1 TS2 TO2 KL1 a1 b1 KL2 a b HiPath 1100 TFE interface Electric latch EGUCOM TSS modul...

Страница 105: ...sistors and C1 capacitor 1 0 μ F 250 Vac Non polarized The connection to the PABX is made with two wires a1 b1 while the connection to the entrance telephone interface is made with four wires a2 b2 KL1 KL2 Figure 3 41Grothe entrance telephone TO1 UB1 UB2 TS1 TS2 TO2 KL1 a1 b1 KL2 a b HiPath 1100 TFE interface Electric latch Grothe transformer TR 1973 K TR TS2 a2 b2 12V TS1 b a 12 V 12 V Grothe TFE...

Страница 106: ...urther information see the TFE Adapter Installation Manual A31003 E8000 X167 19 included with the TFE interface HiPath 1100 TFE interface Electric latch Power supply universal 6573 02 6 7 A B Entrancetelephone amplifier 5680 00 2 6 K1 K a b Entrance tele phone 5760 Button TM 5761 2 12 TO1 UB1 UB2 TS1 TS2 TO2 KL1 a1 b1 KL2 a2 b2 6 12 TS TS ...

Страница 107: ... installation in models F5AZL F8AZ F9AZ Figure 3 44 Overview entrance telephone interface S30817 Q936 C282 Only one entrance telephone may be connected to each module of the TFE inter face Each TFE module works as an entrance telephone OR pager interface To use both functions two modules are required ...

Страница 108: ... TFE S interface requires its own power supply Figure 3 45 Connections of the TFE S interface 7 Warning In the analog interface the a wire must be connected to the negative and the b wire to the positive TUE TUE AC AC X3 6 12V Transformer VCC Latch VCC MIC power supply Low voltage detector high impedance VCC Call detector high impedance VCC Voice circuit amplifier ca 44s44 Mute X4 a b X5 X5 MIC MI...

Страница 109: ...rminal X4 terminal X5 terminal X1 jumper X2 jumper 1 AC a wire Speaker LS1 2 and 3 Zn 1 and 2 600 ohm Ritto 2 and 3 Siedle 1 and 2 2 AC b wire Speaker LS2 3 Contact of the electic latch TUE Contact of the bell KLI Microphone MIC 4 Contact of the electric latch TUE Contact of the bell KLI Microphone MIC ...

Страница 110: ... S with amplifier In the analog interface the a wire should be connected to the negative and the b wire to the positive Figure 3 46 Assigning button pad contacts X2 X1 X2 X5 X4 X3 X5 X4 X3 X1 1 2 3 4 1 2 3 4 1 2 3 4 1 2 3 4 1 2 3 4 1 2 3 4 Connection in Button pad Ritto 5760 Connection in Button pad Siedle TLM 511 01 Siedle TLM 511 02 not possible Potentiometer Potentiometer ...

Страница 111: ...the bell 6 12 V b a 2 6 Bell button Net Electric latch relay HiPath 1100 AC TOEI AC TOEI A KLI B KLI 12 14 13 11 LS1 MIC LS2 MIC LS1 LS2 Speaker MIC MIC Microphone a b System extension KLI KLI bell contact AC AC Bell transformer TOE TOE Electric latch relay The potentiometer must be adjusted according to the instructions of the models con nected to it Do not change the X1 bridge Germany Contact ch...

Страница 112: ...alog telephone dialing detection and DTMF control Please consult installation and configuration requirements for the entrance telephones in their documentation Siedle the following changes should be made to the Siedle TLM 511 01 button pad 1 Open the Siedle button pad 2 Open bridges 1 3 and 4 3 Change the wire of the Speaker of the bl pin for the 12 pin 4 Close the Siedle button pad X2 bridge Ritt...

Страница 113: ... configuration data Consult the ISDN external entrance telephone manual to check available settings and installation instructions Go to the HiPath 1100 Manager folder Advanced System Settings General External entrance telephone and insert the information on the entrance telephone device for correct working The V 24 serial interface module cannot be used if the system has an ADSL Module installed A...

Страница 114: ...nals Pin Signal CTS Clear To Send GND Ground RTS Request to send RxD Receive Data TxD Transmit Data Length approx 6 6 pin SIC mini DIN connector 9 pin female SubD connector Free 9 CTS 8 RTS 7 Free 6 1 2 3 4 5 6 RTS CTS GND TxD RxD VCC 5 GND 4 Free 3 TxD 2 RxD 1 Free Length 102 Level adaptation on the cable and Galvanic Insulation Adapter MB PC Printer Modem ...

Страница 115: ...ables Figure 3 49 Modem and adapter connection system to TxD2 RxD3 RTS7 CTS8 GND5 TxD2 RxD3 CTS5 RTS4 GND7 DSR6 DTR20 9 pin SubD Connector 25 pin SubD Connector TxD2 RTS7 GND5 RxD3 DSR6 DCD8 DTR20 GND7 25 pin SubD Connector 9 pin SubD Connector ...

Страница 116: ...lectronics in the cable EN 60950 1 provide galvanic insulation between the HiPath and the PC This product draws power from both the HiPath and a PC and may therefore only be used on HiPath 1100 switches A USB connection in other types of equipment will not work with this cable Siemens does not recommend any other means of connecting the HiPath 1100 to the PC Pin Signal D and D Data specifies commu...

Страница 117: ...1 serial cable signals Pin Signal DCD Date Carrier Detect CTS Clear To Send DSR Data Send Ready DTR Data Station Ready GND Ground RTS Request to send RX Receive Data TX Transmit Data RI Ring indicator 9 pin male Mini DIN connector 9 pin female SubD Connector RI 9 RTS 8 CTS 7 DTR 6 5 GND 4 DSR 3 RX 2 TX 1 DCD Length 9 8 feet MB PC Modem 1 2 3 7 6 9 2 RX 1 DCD 3 TX 4 DTR 5 GND 7 RTS 6 DSR 8 CTS 9 RI...

Страница 118: ...he starting position of the modem connected to the switch via HiPath 1100 Manager If the modem is connected to the PC remote modem the modem cable should be used and the initialization code set using CommServer This information can be obtained from the modem s instruction manual In the Reset field the default setting for these modems is as follows US ROBOTICS ATZH0 TrendNet ATZH0 D LINK ATHATZH0 I...

Страница 119: ...f the serial cable to the analog modem 9 pin female SubD Connector Free 9 CTS 8 RTS 7 Free 6 5 GND 4 Free 3 TX 2 RX 1 Free Modem 2 RX 3 TX 2 RX 3 TX 9 pin male SubD Connector Free 9 CTS 8 RTS 7 Free 6 5 GND 4 Free 3 TX 2 RX 1 Free Interface V 24 5 GND 5 GND 7 RTS 8 CTS 7 RTS 8 CTS ...

Страница 120: ...5 TME1 Coax Cable 3 12 5 1 CAS Access The TME1 coax cable C39195 A9700 B531 is used for connecting to the E1 interface with a modem TME1 coax cable signals Table 3 44 TME1 coax cable signals Pin Signal CTS Clear To Send GND Ground RTS Request to send RX Receive Data TX Transmit Data Pin Signal RX Receive Data TX Transmit Data ...

Страница 121: ... must use the Balun TME1 coax cable signals Table 3 45 TME1 coax cable signals Balun You must use the balun on the TME1 coax cable if there is any impedance differential between the TME1 and the NT1 modules Technical Data Pin Connector Signal RX J1 Receive Data TX J2 Transmit Data Speed up to 2 048 Mbps Insulation 100V Connectors Coaxial Interface A Dual BNC F RG 59 Twister pair Interface B 8 pin ...

Страница 122: ...ith the batteries This protects against power surges Table 3 47 Technical data of the battery interconnect cable Tolerance temperature 32 to 122ºF Transmission line ITU CTR 12 G 703 Tolerance humidity 5 to 95 Fuse of the interconnect cable 7 5A uniVAL manufactured by MTA Length of the interconnect cable 16 4 feet Speed up to 2 048 Mbps Vshare cable HiPath 1190 Interconnect cable between the PSU s ...

Страница 123: ...h1150 1190 1190R The ferrite that comes with the cable must also be installed see Chapter 4 8 Installing the power supply on page 4 163 Figure 3 54 Power supply cable of the PSU HiPath 1150 Ferrite C39022 Z7000 C7 installed at most 20 mm from the female connector HiPath 1190 1190R HiPath 1150 ...

Страница 124: ...Modules 3 124 Service Manual Interconnect cables ...

Страница 125: ...nd in the List of modules on page 3 44 Configuration installation of modules Tools and equipment required The following tools are required for installing a HiPath 1100 system Cutters and flat nose pliers Standard screwdriver Phillips screwdriver Tool for attaching wires to the Main Distribution Frame Drill Hammer Level Tape measure Digital multimeter for checking power and ground connections Dange...

Страница 126: ...rectly and properly connected before connecting the client interface Step Installation procedures Information 1 Select the location for installing the equipment Usually already defined 4 127 2 Unpacking system components 4 128 3 Getting to know your systems 4 128 4 HiPath1120 1150 wall mounting instructions 4 137 5 Installing modules 4 138 6 Installing the power supply 4 163 7 Connections to the s...

Страница 127: ...ng operation Do not install inside closets The power outlet for connecting the system s power supply must be located close to the equipment and must be easily accessible Follow all environmental guidelines described in the chapter System Data see Environmental conditions on page 2 40 Do not install in vibrating walls Caution Always use an anti static wrist band when working with the HiPath 1100 sy...

Страница 128: ...Step Procedure 1 Check to see that all components listed on the receipt are included in the package 2 Inspect all items for any damage that may have occurred during transportation If any damage occurred report it immediately to the place of purchase 3 Discard packaging materials according to national environmental regulations Warning Use only equipment and systems that are in perfect condition Nev...

Страница 129: ...4 129 Installation Getting to know your systems Opening the Main Distribution Frame Figure 4 2 Opening the HiPath 1120 Main Distribution Frame Location of components Figure 4 3 System installation overview HiPath 1120 ...

Страница 130: ... 4 130 Service Manual Getting to know your systems 4 5 2 HiPath 1150 Dimensions of the HiPath 1150 Figure 4 4 Dimensions of the HiPath 1150 Location of components Figure 4 5 System installation overview HiPath 1150 ...

Страница 131: ...Service Manual 4 131 Installation Getting to know your systems Opening the Main Distribution Frame Figure 4 6 Opening the HiPath 1150 Main Distribution Frame ...

Страница 132: ... HiPath 1190R systems are identical except for a side tab on the HiPath 1190R model which is used for attaching a 19 rack and the fact that there are no side covers Dimensions HiPath 1190 1190R Figure 4 7 Dimensions of the HiPath 1190 1190R Opening the system cabinet Figure 4 8 Opening the HiPath 1190 1190R ...

Страница 133: ...ion Getting to know your systems Procedure for opening the cabinet Location of components Figure 4 9 HiPath 1190 1190R front view Step Procedure 1 Insert screwdriver as shown above 2 Use the screwdriver as shown to remove the cover ...

Страница 134: ...Installation 4 134 Service Manual Getting to know your systems Figure 4 10 HiPath 1190 1190R back view Protective cover AC input sockets ...

Страница 135: ...Service Manual 4 135 Installation Getting to know your systems Figure 4 11 HiPath 1190 1190R cable anchors Figure 4 12 Installing modules on the HiPath 1190 1190R systems ...

Страница 136: ...ocedure Step Procedure 1 Insert module into the appropriate slot 2 Move the latch to the right to secure each module in place 3 Secure each latch using the screws 4 Use the reverse procedure to remove the modules Step Procedure 1 Install the system s brackets on the 19 rack using the screws as shown 2 Insert the switch into the 19 rack 3 Secure the switch on the 19 rack using the screws ...

Страница 137: ...eight of 4 10 ft from the floor 2 Place the bushing over the hole then insert the screw and tighten it until only 0 19 protrude 3 Hang the system at the top of on the screw see figure 4 14 and figure 4 15 4 Mark additional holes for washers and remove the system 5 Drill the remaining holes as marked install washers and screws then tighten them letting 0 19 protrude 6 Hang the system again and alig...

Страница 138: ...0 Manager in off line mode to obtain a visual illustration of the module locations and external lines and the resulting numbering plan see Help Advanced Configuration PABX Information for further information 4 7 2 Location of the modules Installation information The MB and the modules in the HiPath 1120 system are interconnected with a flatcable they must be passed through the ferrite provided and...

Страница 139: ...Service Manual 4 139 Installation Installing modules 4 7 2 1 In the HiPath 1120 Figure 4 16 Location of modules on HiPath 1120 Warning Insert modules only when the power supply is turned OFF ...

Страница 140: ...re they can be installed with respect to each system s limitations HiPath 1150 Slot 1 Type of module Slot 2 Type of module Expansion modules EB 010 Expansion modules EB 010 EB 012 EB 012 EB 202 EB 202 EB 206 EB 206 EB 210 EB 210 EB 200 EB 200 EB 400 EB 400 EB 800 EB 800 Optional modules UP0 E module Optional modules UP0 E module Slot 3 Type of module Slot 4 Type of module ...

Страница 141: ...e HiPath 1190 1190R Figure 4 18 Location of modules on HiPath 1190 1190R Expansion modules EB 010 Expansion modules EB 010 EB 012 EB 012 EB 202 EB 202 EB 206 EB 206 EB 210 EB 210 EB 200 EB 200 EB 400 EB 400 EB 800 EB 800 Optional modules S0 module Optional modules LAN interface module LAN interface module TME1 module ...

Страница 142: ...400 EB 800 EB 800 Optional modules S0 module Optional modules LAN interface module TME1 module Slot 3 Type of module Slot 4 Type of module Expansion modules EB 010 EB 010 EB 012 Expansion modules EB 012 EB 202 EB 202 EB 206 EB 206 EB 210 EB 210 EB 200 EB 200 EB 400 EB 400 EB 800 EB 800 Optional modules UP0 E module Optional modules UP0 E module Position 5 Type of module Slots 6 and 7 Type of modul...

Страница 143: ...EB 800 EB 800 Position 11 Type of module Position 12 Type of module Expansion modules EB 010 EB 010 EB 012 EB 012 EB 202 Expansion modules EB 202 EB 206 EB 206 EB 210 EB 210 EB 200 EB 200 EB 400 EB 400 EB 800 EB 800 Optional modules S0 module TME1 module slot 13 and 14 Type of module Position 15 Type of module Expansion modules EB 010 Expansion modules EB 010 EB 012 EB 202 EB 202 EB 206 EB 206 EB ...

Страница 144: ...Path 1190 1190R systems They can be seen on the Modules Latch Figure 4 18 on page 4 141 Slots 16 and 17 Type of module Position 18 Type of module Expansion modules EB 010 Expansion modules EB 010 EB 012 EB 202 EB 202 EB 206 EB 206 EB 200 EB 210 EB 400 EB 200 EB 800 EB 400 EB 800 Slots 19 and 20 Type of module Expansion modules EB 010 EB 202 EB 206 EB 200 EB 400 EB 800 ...

Страница 145: ...Module see figure 3 31 5 Top side Interconnect the module and the MB using the flat cable s provided taking care to pass it through the ferrite see figure 4 16 6 Connect to the module s MDF Connectors see figure 4 39 7 Reassemble the entire set 8 Performing a visual inspection on page 4 189 9 Turn on the power supply 10 Configure the required data see Configuring the system specifically for the cl...

Страница 146: ...s MDF Connectors see Figure 4 40 5 Reassemble the entire set 6 Performing a visual inspection on page 4 189 7 Turn on the power supply 8 Configure the required data see Operation on page 7 278 9 This is necessary only if you have changed the type of the modules installed in your system Using Manager application go to Advanced tab PBX Information tab Slot Allocation tab Select the Clear All Slots c...

Страница 147: ...ttom opening see figure 4 10 For modules allocated to the system s top slots slots 11 to 20 route the cables through the top anchors See figure 4 11 8 Connect to the appropriate module Connectors see Expansion modules EB on page 3 58 9 Attach cables to anchors using plastic brackets 10 Performing a visual inspection on page 4 189 11 Reassemble the entire set 12 Turn on the power supply 13 Configur...

Страница 148: ...h the administration serial interface Connector of the TME1 module be fore disconnecting all analog extensions and external line Connectors Failure to fol low this procedure may expose the user to dangerous voltages The TME1 module interconnecting cables and Connectors should only be handled by qualified technical personnel Remember to set the DIP switches See TME1 module on page 3 69 ...

Страница 149: ... ADSL line to slot 1 and 2 of the X2 Connector 2 Connect slots 3 and 4 of the X2 Connector to the external line input for the HiPath 1100 3 Connect your network cables to the HUB J3 J5 J6 and J7 Connectors Step Procedure 1 Connect the carrier s ADSL line to slot 1 and 2 of the X11 2 Connect slots 3 and 4 of the X11 Connector to the external line input of the HiPath 1100 3 Connect the cables of you...

Страница 150: ...Installation 4 150 Service Manual Installing modules Connections diagram on the HiPath 1120 Figure 4 20 ADSL Connection on the HiPath 1120 ...

Страница 151: ... Step Procedure 1 Select the SLIMC module 2 Attach the separators provided with the module 3 Attach the Baby Board ADSL module to the separators 4 Connect the cable of the Ethernet Interface to the X6 Connectors 5 Connect the cable of the ADSL line to the X14 Connectors 6 Connect the power cable of the module Baby Board ADSL to the X7 Connectors 7 Performing a visual inspection on page 4 189 8 Con...

Страница 152: ... 2 Attach the separators provided with the module 3 Attach the Baby Board ADSL module to the separators 4 Connect the cable of the Ethernet Interface to the X6 Connectors 5 Connect the cable of the ADSL line to the X14 Connectors 6 Connect the power cable of the module Baby Board ADSL to the X7 Connectors 7 Performing a visual inspection on page 4 189 8 Configure the required data see Operation on...

Страница 153: ...120 Installation Procedures Step Procedure 1 Turn off the power supply 2 Remove the system s cover 3 Attach the separator provided with the module to the MB 4 Attach the module to the MB s pin Connector and to the separator 5 Reassemble the entire set 6 Performing a visual inspection on page 4 189 7 Turn on the power supply 8 Configure the required data see Operation on page 7 278 X7 X6 X14 X7 X6 ...

Страница 154: ... power supply 2 Remove the Main Distribution Frame s cover 3 Remove the backplane 4 Remove the slots above the MB 5 Attach the separator provided with the module to the MB 6 Attach the module to the MB s pin Connector and to the separator 7 Reassemble the entire set 8 Performing a visual inspection on page 4 189 9 Turn on the power supply 10 Configure the required data see Operation on page 7 278 ...

Страница 155: ...y 2 Remove the system s front cover 3 Disconnect the Main Distribution Frame s cables from the MB 4 Move the module s latch as shown in figure 4 12 5 Remove the MB 6 Attach the separator provided with the EVM module to the MB 7 Attach the module to the MB s pin Connector and to the separator 8 Insert the MB into the system 9 Move the module latch back to secure module 10 Connect the Main Distribut...

Страница 156: ...ssembly Diagram Figure 4 26 Installing an EVM module on the HiPath 1190 1190R 11 Reassemble the entire set 12 Performing a visual inspection on page 4 189 13 Turn on the power supply 14 Configure the required data see Operation on page 7 278 Step Procedure ...

Страница 157: ...stalling a Baby Board VCC module on the HiPath 1120 Step Procedure 1 Turn off the power supply 2 Remove the system s cover 3 Attach the separator provided with the module to the MB 4 Attach the module to the MB s pin Connector and to the separator 5 Reassemble the entire set 6 Performing a visual inspection on page 4 189 7 Turn on the power supply 8 Configure the required data see Operation on pag...

Страница 158: ...iagram Figure 4 28 Installing a CTR UP0 E HiPath 1120 module Step Procedure 1 Turn off the power supply 2 Remove the system s cover 3 Attach the module to the corresponding Connector on the MB 4 Reassemble the entire set 5 Performing a visual inspection on page 4 189 6 Turn on the power supply 7 Configure the required data see Operation on page 7 278 ...

Страница 159: ... module Step Procedure 1 Remove the power supply 2 Remove the Main Distribution Frame s cover 3 Remove the backplane 4 Remove the slots above the MB 5 Attach the module to the corresponding Connector on the MB 6 Reassemble the entire set 7 Performing a visual inspection on page 4 189 8 Turn on the power supply 9 Configure the required data see Operation on page 7 278 ...

Страница 160: ...isconnect the Main Distribution Frame s cables from the MB 4 Move the module s latch as shown in figure 4 12 5 Remove the MB 6 Attach the module to the corresponding Connector on the CPU 7 Insert the MB into the system 8 Move the module latch back to secure module 9 Connect the Main Distribution Frame s cables 10 Reassemble the entire set 11 Performing a visual inspection on page 4 189 12 Turn on ...

Страница 161: ...ly 2 Remove the system s cover 3 Raise the system s top slot MB 4 Insert the module in the slot shown on figure 4 31 5 Attach the MB to the module 6 Make the connections to the appropriate module Connector See Music module on page 3 91 7 Reassemble the entire set 8 Performing a visual inspection on page 4 189 9 Turn on the power supply 10 Configure the required data see Operation on page 7 278 ...

Страница 162: ...Installation 4 162 Service Manual Installing modules Figure 4 31 Installing a Music module HiPath 1120 ...

Страница 163: ...ore connecting the power supply to the system see Technical Data on page 2 38 and Power Supply Unit PSU on page 3 93 Step Procedure 1 Check network voltage 2 If the voltage is within the power supply s voltage range connect the power supply 3 Performing a visual inspection on page 4 189 4 Configure the required data see Operation on page 7 278 Warning Use the cable of the power supply to turn syst...

Страница 164: ...65 3 If the voltage is within the power supply s voltage range connect the power supply 4 If the power supply has a battery input socket BBU or if you have acquired the BBU extension kit S30817 H853 B401 please connect them as indicated in Installing the batteries on page 4 169 5 Performing a visual inspection on page 4 189 6 Configure the required data see Operation on page 7 278 Warning Use the ...

Страница 165: ...r supply Figure 4 34 Installation of the PSU HiPath 1150 with BBU Figure 4 35 Power cable of the PSU with BBU HiPath 1150 Interconnect cable with batteries Batteries 2 x 12V in series Interconnect cable PSU Interconnect cable with batteries 20 mm at most ...

Страница 166: ... H770 H410 Medium S30777 H770 H420 Connect the cables indicated in the figure 3 34 into the first power supply and fix it to the chassis see figure 4 37 then proceed in the same way by interconnecting the remaining power supplies using the Vshare interconnect cable the interconnect cable between the PSU and fix them to the chassis Vshare interconnect cable PSU interconnect cable battery cable Inte...

Страница 167: ...ling the PSU in the HiPath 1190 1190R Warning Before powering up the system ensure that the chassis is properly grounded Turn system power on or off by using the switch located on the system s AC input Connecting to the power supply Protective cover AC input sockets for backplanes ...

Страница 168: ...190R Interconnect cable with batteries Batteries 2 x 12V in series Interconnect cable PSU Cable for Protective cover AC input sockets Vshare cable Interconnect cable Interconnect cable between PSU s Interconnect cable PSU Cable for connection with batteries between PSU s batteries connection with the 20 mm at most Ferrites ...

Страница 169: ...ems must have a battery connection socket see Power Supply Unit PSU on page 3 93 and must use the required interconnect cable Battery interconnect cables BBU on page 3 122 Figure 4 38 Connecting batteries to the system Caution FAILURE TO REPLACE BATTERY WITH SPECIFIED BATTERY TYPE CAN CAUSE RISK OF EXPLOSION DISPOSE OF USED BATTERIES ACCORDING TO YOUR COUNTRY S LAWS AND REGULATIONS Batteries 2 x 1...

Страница 170: ...abinet Below are some examples of configurations 4 9 1 HiPath 1120 Example Figure 4 39 Distribution of extensions on the HiPath 1120 MDF Warning When using the RSA version extension lines with a C D interface must only be in stalled indoors Only regular extensions without a C D interface can be installed outdoors The installation of a KS type system telephone requires a CD pair in conjunction with...

Страница 171: ...stem telephones will be disabled Slot Posi tion of the Position of the extension Internal Slot Position of the trunk Position of the exten Internal EB 204 module MB 01 801 Position 1 03 803 02 802 04 804 A B 1 11 A B 9 19 2 12 10 20 3 13 11 21 4 14 12 22 5 15 6 16 7 17 8 18 Slot Position of the trunk Position of the extension Internal EB 204 module Position 2 05 805 06 806 A B 13 23 14 24 15 25 16...

Страница 172: ...the Main Distribution Frame remove the safety latch using a small screwdriver See figure 4 6 After completing the procedure on the system s Main Distribution Frame replace the safety latch Slot External Line Exten sion slot Internal MB 01 801 02 802 The installation of a system telephone requires a CD pair in conjunction with an A B exten sion slot see Installing telephone terminals on page 4 186 ...

Страница 173: ...e Exten sion slot Internal EB 210 module Internal EB 206 module Internal module number Internal Module EB 200 Internal EB 400 module Internal EB 800 module Position 1 03 803 803 803 803 803 803 04 804 804 804 804 804 804 A B 11 21 21 21 805 805 12 22 22 22 806 806 13 23 23 807 14 24 24 808 15 25 25 809 16 26 26 810 17 27 18 28 19 29 20 30 ...

Страница 174: ... Position 2 05 805 805 805 805 807 06 806 806 806 806 808 A B 21 31 27 23 809 22 32 28 24 810 23 33 29 24 34 30 25 35 31 26 36 32 27 37 28 38 29 39 30 40 Slot External Line Exten sion slot Internal EB 210 module Internal EB 206 module EB 202 module Internal Internal EB 200 module Position 3 07 807 807 807 807 08 808 808 808 808 A B 31 41 33 25 32 42 34 26 33 43 35 34 44 36 35 45 37 36 46 38 37 47 ...

Страница 175: ...he Main Distribution Frame would be configured as follows Table 4 6 Example of extension locations on the Main Distribution Frame Slot External Line Exten sion slot Internal EB 210 module Internal EB 206 module EB 202 module Internal Internal EB 200 module Position 4 09 809 809 809 809 10 810 810 810 810 A B 41 51 39 27 42 52 40 28 43 53 41 44 54 42 45 55 43 46 56 44 47 57 48 58 49 59 50 60 Warnin...

Страница 176: ...of extensions on the HiPath 1190 1190R Main Distribution Frame Warning When the S0 module is used the default number of the modules is changed The installation of a system telephone requires a CD pair in conjunction with an A B exten sion slot see Installing telephone terminals on page 4 186 ...

Страница 177: ...tures Connections Step Procedure 1 Attach the end of the interface interface cable with the Mini DIN Connector male to the MB s serial Mini DIN Connector Attach the other end to the printer or PC serial port When connecting to a PC make sure that either the COM 1 or COM 2 port is available 2 The following parameters can be configured when using a PC 9600 14400 19200 default 38400 56000 57600 11520...

Страница 178: ...developed specifically for configuring and managing user features 4 11 1 On the HiPath1120 1150 Figure 4 42 Illustration of USB cable connection Connections Warning The installation drivers are on the Setup and Installation CD Step Procedure 1 Plug the USB adapter cable with the male Mini DIN Connector into the 4 pin Mini DIN Connector on the motherboard Figure 4 42 2 Connect the A to B Standard e...

Страница 179: ...stem programming mode using a PC on page 7 280 Step Procedure 1 Plug the USB adapter cable with the male Mini DIN Connector into the 4 pin Mini DIN Connector on the motherboard Figure 4 43 2 Connect the A to B Standard end of the USB cable to the USB adapter and connect the other end to the computer or modem 3 See System Programming Mode in the System programming mode using a PC on page 7 280 Step...

Страница 180: ...MB on slot X8 Pins 3 and 4 for HiPath 1150 See Figure 4 40 on page 4 172 Pins 1 and 2 for HiPath 1190 1190R See Figure 4 41 on page 4 176 4 13 Installing a TFE entrance telephone interface 4 13 1 Models S30817 K930 A300 and S30122 K7696 T313 S30817 K930 A300 without amplifier S30122 K7696 T313 with amplifier Installation procedures Step Procedure 1 Connect your system to the TFE interface see Inte...

Страница 181: ... on the X2 Connector 4 To activate Pager mode lift the handset at one of the answering extensions and dial the entrance telephone number Once the appropriate number is dialed the calling extension is connected to the entrance telephone but without voice capability 5 For voice capability dial 8 The ambient sound will stop and you will be able to leave a message The sound will be amplified in all sp...

Страница 182: ...X6 Connector wiring it as instructed by the manufacturer 5 When the person at the door presses the entrance telephone button it causes it to ring at extensions configured for answering calls When an extension answers the call the voice capability is automatically enabled 6 Dial the code for the door opener 7 To disable voice capability the attendant extension must dial 9 To enable voice again the ...

Страница 183: ...s A and B For primary protection for a distribution box that is external to the PABX use a MPT250 shield with two PTCs A and B wires for overcurrent protection along with a gas capsule connected to the ground wire through a separate cable that is independent of the cable used for grounding the power supply Danger The HiPath1150 1190 1190R power supplies must be protected by an earth ground in a se...

Страница 184: ... wire For the safety of the user and the technician the HiPath 1190 system has a dedicated terminal for grounding its metal enclosure This terminal is located on the back of the enclosure Connecting a ground wire protects the accessible metal parts of the equipment against high voltage and power levels in the event of a surge or a failure The ground connection is critical and must be wired before ...

Страница 185: ...n Procedure To ensure a proper grounding connection perform the tests described in the table below before placing the system in service 4 15 Protective power outage relays Each external analog line on the EB 202 204 206 210 modules features a relay that forwards the line to the first two extension slots on each EB module in the event of a power outage The ground wire must be connected to the prote...

Страница 186: ... D An optiPoint type system telephone has four wires A B C D two of which A B are required for voice communications A Standard Telephone DP MF has only two wires A B both used for voice Color group Pair A Wire B Wire Color group Pair A Wire B Wire 1 1 wt blu blu wt 3 11 blk blu blu blk 2 wt or or wt 12 blk or or blk 3 wt gre gre wt 13 blk gre gre blk 4 wt cob cob wt 14 blk cob cob blk 5 wt gra gra...

Страница 187: ...tion to C Installation Procedures Step Procedure 1 Install telephone jacks at the extensions 2 Connect each extension jack to the desired A B slot on the Main Distribution Frame 3 KS type system telephones are preset at factory default for C D pairs see CD Interface Assignment on page 6 248 If necessary choose a different C D pair then program the new C D interface assignment 4 Install the telepho...

Страница 188: ...Master Slave telephone HiPath 1120 connections Warning KS type system telephones are powered through the C and D wires Take the nec essary precautions to avoid short circuits at the interconnect block If a short circuit occurs between wires C and D the interface s protection will take the extension out of service To activate the extension again remove the short disconnect the system telephone then...

Страница 189: ... client inter face Warning Before starting to work on the HiPath 1190 make sure the system is grounded and disconnected from all power sources Follow all guidelines to protect the system from electrostatic discharge see Safety Information Caution on page 1 21 Step Procedure Help Notes Measurements 1 Compare the installation position of modules on the slots against the installation diagram Module i...

Страница 190: ...Installation 4 190 Service Manual Performing a visual inspection ...

Страница 191: ... status by means of indications from a set of programmable keys The programming for the system is described in Chapter 6 Configuring the system specifically for the client Topic Page System Telephones Profiset 3030 System Telephone 5 192 E822 ST System telephone 5 193 E821 ST System Telephone for Brazil only 5 195 optiPoint 500 System Telephones 5 196 Programmable Feature Keys 5 203 Settings 5 204...

Страница 192: ...tem messages The third line displays the extension number and system messages pertaining to feature selection options When the or symbol appears next to the line it means there are additional selection options Use the navigation keys to scroll through the available options Press Enter to select an option When the or symbol appears next to the line it means there are additional lines to be displaye...

Страница 193: ...ker 5 Microphone for speakerphone 6 Display 5 2 3 E822 ST System telephone The E822 ST System telephone features a 2 line 16 character alphanumeric display This system telephone features a 2 line display The first line displays time date day of the week number of the extension called and number of system messages The second line displays the extension number and system messages pertaining to featu...

Страница 194: ... Press Enter to select an option E822 ST System telephone layout Figure 5 2 E822 ST system telephone layout 1 Alphanumeric LCD display 2 Programmable status indication LED keys 3 Function Keys 4 SPEAKER Speakerphone Key The speakerphone is disabled when the handset is lifted To switch from speakerphone to normal mode lift the handset and press the SPEAKER key 2 5 4 3 1 ...

Страница 195: ... keys for direct access to TOGGLE PICK UP and CONFERENCE facilities It also features programmable keys for extensions and external lines E821 ST System Telephone Layout Figure 5 3 E821 ST system telephone layout 1 Programmable status indication LED keys 2 Special function keys 3 End Call key for use with a headset 3 2 1 ...

Страница 196: ...nal number system name and function selection options that can be selected by pressing If the appears on the right it means there are more options available Use the arrow keys to navigate through the options Press Enter to select an option optiPoint 500 advance telephone layout Figure 5 4 optiPoint 500 advance System telephone layout Important When there are more than 4 optiPoint 500 Master or Sla...

Страница 197: ...Service Manual 5 197 Telephones System Telephones optiPoint 500 economy basic standard telephone layout Figure 5 5 optiPoint 500 economy basic standard system telephone layout 1 2 3 4 5 6 7 8 9 10 11 ...

Страница 198: ...et Function keys Service menu redial microphone ON OFF or internal speakerphone 2 Keypad 3 Handset 4 This telephone features a 4 line 24 character per line backlit display 5 Key labels Programmable keys 6 Key for confirming a function 7 Keys for selecting a function 8 Keys for configuring the telephone set 9 LEDs 10 Microphone for speakerphone 11 1 5 2 3 8 9 ...

Страница 199: ...memory module with freely programmable keys and specific functions optiPoint 500 rear panel Figure 5 7 optiPoint 500 rear panel On the optiPoint 500 Entry model the preset function keys field 1 can be pro grammed as desired 5 PC USB HiPath 1100 Headset Handset optiPoint adapter optiPoint key module or optiPoint BLF or optiPoint memory module ...

Страница 200: ...ction keys 12 12 12 20 Full duplex speakerphone feature Yes Yes Lighted display Yes Headphone connected using Integrated interface Yes Adapter Yes Yes Yes Handset Interface Yes Yes Yes Yes USB Interface Yes Yes Yes Additional connection interface Yes Yes Yes Adapter slots 0 1 1 2 Additional optiPoint terminals Additional terminals provide more comfort and improve efficiency and safety at work Supp...

Страница 201: ...tem telephones ISDN or analog telephones headsets or speakers Supported adapters include optiPoint acoustic adapter optiPoint analog adapter optiPoint ISDN adapter and optiPoint phone adapter Headset The headset can be used to replace the terminal s handset for hands Free operation Warning For information on installation related issues and operation please see the headset s installation manual Add...

Страница 202: ...ard models For the optiPoint Advanced an optiPoint Acoustic Adapter is optional The headset can be connected to the built in interface on the telephone s rear panel using a RJ45 connector The Headset feature key must be programmed to answer calls Headset models without an electronic hook key e g Plantronics can be connected directly to the handset s interface on an optiPoint Entry Basic or Standar...

Страница 203: ... External calls Answering an internal or external call Consultation internal or external Transfer internal or external Line reservation Individual pickup Toggle Hold Other see chapter on programmable keys in the User Manual Code 91 optiPoint 500 advance economy basic standard A31003 K1270 U101 Profiset 3030 E 822 and E821 A31003 K1270 U102 optiPoint 500 Entry A31003 K1270 U104 ...

Страница 204: ... equipment that uses touch tone dialing This dialing mode is recognized by the dual tone it generates which can be heard by the caller on the handset as the numbers are dialed Procedures for using these types of telephones are indicated after the DTMF symbol Documentation Number Profiset 3030 A31003 K1250 B816 4L19 E821 ST and E822 ST A31003 K1250 B814 3P19 optiPoint500 A31003 H8400 B988 6Z19 Impo...

Страница 205: ...uted using the system s first extension slot analog extension MF or system telephone Connect the PC to the system 2 Programming Mode 95 PASSWORD default 31994 Configure CommServer 3 Valid parameter or code beep Brazil Start the program 4 When an incorrect setting is entered 3 beeps Brazil System data are automatically imported 5 When completed 1 beep Brazil Start programming 6 End programming pres...

Страница 206: ...g the HiPath 1100 Manager on page 7 336 management software Description HiPath 1120 HiPath 1150 HiPath 1190 External line 801 to 806 801 to 832 801 to 845 Extension including S0 11 to 30 11 to 60 610 to 645 101 to 240 Group of external lines 0 or 890 to 899 Call Group CG 770 to 779 Hunt Group HG 780 to 789 UCD subscriber group 790 to 799 Carrier 9 EVM Default internal number 790 EVM Message Ports ...

Страница 207: ...age 6 234 Item Programming 1 Main Configurations page 7 208 2 External line settings page 7 210 3 Programming an Extension page 7 212 4 DISA page 7 218 5 General settings page 7 218 6 Updating the Software page 7 222 7 Remote Administration page 7 222 8 Internal entrance telephone page 7 223 9 Call Detail Report Manager page 7 223 10 Fax DID Feature page 7 226 11 EVM module page 7 228 12 Digital t...

Страница 208: ...rmission List 2 Class 6 Permission List 3 Class 7 default for all lines Night service COS Class 1 Denied List 1 Class 2 Denied List 2 Class 3 Denied List 3 Class 4 Permission List 1 Class 5 Permission List 2 Class 6 Permission List 3 Class 7 Default for all lines extension instead of extension Class 77 for all exten sions Note Class 7 Day Class 7 Night Phonebook 112 Phonebook entry 000 to 249 Numb...

Страница 209: ...3 English 4 French 5 Italian 6 Turkish Automatic 3 Country Group of Countries 165 See Table 6 16 on page 6 226 Automatic 01 Brazil COS changeover 178 extension to enable to disable instead of extension disabled Carrier selection mode LCR or ACS 225 ACS LCR Automatic LCR Warning Tone for Calls without LCR 092 To activate to deactivate Automatic to deacti vate To activate the time for LCR fall back ...

Страница 210: ...nal Line Call Direction 155 External line 1 Bidirectional 2 Incoming unidirectional 3 Outgoing unidirectional instead of external line 1 Bidirec tional Flash Duration in analog line 118 external analog line 05 to 99 05 50 ms 99 990 ms instead of external line Country Reseizure time for external line 129 05 to 99 05 500ms 99 9900ms Automatic 05 Maximum time between rings for an incoming call 117 05...

Страница 211: ...tendant to answer a call on an external analog line 083 External line 01 to 20 in 5 second cycles Automatic 06 30 s Overflow for a Group of external Lines 099 0 or 890 a 899 Group of external Lines 1 For a specific group of external lines 2 For all groups of external lines 3 None 0 or 890 to 899 only for case 1 instead of group 1 First group 2 All 3 None 35 10 for Argentina 30 08 for Thailand Mala...

Страница 212: ...ubscriber Groups 023 UCD Subscriber Group Extension up to 32 agents to delete instead of group None Collect call barring for a UCD Subscriber group 007 UCD Subscriber Group to enable to disable instead of group To disable Message Waiting for UCD queue 024 UCD Subscriber Group extension or MOH Music on Hold instead of group MOH UCD Queue size 025 UCD Subscriber Group 00 to 99 slots instead of group...

Страница 213: ...G 242 Hunt Group HG 01 to 24 in 5 second cycles Automatic 04 Override 144 extension 0 Without permission 1 With permission and beep instead of extension 0 Silent Monitoring 046 extension to enable to disable instead of extension to disable Call Identification for analog exten sion CLIP 010 Analog extension 0 No Caller ID 1 DTMF before ringing 2 DTMF during ringing 3 FSK before ringing 4 FSK during...

Страница 214: ...1120 01 to 04 HiPath 1150 01 to 08 HiPath 1190 01 to 24 or to delete extension instead of extension HiPath1120 1150 1st 11 2nd 12 etc HiPath 1190 None Extension coeffi cient 148 Analog extension Line type Brazil 1 900 ohms 2 600 ohms 3 900 ohms 4 600 ohms instead of extension 1 Default extension Activating external Message Waiting Indicator 014 to enable to disable Automatic to disable External MW...

Страница 215: ...ime out 241 01 a 31 or To deactivate Automatic deacti vated Answering timeout for a Second Atten dant for calls received over MSN 082 Index 001 to 140 01 to 20 in 5 second cycles Automatic 06 30 seconds Modem extension 085 Extension Automatic None MSN and exten sion assignment for external outgo ing calls 086 extension 1 Day 2 Night Index 001 to 140 Automatic None External to exter nal transfer 09...

Страница 216: ... Busy after Call Forwarding No Answer 185 extension to enable to disable instead of extension to disable Permission for conditional call forwarding 247 extension to enable to disable instead of extension To acti vate The overflow extension can be accessed through the specified internal number and cannot be used or programmed as a Fax extension Country Permission List Denied List Brazil 190 0800 19...

Страница 217: ...99 0800 090 India Pakistan Spain 091 112 1003 900 903 905 906 Russia 01 02 03 04 05 07 09 00 Ukraine Peru Philippines Canada South Africa Turkey 0900 Latvia 01 02 03 04 112 0900 Lithuania 01 02 03 112 0900 Italy 112 113 115 118 0900 Australia 000 0900 United Kingdom 000 0900 France 3010 3040 3611 0800 0810 0820 0825 083605 3 08 00 026 0269 0508 0590 0594 0596 Country Permission List Denied List ...

Страница 218: ...stead of extension To deacti vate MSN DISA 019 MSN number up to 20 digits instead of the digit or Automatic None DISA external line 020 external analog line 1 Never 2 Night only 3 Day only 4 Always instead of external line 1 Never Programmed Functions Code Intermediate data Data to be programmed Completing data entry Default Music on hold 136 0 No music 1 Intern MIDI 2 Intern Wave 3 External 4 Ext...

Страница 219: ...e caller list 171 Initial sequence of digits up to 6 digits 5 second timeout None Date Time Manual setting 114 DD Day from 1 to 31 MM Month from 1 to 12 YY Year from 00 to 99 HH Hour from 00 to 23 MlMl Minutes from 00 to 59 Automatic Automatic Update of Date Time 038 to enable to disable Automatic to enable Callback for exter nal calls via ISDN 221 to enable to disable Automatic to enable Call Cha...

Страница 220: ...try New setting 0 to 255 Emergency numbers 040 Position 1 to 5 Number up to 10 digits 5 second timeout See Table 6 11 on page 6 221 Module detection 061 00 Detect all modules or 01 to 20 instead of slot position 00 Type of MSN Signal 073 Position 001 to 140 Type of signal 1 to 4 Automatic 1 Reference clock 090 position or 00 Erases switches to auto mode Physical Interface 1 to 5 Automatic Auto mat...

Страница 221: ...ons 05 ISDN telephones 06 ISDN line 07 Voice Mail 08 CLIP FDW 09 External connections 10 Sensor Relay 11 ISDN CAS Layer 3 12 ISDN Layers 1 and 2 13 optiPoint Layers 1 and 2 delete current configura tion 5 second timeout None Country Emergency Numbers Name Brazil 190 193 Police Fire Department Portugal 112 Emergency Spain 112 Emergency Latvia 01 02 03 04 112 Lithuania 01 02 03 112 Italy 112 113 115...

Страница 222: ...00 00 External number for updating the software 056 Number up to 20 digits instead of the digit or Automatic None Frequency of SW update 057 Month 01 to 12 Automatic 01 Uploading the SW update 059 hh mm hh from 00 to 23 and mm from 00 to 59 Automatic 00 00 Programmed Functions Code Intermediate data Data to be programmed Completing data entry Default Service Call 994 Number of Service Center to co...

Страница 223: ...sition 1 to 20 Extension or to delete instead of slot position No Door lock 116 Position 1 to 20 to enable to disable instead of slot position to disable DIDs for entrance telephones 159 Position 1 to 20 1 Day service 2 Night service Extension 1 Extension 2 up to 10 Extensions or to delete instead of extension Extension 11 101 Permission for opening door 125 Position 1 to 20 Extension or to delete...

Страница 224: ...ng of the first 25 digits of the number to be billed up to 4 digits 5 seconds time out None Cost Code type 243 1 Optional 2 Mandatory Automatic 1 Optional Cost code confir mation 244 to enable to disable Automatic to disable If the system is enabled for Caller ID over digital or analog lines by the local carrier Code Group Country Display language 01 Brazil default Brazil Bolivia Paraguay Portugue...

Страница 225: ...ch 11 China China English 12 Malaysia Malaysia English 13 Singapore Singapore English 14 Thailand Thailand English 15 Greece Greece English 16 India India English 17 Pakistan Pakistan English 18 Spain Spain Spanish 19 Russia Russia Belarus English 20 Ukraine Ukraine English 21 Peru Peru Spanish 22 China2 China2 English 23 Philippines Philippines English 24 Canada Canada English 25 South Africa Sou...

Страница 226: ...Spanish for language For Indonesia set 08 Intern Spanish for country group of countries then 03 English for language Country Protocol Code Brazil 01 DTMF1 1 IM Spain 08 IM English 09 India and Peru 21 DTMF2 2 Other countries FSK 3 Programmed Functions Code Intermediate data Data to be programmed Completing data entry Default Call answering menu 009 Select forwarding digit 0 to 9 or Type extension ...

Страница 227: ...on Configuring the call answering mode 127 External line 0 Module disabled 1 Fax 2 DID 3 Fax DID 4 Message 5 Autofax instead of the number of the free line 0 Fax reception extension 128 External line Extension or to delete instead of external line None Collect call barring 008 1 Fax 2 DID 3 Fax DID 4 Greeting message to enable to disable instead of mode to disable MSN Answering for Fax DID 080 Pos...

Страница 228: ...4 Flemish Belgium 25 Portuguese Brazil 26 Chinese 27 Turkish Automatic 03 IM French 06 Portugal and Brazil 07 Spain Argentina and IM Span ish 12 Greece 02 Other countries Maximum number of auto config urable mailboxes 202 01 to 24 Number of mail boxes Automatic 12 boxes Mailboxes Assign ments 203 number 01 to 24 Extension or EVM virtual port 744 to 747 instead of a mailbox None Mailbox Password 20...

Страница 229: ...untry Code Automatic 3 Italy 1 Other countries Sensor message HiPath 1120 213 1 Message 1 or 2 Message 2 Automatic None Type of voice mail 214 1 None 2 VMI 3 EVM Automatic 1 Voice mail group 215 UCD Group or to delete Automatic None Mailbox assign ment for auto answering mode 216 Mailbox 1 or 2 Greeting message port 7491 or 7492 instead of a mailbox None Audio quality 228 1 Best for greetings and ...

Страница 230: ... No ACK Setup for S0 Line 075 01 02 03 or 11 00 to 01 HiPath 1120 00 PP or PMP only 00 to 04 HiPath 1150 00 to 04 HiPath 1190 to enable to disable Automatic Depending on the coun try Notify 076 01 02 03 or 11 00 to 01 HiPath 1120 00 PP or PMP only 00 to 04 HiPath 1150 00 to 04 HiPath 1190 to enable to disable Automatic Depending on the coun try Automatic Keypad 077 to enable to disable Automatic t...

Страница 231: ...0 to 04 HiPath 1190 to enable to disable Automatic Depending on the coun try B channel 103 01 02 03 or 11 00 to 01 HiPath 1120 00 PP or PMP only 00 to 04 HiPath 1150 00 to 04 HiPath 1190 Master Slave Automatic Depending on the coun try No DIV LEG info for ISDN line 249 01 02 03 or 11 00 to 01 HiPath 1120 00 PP or PMP only 00 to 04 HiPath 1150 00 to 04 HiPath 1190 to enable to disable Automatic Dep...

Страница 232: ...King dom 44 Spain 34 Russia 7 Philippines 63 Singapore 65 Greece 30 Thailand 66 IM Spanish Turkey 90 IM French Ukraine 380 IM English Venezuela 58 India 91 Vietnam 84 Italy 39 France 33 Korea 82 Programmed Functions Code Intermediate data Data to be programmed Completing data entry Default Default configura tion of the LAN interface 013 Automatic ADSL module IP 10 0 0 1 SLIMC SADSLIM LIMC or ADSLI...

Страница 233: ...ntacts closed 1 Contacts open instead of the sensor 0 Contacts closed Time between attempts for acti vating the sensor 050 Time 00 to 10 minutes Automatic 03 3 minutes MSN assignment for the sensor 051 Position 001 to 140 or to delete Automatic None Number dialed by sensor activation 052 Number up to 20 digits Automatic or None Number of attempts for acti vating the sensor 053 001 to 100 attempts ...

Страница 234: ...ncy tone Default access to a group of external lines 002 This feature configures dialing 0 for each extension as the dialing method for a group of external lines The default external line access code is 0 Analog line attendants 142 These define the extensions or Consecutive Groups that will first answer calls received from a specific external line during a specified time period Day Night Any exten...

Страница 235: ... for all extensions in the Restricted Trunk Access with Denied List category list 1 allows you to store 10 numbers list 2 allows you to store 25 numbers list 3 allows you to store 35 numbers Permission list 124 There are 3 Permission Lists that are available for dialing from any extensions in the category Outward Restricted Trunk Ac cess If an extension is connected to a door opener device the dev...

Страница 236: ...al and external calls and for making external calls to any number that is not included in the Denied List Unrestricted Trunk Access Can make any type of call COS Changeover 178 This code allows extensions to use a feature for temporarily changing over the class of service It is therefore possible to allow or deny an extension to transfer its class of service temporarily to another telephone Langua...

Страница 237: ...leting the call at this time When using a system telephone the carrier s name will show on the display To activate the time for LCR fallback 250 This timer should be enabled for routes subject to delays of problems making call connections for example SIP Boxes When the preset time has elapsed the call is routed to the Default Carrier defined in that rule of the LCR See Manager A31003 K1270 M100 LC...

Страница 238: ...er of lines being used by the CLIP DTMF at any given time This is caused by the fact that both the CLIP DTMF and the Conference use common resources in the system So for example In a system with 16 CLIP DTMF lines there can be 2 conferences with 3 participants In a system with 8 CLIP DTMF lines there can be 1 conference with 8 participants or 2 conferences with 4 participants In a system with no C...

Страница 239: ...rty answers the phone the public exchange sends a signal for the system to start call detail recording The following types of signal are possible None Polarity reversal DTMF Tone Tone detector 160 When it is enabled it runs two functions in an external analog line 1 This setting has the system wait for a dial tone detection on the public exchange before making it available to send to the selected ...

Страница 240: ...he Extension key False tone 063 This sends an external line dial tone even when there is no external line available valid for MF DP extensions only Internal access code for Automatic seizure field 226 This features specifies the code to be used for making internal calls when an extension is configured for Automatic Seizure of an external line Access codes are configured according to the country If...

Страница 241: ...all Groups that are accessed by dialing numbers from 770 to 779 When the number is dialed all telephones in the group ring until one of them is answered Call Forwarding within a Call Group CG 222 This feature works only on digital lines It provides call forwarding for extensions belonging to Call Groups When a call is routed to a Call Group it rings at all extensions at the same time The extension...

Страница 242: ...est In the event that all extensions in the group are busy external calls are routed to a hold queue Collect call barring for UCD Group 007 When collect call barring is activated all collect calls are automatically rejected by the system for Brazil only The system by passes collect call barring for members of a UCD Group that is call barring is only verified for the group Message Waiting for UCD Q...

Страница 243: ...s features allows you to set a period of time for the agent to leave the group without being disturbed and make notes about a call Ring signal time at an agent 030 This setting specifies how long an incoming call will keep on ringing at an agent s station before it overflows Agent status after signaling timeout 176 Allows you to identify agent s status at the end of the signaling timeout By defaul...

Страница 244: ...n an extension does not answer an internal or external call within a specified period of time the call rings consecutively at the available and the busy extensions in the group When no one is available the extension may disconnect from the Hunt Group Call Forwarding within a Hunt Group HG 223 This feature works only for digital lines It provides call forwarding for extensions belonging to Hunt Gro...

Страница 245: ...tation as the Silent Monitoring and Conference features A maximum of 2 si multaneous Silent Monitoring is allowed by the system Note The Override feature is ticketed as a Conference Silent Monitoring 046 This setting specifies the extension for performing Overrides without a beep Within the system Silent Monitoring has the same limitation as the Conference and Override features A maximum of 2 si m...

Страница 246: ...al number Electronic Lock Password 126 It blocks the extension from making external calls allowing only internal calls or dialing a number directly from the Phonebook A 5 digit password is used to configure this setting Should the user forget the password used to block the extension the password can be reset to the system s default default password is 0000 Timeout Call Forwarding No Answer 130 Thi...

Страница 247: ...reviously programmed into the Phonebook automatically as soon as the handset is lifted Warmline 162 It allows you to specify a period of time for activating the Hotline Each extension can have a different timeout set for the Warmline from 0 to 9 seconds Assigned Group 151 This feature allows you to assign many extensions to one executive telephone There are 8 groups available with 16 extensions ea...

Страница 248: ...Equipment Connected to an Extension 003 This setting specifies the type of equipment that is connected to extension slot A B or S0 Normal system telephone ISDN or analog telephone Data Fax modem Answering machine Music External entrance telephone Voice Mail A3 B3 C3 D3 A3 B3 C3 D3 A4 B4 C4 D4 A4 B4 C4 D4 A5 B5 C5 D5 A6 B6 C6 D6 A7 B7 C7 D7 A8 B8 C8 D8 If a call has been answered at least once by t...

Страница 249: ...have like an ISDN telephone It must also be controlled by DTMF signals Auto Answering Mode 034 This setting specifies the use of the Auto Answering Mode for the telephone by using a feature code see Functions used for Making Calls Speakerphone Auto Answering Mode in the User Manual Pulses for call charges on an analog extension 041 This sends pulses to be charged for calls on an analog extension 1...

Страница 250: ...Timeout limit day 241 This allows the user to define a day of the month on which the timeout for external calls on all extensions will begin Timeout for a Second Attendant for MSN 082 This consists of a time period in seconds during which an incoming call rings at the First Attendant of an external line If the call is not answered within the specified amount of time it will be directed to the Seco...

Страница 251: ... to configure a timeout between two external calls when no other extension is involved in the call Call timeout can be set from 1 minute to 24 hours default setting is 1 hour Disconnect timeout after and external to external transfer 183 With this option you can specify a period of time for disconnecting an external call This option applies when at least one ex ternal line is an analog line and th...

Страница 252: ...of Call internal or external has been configured 3 Checks the time settings Permission for Conditional Call Forwarding 098 This allows a conditional forwarding to occur An external to external transfer over an analog line is terminated in the following three situations Elapsed timeout for external to external connection code 218 When a busy signal is detected Type of answering signal Code 158 This...

Страница 253: ... DISA This setting allows you to make an external call from an external telephone as if it was an extension through your system In addition the following features can be activated or deactivated Call Forwarding Feature Deactivation Conference Night ser vice Suffix Dialing Door Opener Electronic Lock Individual Speed Dial System Speed Dial Relay and Do Not Disturb Urgent Call and Callback when Busy...

Страница 254: ...line configured as a Fax DID and DISA the call is answered by the Fax DID if available 6 3 5 General settings Music on Hold 136 This setting specifies the type of music the caller on hold will hear Assigning Extensions to an MOH Group 087 This setting allows you to distribute extensions in two MOH groups Music source for the MOH Group 088 This setting specifies the type of music the caller on hold...

Страница 255: ...s or all internal and external calls should be displayed in the Caller Lists Deleting digits from the Caller List 171 Specifies the digits that do not need to be repeated when making a call Date Time Manual Setting 114 Sets the current Date and Time for the system When the default configuration is restored 99 the Date setting displays in formation about the date the software was create and will di...

Страница 256: ...tor 042 This setting specifies the multiplier for Call Charge factors The default setting specifies that each pulse be multiplied by 1 for both factors Call Cost Limit by Extension 043 This setting specifies whether the extension should be assigned a rate schedule and if so which Factor should be used to calculate call charges Call charge value by extension 197 This setting specifies the amount th...

Страница 257: ... sensor 177 When an alarm is activated the HiPath 1120 dials the number on entry 249 of the Phonebook The numbers are dialed and the sequence of digits in DTMF format is repeated every 5 seconds after the connection is established The purpose of this se quence of digits is to identify the alarm source An alarm center for example is able to identify which PABX is sending the tone If the receiving e...

Страница 258: ... 805 for the digital lines 806 and 807 for the external analog lines 11 to 15 for the ISDN extensions 16 to 25 for analog extensions Extension 16 is now the Programming extension If Detect only specified slot is selected the existing numbering configuration will remain Only the module will be detected by the system Type of MSN Signal 073 This setting lets you choose one of the four types of rings ...

Страница 259: ...e period This code makes it possible to configure the profiles to be monitored via the trace The trace can be started ended using the HiPath 1100 Manager or the feature codes see User Manual The default setting is trace not configured 6 3 6 Updating the Software SW Information 001 This displays information about the system s software To view this information use a system telephone with a display T...

Страница 260: ...the telephone operates as usual The default setting specifies updates to be done in a monthly basis Uploading the SW Update 059 This setting specifies when the data downloaded will be uploaded to the system s memory During the upload approximately 3 minutes the telephone operates as usual The default setting specifies the time for the update process at 00 00 hours 6 3 7 Remote configuration Servic...

Страница 261: ... using an MF telephone Remote configuration Remote Configuration must be enabled and the programming extension must have a conversation in progress on the external line over which programming is to be performed In Talk mode enter the code 991 in the programming extension to transfer control of the HiPath 1100 to the remote programmer The remote programmer must then enter the system password using ...

Страница 262: ...in the internal entrance telephone permission will be required for opening the door in the required slots This class of service is assigned to all extensions by default 6 3 9 Call Detail Report Manager Information about calls received and made are stored in the system s memory CDR records can be reviewed in the following manner By using a PC or printer connected through a serial interface By using...

Страница 263: ...uesting that the stored tickets start being sent nticket_stop n This command will be sent by the user Application to the PABX requesting that the stored tickets stop being sent After receiving and accepting those commands new tickets or tickets that are still stored will not be transmitted to the PABX Command Description nend of tick ets n This answer will be sent by the PABX to the Application in...

Страница 264: ...te End of call Time External line used Ln Note Example of the Ln field content for ticketing Extension Ext Some specific types of access will be displayed in this field indicated by the following numbers COS Changeover WCOS Ring duration Ring Call duration Duration It is recommended that you uncheck the Serial Printing checkbox on the HiPath 1100 Manager if tickets are not being issued over an ADS...

Страница 265: ...xternal line is accounted for by the extension that transferred the call Call Detail Report with a Serial Interface 006 This setting specifies that the Call Detail Report will be done through a serial interface Date Time Ln Ext WCOS Ring Duration Number I Call fees Acc code 22 11 99 14 00 00 01 21 00 14 00 01 34 2222222 1 In the event of a power outage during ticketing all tickets that were being ...

Страница 266: ...ow many end digits can be omitted in the data output when dialing a call on an external line These digits will be replaced by Call detail report for incoming calls 161 When this option is selected call details are shown in the CDR record Call Detail Report Filter 167 The number programmed in this filter specifies the type of outgoing call to be recorded based on the first four digits of the dialed...

Страница 267: ...nation for an Extension see Call Forwarding in the User Manual The maximum number of simultaneous conferences supported by the system is 8 Call answering menu 009 The Fax DID lets you create a customized call answering menu transferring the call to an extension or a group depending on the number entered A call is transferred to a preconfigured destination after 3 seconds If a digit is entered befo...

Страница 268: ...ys depending whether the PABX received it over an analog or a digital line For an external analog line the switch is required to bypass the Fax DID module and forward calls to an analog line attendant if there is no attendant available the call is forwarded to an overflow extension Of course if a channel becomes available in the meantime the call will be answered as usual and the timeout will be i...

Страница 269: ...been configured using the HiPath 1100 Manager fewer mailboxes will be available for auto configu ration For example if there are 12 mailboxes and 10 have been configured through the HiPath 1100 Manager only 2 boxes will be available for configuration by the user Mailboxes assignments 203 When attendants are used for MSNs this feature assigns mailboxes to user s extension slots or virtual EVM ports...

Страница 270: ...g selected 1 or 2 must be the same as in the Mailbox Greeting Configuration Code 206 The following settings are available for the Day Night option Greeting 1 Day Greeting 2 Night Message Source 208 This setting assigns a message to one of the two EVM ports Alternatively the message can be assigned to an MSN Message mode 209 This setting specifies whether a message will be played only once or repea...

Страница 271: ...1 modules the first configured for up to 30 channels and the second up to 15 channels When the total number of digital trunks configured for the module plus the number of external analog lines exceed the maxi mum capacity of the system the external analog lines for the EB 202 206 or 210 expansion modules are disabled Nonethe less the extensions will continue to work as usual Lines are disabled in ...

Страница 272: ...ettings Regional Settings If the operating mode is PP Point to Point only the system number will be registered You must configure MSN numbers Basic MSN Settings Any MSN number previously configured must be deleted S0 Ports HiPath 1190 062 This setting specifies the operating mode for the S0 module maximizing the system s port usage This option is best for the HiPath 1190 due to its high port capac...

Страница 273: ...e to an MSN 078 This features allows you to assign the MSNs provided by your local carrier to calls made over digital lines External line prefix 189 This setting specifies the prefix for the PABX external lines for domestic and international calls By default the type of a pro grammed called is not specified External number registration 191 To use the attendant feature each external number must be ...

Страница 274: ...you to change certain default ISDN settings for specified countries ISDN Layer 2 102 Allows you to change certain default ISDN settings for specified countries B channel 103 Allows you to change some default ISDN settings for specified countries No DIV LEG info for ISDN line 249 If this option is disabled and a local carrier provides the Diversion service for ISDN lines the extension forwarding th...

Страница 275: ...e module 192 168 254 253 Default Subnet Mask of the module 255 255 255 0 Default gateway of the module 192 168 254 254 6 3 14 Relay and sensor on the HiPath 1120 You can connect a Music module to the HiPath 1120 system This module also provides a relay and a sensor for integrating other devices such as an entrance telephone a door opener alarms and so on Sensor When the state of a sensor changes f...

Страница 276: ... is able to identify the origin of the call for example an alarm call Number dialed by sensor activation 052 This setting specifies the number to be automatically dialed when a specific sensor is activated She number to be dialed when the sensor is activated is stored in the System Speed Dial When the number stored in the System Speed Dial is changed this field is updated and vice versa Number of ...

Страница 277: ...to use the Relay to control a second ring for an extension slot Timer for deactivating the relay 173 Specifies the length of time that the relay must remain closed External ring for activating the relay 071 This setting allows you to use the relay to set a second signal e g a ring for a specified analog extension Sensor Message 213 After assigning a number you can assign a message to the sensor Th...

Страница 278: ...the system is a task that must be performed only by au thorized technical personnel Step Action Instructions 1 Connecting the system to the power supply Connecting the Power Cable Initialization of the interface 7 278 2 Activating System Programming 7 278 3 Programming with a Telephone Set 7 279 4 System programming mode using a PC 7 280 5 HiPath 1100 applications 7 333 Step Procedure 1 Complete i...

Страница 279: ...ode syntax All the programming is done by entering a code then a setting Each additional setting entered is followed by a confirmation tone 1 beep If the parameter is keyed in wrong it is followed by 3 beeping tones after which the system returns to its initial programming state There are three different ways to finalize the configuration of a setting and return to the initial state of the program...

Страница 280: ...re it in a safe place 7 2 System programming mode using a PC The system CD contains the software packages required for installation with a PC see HiPath 1100 applications on page 7 333 Basic hardware requirements IBM type PC Pentium processor 333 MHz minimum 128 MB RAM minimum Microsoft Windows 98 SE Windows 2000 Windows 2003 Windows ME or Windows XP SVGA Color Monitor 800x600 resolution minimum F...

Страница 281: ...ware to be installed 5 Select the software components you wish to install and install them For programming the HiPath 1100 system the following applications must be installed HiPath 1100 Manager CommServer installs automatically 6 After each component is installed a message is displayed indicating that the installation was completed successfully Click Next every time it appears 7 Click Finish to c...

Страница 282: ...dows status bar and select Properties Specify these settings Connection Type Baud Rate 19200 Default 38400 57600 115200 baud COM port Figure 7 1 Communication Server Properties Configuring a V 24 Serial Interface 9 The CommServer will be dialed automatically when an application is enabledHiPath 1100 The V 24 Serial Interface may not be used if a LAN interface module is installed in the PABX ...

Страница 283: ...ns Install the required drivers see Chapter 7 HiPath 1100 USB Drivers then start installing the HiPath 1100 applications Procedure 1 Insert the HiPath 1100 CD in the CD drive If Auto Run is not configured go to the Windows Start menu click Run and then select the Browse button in the dialog box Open the SETUP EXE file on the CD drive 2 In the Setup window select the language you want to use Once t...

Страница 284: ...on was completed successfully Click Next every time it appears 6 Click Finish to close the installation window This completes the software installation Windows may display a message to restart the computer If this occurs restart the computer 7 After installation is completed configure the Communication Server see Figure 7 3 Right click the CommServer icon on the Windows status bar and select Prope...

Страница 285: ...For programming the HiPath 1100 system the following applications must be installed HiPath 1100 Manager and CommServer installs automatically 5 After each component is installed a message is displayed indicating that the installation was completed successfully Click Next every time it appears 6 Click Finish to close the installation window This completes the software installation Windows may displ...

Страница 286: ...ed known as eCommServer You may therefore make an authorized LAN access to the PABX of an external application such as those that use the SNMP platform Configure the IP address and Port of the LAN interface module in the HiPath 1100 Manager in Tools CommServe Configuration menu Defaults Port 3100 Default IP of the module 192 168 254 253 9 When a HiPath 1100 application is activated the server star...

Страница 287: ...Administration CAPI interface drivers b Connections via optiPoint CAPI This connection via optiPoint is up to four times faster than an optiPoint VCOM connection item a therefore only one administration connection may be made each time No other administration connections via optiPoint CAPI or remote ISDN connections to the system will be made while there is a CAPI connection running USB administra...

Страница 288: ...lected all corresponding country specific settings will be established 3 A window will appear where you can select the software to be installed 4 Select the software components you wish to install and install them For programming the HiPath 1100 system the following applications must be installed HiPath 1100 Manager CommServer installs automatically 5 After each component is installed a message is...

Страница 289: ...nnections via optiPoint VCOM Figure 7 6 CommServer Properties optiPoint Connection Configuration b Connections via optiPoint CAPI Connection Type ISDN Connection Phone 800 Your MSN There is no need fill this in Figure 7 7 CommServer Properties optiPoint CAPI Configuration ...

Страница 290: ...e Browse button in the dialog box Open the SETUP EXE file on the CD drive 3 In the Setup window select the language you want to use 4 A window will appear where you can select the software to be installed 5 Install your selected software components sequentially For programming the HiPath 1100 system the following applications must be installed HiPath 1100 Manager and CommServer installs automatica...

Страница 291: ...allation is then completed and the computer has to be restarted 8 After restarting the computer check the default modem US Robotics configuration on the HiPath 1100 Manager and change the following settings to match your modem see the modem s manual if necessary Figure 7 9 HiPath 1100 Manager Configuration Analog modem ...

Страница 292: ... default modem configuration US Robotics with your modem configuration see the modem s manual If necessary change the following information Figure 7 10 CommServer Configuration Remote Analog modem 10 After exiting the CommServer the server will restart automatically whenever a HiPath 1100 application is activated ...

Страница 293: ...e analog modem adapter cable see Adapter cable for analog modem on page 3 118 and configure check of the start up and reset code of the modem connected to the switch using HiPath 1100 Manager If the modem is connected to the PC remote modem the modem cable should be used and the initialization code set using CommServer This information can be obtained from the modem s instruction manual In the Res...

Страница 294: ...oftware components sequentially For programming the HiPath 1100 system the following applications must be installed HiPath 1100 Manager and CommServer installs automatically 6 After each component is installed a message is displayed indicating that the installation was completed successfully Click Next every time it appears 7 Select Close to close the installation window Installation is then compl...

Страница 295: ...to fill this in Figure 7 12 CommServer Properties Configuration of ISDN connections 9 When a HiPath 1100 application is activated the server starts automatically 7 3 Driver Installation 7 3 1 HiPath 1100 USB Drivers Two types of USB drivers can be installed for the HiPath 1100 system Administration USB driver or Administration CAPI Interface USB driver If all you need is administration of the HiPa...

Страница 296: ... installation 2 Insert the HiPath 1100 CD in the PC s CD drive 3 Select USB Drivers option Figure 7 13 Installation Setup USB Drivers 4 Select the type of driver to install Administrator access is required for performing the installation under Windows 2000 XP If other PABX drivers or an ISDN card are already installed on the system they must be completely uninstalled before installing any other dr...

Страница 297: ...operating system Windows 98 SE 1 Connect the HiPath 1100 system to the computer 2 The Add New Hardware wizard will appear A message will appear indicating that Setup will search for new Composite USB device drivers Click Next to proceed Operating System Windows 98 SE 7 297 Windows ME 7 301 Windows 2000 7 304 Windows 2003 7 307 Windows XP 7 310 Additional system components may need to be installed ...

Страница 298: ...box and click Browse to select the directory where the uncompressed driver is stored Drivers can be found on the CD in the folder SoftwareUSB Drivers The driver is decompressed in C Temp Default If the Administration driver is selected the directory path will be C Temp HiPath1100_Adm_Drivers_040 If you select the Administration CAPI Interface the directory path will be C TempHiPath1100_AdmCAPI_ Dr...

Страница 299: ... of the USB drivers will be confirmed Click Finish 7 A message will appear informing that HiPath 1000is being searched for Repeat driver installation procedures for USB interface devices Steps 1 to 4 To install administration CAPI Interface drivers follow these steps 8 During installation of the HiPath 1000 CAPI Interface configure these two settings 9 In the following window select EURO ISDN DSS1...

Страница 300: ... the default extension is 10 and for HiPath 1190 the default extension is 100 free Click Next to confirm The same will appear again Click Next one more time without entering anything in any field Figure 7 18 Windows 98 SE MSN Number 11 The installation of the USB drivers is now complete CAPI applications installation will now start automatically see CAPI Application setup on page 7 331 ...

Страница 301: ...ME Specify installation folder 4 Select the Search for the best CAPI for your device Recommended checkbox then select the Specify a location checkbox Under Browse select the directory where the decompressed driver is stored Drivers can be found in the Software USB Drivers folder of the CD The driver is decompressed in C Temp Default If the Administration driver is selected the directory path will ...

Страница 302: ...The installation of the USB drivers will be confirmed Click Finish 7 A message will appear informing that HiPath 1000is being searched for Repeat driver installation procedures for USB interface devices Steps 1 to 6 To install administration CAPI Interface drivers follow these steps 8 A message will appear indicating that the best driver for the hardware has been found Click Next to proceed ...

Страница 303: ...ows ME selection for ISDN Enter an available extension number in the Phone MSN field for HiPath 1120 1150 the default extension is 10 and for HiPath 1190 the default extension is 100 Click Next to confirm The same will appear again Click Next one more time without entering anything in any field Figure 7 22 Windows SE MSN Number ...

Страница 304: ...tion setup on page 7 313 Windows 2000 1 Connect the HiPath 1100 system to the computer 2 The Found New Hardware Wizard window appears so that new drivers can be installed Click Next to proceed 3 Select the Search for the best driver for your device option and click Next Figure 7 23 Windows 2000 Driver location You must have administrator s access privileges to install any software ...

Страница 305: ...decompressed in C Temp Default If the Administration driver is selected the directory path will be C TempHiPath1100_Adm_Drivers_040 If you select the Administration CAPI Interface the directory path will be C TempHiPath1100_AdmCAPI_ Drivers_040 Select a folder and click Next Figure 7 25 Windows 2000 Driver location 6 A message will appear indicating that a driver has been found Click Next to proce...

Страница 306: ...l appear twice Click OK every time it appears 9 In the ISDN HiPath 1000 window select European ISDN DSS1 then click Next Figure 7 26 Windows 2000 ISDN selection 10 Enter the MSN CAPI number see Table 6 3 on page 6 206 for HiPath 1120 1150 the default extension is 10 and for HiPath 1190 the default extension is 100 in Add in the Multi subscriber Numbers box Figure 7 27 Windows 2000 MSN ...

Страница 307: ...d Figure 7 28 Windows 2003 Driver location 3 A second window will open Select Search for the best CAPI in these locations then select Include this location in the search Under Browse select the directory where the decompressed driver is stored Drivers can be found in the Software USB Drivers folder of the CD The driver is decompressed in C Temp Default If the Administration driver is selected the ...

Страница 308: ...his is completed the installation of the HiPath 1000 will start A message will appear three times to the effect that the software installation did not pass the Windows logo test Click Next every time it appears 5 In the ISDN HiPath 1000 window select European ISDN DSS1 then click Next Figure 7 30 Windows 2003 ISDN ...

Страница 309: ...drivers will be confirmed Click Finish 8 A message will appear that HiPath 1000 drivers are being searched for Repeat driver installation procedures for USB interface devices Steps 1 to 3 9 Click Next to proceed 10 A message will appear twice to the effect that the driver does not have a Windows logo Click Continue every time this message will appear 11 The installation of the USB drivers is now c...

Страница 310: ...arch for the best CAPI in these locations then select Include this location in the search Under Browse select the directory where the decompressed driver is stored Drivers can be found in the Software USB Drivers folder of the CD The driver is decompressed in C Temp Default If the Administration driver is selected the directory path will be C Temp HiPath1100_Adm_Drivers_040 If you select the Admin...

Страница 311: ...his is completed the installation of the HiPath 1000 will start A message will appear three times to the effect that the software installation did not pass the Windows logo test Click Next every time it appears 5 In the ISDN HiPath 1000 window select European ISDN DSS1 then click Next Figure 7 34 Windows XP ISDN ...

Страница 312: ...rivers will be confirmed Click Finish 8 A message will appear that HiPath 1000 drivers are being searched for Repeat driver installation procedures for USB interface devices Steps 1 to 3 9 Click Next to proceed 10 A message will appear twice to the effect that the driver does not have a Windows logo Click Continue every time this message will appear 11 The installation of the USB drivers is now co...

Страница 313: ...ich to store program icons for running the corresponding applications 4 To complete the installation process answer the introductory messages by clicking Next Click Finish to close the installation window The following applications are then installed on your computer ISDN Setup Wizard Windows 98 SE ME CAPI Monitor Uninstaller FaxComm Installation Loopback Test Outgoing Numbers Configuration MSN Wi...

Страница 314: ...er and proceed with step 6 6 Uninstall all HiPath 1100 components as follows Start Settings Control Panel Software then click on Remove Software 7 Next restart your computer 7 3 2 optiPoint USB drivers There are two types of optiPoint USB drivers that can be installed for the HiPath 1100 system Administration USB driver or Administration USB driver optiPoint CAPI interface If all you need is admin...

Страница 315: ... the search Drivers can be found in the Software USB Drivers folder of the CD The drive is decompressed in C Temp Default If Admin is selected use C TempoptiPoint_Adm_Drivers_039 directory If Admin CAPI is selected use CTempoptiPoint_AdmCAPI_ Drivers_039 Select a folder and enter to confirm 6 For Windows 2000 and Windows XP a message will repeatedly announce that the software being installed does ...

Страница 316: ...Windows 98 SE 1 Connect the HiPath 1100 system to the computer 2 The Add New Hardware wizard will appear A message will appear indicating that Setup will search for new Composite USB device drivers Click Next to proceed 3 Select the Search for the best driver for your device Recommended option and click Next to confirm Operating System Windows 98 SE 7 316 Windows ME 7 319 Windows 2000 7 322 Window...

Страница 317: ...llBridge for Data is located Drivers can be found in the Software USB Drivers folder of the CD The drive is decompressed in C Temp Default If Admin is selected use C TempoptiPoint_Adm_Drivers_039 directory If Admin CAPI is selected use CTempoptiPoint_AdmCAPI_ Drivers_039 Select a folder and click Next Figure 7 37 Windows 98 SE USB drivers installation location 5 The installation of the USB drivers...

Страница 318: ...e please follow these steps 7 During installation of optiPoint CAPI Interface configure these two settings In the following window select EURO ISDN DSS1 and click Next Figure 7 38 Windows 98 SE selection for ISDN Enter an available extension number in the Phone MSN field for HiPath 1120 1150 the valid extension range X Y Click Next to confirm The same will appear again Click Next one more time wit...

Страница 319: ...will now start automatically see CAPI Application setup on page 7 331 Windows ME 1 Connect the HiPath 1100 system to the computer 2 The Add New Hardware wizard will appear A message will appear indicating that Setup will search for new Composite USB device drivers Click Next to proceed 3 Choose Specify the location of the driver Advanced and click Next Click Next to proceed ...

Страница 320: ...on checkbox Under Browse select the directory where the decompressed driver is stored Drivers can be found in the Software USB Drivers folder of the CD The drive is decompressed in C Temp Default If Admin is selected use C TempoptiPoint_Adm_Drivers_039 directory If Admin CAPI is selected use CTempoptiPoint_AdmCAPI_ Drivers_039 Select a folder and click Next Figure 7 41 Windows ME Specify installat...

Страница 321: ...ers CAPI optiPoint Interface follow these steps 8 During installation of optiPoint CAPI Interface configure these two settings 9 A message will appear indicating that the best driver for the hardware has been found Click Next to proceed In the following window select EURO ISDN DSS1 and click Next Figure 7 42 Windows ME selection for ISDN Enter an available extension number in the Phone MSN field f...

Страница 322: ...tomatically see CAPI Application setup on page 7 331 Windows 2000 Proceed as follows 1 Connect the HiPath 1100 system to the computer 2 The Found New Hardware Wizard window appears so that new drivers can be installed Click Next to proceed 3 Select the Search for the best driver for your device option and click Next You must have administrator s access privileges to install any software ...

Страница 323: ...Service Manual 7 323 Operation Driver Installation Figure 7 44 Windows 2000 Driver location ...

Страница 324: ...B Drivers folder of the CD The drive is decompressed in C Temp Default If Admin is selected use C TempoptiPoint_Adm_Drivers_039 directory If Admin CAPI is selected use CTempoptiPoint_AdmCAPI_ Drivers_039 Select a folder and click Next Figure 7 46 Windows 2000 Driver location 6 A message will appear indicating that a driver has been found Click Next to proceed 7 A message will appear to the effect ...

Страница 325: ... digital signature will appear twice Click OK every time it appears 9 In the ISDN optiPoint window select European ISDN DSS1 then click Next Figure 7 47 Windows 2000 ISDN selection 10 Enter the MSN CAPI number see Table 6 3 on page 6 206 for HiPath 1120 1150 the valid extension range is X Y in Add in the Multi subscriber Numbers box Figure 7 48 Windows 2000 MSN ...

Страница 326: ...ion Advanced Click Next to proceed Figure 7 49 Windows 2003 Driver location 3 A second window will open Select Search for the best CAPI in these locations then select Include this location in the search Under Browse select the directory where the decompressed driver is stored Drivers can be found in the Software USB Drivers folder of the CD The drive is decompressed in C Temp Default If Admin is s...

Страница 327: ...ll appear three times to the effect that the software installation did not pass the Windows logo test Click Continue every time this message will appear 5 In the ISDN optiPoint window select European ISDN DSS1 then click Next Figure 7 51 Windows 2003 ISDN 6 Enter the MSN CAPI number see Table 6 3 on page 6 206 valid extension range is X Y in Add in the Multi subscriber Numbers box ...

Страница 328: ...that the driver does not have a Windows logo Click Continue every time this message will appear 11 The installation of the USB drivers is now complete CAPI applications installation will now start automatically see CAPI Application setup on page 7 331 Windows XP Proceed as follows 1 Connect the HiPath 1100 system to the computer 2 The Found New Hardware Wizard window will appear so that new driver...

Страница 329: ...n in the search Under Browse select the directory where the decompressed driver is stored Drivers can be found in the Software USB Drivers folder of the CD The drive is decompressed in C Temp Default If Admin is selected use C TempoptiPoint_Adm_Drivers_039 directory If Admin CAPI is selected use CTempoptiPoint_AdmCAPI_ Drivers_039 Select a folder and click Next Figure 7 54 Windows XP Driver locati...

Страница 330: ...ct that the software installation did not pass the Windows logo test Click Continue every time this message will appear 5 In the ISDN optiPoint window select European ISDN DSS1 then click Next Figure 7 55 Windows XP ISDN 6 Enter the MSN CAPI number see Table 6 3 on page 6 206 valid extension range is X Y in Add in the Multi subscriber Numbers box Figure 7 56 Windows XP MSN ...

Страница 331: ...plications installation window will appear Proceed as follows 1 In this window select the language you want to use and click OK to confirm 2 When you see the Welcome screen click Next to proceed The installation window will then display the default path for installation of the CAPI applications CallBridge for Data Utilities You can choose a different path by selecting Browse Click Next to proceed ...

Страница 332: ... Data Utilities if previously installed to use online services or USB connections by running the Uninstall program as follows Start Programs CallBridge for Data Utilities Uninstall CallBridge for Data Utilities Once CallBridge for Data Utilities has been uninstalled answer No when asked if you want to restart your computer and proceed with step 6 6 Uninstall all HiPath 1100 components as follows S...

Страница 333: ...nts will also have CTI capability available Comm Server This is an application that receives data from the system through a serial port and then distributes the data to different applications Call detail recording packets TAPI packets Data administration packets with the administrative tool Aspects to Consider The HiPath 1100 Version 7 0 application installation overwrites any previous installatio...

Страница 334: ...X managed by the SNMP has a set of variables that store information on its current state This volume of data managed by the SNMP is defined in the MIBs Management Information Bases MIBs are data models that describe all the necessary information for managing the network To be able to access this information you need to install and connect the LAN ports of the SLIMC SADSLIM LIMC or ADSLIM modules t...

Страница 335: ...n the manager requests the agent to alter an item of data Trap used by the agent to communicate a previously defined event to the manager There is an integrated mechanism to manage SNMP traps if a class B error occurs The SNMP management agent assesses the error messages and if they have a corresponding definition certain traps are put into place sent as groups of data to a configurable IP address...

Страница 336: ...ng the Software Update then store the database with the system s settings Read the HiPath 1100 Manager Help file before proceeding with this operation 7 4 4 ADSL settings 7 4 4 1 ADSL module The installation CD contains certain software programs in release 2 6 or higher to help you to configure the module General Information TCP IP protocol If the database has been previously saved in earlier vers...

Страница 337: ...he system reset by pulling out the AC power supply cable Once you have reinserted the AC cable wait approximately 2 minutes for the system to stabilize and start up Figure 7 58 SW Router ADSL firmware update ADSL router Config After you have updated the software the ADSL module must be configured according to the customer s needs using this tool If you need to reset the IP or Subnet Mask enter cod...

Страница 338: ...the version of the ADSL SW To check which version of the SW is loaded in the ADSL module please proceed as follows 1 Connect a PC to the Module 2 Open a command prompt in Windows DOS prompt 3 Run this command telnet X X X X where X X X X is the IP address configured in the ADSL module in this case 10 0 0 1 ...

Страница 339: ...modules General Information TCP IP protocol Default IP 192 168 254 253 Configuration The system is configured using a web interface which can be accessed via any web browser such as Internet Explorer Figure 7 60 Configuring the ADSL via web Browser The web interface is the Siemens Administrative Console and is accessed using the default address http 192 168 254 253 on the web browser The first scr...

Страница 340: ...link of the web page is accessed Figure 7 61 Password and Username window for access via web browser The default Username is admin and the Password is 31994 Changing the Password We recommend that you change the default Password after your first access Follow the link System Password Change Figure 7 62 Changing the default Password After you have changed the password press Save Changes ...

Страница 341: ...efault IP address When you have changed the IP address NetMask and Gateway press Change to confirm the changes This configuration will be saved once you press Save Reboot After rebooting you will not be able to access the Siemens administrative Con sole for 30 seconds and the new IP address must be inserted into the web browser to access the web interface ...

Страница 342: ...e link System Reset Figure 7 64 Default factory settings To return to the default settings click on Factory Defaults This will reboot the module and you will not be able to access the Siemens admin istrative Console for 30 seconds and the default IP address 192 168 254 253 must be inserted into the web browser to access the web interface ...

Страница 343: ...ss Browse to select the bin file to update the firmware Check whether the selected file is a valid firmware file The web interface accepts all file types and this could cause the module to malfunction Software may only be updated by users with an administrator password To update the old ADSL module the firmware file ends with img To update the new ADSL module the firmware file ends with bin ...

Страница 344: ...ed to adjust the parameters of the SADSLIM HiPath 1120 and ADSLIM HiPath1150 1190 1190R modules of the ADSL modem You can also access the Speed Stream Modem configuration using the web interface The default IP address is 192 168 254 254 and can be accessed from any web browser such as MS Internet Explorer Updating the firmware returns the module to the default factory configuration This will reboo...

Страница 345: ...Configuring the Speed Stream Modem The first time you access the service you will need to set a Username and Password Username admin Password 31994 or admin With this Username and Password the user may then login to the modem Figure 7 68 Login to the Speed Stream Modem ...

Страница 346: ... the ADSL Modem WebServer or reset the Router to the factory default using the Reset button Reboot when the Router needs resetting without losing the current settings Select Router reboot in Tools Reboot in the left hand panel of the Web interface The System Reboot window will appear The System Reboot window will continue to be displayed throughout the entire process When the Router has finished r...

Страница 347: ... to configure new settings or when the router does not appear to be working properly 7 4 4 5 COMGATE To use the new ADSL module in systems older than HiPath V7 0 i e V6 0 and V5 2 you need to use COMGATE mode This mode allows the module to be accessed in the same way in systems that predate HiPath V7 0 This option resets all the custom configurations users and passwords on your mo dem For further ...

Страница 348: ...twork HiPath Figure 7 71 Access to COMGATE Through this link you can verify the current configuration and change it for versions 5 2 or 6 0 by clicking Change Press Save Reboot and the system will restart in COMGATE mode Configuration in the web interface works in the same way as explained above Only the connection with the HiPath 1100 will be made using the CommServer and will use the IP addresse...

Страница 349: ...l not be supported by old modules or when a new module is connected to HiPath V6 0 or previous Users will no longer access the eCommServer directly The eCommServer will be used via system applications which will make them transparent to the user The CommServer installed in the PC is not used to connect the HiPath V7 0 via the new ADSL module Connection is made using the eCommServer The application...

Страница 350: ... The following sequence will be included in the official release documentation of the ADSL 1 Do the following if the ADSL is being introduced into a country Check whether there is already official documentation in the KMOSS with the country and carrier configuration If such documentation exists it will be tested and released to the local carrier If this configuration is appropriate or if you encou...

Страница 351: ... configuring the ADSL tool which is based on the configuration information received Instructions concerning the correct sequence and names for introduction by country new carriers and field test already mentioned in this document Item 2 If a country or operator is not included in the ADSL release then the introduction is not a version of Service Support Support for ADSL of ESL 4 2 HiPath 1100 V5 0...

Страница 352: ...___________________________________________________________________ _____________________________________________________________________ 7 4 4 8 Siemens Admin Console This is an administrative program for programming an ADSL module The modules can be configured by accessing their IP number Default 192 168 254 253 from your web browser http 192 168 254 253 Microsoft Internet Explorer or Netscape N...

Страница 353: ...pgrade updates the firmware with an option to select the Erase JFFS2 partition checkbox if you wish to delete the previous settings of the module when you update Network Tab Shows information on the internal configuration of the module LAN shows the current configuration and allows you to change parameters IP address Netmask Gateway and DHCP Client number Hosts shows the IP addresses and the name ...

Страница 354: ...SL modem These adjustments can be made by going to their IP number 192 168 254 254 Default from your Web browser http 192 168 254 254 Microsoft Internet Explorer or Netscape Navigator version 5 0 or higher where you must configure the information of the ADSL and VPI VCI protocols used by the operator DNS user name and password of the provider The ADSL modem used is the Siemens SpeedStream 4100 You...

Страница 355: ...Configuration and select LCR Figure 7 74 LCR module 2 Go to Advanced System Configuration Regional Configuration 1 Select dialing settings in the C O 2 Select the national and international prefixes For example for Brazil Prefix Carrier Code Destination code National Prefix 0 International Prefix 00 ...

Страница 356: ...7 356 Service Manual HiPath 1100 applications Figure 7 75 LCR module regional configuration 3 Go to Advanced LCR and select Create new tab and provide the name For example Table test you may create up to 8 tables ...

Страница 357: ...al National or International 1 In the National prefix the same prefix from Advanced System configuration Regional configuration will be added 2 In the International prefix the same prefix from Advanced System configuration Regional configuration will be added 4 In Trunk group select the the group of outgoing trunks for the calls 5 In Carrier click in the rectangle to edit the name of the Carrier 6...

Страница 358: ...h 1100 applications Figure 7 77 LCR module configuring a rule Example Destination rule 1 code 11 Type National When National is selected the National prefix will be added in Code Code 011 Group of trunks 0 Carrier Brasil Telecom Number 14 ...

Страница 359: ...Service Manual 7 359 Operation HiPath 1100 applications Figure 7 78 LCR module example of a rule Now you must define the time interval start and end the days and click on Add time interval ...

Страница 360: ...k hears a false tone and dials 011 33335000 The LCR rule takes the trunk from group and dials 0 14 11 33335000 in the trunk Example 2 Carrier code prefix destination code The extension takes the phone off of the hook takes a trunk hears a false tone and dials 011 33335000 The LCR rule takes the trunk from group and dials 0 14 11 33335000 in the trunk Example 3 Prefix destination code carrier code ...

Страница 361: ...ult system carrier in the old backups is reflected in all the tables when the restore operation is carried out database conversion Furthermore when the user selects the Apply to all regions button a default carrier is copied to all the tables When the user recovers the backup of versions previous to V7 0 and this backup has both groups of trunks and groups of overflow trunks by destination configu...

Страница 362: ...d software and databases Remove traces Select the software s type of connection to the module local or via modem Select a COM port Select a Country when installing the program including the appropriate protocol and CAS signaling e g line signaling 1bit E M and 2bit R2 and record signaling DP DTMF and MFCR2 For further details on how to configure a TME1 module with E1 CAS access refer to the progra...

Страница 363: ...TME1 module with E1 CAS access refer to the program s Help system 7 4 8 Account Manager CDR Billing Data Software To launch the Account Manager select Start Programs HiPath 1100 Call Detail Recording 7 4 9 Status Monitor indicator Status Monitor Indicator on the computer To start a Status Monitor Indicator select Start Programs HiPath 1100 StatusMonitor If the module does not initialize check its ...

Страница 364: ...100 Manager Menu Bar Tools Software Update This application provides step by step information on how to proceed in the software update Use the Next button to go to the next step of the configuration procedure Use the Back button to go back to the previous step in the procedure The software is updated in two steps 1 Transfer data from the system software to HiPath 1100 During this procedure the ext...

Страница 365: ...ports can be configured to show detailed information on the number of calls received calls answered calls abandoned calls transferred calls answered within or outside a profile set ACD calls duration total talk time total queue time and other data 7 4 14 TAC Smart Telephony Advanced Control optional software This application can be used with the HiPath1150 1190 1190R systems to help identify and d...

Страница 366: ...als Format i i calling extension External call format always Note if an extension is longer the DTMF digit in the protocol is replaced by the additional extension digit 3 Extension called Required element for calls Type 3 and 4 This element remains blank for all types of calls Fixed size 6 DTMF signals Format i i extension called Note if an extension is longer the DTMF digit in the protocol is rep...

Страница 367: ...8 Direct internal call from Extension 1015 to Extension 1011 forwarded to the VMIe Group 11 3 1015 1011 1 9 Direct internal call from Extension 10015 to Extension 10011 forwarded to the VMIe Group configured as second Attendant 4 10015 10011 1 Voice Mail Protocol for the system The Voice Mail indicates when there is a message waiting at an extension s mailbox using a DTMF service code 68 followed ...

Страница 368: ...Operation 7 368 Service Manual HiPath 1100 applications ...

Страница 369: ...h 1150 HiPath 1190 External line 801 to 808 801 to 822 801 to 845 Extension including S0 11 to 30 11 to 60 610 to 645 101 to 240 Group of external lines 0 or 890 to 899 Call Group CG 770 to 779 Hunt Group HG 780 to 789 UCD subscriber group 790 to 799 Carrier 9 EVM Default internal number 790 EVM Message Ports 7491 and 7492 EVM Virtual Ports 744 to 747 Fax DID Virtual Message Ports 740 to 743 USB C...

Страница 370: ...nd its associated Feature Code 4 Using a programmable key Symbols Explanation ll q p Enter numbers keys password internal or external numbers etc w Signaling with a short beep n t Lift Replace the handset s Initiate conversation Service Menu Programmable key is ON Programmable key deleted Blinking Programmable Key and Navigation keys Feature Code System telephone functions Mailbox access keyprogra...

Страница 371: ...Key qme feature to be programmed and Redial Speaker Activate deactivate speakerphone Activate deactivate speaker s Checking Relay Status rmheh Seizure of an external line External call d p External call using a group of external lines lmd lmm p external line Seizure of a Specific external Line lde lhi p external line Feature Code Call Forwarding Call Forwarding Parking Parking Select a key Redial ...

Страница 372: ...l s Functions used when making calls System Speed Dial qk ddd fhm Individual speed dialing qk qd qh Individual Speed Dialing Programming qmf qd qh p number v wait for w Speakerphone Auto Answering Mode Activation qmj wait for w Speakerphone Auto Answering Mode Deactivation rmj wait for w Direct communication call qld p extension with system telephone wait for w s speak the message Internal call p ...

Страница 373: ... Warmline If programmed n Wait for s Override Busy extension p busy extension qjf s LCR Bypass qhi p Carrier number s View time limitations rji Silent Monitoring busy extension qmhh p busy extension s Callback Activation Extension does not answer or is busy 1 p no answer or qil w Wait for The telephone rings n s or 2 Wait for w t Wait The telephone rings n s Callback Deactivation ril Feature Code ...

Страница 374: ...ultation To end a consultation wait for the call to be disconnected s p s Parking s qij d m Recovering a parked call rij d m s General Parking s t Recovering a parked external call qjg p line s Toggle Use after Consultation for answer ing a second call or an urgent call s qf s Suffix Dialing s p data Recovering a Call on Hold s qd if busy or no answer Feature Code Consultation Service Menu Consult...

Страница 375: ...answered Internal s p extension t External s v p number s Functions used when receiving calls Mailbox access p Voice mail group Answering a call on hold qii or s qf s or Group pickup qik or Individual pickup qim p extension Call forwarding on an analog line Call Forwarding to external Number qee p external line Internal call forwarding qee p extension Voice mail group Group Group or Fax DID Call f...

Страница 376: ...being used kmd VM group p password Consultation from a different extension kmd VM group p password p exten sions Consultation from an external extension s p its external number q p password p extension Miscellaneous Functions Entrance telephone Door Opener qje or qje p extension General Alarm Deactivating rmheh p password Electronic lock password change qmg p current password p new password p conf...

Страница 377: ...o not disturb Data Data protection Alarm clock Call back and Speakerphone Auto Answering Mode rd Language Country configuration qmhef p country code Call Group CG and Hunt Group HG Login qli p group if the extension belongs to more than one group Call Group CG and Hunt Group HG Logout rli p group if the extension belongs to more than one group Room Monitor Babyphone qll Music on Hold Activation qm...

Страница 378: ...s attended by the Fax DID feature qmi p password p Programming codes Data protection Activation qhmd Data protection Deactivation rhmd Relay Activation For HiPath 1120 only qmd Relay Deactivation For HiPath 1120 only rmd Night service Activation qhh p password Night service Deactivation rhh p password Call Waiting tone Activation n rlk w t Call Waiting tone Deactivation n qlk w t COS Class of Serv...

Страница 379: ...f p time for example 1230 Alarm Clock After a specified time qhjg p time e g 1230 Alarm Clock For a specified date and time qhjh p date time for example 24121830 Alarm clock Deactivating rhj UCD Subscriber group functions Agent available qhdf Agent unavailable rhdf UCD Subscriber Group kmd kmm Logging into a UCD Subscriber group qhde p group If it belongs to more than one Logging off a UCD Subscri...

Страница 380: ...ng for MSN Activation qjhe p external line w p MSN Immediate Call Forwarding for MSN Deactivation rjhe w Call Forwarding No Answer for MSN Activating qjhf p external line w p MSN Call Forwarding No Answer for MSN Deactivation rjhf w Call Forwarding for MSN when the line is busy Activation qjhg p external line w p MSN Call Forwarding Busy for MSN Ofactivation rjhg w Anonymous caller ID Trace qlh Se...

Страница 381: ...bering plan changes as follows a Access to the group of external lines is done with digit 9 instead of 0 b Calling an operator terminal is done with digit 0 instead of 9 a Group call pickup is done with sequence 0 instead of 57 a Recovery of a parked call is done with sequence 57 instead of 0 Feature Codes can be changed in the HiPath 1100 Manager An expert should be consulted in this case Feature...

Страница 382: ...er Detect CHN China CLIP Calling Line Identification Presentation CND Canada COS Class of Access Class of Service CTI Computer Telephony Integration CTS Clear To Send DID Direct Inward Dialing DISA Direct Inward System Access DP Dial pulse telephone DSR Data Send Ready DTMF Dual Tone Multiple Frequency DTR Data Terminal Ready E1 Primary Access EB Expansion Board ESD Electrostatic Discharge ETSI Eu...

Страница 383: ...ctor PMP Point Multipoint Connection PP Point to Point Connection PSU Power supply unit RSA Republic of South Africa RTC Real time clock RTS Request To Send RUF Ring RxD Receive Data S0 Basic Access SPA Spain SW Software TAPI Telephony Applications Programming Interface TFE Türfernsprecher Entrance Telephone TN C S Power supply systems with Phase Neuter grounded and Ground TN S Power supply system...

Страница 384: ...Abbreviations 9 384 Service Manual ...

Страница 385: ...2 E821 ST System Telephone 5 195 E822 ST System Telephone 5 196 E822 ST System telephone 5 193 Entrance telephone 3 103 external entrance telephone 3 112 Internal entrance telephone interface 3 103 Environmental conditions 2 40 Expansion module EB HiPath 1120 3 58 HiPath 1150 1190 3 61 External line settings 6 210 6 237 F Fax DID module Configuration 6 226 Fax DID module configuration 6 228 Featur...

Страница 386: ...mming comments 6 234 Programming Mode 7 278 Programming mode syntax 7 279 Programming with a computer 7 280 Protection of external lines and extensions 4 183 Protective power outage relays 4 185 PSU specifications HiPath 1120 3 94 HiPath 1150 1190 3 95 R Relay and sensor configuration on the HiPath 1120 6 233 Remote Administration 6 222 Ritto door opener 3 106 Run quick test 6 234 S S2M Maintenanc...

Страница 387: ...al 387 U Unpacking system components 4 128 Updating the Software 6 222 7 364 USB adapter cable 3 116 Using a Telephone Set 7 279 V V 24 Adapter Cable 3 113 Voice Mail 6 218 W What to do in Case of an Emergency 1 23 ...

Страница 388: ...388 Service Manual ...

Страница 389: ...tent that products continue to be developed The selection of features to be provided is not binding unless explicitly established in the terms of the contract All trademarks mentioned herein belong to Siemens Enterprise Communications GmbH Co KG or to their respective owners This device complies with EU Directive 1999 5 EG as attested by the CE Mark This device is manufactured according to a Certi...

Отзывы: