background image

COMMISSIONING   


129 

8017768/12AX/2019-05-31|SICK 

Subject to change without notice 

O P E R A T I N G   I N S T R U C T I O N S  | TIC 


6.7.1


Checking operational readiness 

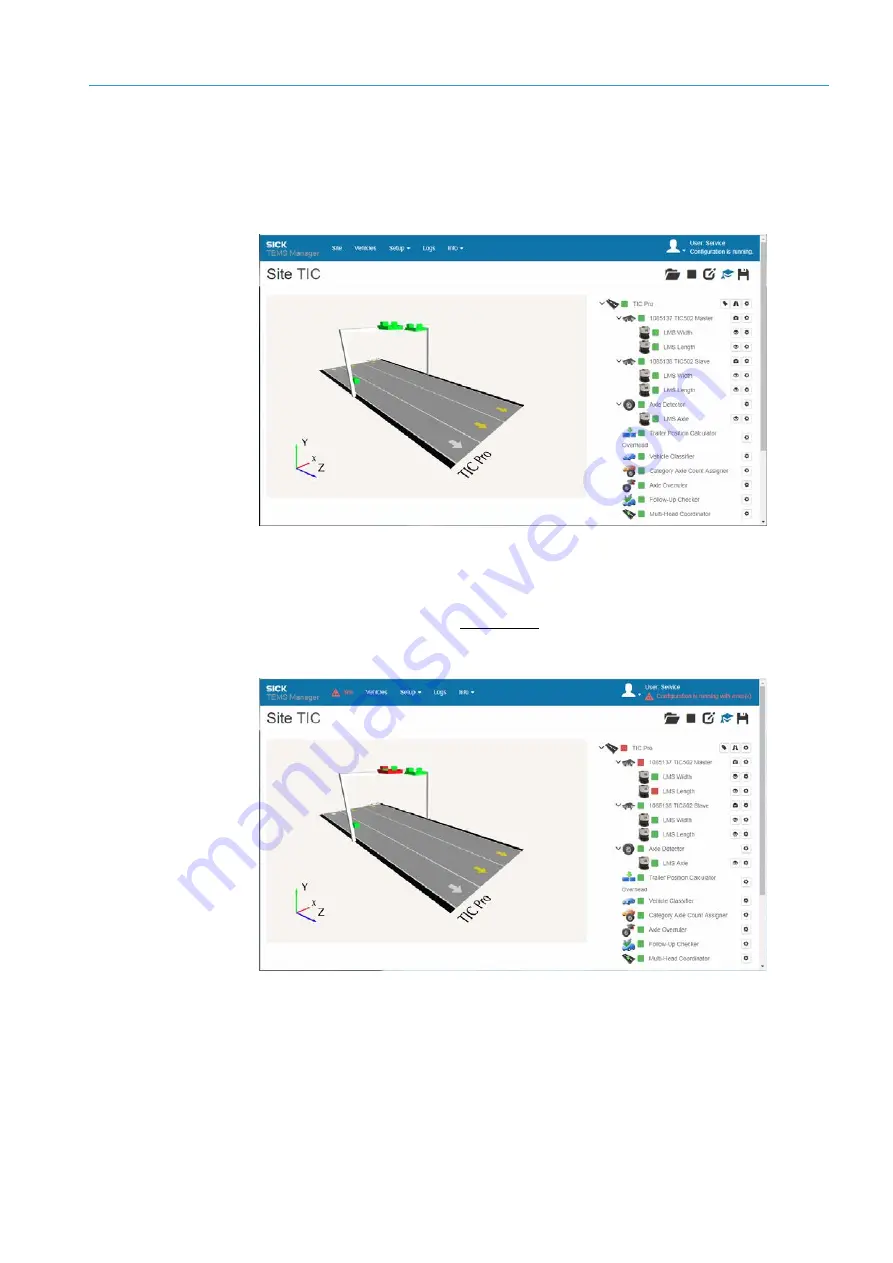
If all the system components in the live view are 

green

 once the configuration has been 

successfully started, they are ready for operation. In the navigation tree, the operational 
readiness of the system functions and system components is indicated by a 

green 

square

. A gray icon signals that a device status is currently unknown.  


When the configuration starts, the sensor components remain red until a connection has 
been established. Depending on the network connectivity, this may take up to two 
minutes.  
If a sensor component remains permanently 

red

, it could be that an incorrect IP address 

has been assigned to it. The problem could also be caused by a missing or inadequate 
voltage supply or poor network connectivity. 


Additional information on fault detection can be found in chapter 

8.3.1 Fault diagnosis in 

TEMS Manager

. 


Note 

Содержание LMS511 SE

Страница 1: ...O P E R AT I N G I N S T R U C T I O N S TRAFFIC INFORMATION COLLECTOR Profiling systems ...

Страница 2: ...emark of the International Business Machine Corporation MS DOS is a trademark of the Microsoft Corporation Windows is a trademark of the Microsoft Corporation Other product names in this document may also be trademarks and are only used here for identification purposes Original documents The German version 8017638 12AX of this document is an original SICK AG document SICK AG does not assume liabil...

Страница 3: ...of the axle counting system function 24 3 2 5 Traffic Controller FPS as OEM variant 25 3 3 The measurement site 27 3 3 1 Typical layout of the measurement site 27 3 3 2 Measurement site for TIC102 28 3 3 3 Measurement site for TIC502 29 3 3 4 Measurement site for TIC501 30 3 3 5 Measurement site for additional axle counting 31 3 4 System operating principle 32 3 4 1 Operating principle of vehicle ...

Страница 4: ...necting the TIC102 to the voltage supply 77 5 3 2 Connecting TIC102 units to one another via Ethernet 78 5 3 3 Connect TIC102 Master to the customer interface 79 5 3 4 SICK connecting cables for TIC102 80 5 4 TIC502 TIC501 electrical installation 81 5 4 1 Traffic Controller connection 83 5 4 2 2D LiDAR sensor connection 84 5 4 3 Connecting to the customer interface 85 5 5 Ethernet switch connectio...

Страница 5: ...ating the TEMS Recorder and packages 148 6 10 1 Displaying information on the TEMS Recorder 148 6 10 2 Updating the TEMS Recorder 149 6 10 3 Updating packages 150 6 11 Using the TEMS Info interface 151 6 12 Installing the security certificate for the HTTPS connection 153 6 12 1 Uploading the supplied HTTPS certificate 153 6 12 2 Uploading your own HTTPS certificate 155 6 13 Extending site 156 6 13...

Страница 6: ...he TIC102 187 9 2 2 Dimensional drawings for the TIC502 188 9 2 3 Dimensional drawings for LMS511 SE 2D LiDAR sensor 189 9 2 4 Traffic Controller dimensional drawings 192 9 3 Category systems 193 9 3 1 European region 193 9 3 2 North American region 196 9 3 3 Brief overview of grouped category systems 198 9 4 Terminology relating to statistical measurement accuracy 199 9 5 Users and authorizations...

Страница 7: ...ing instructions do not provide information on operating the customer system into which the TIC profiling system has been or is going to be integrated More information on this can be found in the customer documentation 1 3 Target group These operating instructions are intended for persons integrating the Traffic Information Collector into a system and performing initial commissioning and operation...

Страница 8: ... form a 3D point cloud The point cloud is used as the basis for calculating the vehicle dimensions and for vehicle classification File transfer protocol a network protocol for transferring data between different systems Light detection and ranging method for optical length and speed measurement Laser measurement scanner 2D LiDAR sensor from SICK AG Traffic enhanced measurement system Customer side...

Страница 9: ...ut in the described order are referred to as step by step instructions and are indicated by numbered lists Carefully read and follow the instruc tions for action Instructions requiring specific action are indicated by an arrow Carefully read and follow the instructions for action LED icons describe the status of a diagnostics LED The LED is illuminated continuously The LED is flashing The LED is o...

Страница 10: ...ate the safe condition of the power driven machinery and he she Has access to and has read the operating instructions 2 2 Applications of the system The Traffic Information Collector is a system for vehicle classification on multi lane roads with eye safe 2D LiDAR sensors The system takes the measurements automatically in free flowing traffic without any need for manual operation The TIC is design...

Страница 11: ...cordance with these operating instructions The TIC is not a safety device for human protection and therefore does not comply with any safety standards It is purely a measurement system without any safety functions and must only be used in this capacity Consequently any responsibility on the part of SICK is restricted to these defined and limited properties of the measurement system If used in any ...

Страница 12: ...and side of the note refers to the type of hazard in question the example here shows a risk of injury resulting from electrical current WARNING Denotes a potentially dangerous situation that may result in severe to fatal injuries The symbol shown on the left hand side of the note refers to the type of hazard in question the example here shows a risk of damage to the eye by laser beams WARNING Deno...

Страница 13: ...and to recurring technical inspections in particular Work safety regulations and safety rules Any other relevant safety provisions The checks must be carried out by qualified safety personnel or specially qualified and authorized personnel and must be recorded and documented to ensure that the tests can be reconstructed and retraced at any time These operating instructions must be made available t...

Страница 14: ...beam Pay attention to the laser safety regulations as per IEC 60 825 1 latest version No maintenance is required to ensure compliance with laser class 1 The laser output aperture is the inspection window on the 2D LiDAR sensor The laser warning is located on the right hand side of the 2D LiDAR sensor Electrical current DANGER Risk of injury and damage caused by electrical current Improper handling...

Страница 15: ...on devices in a widely distributed system spanning several buildings different ground potentials may cause potential equalization currents to flow along the cable shields between the devices thereby creating hazards DANGER Risk of injury and damage caused by potential equalization currents Potential equalization currents between the profiling system and the peripheral devices can have the followin...

Страница 16: ...ly remedy the problem 2 5 Protecting the environment The profiling system has been designed to minimize its impact on the environment It consumes very little energy Always act in an environmentally responsible manner at work For this reason please note the following information on disposal Disposal after final decommissioning Always dispose of unusable or irreparable devices in accordance with the...

Страница 17: ... a housing In the TIC502 the 2D LiDAR sensors are pre assembled on a plate The two system functions for vehicle detection TIC102 and TIC502 can be supplemented by a system function for automated counting of vehicle axles This system function uses a LMS511 SE 2D LiDAR sensor All system functions are controlled via an Traffic Controller via TCP IP Fig 1 TIC system functions A Traffic Controller can ...

Страница 18: ... contamination on the inspection window The level of contamination is displayed directly on the device or displayed via the Traffic Controller and or transmitted to the downstream customer system For detailed information about the operating principle of the 2D LiDAR sensors please refer to the operating instructions for the LMS111 and LMS511 product families Traffic Controller The Traffic Controll...

Страница 19: ... and for performing traffic management It classifies vehicles from different category systems and also detects vehicles when they switch lanes The TIC102 monitors exactly one lane Up to four TIC102 units can run on the Traffic Controller Up to four lanes can be detected in this way System components The TIC102 system function consists of the LMS Width and LMS Length system components These system ...

Страница 20: ...iants contain an overcurrent protective device as well as a network switch Fig 5 System components TIC102 Master TIC102 Slave Scope of delivery TIC102 Quantity Part No Description 1 1055102 TIC102 master The TIC102 with 2 integrated LMS111 S05 2D LiDAR sensors integrated Traffic Controller TIC with TIC software and network switch USB stick with TEMS analyzer TEMS info sample client source code for...

Страница 21: ...2 system functions consist of the LMS Width and LMS Length system components These system components use LMS511 type 2D LiDAR sensors The 2D LiDAR sensors are pre assembled on a metal plate and also aligned at a 25 angle to one another Fig 6 System components TIC502 The LMS Width aligned with the side of the lane records the vehicle s profile in individual 2D profile sections The LMS Width also de...

Страница 22: ...ease contact your local SICK agency Fig 7 System components TIC502 Master TIC502 Slave The customer will also require an Ethernet switch and a power supply unit for the voltage supply Scope of delivery TIC502 Quantity Part No Description 1 1085137 TIC502 master The TIC502 with 2 integrated LMS511 SE 2D LiDAR sensors and a separate Traffic Controller with TIC software USB stick with TEMS analyzer T...

Страница 23: ...ig 8 System components TIC501 The customer will also require a power supply unit for the voltage supply If several TIC501 units are used an Ethernet switch is required Scope of delivery TIC501 Quantity Part No Description 1069322 TIC501 1 1091458 LMS511 SE 2D LiDAR sensor 1 2090117 Traffic Controller TIC with TIC software USB stick with TEMS analyzer TEMS info sample client source code for TEMS in...

Страница 24: ...uantity Part No Description 1 2 2056850 Protection hood recommended for protection from direct sunlight heat and environmental influences 1 2 2063050 Weather hood recommended for protection from direct sunlight heat and environmental influences 1 2 2015623 Mounting kit 1 mounting kit 1 to assist with mounting 1 2 2015624 Mounting kit 2 mounting kit 2 to assist with mounting required mounting kit 1...

Страница 25: ...achine on the host server Implementation is carried out using VirtualBox virtualization software by Oracle Fig 10 Traffic Controller and TEMS Recorder If several profiling systems are operated in parallel for monitoring several lanes one Traffic Controller must be installed for each system In principle you are able to install several Traffic Controller virtual machines on one host server In order ...

Страница 26: ...ms The virtual machine can be installed on the following operating systems on the customer s host server Windows 7 Professional Linux Ubuntu 12 04 CentOS 6 4 System requirements In addition to the resources for the host server s operating system the following requirements must be met in order to use the virtual Traffic Controller on the host server General Standard PC or comparable computer 64 bit...

Страница 27: ...ssigned to each lane The system components for axle counting are mounted on the side on the right and or left edge of the lane A side strip can be visualized in the layout of the measurement site The side strip is not included in any system function Within all layouts the system components are precisely positioned in a 3 dimensional coordinate system Fig 12 Coordinate system The following axes are...

Страница 28: ...hicles as possible within the range of the 2D LiDAR sensors The beam of the LMS Width is emitted diagonally to the road surface The beam of the LMS Length is emitted along the direction of travel Fig 13 Measurement site TIC102 monitoring of 2 lanes One TIC102 each is used for monitoring a lane The Traffic Controller installed in the TIC102 Master can integrate up to four TIC102 units depending on ...

Страница 29: ...ter of the respective lane The beam of the LMS Width is emitted diagonally to the road surface The beam of the LMS Length is emitted along the direction of travel Fig 15 Measurement site TIC502 monitoring of 2 lanes One TIC502 each is used for monitoring a lane Depending on the number of lanes to be monitored data from up to four TIC502 units can be processed on the Controller Fig 16 Measurement s...

Страница 30: ...ace Several lanes can be monitored with one TIC501 A maximum of four lanes can be monitored with a TIC501 if mounted in the center Fig 17 Measurement site TIC501 overhead mounting monitoring of 2 lanes A TIC501 can be expanded with up to three additional LMS511 units Several roads can be monitored at the same time in this way Fig 18 Measurement site TIC501 monitoring of 3 3 lanes Side mounting abo...

Страница 31: ...tion ensures that the side of the vehicle is captured An LMS Axle typically monitors the next closest lane When monitoring several lanes with an LMS Axle shading by vehicles driving next to each other is possible That is why two TIC102 TIC502 units are typically extended by two LMS Axle units in the configuration for two lanes with additional axle counting The LMS Axle is connected to the TIC102 T...

Страница 32: ...osition marks to do this It is an active system featuring eye safe infrared lasers Fig 21 Vehicle detectionoperating principle detection of vehicle contour The system uses the measurement data obtained to generate a 3D point cloud Based on this point cloud the vehicle class can be determined and the number of axles output Fig 22 Vehicle detection operating principle 3D point cloud Any measuring po...

Страница 33: ...02 and TIC502 system functions are identical The laser beam emitted vertically the lane surface from the LMS Width detects the upper side of the vehicle The recording process starts as soon as a vehicle is detected by the LMS Width The recording process stops when the LMS Width detects the final point on the vehicle After the vehicle has passed through 2D cross sections are generated and sent to t...

Страница 34: ... soon as a vehicle is detected by the 2D LiDAR sensor The recording process stops when the 2D LiDAR sensor detects the final point on the vehicle Fig 25 Operating principle of TIC501 vehicle detection LMS Width 3 4 2 Operating principle of the vehicle classification The Traffic Controller combines the individual 2D sections of the vehicle A 3D point cloud is generated taking into account the speed...

Страница 35: ...he total permissible weight Extreme weather situations such as heavy rain or snowstorms may affect the accuracy of output data Counting and classification precision of the TIC102 TIC502 system functions The system is not affected by weather conditions such as fog rain and snow It works in accordance with the technical specifications listed in the annex The typical counting accuracy is 99 8 for the...

Страница 36: ...DAR sensor for counting the number of axles is mounted at the edge of the lane and captures the side of the passing vehicle In order to count the number of axles and determine the axle position and if applicable the height of the first axle the system also needs to access the measuring points of the 3D point cloud Determining the number of axles In order to determine the number of axles the first ...

Страница 37: ...axle counting Wheel detection using a point pattern Calculating axle positions The axle positions are determined on the basis of the point cloud starting from the front of the vehicle Fig 30 Operating principle of axle counting Determining the position of the axles Calculating vehicle height above the first axle For the calculation of the vehicle height above the first axle the profile cross secti...

Страница 38: ...on messages In addition to vehicle related information all three system functions also deliver so called object location messages These messages provide information on the time at which the vehicle was located at a defined position in the lane In order to integrate third party systems such as license plate cameras these messages must be assigned with a time stamp It is possible to define trigger l...

Страница 39: ...e object location messages are then emitted after the calcula tion process for the 3D point cloud Recommended distance of the trigger lines from the zero point of the Z axis System Maximum distance in both directions TIC102 Max 15 m recommended max 10 m TIC502 Max 20 m recommended max 20 m TIC501 Max 15 m no recommended The recommendation is based on distances for which triggering works with high ...

Страница 40: ...l system function records the basic data This supplies the vehicle data The subsequent system functions add to the basic data The figure below illustrates how for a profiling system with axle counting the initial vehicle data is continuously supplemented by the measurement results of the individual system functions At the end of the data processing flow data are output to the higher level system v...

Страница 41: ...em function is used to count vehicle axes Fig 34 Output data The earliest time for output of the complete vehicle information to the downstream system when monitoring one lane or with one 2D LiDAR sensor TIC501 is typically 250 ms after recording is stopped For systems with several TIC102 or TIC502 system functions on the same road data output is delayed by max 3 seconds to prevent double detectio...

Страница 42: ...ts TEMS Manager is used by operators and service technicians Provided that you have the relevant access authorization you can also use TEMS Managerto configure and monitor the system As an alternative to TEMS Manager you can also use TEMS Manager Command Line if you wish to configure the system using command lines TEMS Info interface This receives measurement results as messages The interface dist...

Страница 43: ... network structures For this reason the Traffic Controller has two ports Fig 36 Integration of the profiling system into existing IT infrastructure The IP address of the external network interface card Ethernet 1 is freely configurable so that the profiling system can be integrated into the existing customer network Meanwhile all the system components are connected to one another via the internal ...

Страница 44: ...ofiling system is operating correctly from any computer that is connected to the Traffic Controller Fig 37 Interfaces TEMS Manager site view In addition TEMS Manager serves as a visualization platform for the measurement results Fig 38 Interfaces TEMS Manager measuring mode Provided that they have the relevant access authorization service technicians can also use TEMS Manager to configure the syst...

Страница 45: ...rposes The Disk Storage plug in stores each detected vehicle in a separate file using the vehicle file format The vehicle file is placed in the data directory The vehicle file contains all the information recorded for a vehicle In addition to the vehicle data it includes among other things the 3D point cloud data or information about when and where the vehicle was located within the measuring rang...

Страница 46: ... Traffic Controller Instead they are used to transfer the data directly to an external storage medium The FTP Storage plug in works in a similar way to the Disk Storage plug in by generating vehicle files in the vehicle format It then uploads these automatically to a customer FTP server For this reason the Traffic Controller has an integrated FTP client The connection settings for the FTP server a...

Страница 47: ...d vehicle files that are stored on the Traffic Controller log files can also be downloaded via FTP These can then be sent to SICK Support for fault diagnosis Alternatively the files can be downloaded via TEMS Manager This download process relies on the FTP server that is installed on the Traffic Controller This FTP server is accessed via the client user account with the corresponding password see ...

Страница 48: ...s Requirements for the client computer An up to date version of a web browser must be installed on the client computer This browser must support HTML5 and WebGL Requirements for the customer network Port 80 must be open in the customer network for the TEMS Manager Depending on the functionality the following ports are required Port 21 for FTP access log files vehicle files Port 40 000 to 45 000 fo...

Страница 49: ... of the straight section before and after the measuring point is defined by the maximum vehicle length to be checked Fig 44 Project planning measurement site straight section Minimum distance To ensure optimum measurement results there must be a minimum distance between vehicles passing through the measurement site The faster the speed the longer the distance between the vehicles has to be Fig 45 ...

Страница 50: ...tallation angle is sufficient Fig 46 Project planning Calculating the TIC501 minimum vehicle distance Please note The larger the installation angle the larger the minimum distance between two vehicles If it is expected that the speeds will be slow and the vehicles will drive close to one another then select an installation angle of 20 to 25 Background With a large installation angle and low speeds...

Страница 51: ...he ground The ideal height is 6 meters measured from the lower edge of the TIC housing or the lower edge of the 2D LiDAR sensors Make sure in any case that the system components are attached at least 1 m higher than the highest vehicle to be detected Fig 48 Project planning mounting the TIC102 Fig 49 Project planning mounting the TIC502 When monitoring several lanes the individual system component...

Страница 52: ...ry that is accessible by foot This means that the lanes do not have to be closed for the commissioning process or for any later maintenance work The LMS Width must be mounted to a gantry that is 5 to 8 meters above the ground The ideal height is 6 meters measured from the lower edge of the 2D LiDAR sensor Make sure in any case that the system components are attached at least 1 m higher than the hi...

Страница 53: ...one another as shown in the following figure Fig 52 Project planning mounting the TIC501 installation of several LMS Width units on the gantry Mounting position on the side high on a post mast The side mounting of the LMS Width on a post or mast is done at a 90 angle to the lane surface When mounted at the side the TIC501 system function achieves the highest counting and classification accuracy if...

Страница 54: ...must be prevented by the mounting Ideal mounting position The following figure shows the combination of the vertical and horizontal distance for the TIC501 that generates the best measurement results Fig 55 Project planning Mounting the TIC501 ideal mounting position The chart can be interpreted as follows The TIC501 has the best performance within the green range A maximum distance of 4 m to the ...

Страница 55: ...oad surface A good view means that it must be able to detect as many measurement points on the ground as possible Requirements for optimum measurement results The LMS Axle achieves optimum measurement results when as many measurement points can be generated in the analysis area shadow pattern point patterns for wheels as possible In order to obtain the minimum number of measurement points required...

Страница 56: ...roject planning Angle of incidence for the LMS Axle too steep The following figure shows the combination of the vertical and horizontal distance for the LMS Axle that generates the best measurement results Fig 58 Axle counting project planning Ideal mounting position for the LMS Axle The chart can be interpreted as follows The dark green triangle 1 marks the area where the LMS Axle will achieve th...

Страница 57: ...itted Fig 59 Axle counting project planning Distance of the LMS Axle to the measurement gantry on the Z axis When mounting the device make sure that the LMS Axle is aligned correctly on all three axes You can tell whether the rotation of the 2D LiDAR sensor is correct by considering the top side and front views Rotation about the Y axis The signal must be output at an angle of 90 in relation to th...

Страница 58: ...relation to the road surface The system tolerates a rotational error of 2 about the X axis Fig 61 Axle counting project planning Rotation of the LMS Axle about the X axis Rotation about the Z axis The device s rear panel must be perpendicular to the road surface The system tolerates a rotational error of 2 about the Z axis Fig 62 Axle counting project planning Rotation of the LMS Axle about the Z ...

Страница 59: ...ted in normal operation and requires no operator intervention The LEDs 1 signal the operational status of the 2D LiDAR sensor Fig 63 Status indicators TIC102 LMS111 Display Meaning 2D LiDAR sensor in operation no evaluation cases are reporting an event 2D LiDAR sensor in operation at least one evaluation case reports an event Optics cover is dirty Switching output switched 2D LiDAR sensor in teach...

Страница 60: ... of the status indicators 3 Fig 64 Status indicators LMS511 2D LiDAR sensors Display Meaning 2D LiDAR sensor in operation no evaluation cases are reporting an event 2D LiDAR sensor in operation at least one evaluation case reports an event Optics cover is dirty Switching output switched 2D LiDAR sensor in teach in mode Tab 6 Status indicators 2D LiDAR sensors 3 7 3 Status indicators and controls o...

Страница 61: ...re that the field of view of each 2D LiDAR sensor is not restricted Make sure that the connectors can be plugged in and unplugged without any difficulty Avoid exposing the 2D LiDAR sensors to excessive shock and vibration WARNING Legal provisions When mounting the system components please observe any national and local legal stipulations and official instructions WARNING Prevent the 2D LiDAR senso...

Страница 62: ...tended to have more than one TIC102 Slave you must note the serial numbers of the LMS111 installed in the housing before mounting This information is required during commissioning when manually assigning the devices to the system functions in TEMS Manager Completely open the housing cover of the TIC102 Pull both cover screws outwards and turn them in the connection The housing cover pops open The ...

Страница 63: ...ws in the illustration must point towards the road The LMS Length dashed line must be aligned in parallel with the direction of travel Use the brackets available as accessories for the mounting process 1 Fig 67 Mounting TIC102 1 Mount the TIC102 to the bracket 2 Mount the bracket with the TIC102 to the gateway or bridge Do not secure the mounting bracket to the housing by turning screw but instead...

Страница 64: ...Mounting accessories TIC102 Accessories Description Part number Mounting bracket Mounting bracket for mounting the TIC102 4068061 Weather hood Recommended for protecting the TIC102 housing against environmental influences Color RAL 7032 gray 4068062 LS80b scan finder Infrared receiver for locating the laser beam 6020756 ...

Страница 65: ... Noting the serial numbers of the 2D LiDAR sensors if there are several TIC502 Slaves If the measurement site is intended to have more than one TIC502 Slave you must note the serial numbers of the LMS511 SE before mounting This information is required during commissioning when manually assigning the devices to the system functions in TEMS Manager Fig 69 Mounting TIC502 noting serial numbers of the...

Страница 66: ...aligned in parallel with the direction of travel To enable correct alignment and orientation of the mounting plate the 2D LiDAR sensors have labels which mark them as LMS Width and LMS Length A label on the mounting side of the plate visualizes the direction of travel of the vehicle This specifies the correct alignment of the TIC502 Fig 70 Mounting TIC502 Use a bracket which fits the hole pattern ...

Страница 67: ...umbers of the 2D LiDAR sensors Note which component of the TIC501 has which serial number and mark the TIC501 accordingly so that it can be mounted at the right place 4 2 3 2 Mounting the TIC501 The TIC501 is mounted to a gantry or to the side of a post or a mast The laser beam must be emitted at a right angle to the lane They are normally mounted using the connections in the direction of travel M...

Страница 68: ...le units This information is required during commissioning when manually assigning the devices to the system functions in TEMS Manager Fig 73 Mounting the LMS Axle noting serial numbers of the 2D LiDAR sensors Note which component has which serial number and mark the LMS Axle accordingly so that it can be mounted at the right place 4 2 4 2 Mounting the LMS Axle The LMS Axle is mounted on the side ...

Страница 69: ...h and LMS Length is taken as the level Fig 75 Mounting of LMS Axle LMS Axle level TIC102 TIC502 Please refer to the diagram below to see how the vertical and horizontal distances of the LMS Axle should be combined for the best possible measurement results Fig 76 Mounting of the LMS Axle Ideal mounting position The dark green triangle 1 marks the area where the LMS Axle will achieve the best possib...

Страница 70: ...AR sensor housing overheating and to a great extent from dazzle resulting from sunlight or other light sources Mounting brackets Suitable mounting kits for mounting the LMS511 with or without the weather hood can be purchased from SICK AG If the bracket is provided by the user the following points must be observed Stable mounting bracket that allows adjustable alignment of the 2D LiDAR sensor in t...

Страница 71: ...ts for LMS511 Accessories Description Part number Mounting kit 1 Mounting kit 1 to assist with mounting 2015623 Mounting kit 2 Mounting kit 2 to assist with mounting Mounting kit 1 required 2015624 Mounting kit 3 Mounting kit 3 to assist with mounting Mounting kits 1 and 2 required 2015625 Mounting bracket For retrofitting if mounting bracket 2018303 is already in use 2059271 Mounting kit Mounting...

Страница 72: ...table strap for mast mount 2018304 5306222 Adjustable strap lock Adjustable strap lock for tightening 2 pieces required 5306221 Scan finder The scan finder helps locate the laser beam Devices Accessories Description Part number LS80b scan finder Infrared receiver for locating the laser beam 6020756 For additional accessories please visit www sick com Note ...

Страница 73: ...trol cabinet at the measurement site Ideally it should be mounted near the higher level control but never in the vicinity of transformers or other power units In order to accommodate the leads and wiring there must be enough terminals available Mounting Install the Traffic Controller in a suitable location inside the control cabinet To do this use the M4 thread in the Traffic Controller The Traffi...

Страница 74: ...sure that the cables are routed correctly The cables must not loop down or fall slack in any way They must never pose a hazard to the vehicles driving under the gantry 5 2 Connections All system functions have in common that the system components are connected individually to the voltage supply and connected to the Traffic Controller via Ethernet 5 2 1 TIC102 connections The TIC102 Master has the ...

Страница 75: ... ETH_INTERNAL X2 Ethernet connection to the TIC102 Master or another TIC102 Slave 3 ETH_INTERNAL X3 Ethernet connection to the TIC102 Master or another TIC102 Slave Tab 9 Connections TIC102 Slave 5 2 2 Connections to LMS511 2D LiDAR sensor The LMS511 2D LiDAR sensor has the following connections Fig 80 Connections LMS511 No Connection Description 1 Ethernet Ethernet connection to a switch 2 I O No...

Страница 76: ...he following connections Front Fig 81 Connections Traffic Controller front side No Meaning 1 COM 1 2 2 COM 4 8 bit DIO 3 Antenna connection 4 USB 3 0 5 HDMI Tab 11 Connections Traffic Controller front side Back Fig 82 Connections Traffic Controller rear side No Meaning 1 COM 3 2 FGS 3 USB 2 0 4 Ethernet 1 Customer network 5 Ethernet 2 Sensor network 6 DC in Tab 12 Connections Traffic Controller re...

Страница 77: ...re each supplied separately with voltage Fig 83 Electrical installation TIC102 wiring overview 5 3 1 Connecting the TIC102 to the voltage supply Connect the voltage to each TIC102 Use the cables available as accessories for connecting to the power supply One end of the cables has a M12 plug connector the other is open for connection to the voltage supply 1 Screw the M12 round connector of the cabl...

Страница 78: ...Black Earthing GND 2 3 Black Voltage 24 V 4 4 Black Not assigned 5 5 Green yellow Protection earth 3 Tab 13 Electrical installation of the TIC102 Power cable pin assignment For the voltage supply use a cable with a suitable cross section so that the voltage loss between the connection point and the TIC102 is within the tolerance zone 5 3 2 Connecting TIC102 units to one another via Ethernet If you...

Страница 79: ...2 Ethernet_RX Ethernet interface 3 Ethernet_TX Ethernet interface 4 Ethernet_RX Ethernet interface Tab 14 Electrical installation of the TIC102 Ethernet cable pin assignment 5 3 3 Connect TIC102 Master to the customer interface Connect the TIC102 Master to the company network Use the Ethernet cable available as an accessory This has an M12 plug connector for connection to the TIC102 Master on one ...

Страница 80: ...2 Accessories Description Part number Power connecting cable Voltage supply with 5 pin M12 coupling and open cable end electronics and heating 30 m 6045327 Ethernet connecting cable Connecting cable for connection of the TIC102 units to one another 15 m 6045328 Ethernet connecting cable Connecting cable for connecting the TIC102 Master to the company network 30 m 6045311 ...

Страница 81: ...trical installation Connect the 2D LiDAR sensors used by the TIC502 or TIC501 system functions to the voltage supply and to the Traffic Controller using the Ethernet switch provided at the customer site The Traffic Controller is used for the connection to the customer network Wiring overview of the TIC502 Fig 88 Electrical installation TIC502 wiring overview ...

Страница 82: ...ICAL INSTALLATION 82 8017768 12AX 2019 05 31 SICK O P E R A T I NG I NS T R U C T I O NS TIC Subject to change without notice Wiring overview of the TIC501 Fig 89 Electrical installation TIC501 wiring overview ...

Страница 83: ... and screw the connection tight Connect the Traffic Controller to the voltage supply Fig 90 Electrical installation of the TIC502 TIC501 Connecting the Traffic Controller to the voltage supply Connect the wires of the black and white cable in the control cabinet as follows Wire color Voltage supply White 12 V 36 V DC Black 0 V Tab 15 Electrical installation of the TIC502 TIC501 Connecting the Traf...

Страница 84: ... units for the 2D LiDAR sensor and its heater Wire all connections using copper cables Use the following wire cross sections Connection of Cable cross section Supply voltage At least 0 25 mm2 if local voltage supply power supply unit is in the immediate proximity At least 1 0 mm2 with a maximum length of 20 m when connected to available 24 V DC mains voltage For additional information on the elect...

Страница 85: ... to the Ethernet switch 1 Screw the M12 male connector into the female Ethernet connector on the respective 2D LiDAR sensor 2 Run the Ethernet cable from the 2D LiDAR sensor to the switch 3 There insert the RJ45 male connector into a free female connector Ethernet cable Pin Wire color Description of the Ethernet interface 1 Ethernet_TX Transmit 2 Ethernet_RX Receive 3 Ethernet_TX Transmit 4 Ethern...

Страница 86: ...tage supply as shown below Fig 95 Electrical installation of Ethernet switch 5 6 Electrical installation of the LMS Axle 5 6 1 Connecting the LMS Axle to the TIC102 The LMS Axle is connected to the TIC102 in the lane in which axles are to be counted The connection is established via Ethernet cable Configuration for a lane with axle counting The LMS Axle is connected to the TIC102 Master in series ...

Страница 87: ...ries connection is used for the connection Fig 97 LMS Axle electrical installation TIC102 2 lanes with axle counting 5 6 2 Connecting the LMS Axle to the TIC502 The LMS Axle is connected to the Ethernet switch and supplied separately with voltage The LMS Axle is assigned via TEMS Manager Configuration for two lanes with axle counting The following figure shows the monitoring of two lanes using two...

Страница 88: ...nd electronics and heating 20 m 6050687 Connecting cable Ethernet from 2D LiDAR sensor to Ethernet switch Connecting cable with M12 male connector 4 pin RJ45 20 m 6050685 Ethernet data cable from network switch to Traffic Controller TIC Head A connection type male connector RJ45 Head B connection type male connector RJ45 3 m 6026083 Ethernet switch Accessories Description Part number Ethernet swit...

Страница 89: ...The system starts up automatically when the power supply is connected Checking operating state All components of the profiling system are checked for operational readiness The LED display for the connected devices indicates the device status during the power up cycle Operating state after 60 s The system is ready for operation after approximately 60 seconds Check the operational status of the comp...

Страница 90: ...stomer network Therefore the first step is to change the IP address of a configuration PC that is not connected to the customer network to make it compatible with the address range of the Traffic Controller Only then will you be able to access TEMS Manager and change the IP address of the Traffic Controller to the address range of the customer network Changing the IP address of the configuration P...

Страница 91: ... on the configuration PC 2 Enter the default IP address of the Traffic Controller in the address line As soon as the connection to the Traffic Controller has been established the TEMS Manager web interface opens Adjusting the IP address of the Traffic Controller 1 Click the Setup menu and select the IP Configuration function The authorization must be Service 2 Click in the User name field Enter Se...

Страница 92: ... Traffic Controller can be subsequently found on the customer network 5 Press Submit to confirm Resetting the IP address of the configuration PC As soon as the IP address has been changed TEMS Manager is automatically accessed via the new IP address Consequently communication between the configuration PC and the Traffic Controller is no longer possible Now the configuration PC must be configured t...

Страница 93: ...ation on the start page Click on Set up site configuration with the wizard The site configuration wizard opens The summary on the left hand side shows the pages of the wizard that must be completed depending on the components selected When you have completed configuration on one of these pages it will be marked with a tick On the right hand side settings are adjusted for the page selected As no si...

Страница 94: ...1 Also clarify whether the site provides a side strip This information only affects the visualization of the measurement site in TEMS Manager The system components for counting axles are shown at a distance from the lane The master is assigned to the lane which is directly adjacent to the side strips for the TIC102 and TIC502 The side strip is not included in any system function In the following e...

Страница 95: ...ted system functions from the site configuration 6 4 2 Selecting axle counting On the Select axle counting side you can extend the site configuration to include the Axle Detector system function Click on the plus icon and define the number of system functions used A site configuration can be assigned a maximum of two Axle Detector system functions If your site configuration does not provide for ax...

Страница 96: ...tries Vehicles are identified by comparing criteria for 28 vehicle classes The class representing the closest match is allocated to the vehicle Select Region North America for the USA and Canada Vehicles are identified by comparing them against 30 vehicle classes The class representing the closest match is allocated to the vehicle The most appropriate classification system can be evaluated with yo...

Страница 97: ...ternal category system Specify which external output category system you want to use depending on the selected region With the output category system vehicles are no longer identified on the basis of the individual vehicle classes within the category system Instead they are identified using classification groups traffic checking regulations If you have selected the ECTN classifier for the Europe r...

Страница 98: ... has been selected For users with the Operator and Authorized user authorizations the Location Vehicles Logs and Info registers are available The Settings register is restricted to users with the Service authorization Working range Meaning Location Shows the measurement site in a live view It also allows you to display the system parameters and current system status Vehicles Displays the measureme...

Страница 99: ...etc back to standard values This function is particularly useful if the gantry is no longer visible in the live view because of the adjustments you have made to the 3D scenery Change users Log out current user and log in another user Logout Log out current user Reopening the start page Clicking the program name reloads TEMS Manager This makes the start page reappear with the Site workspace open No...

Страница 100: ...TIC Subject to change without notice Display format on small screens The TEMS Manager display format automatically adjusts to the size of the screen On a smartphone or tablet the content is arranged from top to bottom Click the menu icon to access the individual workspaces in TEMS Manager ...

Страница 101: ...nctions are displayed in a hierarchical structure Lane System function System components The lower section lists plug ins for selecting and configuring the recorded measured values vehicle data and status information The view on the left hand side shows the measurement site with the road lane s and direction of travel along with the system components the installation site and the status display Du...

Страница 102: ...6 2 3 Assigning devices to vehicle detection components Edit site configuration To quit editing mode click the blue icon The configuration remains loaded To reopen the configuration file in editing mode click the icon again Click the icon to restart the loaded configuration file Activate deactivate expert mode Switches the export mode on and off Expert mode displays all system functions in the nav...

Страница 103: ...e site via the mouse wheel when the mouse pointer is on the graphical display If you want to increase or decrease the zoom increments press and hold the Shift key at the same time Tab 18 Functions for displaying the measurement site in TEMS Manager Controlling the graphical display with touch gestures If you are using a computer with a touchscreen you can control the graphical display with certain...

Страница 104: ... tree from top to bottom when editing the system parameters You can still configure the measurement site and system functions even if you have not yet connected or linked any devices You must know the mounting position of the system components If it is necessary to assign the devices to the system components and configure the IP addresses this takes place in a subsequent step 6 6 1 Configuring the...

Страница 105: ...ion of travel 1 For the TIC102 and TIC502 the number of the lanes to be monitored is specified by the number of the system functions specified in the configuration wizard The following rule applies A TIC102 or TIC502 system function monitors exactly one lane You will not make any adjustments in this case For the TIC501 the number of lanes must be checked and adjusted since a TIC501 system function...

Страница 106: ...g the signature This offers a reliable way of checking whether the configuration has been changed e g following the latest standardization procedure 1 Go to the road level in the navigation tree and click the Sign road configuration icon Two input fields appear underneath the road 2 Enter the name of the person who approved the configuration and add any other comments about the approval process 3 ...

Страница 107: ... on the component again and keep the mouse button pressed A grid appears to serve as a guide 3 Now move the component to the relevant plane The orientation of the grid will automatically adapt to the current perspective of the live view Rotate the measurement site in the live view to switch between displaying the grid along the X axis and the Z axis respectively Precisely adjusting components Now ...

Страница 108: ...dinate system The X axis lies straight across the width of the road The first distance parameter X is measured from the origin of the right hand edge of the lane when viewed in the direction of travel The Y axis defines the height at which the component is mounted The second distance parameter Y is measured from the surface of the road The Z axis points in the direction of travel The third distanc...

Страница 109: ...his means that third party systems such as license plate cameras or DSRC antennas can assign events from other components or select the correct image from a video stream This mechanism is not suited for triggering time critical tasks 1 Go to the system function level in the navigation tree and click the Edit system component trigger positions camera icon The input line opens for determining the po...

Страница 110: ...rally be made to the system components The following cases can be differentiated for assignment of the devices to the system components Device assignment for several TIC102 Slaves To correctly assign the 2D LiDAR sensors to the TIC102 Slaves used you need the serial numbers that you recorded before mounting see chapter 4 2 1 1 Noting the serial numbers of the 2D LiDAR sensors for several TIC102 Sl...

Страница 111: ... the internal sensor network 192 168 20 x The assignment of the 2D LiDAR sensors to the system components takes place via the device search This is started on the level of the respective system component via the Start device search magnifier icon Running device search for several TIC102 Slaves The following example shows the process for a site with one TIC102 Master and two TIC102 Slaves In the na...

Страница 112: ...he Start device search magnifier icon The list of assignable devices is currently empty 2 Click the Device Search button The devices connected to the Traffic Controller appear in the list of devices along with their IP address firmware and serial number 2D LiDAR sensors with a yellow background color are already assigned to other system functions In our example the 2D LiDAR sensors are for the TIC...

Страница 113: ...w IP address is unique It must not be the same as the default IP address 192 168 20 11 or 192 168 20 12 The label for the Assign device button changes as a result of changing the IP address in Prepare device The system suggests a new IP address for one or two LMS Width units and shows it in bold print If the serial number fits you can take the suggestion or define an individual IP address as descr...

Страница 114: ...the current component The devices yet to be assigned are still blue Accidentally assigning the LMS Width to an LMS Length is prevented by the system 6 Once the change has been made click Close The device search closes The red circle containing the error number has now disappeared from both LMS Width listings 7 Apply the same process when assigning devices for the two 2D LiDAR sensors to the LMS Le...

Страница 115: ...irection and thus define a mounting position independently of its position on the gantry The LMS Axle must be in the same Z plane as the respective system function for vehicle classification Roughly aligning components First align the 2D LiDAR sensor in the graphical display of the live view 1 Click on a component in the live display 2 Click on the component again and keep the mouse button pressed...

Страница 116: ...idth of the road The first distance parameter X is measured from the origin of the right hand edge of the lane when viewed in the direction of travel The Y axis defines the height at which the laser 2D LiDAR sensors is mounted The second distance parameter Y is measured from the surface of the road The Z axis points in the direction of travel The third distance value is measured in relation to the...

Страница 117: ... of the measurement points within the coordinate system 2 Adjust the Y axis position so that all measurement points are visible on the road surface 3 Adjust the angle of rotation and use the measurement points to check that the signal is being output as required 4 Adjust the X position so that no permanent measurement points e g lane dividers or borders are visible within the lane This is because ...

Страница 118: ...d to the address range of the internal sensor network 192 168 20 x Fig 101 Assigning devices to axle counting components The system assumes the assignment of the Axle Detector system function for vehicle detection The first Axle Detector system function is assigned to the first TIC the second Axle Detector system function to the second TIC or the outermost TIC In a lane with two Axle Detector syst...

Страница 119: ...earch magnifier icon 2 Click the Device Search button The devices connected to the Traffic Controller appear in the list 3 Change the IP address of the sensor and confirm with Prepare device 4 Click Assign device in the LMS Axle with the correct IP address The sensor is assigned to the LMS Axle system component In the list of devices the 2D LiDAR sensor now appears with a green background 5 Click ...

Страница 120: ... system function for vehicle classification In expert mode functions also appear which allow system and device parameters to be edited and plug ins to be added Activating expert mode Go to the toolbar above the navigation area and click the Activate deactivate expert mode icon The navigation area is expanded to include system functions and editing functions Notes on links NOTE Do not change the li...

Страница 121: ...s Users with Authorized User authorization or higher are permitted to edit them as well Opening the detail window 1 Expand the tree that contains the system functions 2 Mark a system function or system component in the navigation area and click the Show Details icon In the example we open the parameters for the LMS Width system component The number of displayed parameters depends on the authorizat...

Страница 122: ...The category system is selected via the wizard The same applies for the additional classification via an external output category system With the output category system vehicles are no longer identified on the basis of the individual vehicle classes within the category system Instead they are identified using classification groups traffic checking regulations You can check the selected category sy...

Страница 123: ... and thus overwritten Depending on which vehicle classes are checked under the rule and the probability of the vehicle belonging to one of these classes the number of axles can be changed to an exact value or narrowed down to a minimum or maximum number of axles For example the axle number 4 can be entered for all vehicles belonging to the car carrier transporter class because their low lying trai...

Страница 124: ...and configured as standard CSV Export Disk Storage FTP Storage and UNC Storage see also chapter 3 5 3 Plug ins for saving and downloading the vehicle data Only a few settings are required for the configuration process Adding plug ins 1 Click on the Add plug in link in the navigation area 2 A list of all available plug ins opens 3 Click on the required plug in in the list it is then applied to the ...

Страница 125: ...determining the output structure of the csv file Parameters Description CsvDefinition Determines whether measured values are identified for one lane more than one lane or for several lanes in conjunction with the axle counting function Culture Defines the number format to be used TimeZone Defines the time stamp for the measurement results when exported to the csv file Disk Storage The Disk Storage...

Страница 126: ...rameters to configure the FTP transfer Parameters Description FtpBasePath FTP root directory FtpPassword FTP password for accessing the customer s FTP server FtpServerAddress IP address of the customer FTP server to which the measurement results are to be uploaded If the IP address is not in the same number range as the Traffic Controller the correct IP gateway must be set within the IP configurat...

Страница 127: ... Traffic Controller Open the detail window for the UNC Storage plug in Configure the UNC path as follows Parameters Description BasePath Defines the network directory The network directory has to be shared so that it can be accessed UNCDomainName UNCPassword UNCUsername A Windows user must have been granted write access to the shared network directory If this user is not a domain user the computer...

Страница 128: ...l be detected automatically by measuring the distance from the ground Floor Finding During the Floor Finding process each 2D LiDAR sensor collects a certain amount of measurement data from the road in the measuring range This process may take a few seconds It will be tracked in the visualization If the configuration cannot be started we recommend that you first check the voltage supply for the sys...

Страница 129: ...ents is indicated by a green square A gray icon signals that a device status is currently unknown When the configuration starts the sensor components remain red until a connection has been established Depending on the network connectivity this may take up to two minutes If a sensor component remains permanently red it could be that an incorrect IP address has been assigned to it The problem could ...

Страница 130: ...er Stop current site configuration Stops the configuration that is currently running in measuring mode The function requires login as a user with Authorized User authorization or higher Edit site configuration Stops the configuration that is currently running and switches the system to editing mode Once in editing mode you can change the system parameters The function requires login as a user with...

Страница 131: ...for device icon The functions for visualizing the measurement points in the live view appear 2 Click Raw measuring points The measurement points detected by the 2D LiDAR sensor are displayed in the live view of TEMS Manager The display is based on the unfiltered raw data for the 2D LiDAR sensor s entire visual range 3 Click Relevant Measurement Points The live view of TEMS Manager now shows the fi...

Страница 132: ...s 3 Open the States area to display the status information for the system component concerned 4 In the event of a fault you can for example refer to this information to see if the 2D LiDAR sensor is affected by contamination see also 8 3 1 Fault diagnosis in TEMS Manager 6 7 4 Switching back to editing mode When in operating mode you can return to editing mode change settings and restart configura...

Страница 133: ... 1 Click the Save current site configuration on hard drive icon in the toolbar 2 The download dialog box of the browser opens right away 3 Specify the location for saving the configuration file The site configuration is saved in XML file format The XML file contains a range of information on the site configuration including IP address for the 2D LiDAR sensors Mounting positions and names of the 2D...

Страница 134: ...order the Vehicles workspace contains a table of the last 50 vehicles recorded or vehicles with a maximum memory of 50 MB The order in which the vehicles are displayed depends on the column selected and the sorting setting The display shows the time of the recording the detected vehicle category together with a pictogram the lane the speed and the vehicle dimensions Changing the number of vehicles...

Страница 135: ...ue Click this icon to switch to the previous or next page from the current one Allows you to open a specific page directly Editing the list view settings You can show and hide the various columns that make up the vehicle table 1 Go to the toolbar in the Vehicles workspace and click the tool icon 2 To control which columns are visible select deselect the relevant checkboxes Checking the measurement...

Страница 136: ... the Disk Storage plug in has been activated all of the vehicle data stored on the Traffic Controller under the data directory can be downloaded using an FTP download see chapter3 5 3 Plug ins for saving and downloading the vehicle data 1 Connect to the FTP server of the Traffic Controller using an FTP client e g FileZilla 2 Log in by entering client for the user name and client as the password 6 ...

Страница 137: ... 3D model of the vehicle and zoom in and out in exactly the same way as with the graphical display of the site To display the surface of the vehicle select the Show continuous surfaces in the 3D view icon Alternatively you can select the Show grid structure in the 3D view icon if you want to see a framework view of the vehicle The Show point data in the 3D view icon provides a point view ...

Страница 138: ...tails page 2 To control which data items are visible select deselect the relevant checkboxes and click Accept to confirm your choices Displaying values together with the confidence level Alternative values with a calculated confidence level are available for most measured values These can be displayed in a separate window Move the mouse over a measured value and click to open the Additional Values...

Страница 139: ...yze errors For instance the diagram can shed light on distorted 3D models of vehicles that appear elongated or compressed In such cases it may be that the system was unable to obtain any measurement points within a particular area Switching to the details page for the previous next vehicle You can switch to the details page for the next or previous vehicle directly from the current one without hav...

Страница 140: ...ing to the vehicle list Go to the menu bar and click the Vehicles workspace option This opens the list of the last 200 vehicles measured 6 8 3 2 Vehicle classes The Vehicle Classifier system function is used to report the vehicle class under Information The class is chosen from all classes in the set category system Click inside the Category field to open the Additional Values window which display...

Страница 141: ...no longer made to all the vehicle classes within the selected category system because the configured classification groups are used instead see also chapter 3 4 2 Operating principle of the vehicle classification 2 Click inside the Category External field to open the Additional Values window This enables you to see the confidence level with which the vehicle has been assigned to the output categor...

Страница 142: ...a and click the Measure icon Regardless of which graphical display you have selected a box containing the maximum vehicle dimensions appears above the vehicle The dimensions of this box are displayed in the upper right area of the 3D view The values correspond to the maximum vehicle dimensions after invoking the function Depending on the selected perspective the 3D model creates a visualization of...

Страница 143: ... R A T I N G I N S T R U C T I O N S TIC The top view visualizes the width line of the box This view makes it possible to measure the width and length with ease The front rear view visualizes the height line of the box This view makes it possible to measure the height and width with ease ...

Страница 144: ...box edges are activated 3 Click on the edge you would like to move 4 Move the edge along the corresponding axis for the shape to be measured The box dimensions here the box length is updated The dimensions of the box are always crucial There is no specific zero point 5 Check the plausibility of the dimensions shown In this example the length dimensions of the tractor Double clicking on the box edg...

Страница 145: ... each day In addition the availability status of the Traffic Controller is checked and logged continuously The results of the internal self check are recorded using the RecorderStatus log type Once again a separate log file is created for each day The RecorderAudit log type delivers a list of all login processes and changes to user rights Displaying the list of log files 1 Open the Logs workspace ...

Страница 146: ...n combine several filters Defining the level of detail for Recorder log type entries You can define a different level of detail for the log entries in the Recorder log type Support will let you know which level of detail is required to provide further assistance 1 Switch to editing mode using the Edit default configuration icon 2 Expand the tree that contains the system functions 3 Mark a system f...

Страница 147: ...e icon 3 Save the log files in a directory of your choice Downloading log files via FTP Alternatively all the logs can be downloaded from the Traffic Controller via FTP The status logs are stored inside the logs directory see also chapter 3 5 4 Downloading log files 1 Connect to the FTP server of the Traffic Controller using an FTP client e g FileZilla 2 Log in by entering client for the user name...

Страница 148: ...der can be displayed and analyzed in TEMS Manager In addition to general data and information on the IP configuration you can also check other data here including the UTC Universal Time Coordinated time setting Upon delivery the Traffic Controller always uses UTC time as the reference time The local web browser and the TEMS Analyzer then convert the UTC times into local time for the displays Go to...

Страница 149: ... on the customer network 2 Start TEMS Manager from a client computer The client computer must be able to access the directory containing the update file 3 Go to the Setup workspace and click Firmware Update When logging in the user must have Service authorization If you are not yet logged in at this level please do so now for more information see appendix at 9 5 Users and authorizations Performing...

Страница 150: ...Updating packages Additional system components plug ins and configuration files e g Vehicle Classifier are supplied as separate files in the temsPackage file format Once again they are installed via TEMS Manager The procedure is very similar to the one for TEMS Recorder updates The configuration that is currently running has to be stopped for this 1 Save the temsPackage file in a directory of your...

Страница 151: ...ng a connection The TCP IP connection is established via the Info client Several connections to the TEMS Info server can be established but each one has to be configured separately The connection is set up using the following sequence of messages TEMS Recorder Direction TEMS Info client Establishing a socket connection Initialize message Information message Configuration message Tab 19 TEMS Info i...

Страница 152: ...ended Message Object Location This message is sent once while the vehicle is passing through the measurement site Tab 22 TEMS Info interface messages vehicle data Status messages When Status Messages are activated they are sent regularly by the Traffic Controller if the status changes provided that this has been configured TEMS Recorder Direction TEMS Info client Status message Tab 23 TEMS Info in...

Страница 153: ... TEMS Manager is via an HTTP connection by default To establish a secure HTTPS connection a corresponding security certificate can be downloaded from TEMS Manager and installed on the client computer Fig 103 Uploading the supplied HTTPS certificate Stopping the current configuration 1 Click the Stop current site configuration Exit editing mode icon Downloading the certificate 1 Select Downloads in...

Страница 154: ...ouble click the CRT file to open it The Certificate window opens containing the certificate details 2 Click on the Install certificate button The certificate import wizard opens 3 Go through the wizard and save the certificate in the certificate memory on the client computer Then connect to TEMS Manager via a secure HTTPS connection Starting TEMS Manager ...

Страница 155: ...se your own HTTPS certificate This certificate must be uploaded to the Traffic Controller 1 Navigate to the Settings working range and select SSL certificate Set certificate 2 Click Browse and select the local CRT file 3 Click Set certificate The following safety note appears 4 Press Continue to confirm The certificate for setting up the secure HTTPS connection is uploaded to the Traffic Controlle...

Страница 156: ...ystem In the following example a site existing of two TIC502 units and one LMS Axle will be extended to include an additional LMS Axle 1 Click on the Start the site configuration wizard icon in Editing mode in the site configuration The site configuration wizard opens The current configuration is shown on the left hand side The right hand side is where you can create a new site or edit the current...

Страница 157: ...2 is retained 4 An LMS Detector system function is currently suggested on the third page 5 Add another Axle Detector system function in the site configuration using the plus icon then click on Next 6 In this example you keep the category system settings 7 End the wizard by clicking Create site The site is extended to include an LMS Axle 8 In 6 6 3 Configuring system functions for axle counting you...

Страница 158: ...they are subsequently adjusted to the conditions at the measurement site When logging in the user must have Service authorization 1 In TEMS Manager click the icon for Load site configuration and start edit it 2 Select the configuration file and click Start Configuration 3 The configuration is loaded in TEMS Manager If a configuration is loaded while another configuration is running the system will...

Страница 159: ...ntenance intervals The following maintenance work must be carried out at the specified time intervals Component Maintenance task Interval Design 2D LiDAR sensor Cleaning the inspection window In the event of a contamination message as soon as possible Aside from this As and when required System manager General Visually inspect the electrical cabling and wiring for damage 1x year System manager The...

Страница 160: ...replaced straight away Corroded plug connectors can have a major impact on 2D LiDAR sensors performance Cables Regularly check the electrical installation Make sure that all cable connections are secure WARNING Loose connections or scorched cables Defects such as loose connections or scorched cables must be rectified immediately WARNING Damaged cable insulation There is a risk of electrocution if ...

Страница 161: ...8 3 1 Fault diagnosis in TEMS Manager Requesting the degree of contamination via the TEMS Info interface The customer can also call up the contamination message via the TEMS Info interface Cleaning the inspection window Use a clean soft brush to remove dust from the inspection window Then wipe the inspection window with a clean damp cloth WARNING Damage to the inspection window The optical output ...

Страница 162: ...rmitted to work on electrical plants or equipment and must comply with electrical regulations when doing so NOTE Claims under the warranty rendered void Some of the housing screws on the devices are sealed Any claims against SICK AG under the warranty will be rendered void if the seals are damaged or if the device is opened The housing must only be opened by authorized SICK service personnel 7 3 1...

Страница 163: ...new TIC102 and screw the plug connectors together Update the measurement site Additional information can be found in chapter 7 3 6 Updating the measurement site 7 3 3 Completely replacing the TIC502 A defective TIC502 can be replaced in its entirety Part number Description 1085137 TIC502 master 1085138 TIC502 slave Replacing the device 1 Loosen the M12 round connectors from the 2D LiDAR sensors an...

Страница 164: ...7 3 5 Replacing the Traffic Controller To order the replacement device please contact your responsible SICK sales unit Replacing the controller 1 Undo the screw connection on the male connector for the voltage supply and pull the voltage cable out of the female connector of the Traffic Controller 2 Pull the connected Ethernet cables out of the respective female connectors 3 Undo the wall bracket f...

Страница 165: ...net 1 TCP IP interface see chapter 6 2 Connecting to TEMS Manager The site configuration has been stored on a backup data card 7 3 6 1 Updating after replacing a TIC102 Master Since the Traffic Controller is also affected by the replacement of the TIC102 Master system component you must either put the entire system in operation see chapter 6 4 Setting up the site configuration with the wizard or u...

Страница 166: ...e device The replacement device is still set to its default IP address The IP address must be changed using the device search when assigning the device The replacement device must have the same IP address as the device it replaced If the device has already been addressed using its default IP address at the measurement site you do not need to change the IP address The device can be assigned directl...

Страница 167: ...nd adjust it as appropriate 5 Click Assign Device The replacement device is assigned to the LMS Width system component of the TIC502 2 system function In the list of devices the 2D LiDAR sensor now appears with a green background 6 Once the change has been made close the Device Search dialog box Loading the site configuration Click the Load site configuration icon Once the loading process is compl...

Страница 168: ...h a connection with the Traffic Controller you have to change this IP address This procedure is described in detail in chapter 6 3 Configuring the IP address of the Traffic Controller Establishing a connection with the TEMS Recorder 1 Connect to TEMS Manager 2 In TEMS Manager log in as a user with the Authorized User authorization or higher Loading the site configuration 1 Click the icon for Load ...

Страница 169: ...em operation if you cannot clearly identify the fault and if you cannot safely remedy the problem 8 1 SICK Support If you cannot remedy the error with the help of the information provided in this chapter please contact your SICK subsidiary To deal with your inquiry quickly we will require the following information Exact name of system component Firmware version see chapter 6 10 1 Displaying inform...

Страница 170: ...the 2D LiDAR sensor LMS111 7 segment display for the LMS511 Display Possible cause Remedy No error has occurred Device is in measuring mode Idle mode outputs are in the OFF state laser is switched off No error has occurred If the criteria for IDLE mode are withdrawn operational readiness is restored Motor starting No error has occurred Fault in the 2D LiDAR sensor Send the 2D LiDAR sensor to the m...

Страница 171: ...s 8 3 Fault indicators at system level Faults that occur on the profiling system are divided into two basic categories warnings and errors In the event of a warning the system remains operational However the cause of the fault must be eliminated as quickly as possible Warnings indicate things like minor contamination on a 2D LiDAR sensor In the event of an error the system is still operational in ...

Страница 172: ... Subject to change without notice 8 3 1 Fault diagnosis in TEMS Manager In TEMS Manager warnings and errors are displayed at every level of the hierarchy i e at device level system function level road level and site level Warnings and errors at a lower level affect all the superordinate levels ...

Страница 173: ...ay icon signals that the current status is unknown This is the case during initialization of the profiling system for example 8 3 1 2 Fault indicators at site level Errors at site level are only shown in the menu bar If the profiling system is only ready for operation to a limited extent the Site workspace is highlighted in red font In addition a red exclamation point appears On the right hand sid...

Страница 174: ...ellow Minor contamination on the inspection window of the 2D LiDAR sensor Inspection window of the 2D LiDAR sensor is yellow Clean the inspection window of the 2D LiDAR sensor Housing red Heavy contamination on the inspection window of the 2D LiDAR sensor Clean the inspection window of the 2D LiDAR sensor No supply voltage to the 2D LiDAR sensor or voltage is too low Check the voltage supply Ether...

Страница 175: ...nsor can see in its visual range 3 Click Relevant Measurement Points The live view now shows the filtered measurement data from the 2D LiDAR sensors The filtered measurement data are used as the basis for the 3D point cloud and the resulting calculations Visualization of the filtered measurement data helps to detect faults Showing the details The detail window helps you narrow down the system faul...

Страница 176: ...e affected by faults Red numbers signal the presence of an error Erroneous configurations cannot be started Yellow numbers signal a warning Warnings do not prevent the configuration from starting The number shows how many errors or warnings there are in each case You can narrow the problem down by right clicking the fault number This opens a window containing further detailed information In the ex...

Страница 177: ...parate log file is created for each day see also chapter 6 9 Downloading log files Alternatively all the logs can be downloaded from the Traffic Controller via FTP The status logs are stored inside the logs directory see also chapter 3 5 4 Downloading log files 1 Connect to the FTP server of the Traffic Controller using an FTP client 2 Log in by entering client for the user name and client as the ...

Страница 178: ...ode for the site configuration log in as a user with Service authorization 2 Switch on expert mode 3 In the navigation tree go to the level of the relevant system function not the system component and click the Show Details icon 4 In the detail window for the system function set the RawDataEnabled parameter to Yes 5 Close the detail window and start the configuration The raw 2D LiDAR sensor data a...

Страница 179: ...e and client as the password Deleting raw data Once the raw data has been downloaded from the RawData directory on the Traffic Controller you must manually delete the data Otherwise the data will clog up the SSD by taking up unnecessary storage capacity The raw data are not deleted automatically when you deactivate the function for recording raw data 8 3 5 Sensor component failures In the event of...

Страница 180: ...ming calculation Finished Result is available FloorFinderResult None No result available yet NotEnoughPoints The number of visible measurement points is insufficient Wrong configuration NoiseTooHigh Too much interference in measurement data Snow trash dust spray TooClose Result too near to scanner Is there an object in the way AngleDeviationTooLarge Result skewed Is the scanner hanging crooked Dis...

Страница 181: ...l for the lanes in TEMS Manager The configuration does not have to be stopped for this Classification keeps delivering poor results unclear 3D point clouds Possible cause Remedy The orientation of the 2D LiDAR sensors was incorrectly rotated by 180 when configuring it in TEMS Manager Check the configuration The TIC501 mounting angle does not correspond with correct alignment Adjust the mounting an...

Страница 182: ...s mounted too high angle of incidence too steep etc Make sure that the device is mounted in accordance with the specifications see chapter 3 6 5 Requirements for mounting the axle counting components The LMS Axle s visual range has been blocked by outside ambient conditions e g snow temporary lane barriers Check that the visual range of the 2D LiDAR sensor is clear Clear away anything that is bloc...

Страница 183: ...commended distance between maximum vehicle height and sensor Typ 1 5 m Calibration Automatic Laser class 1 eye safe IEC 60825 1 2007 3 Heating Yes Integrated computer unit Traffic Controller TIC Performance Counting accuracy 99 8 Classification accuracy Typ 98 for TLS8 1 classes Interfaces Data log TEMS Info interface TCP IP interface TEMS Manager HTTP configuration software NTP synchronization Ye...

Страница 184: ...r class 1 eye safe IEC 60825 1 2007 3 Heating Yes Separate computer unit Traffic Controller TIC Performance Counting accuracy 99 85 Classification accuracy Typ 98 for TLS8 1 classes Accuracy of speed measurement 3 km h at 100 km h 3 at 100 km h Only for vehicles with directional stability which pass under the LMS Length Interfaces Data log TEMS Info interface TCP IP interface TEMS Manager HTTP con...

Страница 185: ...TTP configuration software Mechanics electronics Mounting position Over the lane or on the side Weight 4 4 kg Ambient operating temperature 40 C 60 C Protect the TIC502 from direct sunlight with a weather guard to keep it from overheating Tab 31 TIC501 data sheet 9 1 4 Excerpt from the LMS511 SE data sheet LMS511 SE Application Outdoor Light source Infrared λ 905 nm Laser class Laser class 1 IEC 6...

Страница 186: ... function indicators Supply voltage 24 V DC 12 V DC 36 V DC Operator interface Female Ethernet connector LAN 1 on Traffic Controller Sensor interface Female Ethernet connector LAN 2 on Traffic Controller Housing dimensions 180 mm x 33 mm x 121 2 mm W x H x D Weight 800 g Mounting Screwable Enclosure rating IP 20 Internal memory 32 GB Data log TEMS Info interface TCP IP interface TEMS Manager HTTP ...

Страница 187: ...2019 05 31 SICK Subject to change without notice O P E R A T I N G I N S T R U C T I O N S TIC 9 2 Dimensional drawings 9 2 1 Dimensional drawings for the TIC102 Fig 104 Dimensional drawings of the TIC102 with mounting bracket ...

Страница 188: ...9 ANNEX 188 8017768 12AX 2019 05 31 SICK O P E R A T I NG I NS T R U C T I O NS TIC Subject to change without notice 9 2 2 Dimensional drawings for the TIC502 Fig 105 TIC502 dimensional drawings ...

Страница 189: ... 12AX 2019 05 31 SICK Subject to change without notice O P E R A T I N G I N S T R U C T I O N S TIC 9 2 3 Dimensional drawings for LMS511 SE 2D LiDAR sensor Fig 106 Dimensional drawings for the LMS511 SE 2D LiDAR sensor ...

Страница 190: ... 31 SICK O P E R A T I NG I NS T R U C T I O NS TIC Subject to change without notice Fig 107 Dimensional drawings of the LMS511 SE with mounting kits 1 and 2 Fig 108 Dimensional drawings for the LMS511 SE with mounting kits 1 2 and 3 ...

Страница 191: ...ANNEX 9 191 8017768 12AX 2019 05 31 SICK Subject to change without notice O P E R A T I N G I N S T R U C T I O N S TIC Fig 109 Dimensional drawings for the LMS511 SE with weather hood large ...

Страница 192: ... 192 8017768 12AX 2019 05 31 SICK O P E R A T I NG I NS T R U C T I O NS TIC Subject to change without notice 9 2 4 Traffic Controller dimensional drawings Fig 110 Dimensional drawing of the Traffic Controller ...

Страница 193: ...purely for the purpose of describing the relevant vehicle class The external vehicle geometry is the definitive factor when determining the classes not the effective and total permissible weight Category systems ECTN Swiss 10 TLS 8 1 TLS 5 1 TLS 2 0 ECTN output via interface Description Symbol 000 0 6 6 32 Unknown Vehicle has been detected but cannot be classified 110 2 10 1 32 Bike Motorbike or s...

Страница 194: ...face up to 12 m long weight 3 5 t 421 9 8 4 33 TruckDumpster WithTrailer Dumper truck with empty or almost empty loading surface with trailer up to 18 75 m long weight 3 5 t 430 8 3 3 33 TruckTanker Tanker for transporting liquids oval cross section up to 12 m long weight 3 5 t 431 9 8 4 33 TruckTankerWith Trailer Tanker for transporting liquids with trailer oval cross section up to 18 75 m long w...

Страница 195: ...r Tanker with semitrailer oval cross section up to 16 5 m long weight 3 5 t 540 10 9 4 33 ArticTruckLow Loaded Low loader with semitrailer up to 16 5 m long weight 3 5 t 590 8 3 3 33 TractorTruck Articulated truck without semitrailer 610 1 5 5 33 Bus Bus for transporting large numbers of people overland bus regional bus 9 seats 611 1 5 5 33 BusWithTrailer Bus for transporting large numbers of peop...

Страница 196: ...hout bicycle or moped 111 MotorcycleWithTrailer 2 MotorcycleWith Trailer Motorbike or scooter with trailer of all types 210 Automobile 3 Automobile Automobiles of all types with load on the roof with bicycle attached at the back 211 AutomobileWithTrailer 4 Automobile WithTrailer Automobiles with trailer of all types empty nearly empty loaded 320 Pick up 5 VanPickup Pick ups of all types with witho...

Страница 197: ...all types empty nearly empty loaded includes also tractor unit with trailer 510 TractorTrailerCombo 11 TractorTrailer Combo Semitrailer trucks with cubical loading in the back regardless of the shape of the cab 530 TractorTrailerCombo Tanker Semitrailer trucks transporting cylindrical loading 540 TractorTrailerCombo LowLoaded Semitrailer trucks with low loading area in the back empty nearly empty ...

Страница 198: ...thTrailer 5 Bus Bus Category system Class No Description Output via interface TLS 2 0 32 Car or similar Car 33 Truck or similar Truck Category system Class No Description Output via interface Swiss 10 0 Unknown Unknown 1 Bus car Bus 2 Motorbike Bike 3 Car Car 4 Car with trailer CarWithTrailer 5 Delivery van Van 6 Delivery van with trailer VanWithTrailer 7 Delivery van with semitrailer VanArtic 8 T...

Страница 199: ...is gives a counting accuracy of 99 8 The classification accuracy shows how many of the vehicles have been correctly classified In our example 9 800 of the 10 000 vehicles have been correctly classified The system s classification accuracy amounts to 98 The classification rate for trucks is higher than for cars Trucks 4 910 of 5 000 vehicles were correctly classified 98 2 Cars 4 890 of 5 000 vehicl...

Страница 200: ...ew advanced parameters View expert parameters Manage users Edit configuration Load and start configuration Production Production Program internal user Can neither be edited nor deleted Developer Developer Program internal user Can neither be edited nor deleted Tab 36 User and authorizations TEMS Manager Change AuthorizedClient and Service default passwords straight after initial login to protect T...

Страница 201: ... on the Edit icon in the user line 5 Define the new password in the Change password area The new password must not be identical to the previous one 6 Enter the new password again This ensures that you wish to use the spelling entered in the previous field 7 Confirm with Change password Successful adaptation of the password is confirmed 8 Return to the list of users using the arrow icon A password ...

Страница 202: ...Service authorization 2 Open user management 3 Click on Create user 4 Enter user name The user name is case sensitive Note upper lowercase letters 5 Assign the user one of the three authorizations 6 As an option you can limit the log in time of the user 7 Assign password 8 Complete with Save The list of standard users is extended to include the newly created user Note ...

Страница 203: ...e Settings register select the User management function 2 Enter new password and confirm by entering it again 3 Click on Change password 9 5 5 User data for accessing the FTP server of the Traffic Controller The application processing unit features an integrated FTP server for downloading vehicle data and log files via FTP This FTP server is accessed by entering set user data User name Client Pass...

Страница 204: ... line cmd exe or in Powershell Using TEMS Manager Command Line the following functionality is available 1 Connection to a TEMS Recorder instance Using IP Address Host Name and optionally port number Using the serial number of the TEMS Recorder 2 Uploading a site configuration in temsXml format 3 Downloading current site configuration in temsXml format 4 Downloading TEMS Recorder configuration in t...

Страница 205: ... directory of the TEMS Manager software default installation path C Program Files SICK TEMS Manager In 64 bit systems the path will look as follows C Program Files x86 SICK TEMS Manager 2 In order to see the available commands in the help screen type Ectn Tems TemsManagerCmd exe 3 For example in order to connect to a TEMS Recorder with serial number 91234567 you can use Ectn Tems TemsManagerCmd ex...

Страница 206: ...ell TEMS Manager Command Line can be used from Powershell for more advanced scripting Scripting with Powershell is the preferred way to manage multiple TEMS Recorder systems For example it is possible to collect the state of all reachable TEMS Recorders change IP addresses change NTP servers or update the TEMS Recorders to a specific version ...

Страница 207: ...fied error occurred Details are printed to the console output 1 AbortedByUser Most long running operations may be canceled by the user using the ESC key 2 Description Parameters Optional Connect through IP address 127 0 0 1 port 1234 Connect through serial no discover 12345678 Provide password password servicelevel userlevel Service Get status state D State temsXml Get configuration config D Recor...

Страница 208: ... The discovery couldn t find a TEMS Recorder with the indicated serial number 8 Multiple Results The discovery found more than one TEMS Recorder with the same serial number 9 Provide Password Ectn Tems TemsManagerCmd exe connection info password password userlevel userlevel Example Ectn Tems TemsManagerCmd exe connection info password client userlevel AuthorizedClient All commands that change the ...

Страница 209: ...me LMS Value OK Health Good DeviceState DeviceState RoadState PluginState Name Ectn Tems TemsRecorderPluginCsv PluginTypeLogicCsv Name IsOnline true IsOnline PluginState PluginState Name Ectn Tems TemsRecorderPluginDiskStorage PluginTypeLogicDiskStorage Name IsOnline true IsOnline PluginState TemsInfoClientCount 0 TemsInfoClientCount RecorderTime 2013 05 27T22 30 34 7176626Z RecorderTime NtpClient...

Страница 210: ... ExternalSubnetMask ExternalGateway ExternalDnsServers DevicesIpAddress 192 168 20 200 DevicesIpAddress DevicesSubnetMask 255 255 255 0 DevicesSubnetMask DevicesGateway NtpServers ch pool ntp org NtpServers ProcessingPoints 8 ProcessingPoints NtpStatusUpdateFrequency 30 NtpStatusUpdateFrequency NtpStatusUpdatePeerMandatory true NtpStatusUpdatePeerMandatory NtpStatusUpdateOffsetLimit 0 NtpStatusUpd...

Страница 211: ...ing 0 Input Read Failure The site configuration file did not exist or couldn t be accessed 40 Load Failure TEMS Recorder rejected the site configuration for some reason More details in the error console 41 Start Last Site Configuration Ectn Tems TemsManagerCmd exe connection info start timeout 300 Restarts a site configuration that was previously stopped Parameters Arguments Default Start Required...

Страница 212: ...th an OEM Image Parameters Arguments Default Serial 8 digit serial number of the TEMS Recorder usually the serial number of the IPC Required Timeout Number of seconds to wait for the completion of this operation 300 Name Description ERRORLEVEL success The serial number change was successfully applied 0 Connection Failure Timeout network interruption 80 Argument Failure The serial number wasn t in ...

Страница 213: ...ameters Arguments Default IP New IP v4 address of the TEMS Recorder Required Mask Subnet mask of the TEMS Recorder Default Subnet Mask for IP address Gateway IP address of the default gateway No gateway Dns Comma separated list of IP addresses of DNS servers No DNS servers Timeout Number of seconds to wait for the completion of this operation 300 Name Description ERRORLEVEL success The IP configur...

Страница 214: ... the process failed More details in the error console 113 Set DHCP IP Configuration Ectn Tems TemsManagerCmd exe connection info ipauto Ectn Tems TemsManagerCmd exe connection info ip Changes the IP configuration to DHCP on the TEMS Recorder Parameters Arguments Description Default IP Through TCP Required IPAUTO Through UDP Required Name Description ERRORLEVEL success The IP configuration was succ...

Страница 215: ...with international directives and regulations batteries accumulators and electrical or electronic devices must not be disposed of with household waste The owner is obligated to dispose of the devices at the end of their service life via the appropriate public disposal points This symbol on the product packaging or in this document indicates that a product is covered by these provisions The followi...

Страница 216: ... Mail support sick jp Malaysia Phone 6 03 8080 7425 E Mail enquiry my sick com Mexico Phone 52 472 748 9451 E Mail mario garcia sick com Netherlands Phone 31 30 2044 000 E Mail info sick nl New Zealand Phone 64 9 415 0459 0800 222 278 tollfree E Mail sales sick co nz Norway Phone 47 67 81 50 00 E Mail sick sick no Poland Phone 48 22 539 41 00 E Mail info sick pl Romania Phone 40 356 171 120 E Mail...

Отзывы: