68
7.1.5 Setting the Date and Time
Setting Items
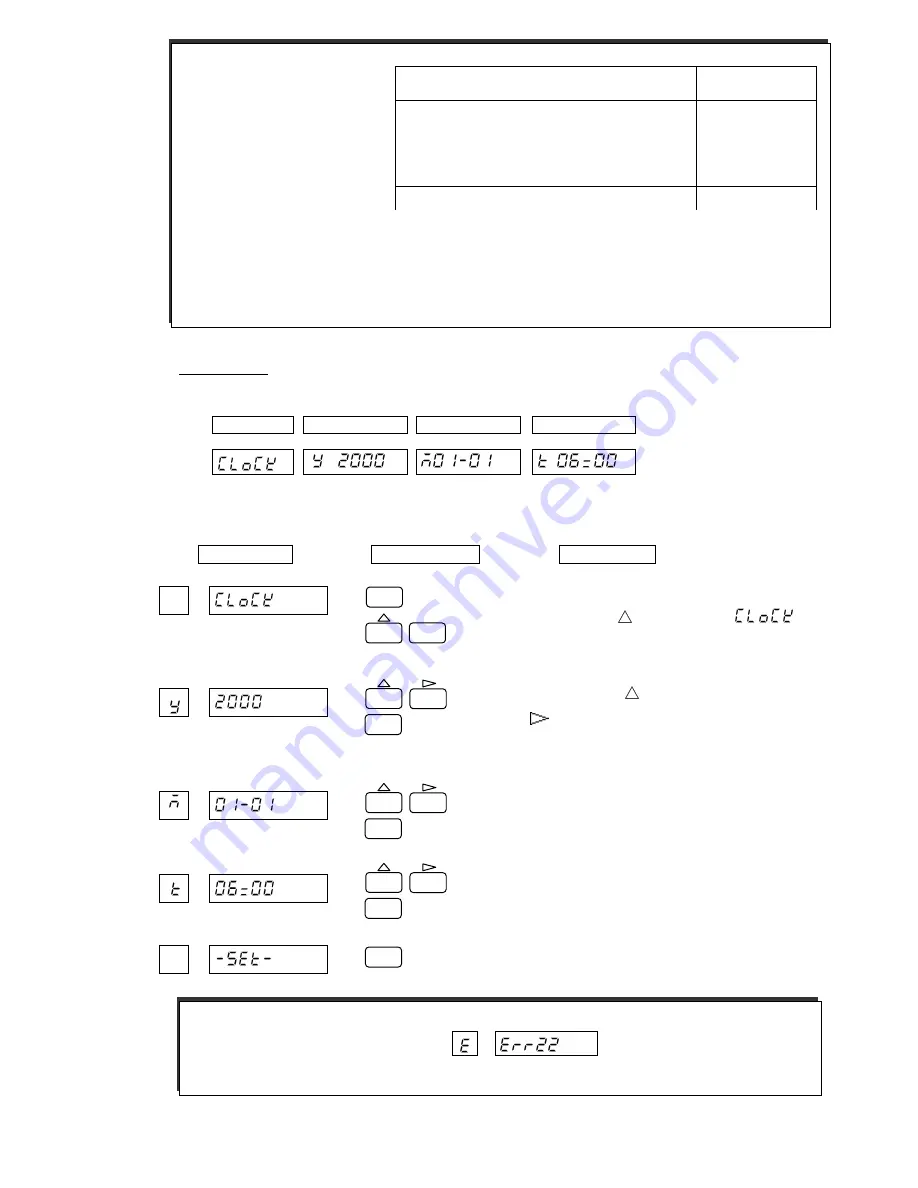
The following describes how to set the date/time of the internal clock.
Example: When setting the date and time to January 1st, 2000, 6:00.
Press the “MENU” key for 3 seconds or longer to enter
setup mode. Use the
key to display "
", and
press the “ENT” key.
Set the year. Use the
key to select a numeral, and
use the
key to shift a digit.
Press the “ENT” key.
Set the month and day.
Follow the same process as above.
Set the time (Hour:Minute).
Follow the same process as above.
Press the “ENT” key. To return to user mode, press the
“MENU” key for 3 seconds or longer.
Time
Setting
Year
Month, Day
[
Note
]
Restriction of printing
by chart feed speed:
When the chart feed speed is 0 mm/h, it is printed with forcible chart feed. (When the chart speed is
higher than 120 mm/h, the Table shown above is not printed.) List Printing, Engineering List Printing,
Manual Printing (key), DI Comment printing (Asynchronous), DI Date/Time printing (Asynchronous), DI
Manual printing (Asynchronous), Logging printing (Asynchronous) and Recording Start/Stop printing
(Asynchronous) are printed regardless of the chart feed speed.
Printing type
Chart speed
(mm/h)
Alarm occurrence printing, Alarm recovery
printing, Affix printing, DI Comment printing
(Synchronous), DI Date/Time printing
(Synchronous), DI Manual printing (Synchronous),
Recording Start printing (Synchronous)
5 to 100 (mm/h)
Logging printing (Synchronous)
10 to 100 (mm/h)
[Note]
If a non-existent date or time is entered,
is displayed.
Press the “ENT” key and re-enter a correct numeral.
MENU
ESC
3 sec
ENT
FEED
ENT
ENT
FEED
ENT
FEED
ENT
Display
Operation Keys
Description
Содержание HR-700
Страница 1: ...HYBRID RECORDER HR 700 PEN WRITING INSTRUCTION MANUAL ...
Страница 122: ...121 ...
Страница 123: ...122 ...


