background image

n

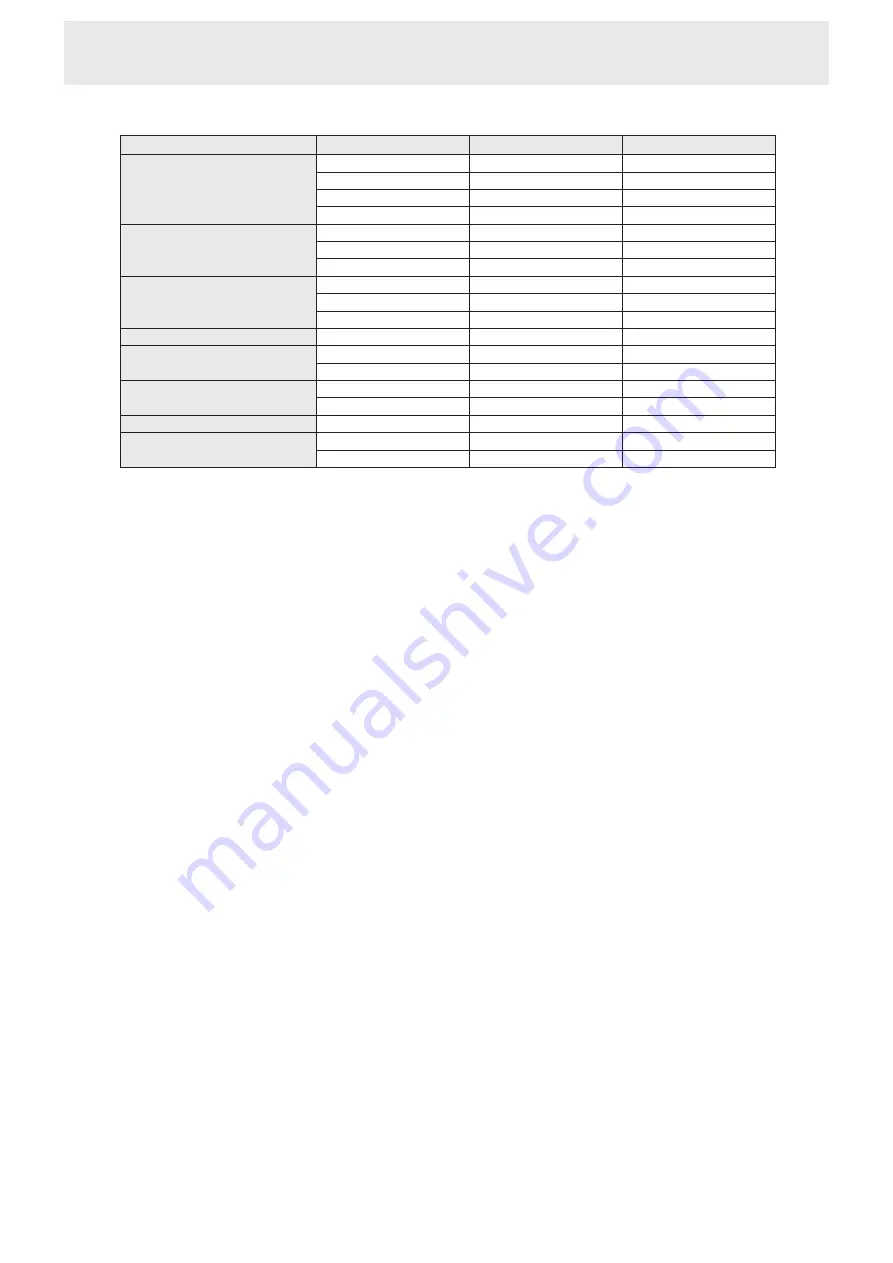
Compatible signal timing (AV)

Screen resolution

Frequency

HDMI

Component

1920 × 1080p

24Hz

Yes

-

50Hz

Yes

Yes

59.94Hz

Yes

Yes

60Hz

Yes

Yes

1920 × 1080i

50Hz

Yes

Yes

59.94Hz

Yes

Yes

60Hz

Yes

Yes

1280 × 720p

50Hz

Yes

Yes

59.94Hz

Yes

Yes

60Hz

Yes

Yes

720 × 576p

50Hz

Yes*

1

-

720 × 480p

59.94Hz

Yes*

1

-

60Hz

Yes*

1

-

640 × 480p(VGA)

59.94Hz

Yes*

*

2

-

60Hz

Yes*

*

2

-

720(1440) × 576i

50Hz

Yes

-

720(1440) × 480i

59.94Hz

Yes

-

60Hz

Yes

-

*1 When using this signal, use the remote control to operate the monitor. Operation using the buttons on the monitor is not possible.
*2 Settings other than Dot by Dot/UNDERSCAN will result in partial display.

Specifications

Содержание PN-C603D

Страница 1: ...PN C703B PN C603D LCD MONITOR USER MANUAL ...

Страница 2: ...ORTANT To aid reporting in case of loss or theft please record the product s model and serial numbers in the space provided The numbers are located in the rear of the product Model No Serial No U S A ONLY ...

Страница 3: ...ctions in the literature accompanying the product WARNING FCC Regulations state that any unauthorized changes or modifications to this equipment not expressly approved by the manufacturer could void the user s authority to operate this equipment NOTE This equipment has been tested and found to comply with the limits for Class A digital device pursuant to Part 15 of the FCC Rules These limits are d...

Страница 4: ...vent people from stepping on them or objects from resting on them 10 The screen used in this product is made of glass Therefore it can break when the product is dropped or applied with impact Be careful not to be injured by broken glass pieces in case the screen breaks 11 Overloading Do not overload AC outlets or extension cords Overloading can cause fire or electric shock 12 Entering of objects a...

Страница 5: ... radio interference in which case the user may be required to take adequate measures 2 Batteries shall not be exposed to excessive heat such as sunshine fir or the like 3 To prevent injury this apparatus must be securely attached to the floor wal in accordance with the installation instructions 4 An apparatus with CLASS I construction shall be connected to a MAIN socket outlet with a protective ea...

Страница 6: ...lectrician for replacement of the obsolete outlet 10 Protect the power cord from being walked on or pinched particularly at plugs convenience receptacles and the point where they exit from the apparatus 11 Only use attachments accessories specified by the manufacture 12 Use only with the cart stand tripod bracket or table specified by the manufacture or sold with the apparatus When a cart is used ...

Страница 7: ...evice during touch panel input Input may not take place correctly If the infrared transmitter receiver becomes dirty malfunctioning may result Use a soft cloth to gently wipe dirt off the infrared transmitter receiver If dust accumulates inside the infrared transmitter receiver the product cannot transmit or receive infrared rays properly resulting in a malfunction To clean the dust accumulated in...

Страница 8: ...d at an ambient temperature between 41 F 5 C and 95 F 35 C Provide enough space around the monitor to prevent heat from accumulating inside 7 7 8 20 Unit inch cm 2 5 2 5 2 5 2 3 16 5 5 If it is difficult to provide sufficient space for any reaso such as the installation of the monitor inside a housing or if the ambient temperature may be outside of the range of 41 F 5 C to 95 F 35 C install a fan ...

Страница 9: ...n Off 17 Turning power on off 17 Touch action 18 Touch action 18 Touch Pen 20 Other functions 20 Cautionary points 20 Eraser 20 Basic Operation 21 Using the buttons on the remote control unit and monitor 21 Menu Items 23 Displaying the menu screen 23 Menu item details 24 Adjustments for PC screen display 27 Functional Restriction Setting FUNCTION 28 Controlling the Monitor with a PC RS 232C 29 PC ...

Страница 10: ...ch panel the monitor must be connected to a computer using a USB cable The touch panel operates with the standard Window driver Liquid Crystal Display Monitor 1 Remote control unit 1 Remote control unit battery R 6 AA size 2 CD ROM Utility Disk 1 CD ROM Touch Display Link 1 Touch Display Link License 1 Setup Manual 1 Touch pen 1 Tray 1 Tray mounting screws M3 5 Eraser 1 Cable clamp affixing type S...

Страница 11: ...e for touch panel See page 13 14 HDMI3 input terminal INPUT3 See page 13 15 HDMI2 input terminal INPUT2 See page 13 16 HDMI1 input terminal INPUT1 See page 13 17 Audio input terminal for INPUT2 INPUT6 See page 13 18 Audio input terminal for INPUT4 See page 13 19 AV component input terminals INPUT4 See page 13 20 AV video input terminal INPUT5 See page 13 21 Audio input terminal for INPUT5 See page...

Страница 12: ...utton See page 17 3 MUTE button See page 21 4 VOL buttons See page 21 Cursor control buttons 5 DISPLAY F1 button See page 21 6 MODE F2 button See page 21 7 INPUT button See page 21 8 MENU button See page 21 9 ENTER button See page 21 10 RETURN button See page 21 11 SIZE F3 button See page 21 ...

Страница 13: ...played through this monitor by connecting the playback device to the monitor s audio input and connecting the monitor s audio output to the speakers or other devices 1 HDMI1 input terminal INPUT1 2 HDMI2 input terminal INPUT2 3 HDMI3 input terminal INPUT3 Use a commercially available HDMI cable conforming to the HDMI standard To input only video by HDMI and input audio by analog connect to the HDM...

Страница 14: ...lug the power cord supplied into the AC input terminal 2 Plug the power cord supplied into the AC power outlet TIPS Be sure to clamp the power cord supplied using the supplied cable clamp See page 15 nPN C603D Caution When all connections are complete connect the power cord 1 Power cord Supplied For power outlet 2 AC input terminal For power outlet Power cord ...

Страница 15: ...ion Covers Binding Cables After installing the monitor affix the stand hole protectio covers 1 Peel off the backing sheet and affix the cover on the monitor Be sure to clamp the USB cable and the supplied power cord PN C703B only using the supplied cable clamp When clamping the power cord take care not to stress the terminal of the power cord Do not bend the power cord excessively The cable clamp ...

Страница 16: ...x 16 4 feet 5 m at an angle of approx 10 from the center to the top bottom right left of the remote control sensor 10 10 10 10 Remote control sensor 16 4 feet 5 m TIPS Do not expose the remote control unit to shock by dropping or stepping on it This could lead to a malfunction Do not expose the remote control unit to liquids and do not place it in an area with high humidity The remote control unit...

Страница 17: ...off Green lit Power on Red lit Standby mode 2 Turn the power on and off with the POWER button on the remote control Point the remote control unit toward the remote control sensor see page 16 on the monitor and press the POWER button TIPS To turn on the power while Power LED is off press the POWER button on the side of the monitor Caution When the power is turned off and on by disconnecting and con...

Страница 18: ...nd touch in Control Panel select the checkbox For the procedures for using the touch pen in the Pen Software see the Pen Software Operation Manual nCommon finger and touch pen actions Single tap Same action as left clicking a mouse Touch with your finger touch pen Double tap Same action as double clicking a mouse Quickly touch twice with your finger touch pen When double tapping with your finge be...

Страница 19: ...our finge touch pen and then lift your finger touch pen from the screen Slide to pan With your finger touch pen touching the screen move it up and down to scroll the screen nFinger actions Zoom Use in a screen that is capable of enlargement reduction Touch the screen with two fingers and move your finger closer together to reduce the view or apart to enlarge the view Reduction Enlargement Press an...

Страница 20: ...pose other than touch panel operation Do not press hard on the pen tip Operation will not take place correctly if there is an obstacle between the infrared transmitter receiver and the touch pen or your finge Operation will not take place correctly if your fingers or your sleeve is near the screen If the touch pen is held too flat against the screen the touch position may not be correctly detected...

Страница 21: ...u screen see page 23 4 VOL Volume adjustment Cursor control When the menu is not displayed press or to display the volume menu and adjust the volume If you do not press any buttons for about 3 seconds the volume menu automatically disappears To select settings move the cursor up and down 5 Cursor control To select settings move the cursor left and right 6 ENTER Confirm the setting 7 RETURN Returns...

Страница 22: ...IDE 3 Some software may cause noise or distortion at the edges or top of the screen however this is not a failure In this event set the screen size to WIDE TIPS Using this monitor s screen size switching to compress or expand the screen for commercial or public viewing in establishments like cafes or hotels may infringe on the rights of the creators as protected by Copyright Law so please be caref...

Страница 23: ...display the menu screen PICTURE MODE ADJUST PICTURE QUALITY FINE MOTION DIGITAL NR SIZE COLOR ADJUSTMENT RESET PICTURE 2 Press or to select PICTURE 3 Press or to select ADJUST PICTURE QUALITY and press ENTER 4 Press or to select CONTRAST RETURN PC CLEAR PICTURE PROCESSING BRIGHT CONTRAST BLACK LEVEL COLORS TINT SHARPNESS 16 32 0 0 0 0 ADJUST PICTURE QUALITY 5 Press or to adjust the setting RETURN ...

Страница 24: ...icture BLACK LEVEL Adjust the brightness of the picture COLORS Adjusts the color intensity TINT Adjust skin tones Adjust to a redder tone with or a greener tone with SHARPNESS Adjusts the sharpness of the image FINE MOTION Use this when showing a picture with fast movement DIGITAL NR Noise Reduction This reduces noise on the screen to produce a clearer picture Setting a higher level reduces more n...

Страница 25: ...it to manually restore power to the monitor OFF IF NO OPERATION Determines whether or not to set the monitor to go into standby mode when there is no operation from the remote control unit or RS 232C command operations for a certain period of time 30MIN Switch to standby mode when the monitor is left idle for 30 minutes 4HR Switch to standby mode when the monitor is left idle for 4 hours DISABLE T...

Страница 26: ...d V POS are automatically adjusted using the currently input video signal Use this automatic adjustment when you use the D sub to display a computer screen for the first time or when you change the setting of the computer The automatically synchronized phase cannot be saved If phase readjustment is needed use again this automatic adjustment H POS Adjust the horizontal position of the image V POS A...

Страница 27: ... nScreen display for adjustment Before adjusting the image quality or picture display an image that brightens the entire screen If you are using a Windows PC use the adjustment pattern on the supplied CD ROM Opening the adjustment pattern The following example is performed in Windows 7 1 Load the supplied CD ROM into the computer s CD ROM drive 2 Open CD Drive in Computer 3 Double click Adj_uty ex...

Страница 28: ...remote control unit MONITOR LOCK Disables the power button on the monitor RC LOCK You can disable the remote control buttons OFF Enables operation ON 1 Disables all remote control operations ON 2 Disables all remote control operations other than POWER button turning power on off and Cursor control buttons volume adjustment MONITOR LOCK You can disable the monitor buttons other than POWER button ME...

Страница 29: ...ter string comprised of 0 9 space Example VOLM030 Be sure to input 4 characters for the parameter Pad with spaces if necessary is a return code 0DH Wrong VOLM30 Right VOLM030 The current value can be returned by using or as the parameter Example VOLM From PC to monitor How much is current volume setting 30 From monitor to PC Current volume setting 30 Wrong VOLM Right VOLM nResponse code format Whe...

Страница 30: ...NDARD A V M D 2 MOVIE A V M D 5 DYNAMIC A V M D 6 DYNAMIC FIXED A V M D 7 PC VOLUME V O L M Set the volume 0 100 When AUDIO OUTPUT is set to VARIABLE the Parameter 0 100 is supported for the setting value 100 0 SCREEN H P O S Adjust the horizontal position of the image 000 180 PC INPUT6 V P O S Adjust the vertical position of the image 000 120 PC INPUT6 C L C K Set the frequency of the sampling cl...

Страница 31: ... switch off and then back on again connecting the computer with a graphic card the resolution may change to 640 x 480 The resolution changes back to 1920 x 1080 according to the following steps Disconnect and connect the video cable Press the DETECT button when the SCREEN RESOLUTION is displayed For Windows Reboot the computer The touch panel does not respond Is the USB cable connected properly If...

Страница 32: ...If the monitor enters standby mode due to a rise in temperature to return to normal display turn the power switch off and then back on again The monitor however will enter standby mode again if the cause of the temperature rise is not eliminated See page 8 Check whether the monitor is placed at a location where a quick rise in temperature is likely Internal temperature rises quickly if the vents o...

Страница 33: ...Touch Panel Detection method Infrared blocking detection method PC connector USB 2 0 compliant x 1 Power requirement AC 100 V 240 V 2 7 A 50 60 Hz AC 100 V 120 V 2 1 A 50 60 Hz Operating temperature 2 41 F to 95 F 5 C to 35 C Operating humidity 2 20 to 80 no condensation Power consumption Maximum standby mode 3 235 W 0 5 W 180 W 0 3 W Dimensions excluding protrusions inch mm Approx 64 5 16 W x 4 5...

Страница 34: ...7 8 200 9 1 16 230 6 11 16 170 Unit inch mm Unit inch mm PN C703B PN C603D When mounting the monitor be sure to use a wall mount bracket that complies with the VESA compatible mounting method SHARP recommends using M6 screws and tighten the screws Note that screw hole depth of the monitor is 3 8 inch 10 mm Loose mounting may cause the product to fall resulting in serious personal injuries as well ...

Страница 35: ...2Hz 75Hz 56Hz 60Hz 72Hz 75Hz 60Hz 60Hz 70Hz 75Hz 75Hz 60Hz 75Hz 60Hz 60Hz 60Hz 75Hz 60Hz 60Hz 60Hz 60Hz 60Hz 60Hz 70Hz 60Hz 70Hz 25 175MHz 31 5MHz 31 5MHz 36 0MHz 40 0MHz 50 0MHz 49 5MHz 33 75MHz 65 0MHz 75 0MHz 78 75MHz 108 0MHz 79 5MHz 102 25MHz 83 5MHz 108 0MHz 108 0MHz 135 0MHz 85 5MHz 121 75MHz 162 0MHz 154 0MHz 74 4MHz 148 5MHz 28 3MHz 64 13MHz 74 25MHz Analog D sub Yes Yes Yes Yes Yes Yes Y...

Страница 36: ...Yes Yes 59 94Hz Yes Yes 60Hz Yes Yes 720 576p 50Hz Yes 1 720 480p 59 94Hz Yes 1 60Hz Yes 1 640 480p VGA 59 94Hz Yes 1 2 60Hz Yes 1 2 720 1440 576i 50Hz Yes 720 1440 480i 59 94Hz Yes 60Hz Yes 1 When using this signal use the remote control to operate the monitor Operation using the buttons on the monitor is not possible 2 Settings other than Dot by Dot UNDERSCAN will result in partial display Speci...

Страница 37: ...al 14 Vsync signal input 7 GND for green video signal 15 DDC clock 8 GND for blue video signal nHDMI input terminal pins HDMITM Connector No Function No Function 1 TMDS data 2 11 TMDS clock shield 2 TMDS data 2 shield 12 TMDS clock 3 TMDS data 2 13 CEC 4 TMDS data 1 14 N C 5 TMDS data 1 shield 15 SCL 6 TMDS data 1 16 SDA 7 TMDS data 0 17 DDC CEC GND 8 TMDS data 0 shield 18 5V 9 TMDS data 0 19 Hot ...

Страница 38: ...times or more the weight of the monitor Install by the most suitable method for the material and the structure To attach a VESA compliant mounting bracket use M6 screws that are 5 16 inch 8 mm to 3 8 inch 10 mm longer than the thickness of the mounting bracket Screws M6 Bracket The monitor mounting 5 16 3 8 inch 8 10 mm Do not use an impact driver After mounting please carefully ensure the monitor...

Страница 39: ...PN C703B LCD MONITOR OPERATION MANUAL ...

Страница 40: ...ORTANT To aid reporting in case of loss or theft please record the product s model and serial numbers in the space provided The numbers are located in the rear of the product Model No Serial No U S A ONLY ...

Страница 41: ...ions in the literature accompanying the product WARNING FCC Regulations state that any unauthorized changes or modifications to this equipment not expressly approved by the manufacturer could void the user s authority to operate this equipment NOTE This equipment has been tested and found to comply with the limits for Class A digital device pursuant to Part 15 of the FCC Rules These limits are des...

Страница 42: ...nt people from stepping on them or objects from resting on them 10 The screen used in this product is made of glass Therefore it can break when the product is dropped or applied with impact Be careful not to be injured by broken glass pieces in case the screen breaks 11 Overloading Do not overload AC outlets or extension cords Overloading can cause fire or electric shock 12 Entering of objects and...

Страница 43: ...t In a domestic environment this product may cause radio interference in which case the user may be required to take adequate measures 2 Batteries shall not be exposed to excessive heat such as sunshine fire or the like 3 To prevent injury this apparatus must be securely attached to the floor wall in accordance with the installation instructions 4 An apparatus with CLASS I construction shall be co...

Страница 44: ...ectrician for replacement of th obsolete outlet 10 Protect the power cord from being walked on or pinched particularly at plugs convenience receptacles and the point where they exit from the apparatus 11 Only use attachments accessories specified by the manufacture 12 Use only with the cart stand tripod bracket or table specified by the manufacture or sold with the apparatus When a cart is used us...

Страница 45: ... is connected do not operate the USB device during touch panel input Input may not take place correctly If the infrared transmitter receiver becomes dirty malfunctioning may result Use a soft cloth to gently wipe dirt off the infrared transmitter receiver If dust accumulates inside the infrared transmitter receiver the product cannot transmit or receive infrared rays properly resulting in a malfun...

Страница 46: ...at an ambient temperature between 41 F 5 C and 95 F 35 C Provide enough space around the monitor to prevent heat from accumulating inside 7 7 8 20 Unit inch cm 2 5 2 5 2 5 2 3 16 5 5 If it is difficult to provide sufficient space for any reas such as the installation of the monitor inside a housing or if the ambient temperature may be outside of the range of 41 F 5 C to 95 F 35 C install a fan or ...

Страница 47: ... touch panel the monitor must be connected to a computer using a USB cable The touch panel operates with the standard Window driver Liquid Crystal Display Monitor 1 Power cord 1 Remote control unit 1 Remote control unit battery R 6 AA size 2 CD ROM Utility Disk 1 CD ROM Touch Display Link 1 Touch Display Link License 1 Setup Manual 1 Touch pen 1 Tray 1 Tray mounting screws M3 5 Eraser 1 Cable clam...

Страница 48: ... 13 HDMI3 input terminal INPUT3 See page 13 14 HDMI2 input terminal INPUT2 See page 13 15 HDMI1 input terminal INPUT1 See page 13 4 Infrared transmitter receiver 5 Tray See page 38 16 Audio input terminal for INPUT2 INPUT6 See page 13 17 Audio input terminal for INPUT4 See page 13 18 AV component input terminals INPUT4 See page 13 19 AV video input terminal INPUT5 See page 13 20 Audio input termin...

Страница 49: ...ton See page 17 3 MUTE button See page 21 4 VOL buttons See page 21 Cursor control buttons 5 DISPLAY F1 button See page 21 6 MODE F2 button See page 21 7 INPUT button See page 21 8 MENU button See page 21 9 ENTER button See page 21 10 RETURN button See page 21 11 SIZE F3 button See page 21 ...

Страница 50: ...yed through this monitor by connecting the playback device to the monitor s audio input and connecting the monitor s audio output to the speakers or other devices 1 HDMI1 input terminal INPUT1 2 HDMI2 input terminal INPUT2 3 HDMI3 input terminal INPUT3 Use a commercially available HDMI cable conforming to the HDMI standard To input only video by HDMI and input audio by analog connect to the HDMI2 ...

Страница 51: ...nect the power cord 1 Plug the power cord supplied into the AC input terminal 2 Plug the power cord supplied into the AC power outlet TIPS Be sure to clamp the power cord supplied using the supplied cable clamp 1 Power cord Supplied For power outlet 2 AC input terminal Be sure to clamp the power cord supplied and the USB cable using the supplied cable clamp When clamping the power cord take care n...

Страница 52: ...Affixing the Stand Hole Protection Covers After installing the monitor affix the stand hole protectio covers 1 Peel off the backing sheet and affix the cover on the monitor ...

Страница 53: ...6 4 feet 5 m at an angle of approx 10 from the center to the top bottom right left of the remote control sensor 10 10 10 10 Remote control sensor 16 4 feet 5 m TIPS Do not expose the remote control unit to shock by dropping or stepping on it This could lead to a malfunction Do not expose the remote control unit to liquids and do not place it in an area with high humidity The remote control unit ma...

Страница 54: ... Green lit Power on Red lit Standby mode 2 Turn the power on and off with the POWER button on the remote control Point the remote control unit toward the remote control sensor see page 16 on the monitor and press the POWER button TIPS To turn on the power while Power LED is off press the POWER button on the side of the monitor Caution When the power is turned off and on by disconnecting and connec...

Страница 55: ... touch in Control Panel select the checkbox For the procedures for using the touch pen in the Pen Software see the Pen Software Operation Manual nCommon finger and touch pen actions Single tap Same action as left clicking a mouse Touch with your finger touch pen Double tap Same action as double clicking a mouse Quickly touch twice with your finger touch pen When double tapping with your finge be s...

Страница 56: ... finge touch pen and then lift your finger touch pen from the screen Slide to pan With your finger touch pen touching the screen move it up and down to scroll the screen nFinger actions Zoom Use in a screen that is capable of enlargement reduction Touch the screen with two fingers and move your finger closer together to reduce the view or apart to enlarge the view Reduction Enlargement Press and t...

Страница 57: ...se other than touch panel operation Do not press hard on the pen tip Operation will not take place correctly if there is an obstacle between the infrared transmitter receiver and the touch pen or your finge Operation will not take place correctly if your fingers or your sleeve is near the screen If the touch pen is held too flat against the screen th touch position may not be correctly detected If...

Страница 58: ...U Displays and turns off the menu screen see page 23 4 VOL Volume adjustment Cursor control When the menu is not displayed press or to display the volume menu and adjust the volume If you do not press any buttons for about 3 seconds the volume menu automatically disappears To select settings move the cursor up and down 5 Cursor control To select settings move the cursor left and right 6 ENTER Conf...

Страница 59: ... 3 Some software may cause noise or distortion at the edges or top of the screen however this is not a failure In this event set the screen size to WIDE TIPS Using this monitor s screen size switching to compress or expand the screen for commercial or public viewing in establishments like cafes or hotels may infringe on the rights of the creators as protected by Copyright Law so please be careful ...

Страница 60: ...play the menu screen PICTURE MODE ADJUST PICTURE QUALITY FINE MOTION DIGITAL NR SIZE COLOR ADJUSTMENT RESET PICTURE 2 Press or to select PICTURE 3 Press or to select ADJUST PICTURE QUALITY and press ENTER 4 Press or to select CONTRAST RETURN PC CLEAR PICTURE PROCESSING BRIGHT CONTRAST BLACK LEVEL COLORS TINT SHARPNESS 16 32 0 0 0 0 ADJUST PICTURE QUALITY 5 Press or to adjust the setting RETURN PC ...

Страница 61: ...ure BLACK LEVEL Adjust the brightness of the picture COLORS Adjusts the color intensity TINT Adjust skin tones Adjust to a redder tone with or a greener tone with SHARPNESS Adjusts the sharpness of the image FINE MOTION Use this when showing a picture with fast movement DIGITAL NR Noise Reduction This reduces noise on the screen to produce a clearer picture Setting a higher level reduces more nois...

Страница 62: ...to manually restore power to the monitor OFF IF NO OPERATION Determines whether or not to set the monitor to go into standby mode when there is no operation from the remote control unit or RS 232C command operations for a certain period of time 30MIN Switch to standby mode when the monitor is left idle for 30 minutes 4HR Switch to standby mode when the monitor is left idle for 4 hours DISABLE This...

Страница 63: ... POS are automatically adjusted using the currently input video signal Use this automatic adjustment when you use the D sub to display a computer screen for the first time or when you change the setting of the computer The automatically synchronized phase cannot be saved If phase readjustment is needed use again this automatic adjustment H POS Adjust the horizontal position of the image V POS Adju...

Страница 64: ...Screen display for adjustment Before adjusting the image quality or picture display an image that brightens the entire screen If you are using a Windows PC use the adjustment pattern on the supplied CD ROM Opening the adjustment pattern The following example is performed in Windows 7 1 Load the supplied CD ROM into the computer s CD ROM drive 2 Open CD Drive in Computer 3 Double click Adj_uty exe ...

Страница 65: ...ote control unit MONITOR LOCK Disables the power button on the monitor RC LOCK You can disable the remote control buttons OFF Enables operation ON 1 Disables all remote control operations ON 2 Disables all remote control operations other than POWER button turning power on off and Cursor control buttons volume adjustment MONITOR LOCK You can disable the monitor buttons other than POWER button MENU ...

Страница 66: ... string comprised of 0 9 space Example VOLM030 Be sure to input 4 characters for the parameter Pad with spaces if necessary is a return code 0DH Wrong VOLM30 Right VOLM030 The current value can be returned by using or as the parameter Example VOLM From PC to monitor How much is current volume setting 30 From monitor to PC Current volume setting 30 Wrong VOLM Right VOLM nResponse code format When a...

Страница 67: ...NAMIC A V M D 6 DYNAMIC FIXED A V M D 7 PC VOLUME V O L M Set the volume 0 100 When AUDIO OUTPUT is set to VARIABLE the Parameter 0 100 is supported for the setting value 100 0 SCREEN H P O S Adjust the horizontal position of the image 000 180 PC INPUT6 V P O S Adjust the vertical position of the image 000 120 PC INPUT6 C L C K Set the frequency of the sampling clock of the picture 000 180 PC INPU...

Страница 68: ...itch off and then back on again connecting the computer with a graphic card the resolution may change to 640 x 480 The resolution changes back to 1920 x 1080 according to the following steps Disconnect and connect the video cable Press the DETECT button when the SCREEN RESOLUTION is displayed For Windows Reboot the computer The touch panel does not respond Is the USB cable connected properly If yo...

Страница 69: ...the monitor enters standby mode due to a rise in temperature to return to normal display turn the power switch off and then back on again The monitor however will enter standby mode again if the cause of the temperature rise is not eliminated See page 8 Check whether the monitor is placed at a location where a quick rise in temperature is likely Internal temperature rises quickly if the vents on t...

Страница 70: ...0 W 10 W 6 Ω Touch Panel Detection method Infrared blocking detection method PC connector USB 2 0 compliant x 1 Power requirement AC 100 V 240 V 2 7 A 50 60 Hz Operating temperature 2 41 F to 95 F 5 C to 35 C Operating humidity 2 20 to 80 no condensation Power consumption Maximum standby mode 3 235 W 0 5 W Dimensions excluding protrusions inch mm Approx 64 5 16 W x 4 5 16 D x 39 1 8 H 1633 x 109 x...

Страница 71: ... use a wall mount bracket that complies with the VESA compatible mounting method SHARP recommends using M6 screws and tighten the screws Note that screw hole depth of the monitor is 3 8 inch 10 mm Loose mounting may cause the product to fall resulting in serious personal injuries as well as damage to the product The screw and hole should come together with over 5 16 inch 8 mm length of thread Use ...

Страница 72: ... 75Hz 56Hz 60Hz 72Hz 75Hz 60Hz 60Hz 70Hz 75Hz 75Hz 60Hz 75Hz 60Hz 60Hz 60Hz 75Hz 60Hz 60Hz 60Hz 60Hz 60Hz 60Hz 70Hz 60Hz 70Hz 25 175MHz 31 5MHz 31 5MHz 36 0MHz 40 0MHz 50 0MHz 49 5MHz 33 75MHz 65 0MHz 75 0MHz 78 75MHz 108 0MHz 79 5MHz 102 25MHz 83 5MHz 108 0MHz 108 0MHz 135 0MHz 85 5MHz 121 75MHz 162 0MHz 154 0MHz 74 4MHz 148 5MHz 28 3MHz 64 13MHz 74 25MHz Analog D sub Yes Yes Yes Yes Yes Yes Yes ...

Страница 73: ... Yes 59 94Hz Yes Yes 60Hz Yes Yes 720 576p 50Hz Yes 1 720 480p 59 94Hz Yes 1 60Hz Yes 1 640 480p VGA 59 94Hz Yes 1 2 60Hz Yes 1 2 720 1440 576i 50Hz Yes 720 1440 480i 59 94Hz Yes 60Hz Yes 1 When using this signal use the remote control to operate the monitor Operation using the buttons on the monitor is not possible 2 Settings other than Dot by Dot UNDERSCAN will result in partial display Specific...

Страница 74: ...14 Vsync signal input 7 GND for green video signal 15 DDC clock 8 GND for blue video signal nHDMI input terminal pins HDMITM Connector No Function No Function 1 TMDS data 2 11 TMDS clock shield 2 TMDS data 2 shield 12 TMDS clock 3 TMDS data 2 13 CEC 4 TMDS data 1 14 N C 5 TMDS data 1 shield 15 SCL 6 TMDS data 1 16 SDA 7 TMDS data 0 17 DDC CEC GND 8 TMDS data 0 shield 18 5V 9 TMDS data 0 19 Hot plu...

Страница 75: ...mes or more the weight of the monitor Install by the most suitable method for the material and the structure To attach a VESA compliant mounting bracket use M6 screws that are 5 16 inch 8 mm to 3 8 inch 10 mm longer than the thickness of the mounting bracket Screws M6 Bracket The monitor mounting 5 16 3 8 inch 8 10 mm Do not use an impact driver After mounting please carefully ensure the monitor i...

Страница 76: ... PN L602B PN L603A PN 60TA3 PN L603B PN 60TB3 PN L702B PN L703A PN 70TA3 PN L703B PN 70TB3 PN C series PN C703B PN 70SC3 LL S series LL S201A LL S242A LL P series LL P202V PN K series PN K322B PN K322BH PN ZL01 PN ZL02 Preinstalled The models that will become successively compatible Schedule not fixed yet are as belo PN L series PN L802B ...

Страница 77: ...rPoint Excel and Internet Explorer are either registered trademarks or trademarks of Microsoft Corporation in the United States and or other countries Intel Celeron and Intel Core 2 Duo are trademarks or registered trademarks of Intel Corporation or its subsidiaries in the U S A and other countries AMD AMD Sempron AMD Athlon and combinations thereof are trademarks of Advanced Micro Devices Inc Nam...

Страница 78: ...ows Vista 32 bit or 64 bit version Windows 7 32 bit or 64 bit version Windows 8 32 bit or 64 bit version Windows 8 1 32 bit or 64 bit version CPU Intel Celeron or AMD Sempron 1 6 GHz or faster Intel Core 2 Duo or AMD Athlon II X2 2 8 GHz or faster recommended Memory At least 2 GB Free space on hard drive At least 200 MB free space separately required for data storage ...

Страница 79: ...a appears when the software is launched If the text zoom percentage is changed to other than 100 parts of this software may not display correctly Whiteboard mode You can use the screen as a whiteboard Up to 4 boards can be opened Board list Starting whiteboard mode Follow the steps below to start the software On the desktop touch the Pen Software shortcut icon twice quickly or double click the ico...

Страница 80: ...ormat twice quickly or double click the fil In Windows 8 8 1 launching is also possible from the Start screen and the Apps screen n Lite version To launch whiteboard mode of this software touch Whiteboard in the launcher screen TIPS The overlay board cannot be used with the lite version Only 1 whiteboard can be used with the lite version Exiting the software Touch the Quit button on the toolbar Wh...

Страница 81: ...he menu is displayed select the unpin setting 3 Sheet list Touch this tab to display the list of sheets shown as thumbnail images Page 21 4 Settings Displays the pen software settings screen Page 47 5 Search box You can search for text and handwritten characters in the box Page 28 6 Sheet navigation buttons Page No Touch the sheet navigation button to change the displayed sheet Page 19 The number ...

Страница 82: ...uch the indicator to display the square menu TIPS The illustration displayed in the indicator varies depending on the function used The square menu has 2 sides To change the menu touch the button under the icon or touch the blank center of the square menu When a place other than the menu is touched the menu disappears and the indicator is displayed TIPS The square menu and indicator can be moved b...

Страница 83: ...ppears when a fixed time elapses after the touch pen is moved away from the menu Page 7 When the toolbar is hidden the show toolbar icon or appears Touch the show toolbar icon to show the toolbar TIPS The menu icon types that appear by default are the same as in the square menu and floating menu In classic menu 1 menu is used for the settings even when using multiple pens When using multiple pens ...

Страница 84: ... original state pinned Touch to change the tool bar to horizontal display The tool bar changes between vertical and horizontal display each time this is touched TIPS The menu icon types that appear by default are the same as in the square menu and classic menu In floating menu 1 menu is used for the settings even when using multiple pens When using multiple pens the line colo and thickness are the...

Страница 85: ... Page Drawing Object Draw a figure or line arro 26 Paste Pastes a copied object 34 Open Open a file 18 Text Enter text 28 Insert Image The Insert an image file or Screen Capture selection screen appears 29 Save The Save as a new file Save to the same file Save PDF and Save image selection screen appears 17 All Functions Displays all functions in list view From the list you can select functions to ...

Страница 86: ...to Pen 3 Handwriting 23 6 Eraser Erase hand drawn lines 25 7 Drawing Object Draw a figure or line arro 26 8 Text Enter text 28 9 Insert Image The Insert an image file or Screen Capture 1 selection screen appears 29 10 Paste Pastes a copied object 34 11 Undo Cancel the immediately preceding operation 36 12 Redo Redo the immediately preceding canceled operation 36 13 Select Select an object 31 14 Vi...

Страница 87: ...rectangle around the objects 32 Lasso Selection Select a group of objects by drawing a line around the objects 32 View See page 11 12 20 37 Undo See page 11 12 36 Redo See page 11 12 36 Zoom In Enlarge part of the screen 36 Zoom In Selection Enlarge the view of only the specified area 36 Open Open New Create a new board 18 Open as a new fil Open the data as a new file Add to the current sheet Open...

Страница 88: ...s enabled The icon shows the Simultaneous Drawing with Multiple Fingers status 48 1 Cannot be used in the lite version 2 Displayed in the lite version or when Cloud Portal Office Meeting Room is installed 3 Displayed in the lite version or when Touch Display Link is installed 4 Displayed when the external application is registered Page 39 Custmizing an icon to be displayed on the square menu 1 Tou...

Страница 89: ...drop the icon in the blank space The same icon cannot be added more than once Icons that have already been added are grayed out An icon can be dragged between menu positions at the left and inserted To remove an icon from the menu drag the icon to the icon list 4 To close the settings touch or a point outside the settings menu TIPS At least one or more Pen icon should be displayed on the menu Cann...

Страница 90: ... Window display whiteboard mode full version only The whiteboard can be displayed in a window Touch the Window button on the toolbar To return to full screen display touch the Maximize button on the toolbar Window Maximize ...

Страница 91: ...erlay mode Save as a new file Save as an overlay file SWSO format Save to the same file Save to the same file SWSO format as saved previous Save PDF or Save image Save in a different file format File format to save as image can be set in Image format of Customizing the Settings Page 52 Lite version or when Cloud Portal Office Meeting Room is inst lled Save and Upload or Save PDF and Upload can be ...

Страница 92: ...de full version only If there is unsaved editing data selecting Yes displays the save confirmation dialog box Lite version or when Cloud Portal Office Meeting Room is inst lled Open New from Cloud or Open from Cloud can be selected Page 13 3 Select the file acquisition location In the lite version select the file from USB TIPS An SWS format whiteboard file can be opened and edited in this software...

Страница 93: ...Sheet navigation button Previous Touch this button to display the previous sheet When the first sheet is displayed this button is disabled 4 Sheet navigation button Next Touch this button to display the next sheet When the last sheet is displayed appears Touch to automatically add a new sheet TIPS In overlay mode you can set a captured image of the desktop as the background that appears when you c...

Страница 94: ...cluding the PN L603A PN 60TA3 PN L703A PN 70TA3 PN L603B PN 60TB3 PN L703B PN 70TB3 set Touch Mode Setting of the touch panel driver to Dual and Input Mode Setting to Standard or HandWrite When using the PN L603A PN 60TA3 PN L703A PN 70TA3 PN L603B PN 60TB3 PN L703B PN 70TB3 set Touch Operation Mode of the touch panel settings tool to Multi Touch Mode and Input mode of the touch pen utility to Sta...

Страница 95: ...elected sheet 1 4 6 5 3 2 1 Currently selected sheet 2 Thumbnail images 3 Properties Page 22 4 Thumbnail navigation button Previous 5 Thumbnail navigation button Next 6 Add a new sheet TIPS The sheet list can be dragged horizontally to move through the thumbnails Full screen view 1 Touch Sheet list button on the toolbar The list of the thumbnail images of the sheets is displayed 2 Quickly touch th...

Страница 96: ...lect All Sheets Selects all sheets If touched when all sheets are already selected selection of all sheets will be canceled Properties Use to change the settings of the selected sheet Whiteboard The background color background image image file used show hide display method and sheet size page 23 can be set Full version only Overlay board You can set whether the desktop is captured and used as the ...

Страница 97: ...ngle object even though they are separate This period can be changed Page 53 Draw a shape Draw another shape Both shapes are determined as a single object Less than 0 5 second After 0 5 second TIPS You can switch through Pen 1 to Pen 3 and Eraser by repeatedly pressing Function Button 2 of a 2 button pen To change functions using Function Button 2 select the touch panel driver Properties and set F...

Страница 98: ...id line Brush The line width varies depending on the pen pressure Only with 3 button pen and digitizer pen Marker Draws a line without hiding objects under the line Figure pen See page 27 2 Set the color and thickness of the line To use a pen of different color or thickness select by clicking in Other color or Other width 3 Check this box to make the line translucent This is always selected when M...

Страница 99: ...u cannot use the Eraser button to erase pasted images You cannot use it either to erase the edges of a line to make the line thinner Even if you erase the edges only the entire width of the line will be erased An object drawn with the pen function cannot be erased if it is part of a group If Automatically Find Eraser is set page 48 and Pen 1 to Pen 3 or Eraser is selected on the PN L Series PN C70...

Страница 100: ...nu appear 2 Drag on the board to draw the shape The line shape is drawn in the area specified by dragging n Figure settings menu You can change the figure settings 5 4 3 2 1 1 Select an object 2 Set the width and shape of the line Touch to set the shape 3 Set the line color 4 Set the color to fill in 5 Check this box to make the shape translucent To close the settings touch or a point outside the ...

Страница 101: ... Set the color of the line or arrow 4 Check this box to make the line or arrow translucent 1 4 3 2 To close the settings touch or a point outside the settings menu Drawing a shape with the figure pen Circles squares triangles and lines drawn by hand can be automatically formed 1 Touch one of Pen 1 to Pen 3 in the menu 2 Touch the icon of the pen that has been selected The settings menu for the pen...

Страница 102: ...Select this checkbox to make the text translucent TIPS To change the text settings after entering text follow the steps below 1 Touch Touch Selection in the menu Page 31 2 Touch the text When the text is selected the expansion menu appears 3 Select Properties in the expansion menu and change the settings You can search the Internet using text you enter as a keyword Page 40 Searching for text and h...

Страница 103: ...the original file is changed or the file is moved to a d ferent location If multiple large size images are pasted on the same page operation may become slow n Capturing saving the currently displayed screen full version only You can load an image file or paste the currently displayed screen Display the image that you want to capture Capturing the entire screen 1 Touch Insert Image in the menu 2 To...

Страница 104: ... file format in the drop down list specify the save location and touch Save Company Name XXXXXXXX Date of Establishment XXXXXXXX Location XXXXXXXX Corporate Profile Internet Explorer http www xxxxxxxxxxxxxxxxx Corporate Profile Internet Explorer Done Corporate Profile Company Name XXXXXXXX Date of Establishment XXXXXXXX Location XXXXXXXX Corporate Profile Internet Explorer http www xxxxxxxxxxxxxxx...

Страница 105: ...n object The object is selected and the expansion menu appears The following editing operations can be performed in the expansion menu Cut Copy Duplicate Delete Rotate Convert to Text handwritten characters only Web Search texts handwritten characters only Order Group Ungroup Trimming images only Properties excluding images Select point Touch an object Touch an area where something is drawn You ca...

Страница 106: ... around the objects 1 Touch Lasso Selection in the menu If the Select menu is not Lasso Selection follow the steps below to change the menu 1 Touch the currently displayed menu Touch Selection or Rectangle Selection 2 Touch Lasso Selection 2 Draw a line around the area to be selected The objects inside the enclosed shape will be selected Caution Objects which are not entirely included in the area ...

Страница 107: ...ngers and move them together to zoom out Spread your fingers apart to zoom in To manipulate multiple objects at once follow the steps in Selecting multiple objects page 32 n Rotating an object 1 Select an object Page 31 2 Drag the select point at the center top Or select Rotate Right Rotate Left or Rotate 180 degrees from Rotate from the expansion menu Select point TIPS You can also rotate by spec...

Страница 108: ...nsion menu TIPS Clear Sheet in Eraser can be used to delete all objects on the current sheet page 25 To manipulate multiple objects at once follow the steps in Selecting multiple objects page 32 n Trimming an object image 1 Select an object image Page 31 Objects other than images cannot be trimmed 2 Select Trimming from the expansion menu 3 Drag on the edge of image to specify the area you want to...

Страница 109: ...TIPS To manipulate multiple objects at once follow the steps in Selecting multiple objects page 32 n Converting objects handwritten characters to text Characters written by using Pen 1 to Pen 3 can be converted to text 1 Select an object handwritten characters Page 31 2 Select Convert to Text from the expansion menu The handwritten characters are converted to text according to their size SAMPLE TI...

Страница 110: ... The area around the touched point is enlarged and displayed The area around the point is enlarged Touch the point to enlarge Enlarging a specified area 1 Touch Zoom In Selection in the menu 2 Drag the area you want to enlarge The specified area is enlarged in a separate windo TIPS The narrower the area specified the more the view is enlarged The drawing and image capturing functions cannot be use...

Страница 111: ...of 25 3 Pan window Shows a thumbnail of the current sheet Each time you double click inside the display frame the magnification switches between 100 and Fit Width 4 Display frame Shows the area that is displayed on the screen To move the area that is displayed drag the display frame TIPS The screen can be enlarged or reduced by Zoom dual touch When the screen is enlarged the display position can b...

Страница 112: ...annot be used simultaneously even if displayed in windows When Automatically Find Eraser is set no pens can be used while a drawn line is erased by an eraser Page 48 When multiple touch pens are used touch positions and touch pen information color thickness etc may become interchanged and lines may break When touched simultaneously When touch pens are moved near each other When batteries are low W...

Страница 113: ...name that will be shown on the toolbar File Path Set the file path of the application to be added You can touch Ref to the right of the entry box to select and add the application Launch Options Set launch options for the application 4 When you have completed the settings touch OK Editing deleting an added application 1 Touch the Settings button on the toolbar 2 Touch Settings in External Applicat...

Страница 114: ...try screen appears 2 Enter the Keyword 3 Select the Search Engine and touch Search n Searching using entered text as a keyword 1 Touch Touch Selection in the menu and select the text you want to use for the keyword Page 31 2 Select Web Search from the expansion menu The selected text is entered in Keyword Caution It is not possible to set only one part of the text in the text box as the keyword 3 ...

Страница 115: ...ng The printed document will be converted into an image and sent to the Pen Software n In the Pen Software When the image has been sent the Data has been received dialog box will appear 5 Touch the dialog box This completes the receiving of data TIPS It may not be possible to correctly convert documents from some software applications It may not be possible to correctly convert parts of contents f...

Страница 116: ...e an image Use JPEG for the scan send format TIPS The first time you use Network Scanner Tool in the full version install Network Scanner Tool on the computer on which Pen Software has been installed and configure the Network Scanner Tool settings Page 55 To acquire an image from a multifunction machine the Network Scanner Tool must be running on your computer n In the multifunction machine 1 Plac...

Страница 117: ...AIN device can be acquired to the Whiteboard TIPS For the procedure for using the TWAIN device see the manual for the TWAIN device 1 Place the original in the TWAIN device 2 Touch Import images in the menu The acquire image screen of your scanner or other TWAIN device will appear Acquiring an image from a TWAIN device Full version only ...

Страница 118: ...e to arrow select mode 5 Change to pen mode To select the pen color touch the icon again while it is selected 6 Change to eraser mode 7 Start the Pen Software whiteboard When the Whiteboard is running the icon that appears on the Whiteboard can be clicked to return to the slideshow 8 End the displayed slideshow and close the control toolbar If draw screen is performed in pen mode a confirmation sc...

Страница 119: ...ttings button on the toolbar 2 Touch Settings in Print setting on the Other tab 3 Specify the print settings See below 4 When you finish adjusting the settings touch 2 1 3 4 5 1 Printer Name Select the printer to be used for printing 2 Properties Set the printer details The setting options depend on the printer For the setting options refer to the instruction manual of the printer 3 Whiteboard Bac...

Страница 120: ...et Touch Operation Mode of the touch panel settings tool to Multi Touch Mode The software keyboard for text entry may not appear in the display that shows Pen Software In Windows 7 the software keyboard cannot be displayed in a secondary display An external application page 39 launched from the pen software may appear in the primary display n Secondary display settings To use the touch panel in th...

Страница 121: ...boards are created added setting will be reflected 1 2 3 4 5 6 7 1 Menu Select Square Menu Classic Menu or Floating Menu for the menu format Page 8 9 10 2 Icon Size Set the icon size to Large or Small in the square menu and classic menu 3 Touch Pen Select the pen to use from 2 Button Pen Only full version only 3 Button Pen Only or Finger or Other Pen Select Finger or Other Pen when using a passive...

Страница 122: ...too quick The distance between the two points is too short The two points intersect The points are aligned horizontally or vertically 5 Simultaneous Drawing with Multiple Fingers Set to Enable when drawing with multiple fingers To use this function set Dual Touch Gesture to Disable and Touch Pen to Finger or Other Pen Page 47 6 Automatically Find Eraser When set to On the pen automatically change ...

Страница 123: ...new boards are created added setting will be reflected 1 2 To change all default settings 1 Pen 1 to Pen 3 Eraser Text Drawing Object Set the function default settings that are applied when the Pen Software is started 2 Select Set Touch Selection Rectangle Selection or Lasso Selection for the selection method ...

Страница 124: ...ttings for each 3 Button Pen The Settings for each 3 Button Pen screen appears 2 1 3 Click the Pen Number of the pen that you want to set To automatically select the Pen Number of the currently used pen press the Auto Select button 4 Set the default settings for Pen 1 to Pen 3 and Eraser TIPS If you change the Menu or Touch Pen setting after changing the default settings the checkmark will be remo...

Страница 125: ... is always at the front 3 Show window to be restored from minimize Full version only Set On or Off When set to On and the software is minimized page 7 the window will appear for restoration from minimize Touch the window to return to full screen display 4 Show soft keyboard when entering text Set On or Off 5 Mouse cursor Set whether to show a cursor 6 Show the grid lines Set Show or Hide 7 Grid In...

Страница 126: ...he Overlay board show captured desktop in background Full version only Set whether the desktop is captured and used as the background image when the sheet display is changed or moved in overlay mode 3 Import images Set the method used to import images Page 18 Caution PDF files can be opened only as Background 4 Image format Set the file format for files saved using Save image Page 1 ...

Страница 127: ... Print setting Register the settings for printing Page 45 3 Window size Ratio Specify the size and magnification of the zoom displa Page 36 4 Object Recognition Time Set the period until a hand drawn line is determined as an object Page 23 5 External Application Settings Full version only You can add external applications that can be launched while the software is running Page 39 n About The versi...

Страница 128: ...nd disable uninstall and reinstall this software When installation is finished shortcut icons for whiteboard mode and overlay mode will be created on the desktop In Windows 8 8 1 Pen Software and Overlay mode Pen Software tiles are also added to the Start screen and Apps screen The Pen Software printer driver will also be added Page 41 n Uninstalling 1 Exit all running software applications 2 Open...

Страница 129: ...n Configuring settings for the Network Scanner Tool The folder that will be used to acquire images scanned from the multifunction machine must be stored as a destination in the multifunction machine s address book When creating a profile select Move File to Folder and set the path to the folder below for acquiring images in Details C ProgramData sharp PenSoftware JPEG When OS is installed in C dri...

Страница 130: ...ware also uses software components that are distributed as free software and for which third parties own the copyrights GNU General Public License GNU Lesser General Public License GNU AFFERO GENERAL PUBLIC LICENSE and other licenses apply to some of these software components Free Software Regarding free software requests for the source code are sometimes received subject to the condition that the...

Страница 131: ...re disclaimed In no event shall the Intel Corporation or contributors be liable for any direct indirect incidental special exemplary or consequential damages including but not limited to procurement of substitute goods or services loss of use data or profits or business interruption however caused and on any theory of liability whether in contract strict liability or tort including negligence or o...

Страница 132: ...PN C703B LCD MONITOR ...

Страница 133: ...internal parts For the same reason do not spill water or liquid on the product 13 Servicing Do not attempt to service the product yourself Removing covers can expose you to high voltage and other dangerous conditions Request a qualified service person to perform servicing 14 Repair If any of the following conditions occurs unplug the power cord from the AC outlet and request a qualified servic per...

Страница 134: ...angers of climbing on furniture to reach the monitor or its controls Especially for child safety Don t allow children to climb on or play with the monitor Don t place the monitor on furniture that can easily be used as steps such as a chest of drawers Remember that children can become excited while watching a program especially on a larger than life monitor Care should be taken to place or install...

Страница 135: ...installing the monitor affix the stand hole protectio covers SAFETY INSTRUCTION Do not use the monitor where there is a lot of dust where humidity is high or where the monitor may come into contact with oil or steam Do not use in an environment where there are corrosive gases sulfur dioxide hydrogen sulfide nitrogen dioxide chlorine ammonia ozone etc As this could lead to fire Ensure that the moni...

Страница 136: ...es 1 Press the cover gently and slide it in the direction of the arrow 2 See the instructions in the compartment and put in the supplied batteries R 6 AA size x 2 with their plus and minus sides oriented correctly 3 Close the cover Liquid Crystal Display Monitor 1 Power cord 1 Remote control unit 1 Remote control unit battery R 6 AA size 2 CD ROM Utility Disk 1 Setup Manual this manual 1 Touch pen...

Страница 137: ... monitor must be connected to a computer using a USB cable The touch panel operates with the standard Window driver The terms HDMI and HDMI High Definition Multimedia Interface a d the HDMI Logo are trademarks or registered trademarks of HDMI Licensing LLC in the United States and other countries 1 AC input terminal 2 Power cord Supplied 3 HDMI 3 input terminal INPUT3 4 HDMI 2 input terminal INPUT...

Страница 138: ...f 1 Press the POWER button on the side of the monitor to turn on the power The power LED lights green Remote control sensor Power LED Status Status of the monitor Off Power off Green lit Power on Red lit Standby mode 2 Turn the power on and off with the POWER button on the remote control Point the remote control unit toward the remote control sensor on the monitor and press the POWER button Cautio...

Страница 139: ...er After mounting please carefully ensure the monitor is secure and not able to come loose from the wall or mount Do not use any screw holes other than VESA holes for installation nAttaching the Tray Secure the tray using 5 tray mounting screws M3 supplied Specifications Model PN C703B Power requirement AC 100 V 240 V 2 7 A 50 60 Hz Operating temperature 41 F to 95 F 5 C to 35 C Operating humidity...

Отзывы: